In this example, we will see the details of how to install Apache Hadoop on an Ubuntu system.
We will go through all the required steps starting with the required pre-requisites of Apache Hadoop followed by how to configure Hadoop and we will finish this example by learning how to insert data into Hadoop and how to run an example job on that data.
Table Of Contents
1. Introduction
The example will describe all the required steps for installing a single-node Apache Hadoop cluster on Ubuntu 15.10. Hadoop is a framework for distributed processing of application on large clusters of commodity hardware. It is written in Java and follows the MapReduce computing paradigm.
2. Prerequisites
Following are the prerequisites of running Apache Hadoop on Ubuntu. Follow the steps to get all the prerequisites in place.
2.1 Installing Java
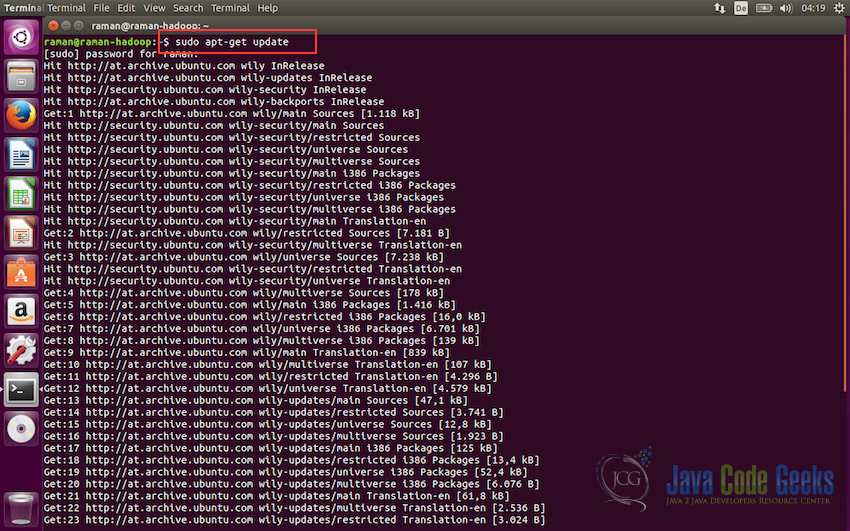
As Apache Hadoop is written in Java, it needs latest Java to be installed in the system. To install Java, first of all update the source list
#Update the source list
sudo apt-get update
It should update all the existing packages as shown in the screeenshot below.
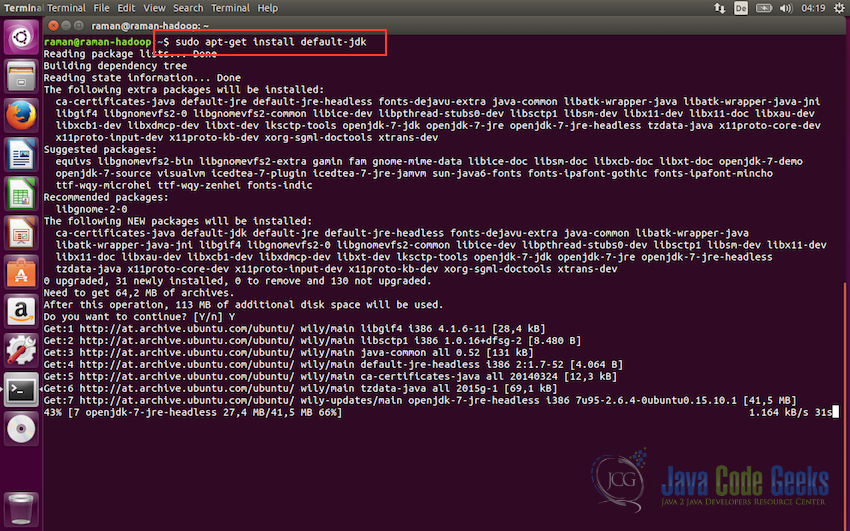
Now install the default jdk using the following command.
# The OpenJDK project is the default version of Java
sudo apt-get install default-jdk
The OpenJDK is the default version of Java for Ubuntu Linux. It should be successfully installed with the apt-get command.
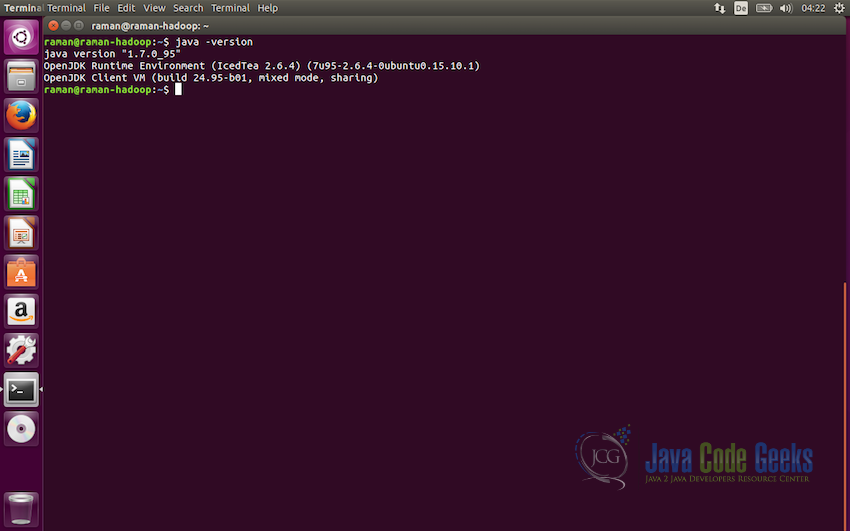
The default-jdk installs the version 1.7 of Java. Version 1.7 will be fine to run Hadoop but if you would like, you can explicitely install version 1.8 also.
#Java Version
java -version
This completes the first prerequisite of the Apache Hadoop. Next we will move to creating a dedicated user which Hadoop can use for execution of its tasks.
2.2 Creating a Dedicated User
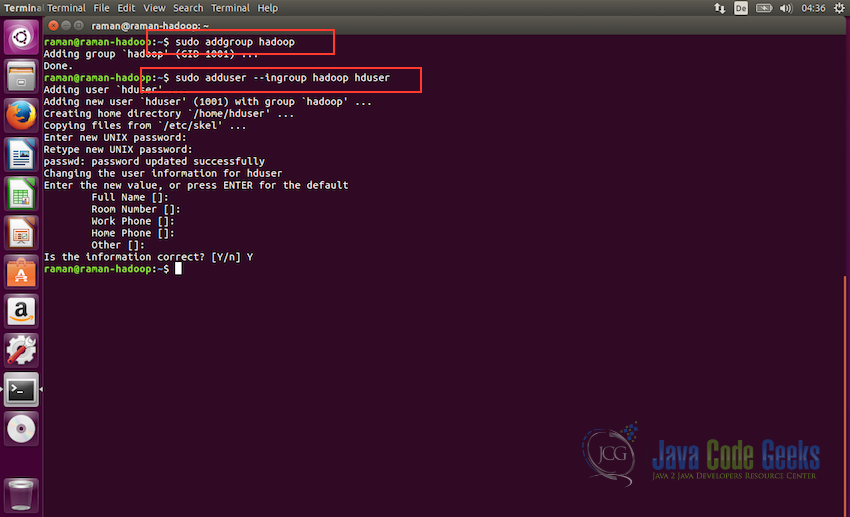
Hadoop needs a separate dedicated user for execution. With a complete control over the Hadoop executables and data folders. To create a new user, use the following command in the terminal.
#create a user group for hadoop
sudo addgroup hadoop

#create user hduser and add it to the hadoop usergroup
sudo adduser --ingroup hadoop hduser
The first command creates a new group with the name “hadoop” and the second command creates a new user “hduser” and assigns it to the “hadoop” group. We have kept all the user data like “First Name”, “Phone Number” etc empty. You can keep it empty or assign values to the account as per your choice.
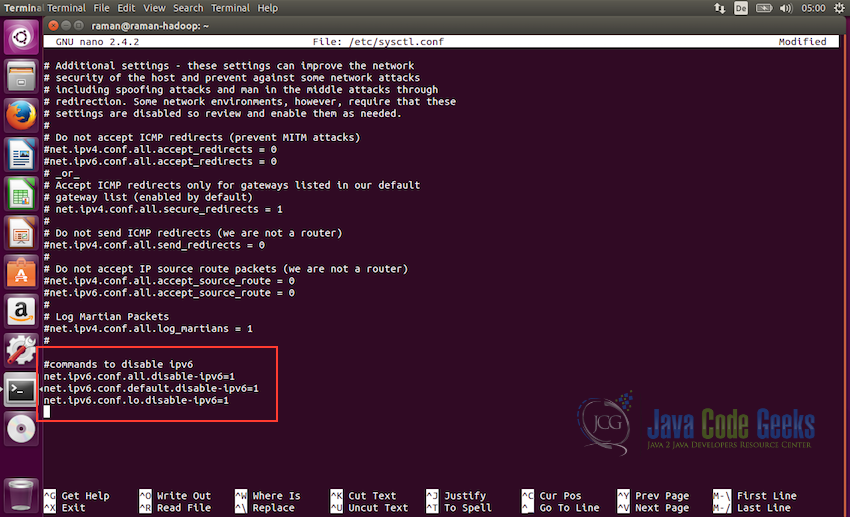
2.3 Disable ipv6
Next step is to disable ipv6 on all the machines. Hadoop is set to use ipv4 and that is why we need to disable ipv6 before creating a hadoop cluster. Open /etc/sysctl.conf as root using nano(or any other editor of your choice)
sudo nano /etc/sysctl.conf
and add the following lines at the end of the file.
#commands to disable ipv6
net.ipv6.conf.all.disable-ipv6=1
net.ipv6.conf.default.disable-ipv6=1
net.ipv6.conf.lo.disable-ipv6=1
Save the file using ctrl+X and then Yes when it prompts for saving the file. After this, to check if the ipv6 is properly disabled we can use the following command:
cat /proc/sys/net/ipv6/conf/all/disable-ipv6
it should return 0 or 1 as an output and we want it to be 1 as it symbolizes that the ipv6 is disable
2.4 Installing SSH and Setting up certificate
Hadoop requires SSH access to manage its remote nodes as well as node on local machine. For this example, we need to configure SSH access to localhost.
So, we will make sure we have SSH up and running and set up the public key access to allow it to login without a password. We will set up SSH certificate for allowing a password less authentication. Use the following commands to do the required steps.
ssh has two main components:
- ssh: The command we use to connect to remote machines – the client.
- sshd: The daemon that is running on the server and allows clients to connect to the server.
SSH is pre-enabled on ubuntu but to make sure sshd is enables we need to install ssh first using the following command.
#installing ssh
sudo apt-get install ssh
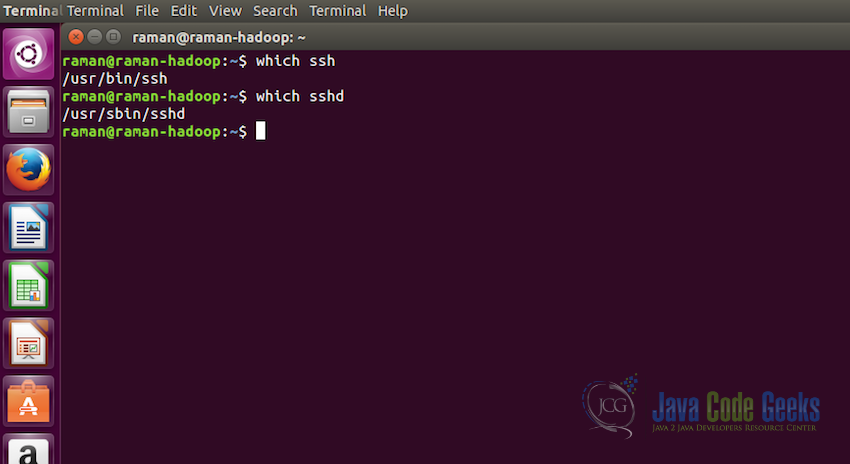
To make sure everything is setup properly, use the following commands and make sure the output is similar to the one displayed in the screenshot.
#Checking ssh
which ssh

#Checking sshd
which sshd
Both the above commands should show the path of the folder where ssh and sshd is installed as shown in the screenshot below. This is to make sure that both are present in the system.
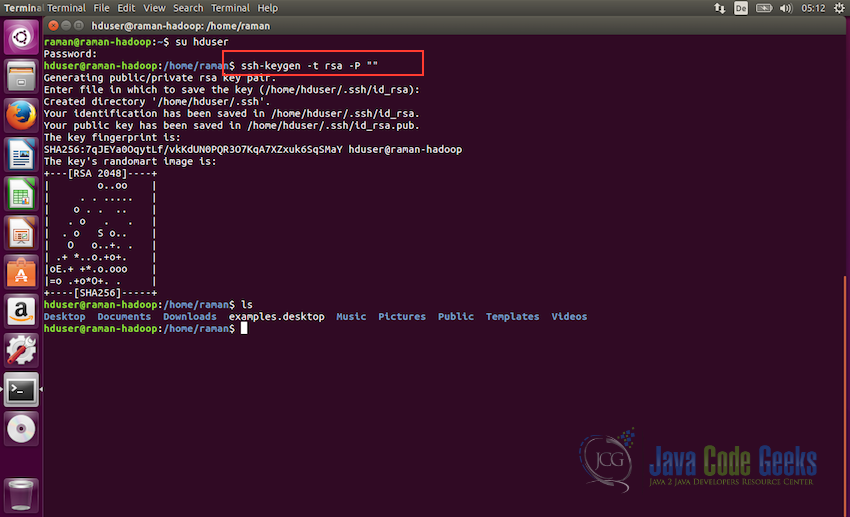
Now, in order to generate the ssh certificate we will switch to the hduser user. In the following command, we are keeping password empty while generating the key for ssh, you can give it some password if you would like to.
#change to user hduser
su hduser

#generate ssh key
ssh-keygen -t rsa -P ""
The second command will create an RSA key-pair for the machine. The password for this key will be empty as mentioned in the command. It will ask for the path to store the key with default path being $HOME/.ssh/id-rsa.pub, just press enter when prompted to keep the same path. If you plan to change the path then remember it as it will be needed in the next step.
Enable SSH access to the machine with the key created in the previous step. For this, we have to add the key to the authorized keys list of the machine.
cat $HOME/.ssh/id_rsa.pub >> $HOME/.ssh/authorized_keys
We can check if ssh works as following, is the ssh to localhost is succesful witout password prompt, then the certificate is properly enabled.
ssh localhost
By now, we are done with all the prerequisites for the Apache Hadoop. We will check how to setup Hadoop in the next section.
3. Installing Apache Hadoop
After all the prerequisites, we are ready to install Apache Hadoop on our Ubuntu 15.10 machine.
3.1 Download Apache Hadoop
- Download Hadoop from Apache Mirrors at www.apache.org/dyn/closer.cgi/hadoop/core. It can be downloaded manually or using
wgetcommand. - After download finishes, extract hadoop folder and move it to
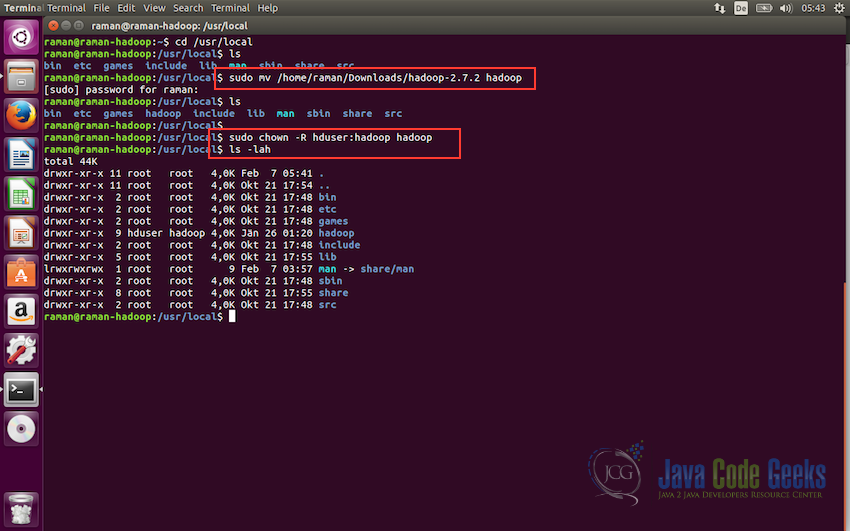
/usr/local/hadoopand finally change the owner of the folder tohduserandhadoopgroup.
#Change to the directory
cd /usr/local

#move hadoop files to the directory
sudo mv /home/hadoop1/Downloads/hadoop-2.7.1 hadoop

#change the permissions to the hduser user.
sudo chown -R hduser:hadoop hadoop
We can now check the permissions of the hadoop folder using the command:
ls -lah
This command shows the list of content in the /usr/local/ directory along with the metadata. Hadoop fodler should have hduser as the owner and hadoop as the user group as shown in the screenshot below.
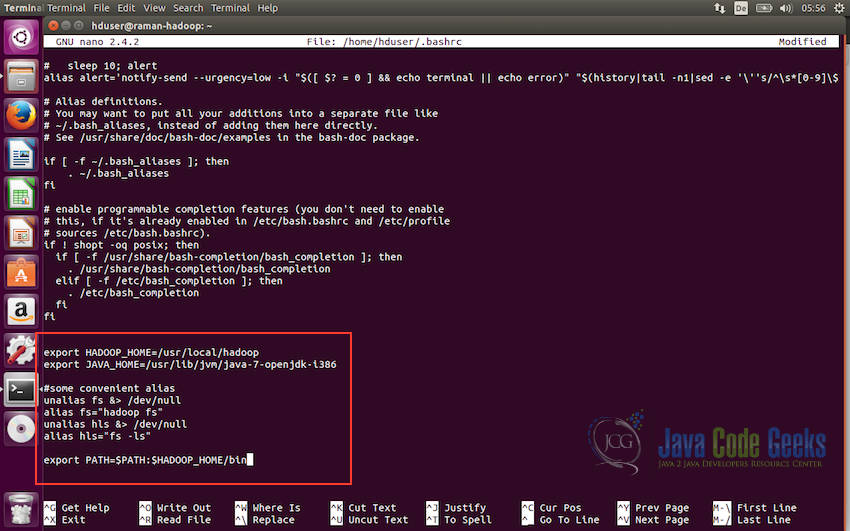
3.2 Updating bash
- Update the
bashrcfile for the user hduser. - At the end of the file, add the following lines.
   su - hduser
   nano $HOME/.bashrc
   export HADOOP_HOME=/usr/local/hadoop
   export JAVA_HOME=/usr/lib/jvm/java-7-openjdk-i386

   #Some convenient aliases
   unalias fs &> /dev/null
   alias fs="hadoop fs"
   unalias hls &> /dev/null
   alias hls="fs -ls"

   export PATH=$PATH:$HADOOP_HOME/bin
The block of convenient aliases is optional and can be omitted. JAVA_HOME, HADOOP_HOME and PATH are the only compulsary requirements.
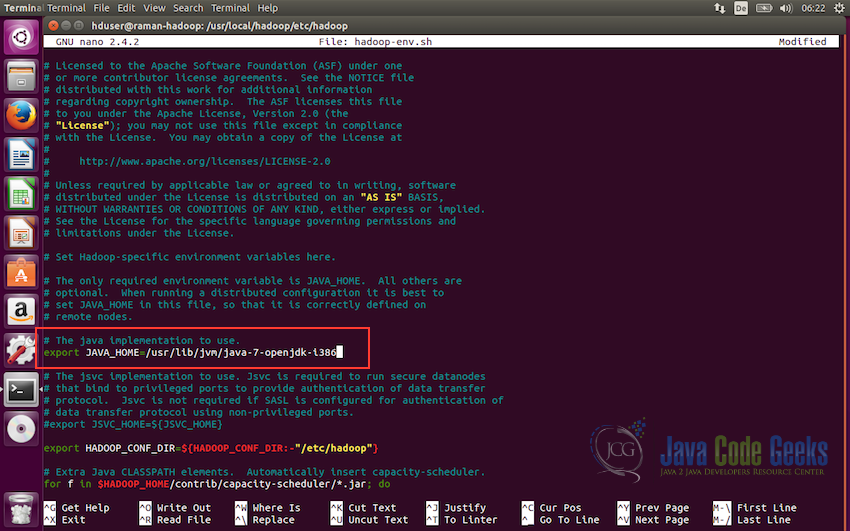
3.3 Configuring Hadoop
In this step, we will configure the Hadoop.
- Open
hadoop-env.shin/usr/local/hadoop/etc/hadoop/and set theJAVA_HOMEvariable as shown below:export JAVA_HOME=/usr/lib/jvm/java-7-openjdk-i386
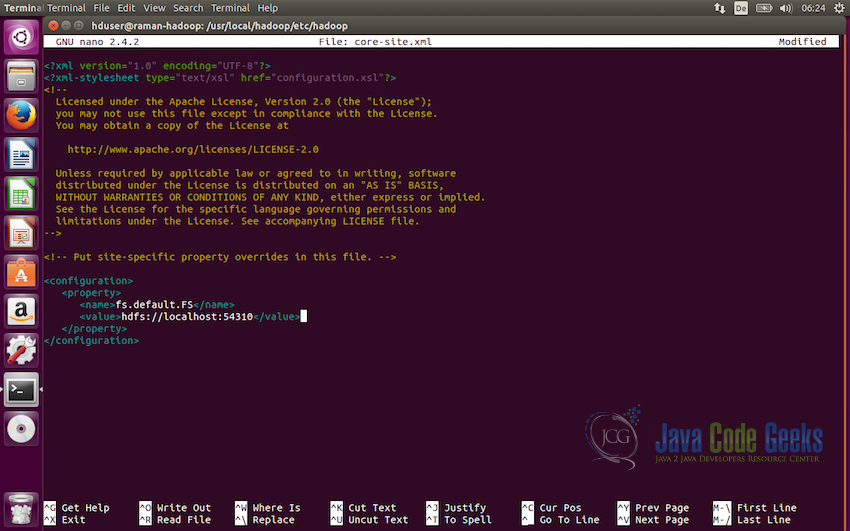
-
Next, we will configure the
core-site.xmlin the folder/usr/local/hadoop/etc/hadoop/and add the following property<configuration> <property> <name>fs.defaultFS</name> <value>hdfs://localhost:54310</value> </property> </configuration> -
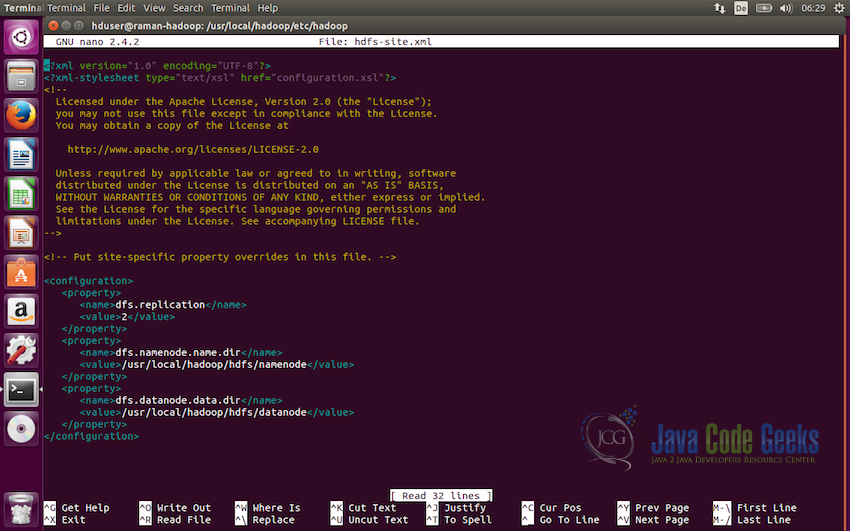
Next we need to update
hdfs-site.xml. This file is used to specify the directories which will be used as thenamenodeand thedatanode.<configuration> <property> <name>dfs.replication</name> <value>2</value> </property> <property> <name>dfs.namenode.name.dir</name> <value>/usr/local/hadoop/hdfs/namenode</value> </property> <property> <name>dfs.datanode.data.dir</name> <value>/usr/local/hadoop/hdfs/datanode</value> </property> </configuration> -
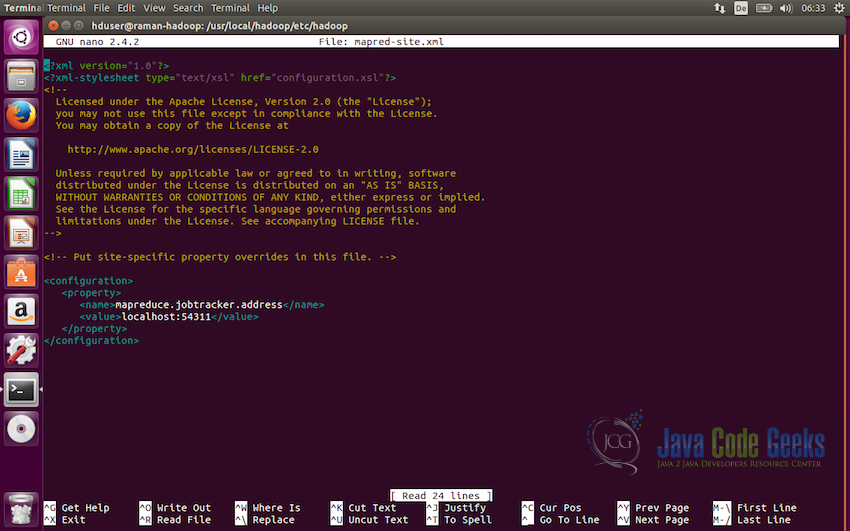
Now, we will update
mapred-site.xmlfile. The folder/usr/local/hadoop/etc/hadoop/contains the filemapred-site.xml.template. Rename this file tomapred-site.xmlbefore modification.<configuration> <property> <name>mapreduce.jobtracker.address</name> <value>localhost:54311</value> </property> </configuration>
and save the file using ctrl+X and then Yes.
Note: The path to java should be the path where the java is present in the system. By default it should be in the /usr/lib folder, but make sure it is the correct path as per your system. Also, make sure the version of java is correct which you want to use. Following screenshot shows where it need to be modified in the hadoop-env.sh.
This tells the system where the default file system should be running on the system.

3.4 Formatting the Hadoop Filesystem
We are now done with all the configuration, so before starting the cluster we need to format the namenode. To do so, use the following command on the terminal.
hdfs namenode -format
This command should be executed without any error on the console output. If it is executed without any errors, we are good to start the Apache Hadoop instance on our Ubuntu system.
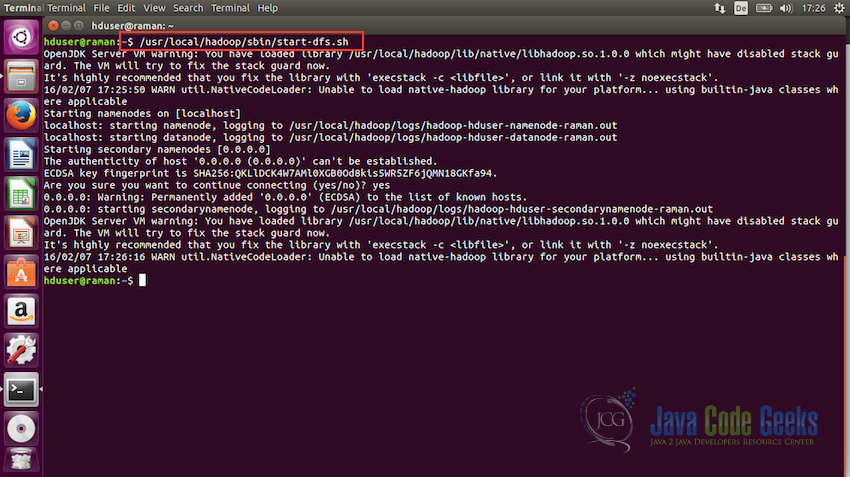
3.5 Starting Apache Hadoop
Now it is time to start the Hadoop. Following is the command to do so:
/usr/local/hadoop/sbin/start-dfs.sh
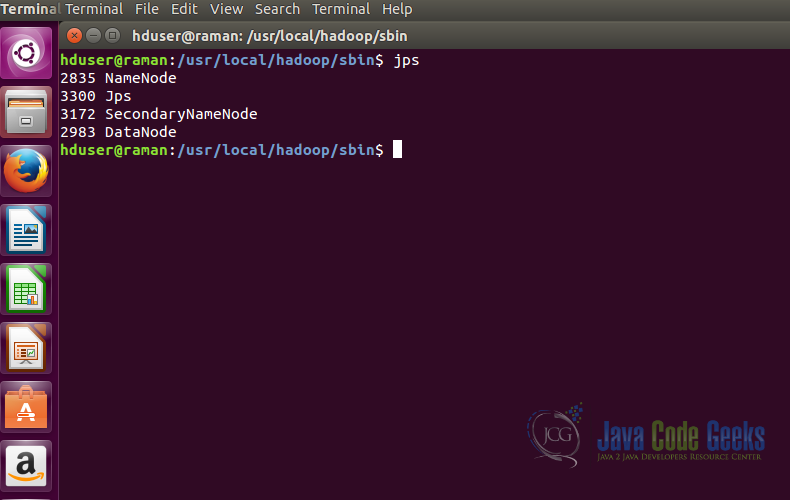
Once the dfs starts without any error, we can check if everything is working fine using the command jps
cd /usr/local/hadoop/sbin

#Checking the status of the Hadoop components
jps
This command displays all the components of Hadoop which are running properly, we should see atleast a Namenode and a Datanode as shown in the screenshot below.
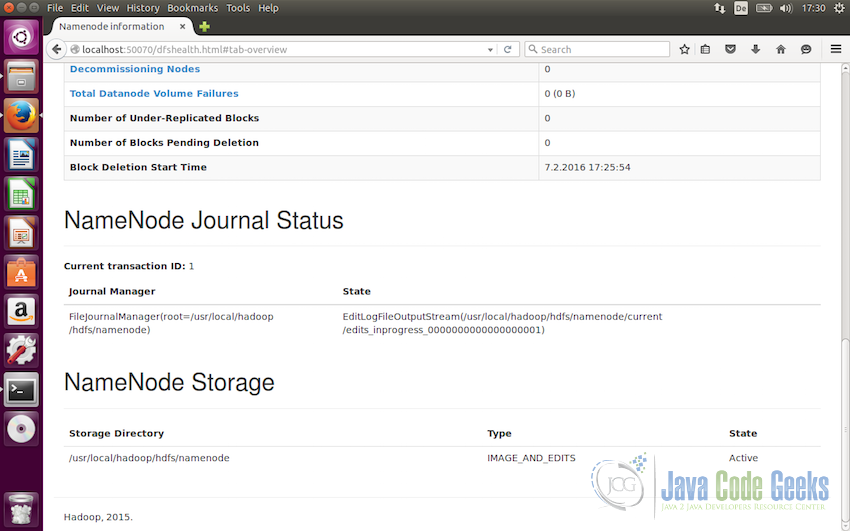
Other options is to check the status of Apache Hadoop using the web interface for the Namenode on http://localhost:50070.
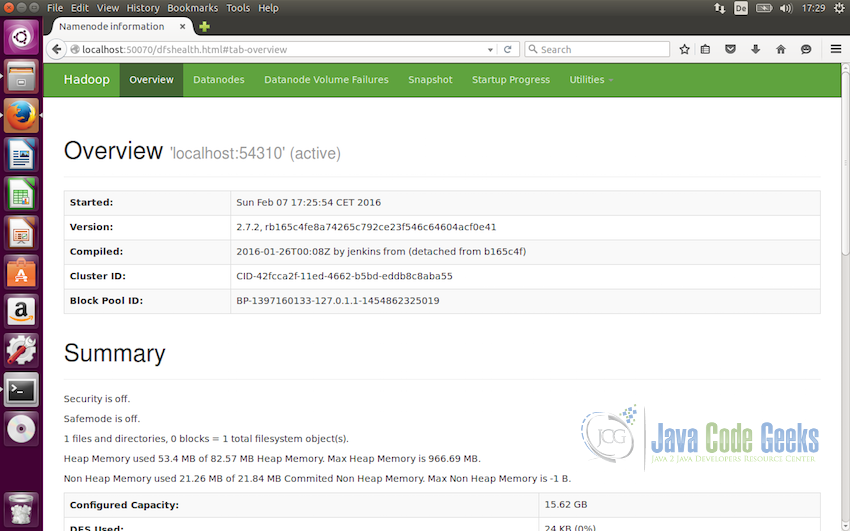
Following screenshot displays the details of Namenode in the web interface
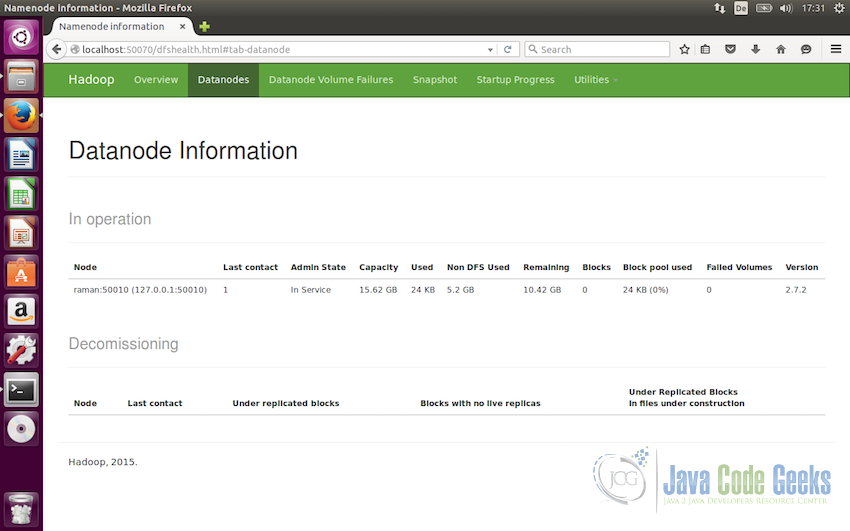
and the following screenshot shows the Datanode details in the Hadoop web interface
3.6 Testing MapReduce Job
-
First of all, lets make the required HDFS directories and copy some input data for testing purpose
#Make the required directories in HDFS
bin/hdfs dfs -mkdir /user
bin/hdfs dfs -mkdir /user/hduser
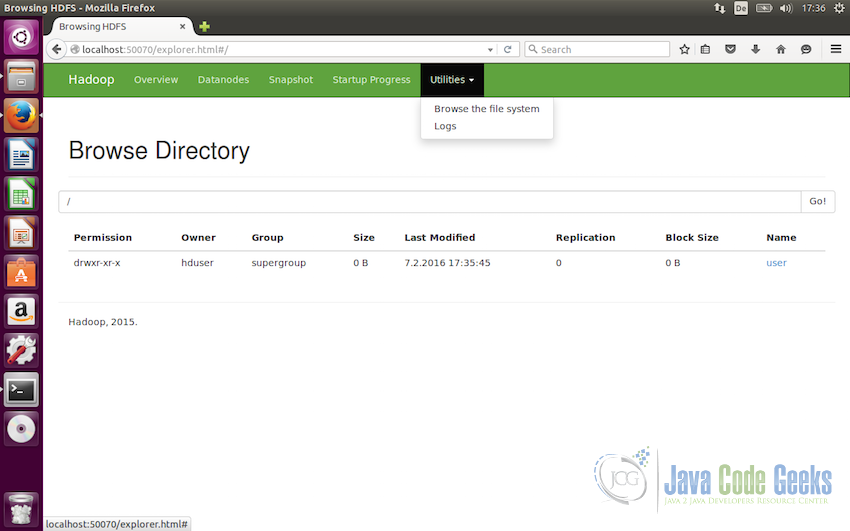
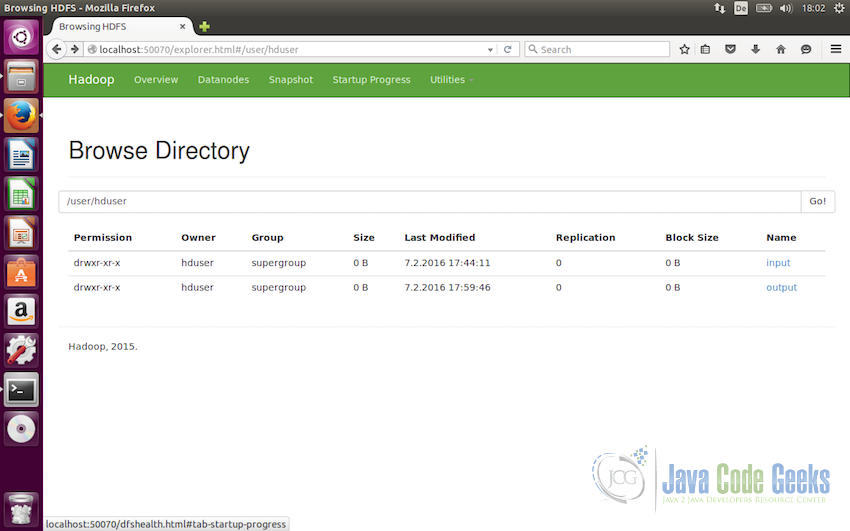
These directories can be accessed from the web interface also. To do so, go to the web interface, from the menu select ‘Utilities’ and from dropdown select ‘Browse the file system’
-
Now, we can add some dummy files to the directory which we will use for the testing purpose. Let us pass the all the files from
etc/hadoopfolder.#Copy the input files into the distributed file system /usr/local/hadoop/bin/hdfs dfs -put /usr/local/hadoop/etc/hadoop input
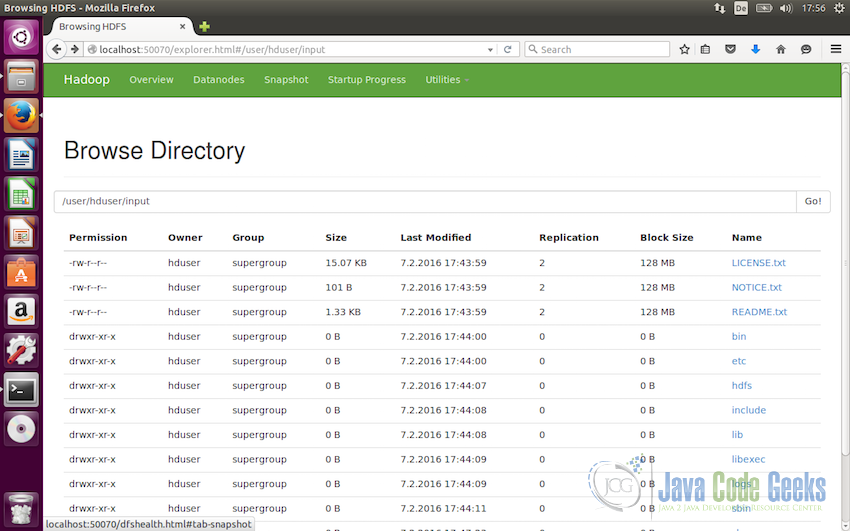
Following screenshot shows the files added to the directories
/user/hduser/inputin the web interface -
Run the MapReduce example job included in the Hadoop package using the following command:
/usr/local/hadoop/bin/hadoop jar /usr/local/hadoop/share/hadoop/mapreduce/hadoop-mapreduce-example-2.7.1.jar grep input output 'dfs[a-z.]+'
Note: For details on how MapReduce example works, refer to the article “Hadoop Hello World Example”
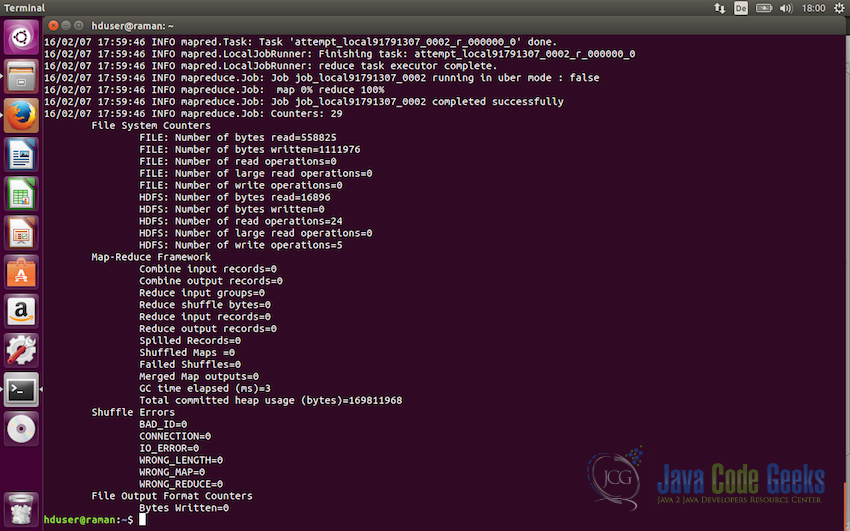
Following screenshot shows the output log of the test example:
-
We can now view the output file using the command
/usr/local/hadoop/bin/hdfs dfs -cat output/*
or using the web interface also as displayed in the screenshot below:
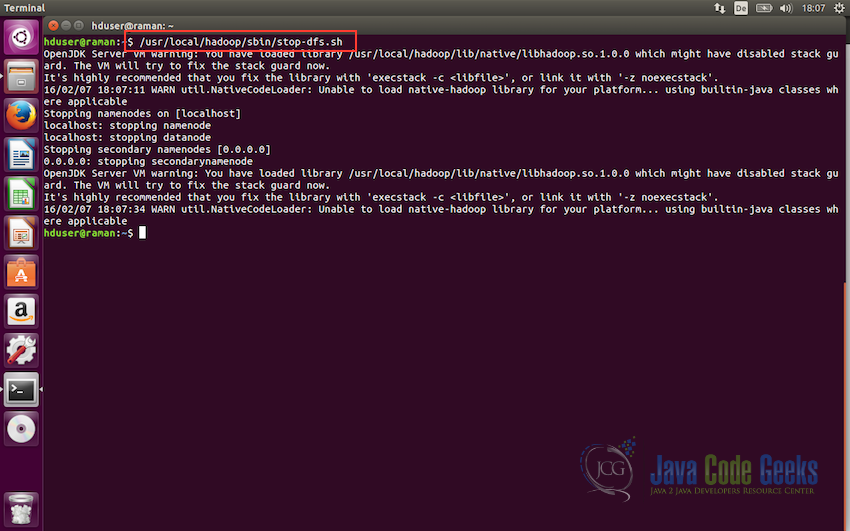
3.7 Stopping Apache Hadoop
We can now stop the dfs(distributed format system) using the following command:
/usr/local/hadoop/sbin/stop-dfs.sh
4. Conclusion
This brings us to the end of the example. By now, we have Apache Hadoop Installed on our Ubuntu system and we know how to add data to the Hadoop and how to execute the job on the added data. After this, you can play around with Hadoop. You may also like to follow the example to know some of the common Hadoop File System commands.

Java Installation and configuration with ‘update-alternative’ is the perfect solution for all ubuntu versions.
But installation using using apt-get is time-consuming for different linux flavours like ubuntu, linux mint and etc.
I resolved and documented java installation steps for ubuntu version. I hope it may be helpful for beginner. you can visit below link
https://vinodluhar.com/how-to-install-java-on-ubuntu-2021/