This is an article about the JavaFX Media API. JavaFX supports playing audio and video through the JavaFX Media API. HTTP live streaming of static media files and live feeds are also supported.
A number of media formats are supported, including AAC, AIFF, WAV, and MP3. FLV containing VP6 video and MP3 audio and MPEG-4 multimedia container with H.264/AVC video formats are also supported.
The support for a specific media format is platform dependent. Some media playback features and formats do not require any addition installations; some require third-party software to be installed.
The following table shows an overview of the whole article:
Table Of Contents
The following examples use Java SE 7 and JavaFX 2.2.
1. Introduction
The Media API consists of the following classes:
- AudioClip
- Media
- MediaPlayer
- MediaView
- MediaErrorEvent
- MediaException
AudioClip is used to play a short audio clip with minimal latency. Typically, this is useful for sound effects, which are usually short audio clips.
Use the Media, MediaPlayer, and MediaView classes for playing audios and videos of longer length.
The Media and MediaPlayer classes are used to play audios as well as videos. An instance of the Media class represents a media resource, which could be an audio or video. It provides the information about the media, for example, the duration of the media.
An instance of the MediaPlayer class provides controls for playing a media.
An instance of the MediaView class provides the view of a media being played by a MediaPlayer. A MediaView is used for viewing a video.
Several things can go wrong when you attempt to play a media, for example, the media format may not be supported or the media content may be corrupt.
An instance of the MediaException class represents a specific type of media error that may occur during media playback. When a media-related error occurs, a MediaErrorEvent is generated. You can handle the error by adding an appropriate event handler to the
media objects.
2. Playing Audio Clips
2.1 The Code
FxMediaExample1.java
import java.net.URL;
import javafx.application.Application;
import javafx.event.ActionEvent;
import javafx.event.EventHandler;
import javafx.scene.Scene;
import javafx.scene.control.Button;
import javafx.scene.control.Label;
import javafx.scene.control.Slider;
import javafx.scene.layout.GridPane;
import javafx.scene.layout.HBox;
import javafx.scene.layout.VBox;
import javafx.scene.media.AudioClip;
import javafx.stage.Stage;

public class FxMediaExample1 extends Application
{
	private AudioClip audioClip;

	public static void main(String[] args)
	{
		Application.launch(args);
	}

	@Override
	public void init()
	{
		// Create an AudioClip, which loads the audio data synchronously
		final URL resource = getClass().getResource("Test.mp3");
		audioClip = new AudioClip(resource.toExternalForm());
	}

	@Override
	public void start(Stage stage)
	{
		// Create the Buttons
		Button playButton = new Button("Play");
		Button stopButton = new Button("Stop");

		// Create the Sliders
		final Slider cycleSlider = new Slider(1, 5, 1);
		cycleSlider.setMajorTickUnit(1);
		cycleSlider.setShowTickLabels(true);

		final Slider volumeSlider = new Slider(0.0, 1.0, 0.5);
		volumeSlider.setMajorTickUnit(0.1);
		volumeSlider.setShowTickLabels(true);

		final Slider rateSlider = new Slider(0, 8, 4);
		rateSlider.setMajorTickUnit(1);
		rateSlider.setShowTickLabels(true);

		final Slider balanceSlider = new Slider(-1.0, 1.0, 0.0);
		balanceSlider.setMajorTickUnit(0.2);
		balanceSlider.setShowTickLabels(true);

		final Slider panSlider = new Slider(-1.0, 1.0, 0.0);
		panSlider.setMajorTickUnit(0.2);
		panSlider.setShowTickLabels(true);

		final Slider prioritySlider = new Slider(0.0, 10.0, 0.0);
		prioritySlider.setMajorTickUnit(1);
		prioritySlider.setShowTickLabels(true);

		// Create the Event Handlers for the Button
		playButton.setOnAction(new EventHandler <ActionEvent>()
		{
            public void handle(ActionEvent event)
            {
            	audioClip.play();
            }
        });

		stopButton.setOnAction(new EventHandler <ActionEvent>()
		{
            public void handle(ActionEvent event)
            {
            	audioClip.stop();
            }
        });

		// Bind the Properties
		audioClip.cycleCountProperty().bind(cycleSlider.valueProperty());
		audioClip.volumeProperty().bind(volumeSlider.valueProperty());
		audioClip.rateProperty().bind(rateSlider.valueProperty());
		audioClip.balanceProperty().bind(balanceSlider.valueProperty());
		audioClip.panProperty().bind(panSlider.valueProperty());
		audioClip.priorityProperty().bind(prioritySlider.valueProperty());

		// Create the GridPane
		GridPane sliderPane = new GridPane();
		// Set horizontal and vertical Spacing
		sliderPane.setHgap(5);
		sliderPane.setVgap(10);

		// Add the details to the GridPane
		sliderPane.addRow(0, new Label("CycleCount:"), cycleSlider);
		sliderPane.addRow(1, new Label("Volume:"), volumeSlider);
		sliderPane.addRow(2, new Label("Rate:"), rateSlider);
		sliderPane.addRow(3, new Label("Balance:"), balanceSlider);
		sliderPane.addRow(4, new Label("Pan:"), panSlider);
		sliderPane.addRow(5, new Label("Priority:"), prioritySlider);

		// Create the HBox
		HBox buttonBox = new HBox(5, playButton, stopButton);

		VBox root = new VBox(5,sliderPane, buttonBox);
		// Set the Sie of the VBox
		root.setPrefWidth(300);
		root.setPrefHeight(350);

		// Set the Style-properties of the HBox
		root.setStyle("-fx-padding: 10;" +
				"-fx-border-style: solid inside;" +
				"-fx-border-width: 2;" +
				"-fx-border-insets: 5;" +
				"-fx-border-radius: 5;" +
				"-fx-border-color: blue;");

		// Create the Scene
		Scene scene = new Scene(root);
		// Add the scene to the Stage
		stage.setScene(scene);
		// Set the title of the Stage
		stage.setTitle("An AucioClip Example");
		// Display the Stage
		stage.show();
	}
}
An instance of the AudioClip class is used to play a short audio clip with minimal latency. Typically, this is useful for playing short audio clips, for example, a beep sound when the user makes an error or producing short sound effects in gaming applications.
The AudioClip class provides only one constructor that takes a URL in string form, which is the URL of the audio source. The audio clip is immediately loaded into memory in raw, uncompressed form. This is the reason why you should not use this class for long-playing audio clips.
The source URL could use the HTTP, file, and JAR protocols. This means that you can play an audio clip from the Internet, the local file system, and a JAR file.
The following snippet of code creates an AudioClip:
// Create an AudioClip, which loads the audio data synchronously
final URL resource = getClass().getResource("Test.mp3");
audioClip = new AudioClip(resource.toExternalForm());
When an AudioClip object is created, the audio data are loaded into the memory and they are ready to be played immediately. Use the play() method to play the audio and the stop() method to stop the playback:
/ Create the Event Handlers for the Button
playButton.setOnAction(new EventHandler <ActionEvent>()
{
    public void handle(ActionEvent event)
    {
	audioClip.play();
    }
});

stopButton.setOnAction(new EventHandler <ActionEvent>()
{
    public void handle(ActionEvent event)
    {
	audioClip.stop();
    }
});
The AudioClip class supports setting some audio properties when the clip is played:
- cycleCount
- volume
- rate
- balance
- pan
- priority
All of the above properties, except the cycleCount, can be set on the AudioClip class. Subsequent calls to the play() method will use them as defaults. The play() method may also override the defaults for a specific playback. The cycleCount property must be specified on the AudioClip and all subsequent playbacks will use the same value. The cycleCount specifies the number of times the clip is played when the play() method is called. It defaults to 1, which plays the clip only once.
The volume specifies the relative volume of the playback. The valid range is 0.0 to 1.0. A value of 0.0 represented muted, whereas 1.0 represents full volume.
The rate specifies the relative speed at which the audio is played. The valid range is 0.125 to 8.0. A value of 0.125 means the clip is played eight times slower, and the value of 8.0 means the clip will play eight times faster. The rate affects the playtime and the pitch. The default rate is 1.0, which plays the clip at the normal rate.
The balance specifies the relative volume for the left and right channels. The valid range is -1.0 to 1.0. A value of -1.0 sets the playback in the left channel at normal volume and mutes the right channel. A value of 1.0 sets the playback in the right channel at normal volume and mutes the left channel. The default value is 0.0, which sets the playback in both channels at normal volume.
The pan specifies distribution of the clip between the left and right channels. The valid range is -1.0 to 1.0. A value of -1.0 shifts the clip entirely to the left channel. A value of 1.0 shifts the clip entirely to the right channel. The default value is 0.0, which plays the clip normally. Setting the value for pan for a mono clip has the same effect of setting the balance. You should change the default for this property only for audio clips using stereo sound.
The priority specifies the priority of the clip relative to other clips. It is used only when the number of playing clips exceeds the system limits. The playing clips with the lower priority will be stopped. It can be set to any integer. The default priority is set to zero.
The play() method is overloaded. It has three versions:
- void play()
- void play(double volume)
- void play(double volume, double balance, double rate, double pan,int priority)
The no-args version of the method uses all of the properties set on the AudioClip. The other two versions can override the specified properties for a specific playback.
Suppose the volume for the AudioClip is set to 1.0. Calling play() will play the clip at the volume 1.0 and calling play(0.20) will play the clip at volume 0.20, leaving the volume property for the AudioClip unchanged at 1.0. That is, the play() method
with parameters allows you to override the AudioClip properties on a per-playback basis.
The AudioClip class contains an isPlaying() method to check if the clip is still playing. It returns true is the clip is playing. Otherwise, it returns false.
2.2 The GUI
A simple Audio Player Example:

3. Playing Media
3.1 The Code
FxMediaExample2.java
import java.net.URL;
import javafx.application.Application;
import javafx.event.ActionEvent;
import javafx.event.EventHandler;
import javafx.scene.Scene;
import javafx.scene.control.Button;
import javafx.scene.effect.DropShadow;
import javafx.scene.layout.HBox;
import javafx.scene.layout.VBox;
import javafx.scene.media.Media;
import javafx.scene.media.MediaPlayer;
import javafx.scene.media.MediaPlayer.Status;
import javafx.scene.media.MediaView;
import javafx.scene.paint.Color;
import javafx.stage.Stage;

public class FxMediaExample2 extends Application
{
	public static void main(String[] args)
	{
		Application.launch(args);
	}

	@Override
	public void start(Stage stage)
	{
		// Locate the media content in the CLASSPATH
		URL mediaUrl = getClass().getResource("Test.mp4");
		String mediaStringUrl = mediaUrl.toExternalForm();

		// Create a Media
		Media media = new Media(mediaStringUrl);

		// Create a Media Player
		final MediaPlayer player = new MediaPlayer(media);
		// Automatically begin the playback
		player.setAutoPlay(true);

		// Create a 400X300 MediaView
		MediaView mediaView = new MediaView(player);
		mediaView.setFitWidth(400);
		mediaView.setFitHeight(300);
		mediaView.setSmooth(true);

		// Create the DropShadow effect
		DropShadow dropshadow = new DropShadow();
		dropshadow.setOffsetY(5.0);
		dropshadow.setOffsetX(5.0);
		dropshadow.setColor(Color.WHITE);

		mediaView.setEffect(dropshadow);

		// Create the Buttons
		Button playButton = new Button("Play");
		Button stopButton = new Button("Stop");

		// Create the Event Handlers for the Button
		playButton.setOnAction(new EventHandler <ActionEvent>()
		{
            public void handle(ActionEvent event)
            {
            	if (player.getStatus() == Status.PLAYING)
            	{
            		player.stop();
            		player.play();
            	}
            	else
            	{
            		player.play();
            	}
            }
        });

		stopButton.setOnAction(new EventHandler <ActionEvent>()
		{
            public void handle(ActionEvent event)
            {
            	player.stop();
            }
        });

		// Create the HBox
		HBox controlBox = new HBox(5, playButton, stopButton);

		// Create the VBox
		VBox root = new VBox(5,mediaView,controlBox);

		// Set the Style-properties of the HBox
		root.setStyle("-fx-padding: 10;" +
				"-fx-border-style: solid inside;" +
				"-fx-border-width: 2;" +
				"-fx-border-insets: 5;" +
				"-fx-border-radius: 5;" +
				"-fx-border-color: blue;");

		// Create the Scene
		Scene scene = new Scene(root);
		// Add the scene to the Stage
		stage.setScene(scene);
		// Set the title of the Stage
		stage.setTitle("A simple Media Example");
		// Display the Stage
		stage.show();
	}
}
JavaFX provides a unified API to work with audio and videos. You use the same classes to work with both. The Media API internally treats them as two different types of media that is transparent to the API users.
The Media API contains three core classes to play back media:
- Media
- MediaPlayer
- MediaView
3.2 Creating a Media Object
An instance of the Media class represents a media resource, which could be an audio or a video. It provides the information related to the media, for example, the duration, metadata, data, and so forth.
If the media is a video, it provides the width and height of the video. A Media object is immutable. It is created by supplying a string which contains the path of the media resource, as in the following code:
// Locate the media content in the CLASSPATH
URL mediaUrl = getClass().getResource("Test.mp4");
String mediaStringUrl = mediaUrl.toExternalForm();

// Create a Media
Media media = new Media(mediaStringUrl);
The Media class contains the following properties, which are read-only:
- duration
- width
- height
- error
- onError
The duration specifies the duration of the media in seconds. It is a Duration object. If the duration is unknown, it is Duration.UNKNOWN.
The width and height give the width and height of the source media in pixels, respectively. If the media does not have width and height, they are set as zero.
The error and onError properties are related. The error property represents the MediaException that occurs during the loading of the media. The onError is a Runnable object that you can set to get notified when an error occurs. The run() method of the Runnable is called when an error occurs.
3.3 Creating a MediaPlayer Object
A MediaPlayer provides the controls, for example, play, pause, stop, seek, play speed, volume adjustment, for playing the media. The MediaPlayer provides only one constructor that takes a Media object as an argument:
// Create a Media Player
final MediaPlayer player = new MediaPlayer(media);
You can get the reference of the media from the MediaPlayer using the getMedia() method of the MediaPlayer class.
Like the Media class, the MediaPlayer class also contains error and onError properties to report errors. When an error occurs on the MediaPlayer, the same error is also reported on the Media object.
3.4 Creating a MediaView Node
A MediaView is a Node. It provides the view of a media being played by a MediaPlayer. Note that an audio clip does not have visuals. If you try creating a MediaView for an audio content, it would be empty. To watch a video, you create a MediaView and add it to a Scene Graph.
The MediaView class provides two constructors:
one no-args constructor and one that takes a MediaPlayer as an argument:
- public MediaView()
- public MediaView(MediaPlayer mediaPlayer)
The no-args constructor creates a MediaView that is attached to any MediaPlayer. You will need to set a MediaPlayer using the setter for the mediaPlayer property:
// Create a 400X300 MediaView
MediaView mediaView = new MediaView();
mediaView.setMediaPlayer(player);
mediaView.setFitWidth(400);
mediaView.setFitHeight(300);
The other constructor lets you specify a MediaPlayer for the MediaView:
// Create a 400X300 MediaView
MediaView mediaView = new MediaView(player);
mediaView.setFitWidth(400);
mediaView.setFitHeight(300);
3.5 Customizing the MediaView
If the media has a view (e.g., a video), you can customize the size, area, and quality of the video using the following properties:
- fitHeight
- fitWidth
- preserveRatio
- smooth
- viewport
- x
- y
The fitWidth and fitHeight properties specify the resized width and height of the video, respectively. By default, they are zero, which means that the original width and height of the media will be used.
mediaView.setfitWidth(400);
mediaView.setFitHeight(300);
The preserveRatio property specifies whether to preserve the aspect ratio of the media while resizing. By default, it is false.
The smooth property specifies the quality of the filtering algorithm to be used in resizing the video. The default value is platform dependent. If it is set to true, a better-quality filtering algorithm is used.
mediaView.setSmooth(true);
A viewport is a rectangular region to view part of a graphic. The viewport, x, and y properties together let you specify the rectangular area in the video that will be shown in the MediaView.
A MediaView is a Node. Therefore, to give a better visual experience to the audience, you can also apply effects and transformations to the MediaView.
3.6 Combining Media, MediaPlayer, and MediaView
The content of a media can be used simultaneously by multiple Media objects. However, one Media object can be associated with only one media content in its lifetime.
A Media object can be associated with multiple MediaPlayer objects. However, a MediaPlayer is associated with only one Media in its lifetime.
A MediaView may optionally be associated with a MediaPlayer. Of course, a MediaView that is not associated with a MediaPlayer does not have any visuals. The MediaPlayer for a MediaView can be changed.
Changing the MediaPlayer for a MediaView is similar to changing the channel on a television. The view for the MediaView is provided by its current MediaPlayer. You can associate the same MediaPlayer with multiple MediaViews:
Different MediaViews may display different parts of the same media during the playback.
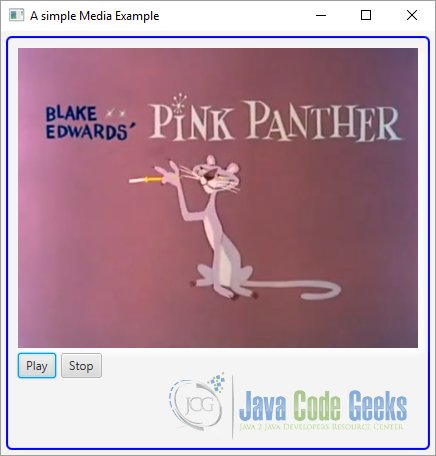
3.7 The GUI
The following image shows the GUI of the MediaPlayer:
4. Handling Playback Errors
4.1 The Code
FxMediaExample3.java
import java.net.URL;
import javafx.application.Application;
import javafx.event.ActionEvent;
import javafx.event.EventHandler;
import javafx.scene.Scene;
import javafx.scene.control.Button;
import javafx.scene.control.TextArea;
import javafx.scene.effect.DropShadow;
import javafx.scene.layout.HBox;
import javafx.scene.layout.VBox;
import javafx.scene.media.Media;
import javafx.scene.media.MediaErrorEvent;
import javafx.scene.media.MediaException;
import javafx.scene.media.MediaPlayer;
import javafx.scene.media.MediaPlayer.Status;
import javafx.scene.media.MediaView;
import javafx.scene.paint.Color;
import javafx.stage.Stage;

public class FxMediaExample3 extends Application
{
	// Create the Area for Logging
	private TextArea messageArea = new TextArea();

	public static void main(String[] args)
	{
		Application.launch(args);
	}

	@Override
	public void start(Stage stage)
	{
		// Locate the media content in the CLASSPATH
		URL mediaUrl = getClass().getResource("Test.mp4");
		String mediaStringUrl = mediaUrl.toExternalForm();

		// Create a Media
		final Media media = new Media(mediaStringUrl);

		// Create a Media Player
		final MediaPlayer player = new MediaPlayer(media);
		// Automatically begin the playback
		player.setAutoPlay(true);

		// Create a 400X300 MediaView
		final MediaView mediaView = new MediaView(player);
		mediaView.setFitWidth(400);
		mediaView.setFitHeight(300);
		mediaView.setSmooth(true);

		// Create the DropShadow effect
		DropShadow dropshadow = new DropShadow();
		dropshadow.setOffsetY(5.0);
		dropshadow.setOffsetX(5.0);
		dropshadow.setColor(Color.WHITE);

		mediaView.setEffect(dropshadow);

		// Create the Buttons
		Button playButton = new Button("Play");
		Button stopButton = new Button("Stop");

		// Create the Event Handlers for the Button
		playButton.setOnAction(new EventHandler <ActionEvent>()
		{
            public void handle(ActionEvent event)
            {
            	if (player.getStatus() == Status.PLAYING)
            	{
            		player.stop();
            		player.play();
            	}
            	else
            	{
            		player.play();
            	}
            }
        });

		stopButton.setOnAction(new EventHandler <ActionEvent>()
		{
            public void handle(ActionEvent event)
            {
            	player.stop();
            }
        });

		// Create Handlers for handling Errors
		player.setOnError(new Runnable()
		{
            public void run()
            {
                // Handle asynchronous error in Player object.
            	printMessage(player.getError());
            }
        });

		media.setOnError(new Runnable()
		{
            public void run()
            {
                // Handle asynchronous error in Media object.
            	printMessage(media.getError());
            }
        });

		mediaView.setOnError(new EventHandler <MediaErrorEvent>()
		{
			public void handle(MediaErrorEvent event)
			{
                // Handle asynchronous error in MediaView.
            	printMessage(event.getMediaError());
            }
		});

		// Create the HBox
		HBox controlBox = new HBox(5, playButton, stopButton);

		// Create the VBox
		VBox root = new VBox(5,mediaView,controlBox,messageArea);

		// Set the Style-properties of the HBox
		root.setStyle("-fx-padding: 10;" +
				"-fx-border-style: solid inside;" +
				"-fx-border-width: 2;" +
				"-fx-border-insets: 5;" +
				"-fx-border-radius: 5;" +
				"-fx-border-color: blue;");

		// Create the Scene
		Scene scene = new Scene(root);
		// Add the scene to the Stage
		stage.setScene(scene);
		// Set the title of the Stage
		stage.setTitle("Handling Media Errors");
		// Display the Stage
		stage.show();
	}

	private void printMessage(MediaException error)
	{
		MediaException.Type errorType = error.getType();
		String errorMessage = error.getMessage();
		messageArea.appendText("\n" + "Type:" + errorType + ", error mesage:" + errorMessage);
	}
}
An instance of the MediaException class, which inherits from the RuntimeException class, represents a media error that may occur in a Media, MediaPlayer, and MediaView.
Media playback may fail for a number of reasons. The API users should be able to identify specific errors. The MediaException class defines a static enum MediaException.Type whose constants identify the type of error. The MediaException class contains a getType() method that returns one of the constants of the MediaException.Type enum.
The constants in the MediaException.Type enum are listed below:
- MEDIA_CORRUPTED
- MEDIA_INACCESSIBLE
- MEDIA_UNAVAILABLE
- MEDIA_UNSPECIFIED
- MEDIA_UNSUPPORTED
- OPERATION_UNSUPPORTED
- PLAYBACK_HALTED
- PLAYBACK_ERROR
- UNKNOWN
The MEDIA_CORRUPTED error type indicates that the media is corrupted or invalid.
The MEDIA_INACCESSIBLE error type indicates that the media is inaccessible. However, the media may exist.
The MEDIA_UNAVAILABLE error type indicates that that media does not exist or it is unavailable.
The MEDIA_UNSPECIFIED error type indicates that the media has not been specified.
The MEDIA_UNSUPPORTED error type indicates that the media is not supported by the platform.
The OPERATION_UNSUPPORTED error type indicates that the operation performed on the media is not supported by the platform.
The PLAYBACK_HALTED error type indicates an unrecoverable error that has halted the playback.
The PLAYBACK_ERROR error type indicates a playback error that does not fall into any other described categories.
The UNKNOWN error type indicates that an unknown error has occurred.
The Media and MediaPlayer classes contain an error property that is a MediaException. All three classes contain an onError property, which is an event handler that is invoked when an error occurs. The types of the onError properties in these classes are not consistent.
It is a Runnable for the Media and MediaPlayer classes and the MediaErrorEvent for the MediaView class.
The following snippet of code shows how to handle errors on a Media, MediaPlayer, and MediaView.
// Create Handlers for handling Errors
player.setOnError(new Runnable()
{
    public void run()
    {
	// Handle asynchronous error in Player object.
	printMessage(player.getError());
    }
});

media.setOnError(new Runnable()
{
    public void run()
    {
	// Handle asynchronous error in Media object.
	printMessage(media.getError());
    }
});

mediaView.setOnError(new EventHandler <MediaErrorEvent>()
{
    public void handle(MediaErrorEvent event)
    {
	// Handle asynchronous error in MediaView.
	printMessage(event.getMediaError());
    }
});
Media error handlers are invoked on the JavaFX Application Thread. Therefore, it is safe to update the Scene Graph from the handlers.
It is recommended that you enclose the creation of the Media, MediaPlayer, and MediaView objects in a try-catch block and handle the exception appropriately. The onError handlers for these objects are involved after the objects are created. If an error occurs during the creation of these objects, those handlers will not be available.
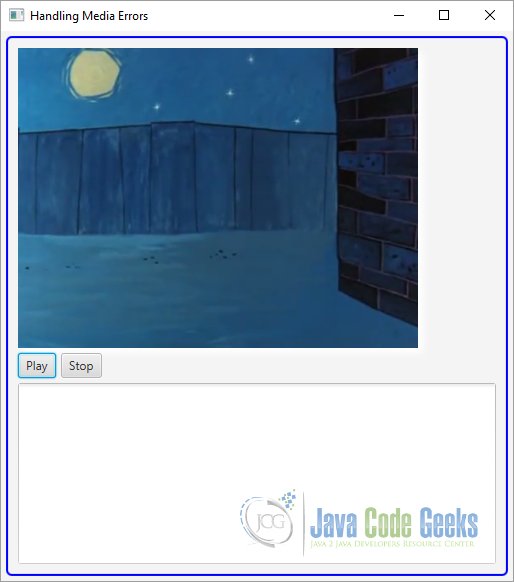
4.2 The GUI
The following GUI shows a MediaPlayer with Error Handling:
5. State Transitions of the MediaPlayer
5.1 The Code
FxMediaExample4.java
import java.net.URL;
import javafx.application.Application;
import javafx.beans.value.ChangeListener;
import javafx.beans.value.ObservableValue;
import javafx.event.ActionEvent;
import javafx.event.EventHandler;
import javafx.scene.Scene;
import javafx.scene.control.Button;
import javafx.scene.control.TextArea;
import javafx.scene.effect.DropShadow;
import javafx.scene.layout.HBox;
import javafx.scene.layout.VBox;
import javafx.scene.media.Media;
import javafx.scene.media.MediaErrorEvent;
import javafx.scene.media.MediaException;
import javafx.scene.media.MediaPlayer;
import javafx.scene.media.MediaPlayer.Status;
import javafx.scene.media.MediaView;
import javafx.scene.paint.Color;
import javafx.stage.Stage;

public class FxMediaExample4 extends Application
{
	// Create the Area for Logging
	private TextArea messageArea = new TextArea();

	public static void main(String[] args)
	{
		Application.launch(args);
	}

	@Override
	public void start(Stage stage)
	{
		// Locate the media content in the CLASSPATH
		URL mediaUrl = getClass().getResource("Test.mp4");
		String mediaStringUrl = mediaUrl.toExternalForm();

		// Create a Media
		final Media media = new Media(mediaStringUrl);

		// Create a Media Player
		final MediaPlayer player = new MediaPlayer(media);
		// Automatically begin the playback
		player.setAutoPlay(true);

		// Create a 400X300 MediaView
		final MediaView mediaView = new MediaView(player);
		mediaView.setFitWidth(400);
		mediaView.setFitHeight(300);
		mediaView.setSmooth(true);

		// Create the DropShadow effect
		DropShadow dropshadow = new DropShadow();
		dropshadow.setOffsetY(5.0);
		dropshadow.setOffsetX(5.0);
		dropshadow.setColor(Color.WHITE);

		mediaView.setEffect(dropshadow);

		// Create the Buttons
		Button playButton = new Button("Play");
		Button stopButton = new Button("Stop");

		// Create the Event Handlers for the Button
		playButton.setOnAction(new EventHandler <ActionEvent>()
		{
            public void handle(ActionEvent event)
            {
            	if (player.getStatus() == Status.PLAYING)
            	{
            		player.stop();
            		player.play();
            	}
            	else
            	{
            		player.play();
            	}
            }
        });

		stopButton.setOnAction(new EventHandler <ActionEvent>()
		{
            public void handle(ActionEvent event)
            {
            	player.stop();
            }
        });

		// Create Handlers for handling Errors
		player.setOnError(new Runnable()
		{
            public void run()
            {
                // Handle asynchronous error in Player object.
            	printMessage(player.getError());
            }
        });

		media.setOnError(new Runnable()
		{
            public void run()
            {
                // Handle asynchronous error in Media object.
            	printMessage(media.getError());
            }
        });

		mediaView.setOnError(new EventHandler <MediaErrorEvent>()
		{
			public void handle(MediaErrorEvent event)
			{
                // Handle asynchronous error in MediaView.
            	printMessage(event.getMediaError());
            }
		});

		// Add a ChangeListener to the player
		player.statusProperty().addListener(new ChangeListener<MediaPlayer.Status>()
		{
			// Log the Message
		    public void changed(ObservableValue<? extends MediaPlayer.Status> ov,
		            final MediaPlayer.Status oldStatus, final MediaPlayer.Status newStatus)
		    {
		    	messageArea.appendText("\nStatus changed from " + oldStatus + " to " + newStatus);
		    }
		});

		// Add a Handler for PLAYING status
		player.setOnPlaying(new Runnable()
		{
            public void run()
            {
            	messageArea.appendText("\nPlaying now");
            }
		});

		// Add a Handler for STOPPED status
		player.setOnStopped(new Runnable()
		{
            public void run()
            {
            	messageArea.appendText("\nStopped now");
            }
		});

		// Create the HBox
		HBox controlBox = new HBox(5, playButton, stopButton);

		// Create the VBox
		VBox root = new VBox(5,mediaView,controlBox,messageArea);

		// Set the Style-properties of the HBox
		root.setStyle("-fx-padding: 10;" +
				"-fx-border-style: solid inside;" +
				"-fx-border-width: 2;" +
				"-fx-border-insets: 5;" +
				"-fx-border-radius: 5;" +
				"-fx-border-color: blue;");

		// Create the Scene
		Scene scene = new Scene(root);
		// Add the scene to the Stage
		stage.setScene(scene);
		// Set the title of the Stage
		stage.setTitle("A State Transition Example");
		// Display the Stage
		stage.show();
	}

	private void printMessage(MediaException error)
	{
		MediaException.Type errorType = error.getType();
		String errorMessage = error.getMessage();
		messageArea.appendText("\n" + "Type:" + errorType + ", error mesage:" + errorMessage);
	}
}
A MediaPlayer always has a status. The current status of a MediaPlayer is indicated by the read-only status property. The status changes when an action is performed on the MediaPlayer. It cannot be set directly. The status of a MediaPlayer is defined by one of the eight constants in the MediaPlayer.Status enum:
- UNKNOWN
- READY
- PLAYING
- PAUSED
- STALLED
- STOPPED
- HALTED
- DISPOSE
The MediaPlayer transitions from one status to another when one of the following methods is called:
- play()
- pause()
- stop()
- dispose()
When a MediaPlayer is created, its status is UNKNOWN. Once the media is prerolled and it is ready to be played, the MediaPlayer transitions from UNKNOWN to READY. Once the MediaPlayer exits the UNKNOWN status, it cannot reenter it in its lifetime.
The MediaPlayer transitions to the PLAYING status when the play() method is called. This status indicates that the media is playing. Note if the autoPlay property is set to true, the MediaPlayer may enter the PLAYING status without calling the play() method explicitly after it is created.
When the MediaPlayer is playing, it may enter the STALLED status if it does not have enough data in its buffer to play. This status indicates that the MediaPlayer is buffering data. When enough data are buffered, it goes back to the PLAYING status.
When a MediaPlayer is stalled, calling the pause() and stop() methods, it transitions to the PAUSED and STOPPED status, respectively. In that case, the buffering continues. However, the MediaPlayer does not transition to the PLAYING status once enough data are buffered. Rather, it stays in the PAUSED or STOPPED status.
Calling the paused() method transitions the MediaPlayer to the PAUSED status. Calling the stop() method transitions the MediaPlayer to the STOPPED status.
In cases of an unrecoverable error, the MediaPlayer transitions to the HALTED terminal status. This status indicates that the MediaPlayer cannot be used again. You must create a new MediaPlayer if you want to play the media again.
The dispose() method frees all of the resources associated with the MediaPlayer. However, the Media object used by the
MediaPlayer can still be used. Calling the dispose() method transitions the MediaPlayer to the terminal status DISPOSED.
It is common to display the status of the MediaPlayer in an application. Add a ChangeListener to the status property to listen for any status changes.
Typically, you will be interested in receiving a notification when the status of the MediaPlayer changes. There are two ways to get the notifications:
- By adding a ChangeListener to the status property
- By setting status change handlers
The first method is suitable if you are interested in listening for any type of status change. The following snippet of code shows this method:
// Add a ChangeListener to the player
player.statusProperty().addListener(new ChangeListener<MediaPlayer.Status>()
{
	// Log the Message
    public void changed(ObservableValue<? extends MediaPlayer.Status> ov,
	    final MediaPlayer.Status oldStatus, final MediaPlayer.Status newStatus)
    {
	messageArea.appendText("\nStatus changed from " + oldStatus + " to " + newStatus);
    }
});
The second method is suitable if you are interested in handling a specific type of status change. The MediaPlayer class contains the following properties that can be set to Runnable objects:
- onReady
- onPlaying
- onRepeat
- onStalled
- onPaused
- onStopped
- onHalted
The run() method of the Runnable object is called when the MediaPlayer enters into the specific status.
For example, the run() method of the onPlaying handler is called when the player enters the PLAYING status.
The following snippet of code shows how to set handlers for a specific type of status change:
// Add a Handler for PLAYING status
player.setOnPlaying(new Runnable()
{
	public void run()
	{
		messageArea.appendText("\nPlaying now");
	}
});

// Add a Handler for STOPPED status
player.setOnStopped(new Runnable()
{
	public void run()
	{
	messageArea.appendText("\nStopped now");
	}
});
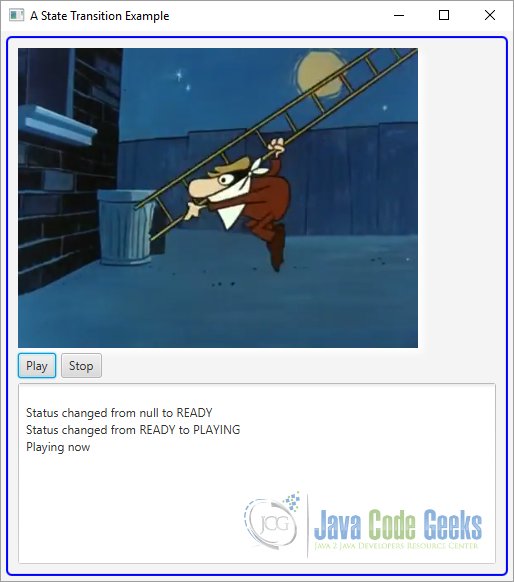
5.2 The GUI
The following GUI shows a MediaPlayer with State Transitions:
6. Controlling Media Properties
6.1 The Code
FxMediaExample5.java
import java.net.URL;
import javafx.application.Application;
import javafx.beans.InvalidationListener;
import javafx.beans.Observable;
import javafx.event.ActionEvent;
import javafx.event.EventHandler;
import javafx.scene.Scene;
import javafx.scene.control.Button;
import javafx.scene.control.Label;
import javafx.scene.control.Slider;
import javafx.scene.control.TextArea;
import javafx.scene.effect.DropShadow;
import javafx.scene.layout.GridPane;
import javafx.scene.layout.HBox;
import javafx.scene.layout.VBox;
import javafx.scene.media.Media;
import javafx.scene.media.MediaPlayer;
import javafx.scene.media.MediaPlayer.Status;
import javafx.scene.media.MediaView;
import javafx.scene.paint.Color;
import javafx.stage.Stage;

public class FxMediaExample5 extends Application
{
	// Create the Area for Logging
	private TextArea messageArea = new TextArea();

	public static void main(String[] args)
	{
		Application.launch(args);
	}

	@Override
	public void start(Stage stage)
	{
		// Create the Sliders
		final Slider cycleSlider = new Slider(1, 5, 1);
		cycleSlider.setMajorTickUnit(1);
		cycleSlider.setShowTickLabels(true);

		final Slider volumeSlider = new Slider(0.0, 1.0, 0.5);
		volumeSlider.setMajorTickUnit(0.1);
		volumeSlider.setShowTickLabels(true);

		final Slider rateSlider = new Slider(0, 8, 4);
		rateSlider.setMajorTickUnit(1);
		rateSlider.setShowTickLabels(true);

		final Slider balanceSlider = new Slider(-1.0, 1.0, 0.0);
		balanceSlider.setMajorTickUnit(0.2);
		balanceSlider.setShowTickLabels(true);

		// Locate the media content in the CLASSPATH
		URL mediaUrl = getClass().getResource("Test.mp4");
		String mediaStringUrl = mediaUrl.toExternalForm();

		// Create a Media
		final Media media = new Media(mediaStringUrl);

		// Create a Media Player
		final MediaPlayer player = new MediaPlayer(media);
		// Automatically begin the playback
		player.setAutoPlay(true);

		// Create a 400X300 MediaView
		final MediaView mediaView = new MediaView(player);
		mediaView.setFitWidth(400);
		mediaView.setFitHeight(300);
		mediaView.setSmooth(true);

		// Create the DropShadow effect
		DropShadow dropshadow = new DropShadow();
		dropshadow.setOffsetY(5.0);
		dropshadow.setOffsetX(5.0);
		dropshadow.setColor(Color.WHITE);

		mediaView.setEffect(dropshadow);

		// Create the Buttons
		Button playButton = new Button("Play");
		Button stopButton = new Button("Stop");

		// Create the Event Handlers for the Button
		playButton.setOnAction(new EventHandler <ActionEvent>()
		{
            public void handle(ActionEvent event)
            {
            	if (player.getStatus() == Status.PLAYING)
            	{
            		player.stop();
            		player.play();
            	}
            	else
            	{
            		player.play();
            	}
            }
        });

		stopButton.setOnAction(new EventHandler <ActionEvent>()
		{
            public void handle(ActionEvent event)
            {
            	player.stop();
            }
        });

		// Create the Listener for the Sliders
		cycleSlider.valueProperty().addListener(new InvalidationListener()
		{
			@Override
			public void invalidated(Observable ov)
			{
				if (cycleSlider.isValueChanging())
				{
					messageArea.appendText("\nCycle Count changed to: " + (int)cycleSlider.getValue());
					player.setCycleCount((int)cycleSlider.getValue());
				}
			}
		});

		volumeSlider.valueProperty().addListener(new InvalidationListener()
		{
			@Override
			public void invalidated(Observable ov)
			{
				if (volumeSlider.isValueChanging())
				{
					messageArea.appendText("\nVolume changed to: " + volumeSlider.getValue());
					player.setVolume(volumeSlider.getValue());
				}
			}
		});

		rateSlider.valueProperty().addListener(new InvalidationListener()
		{
			@Override
			public void invalidated(Observable ov)
			{
				if (rateSlider.isValueChanging())
				{
					messageArea.appendText("\nRate changed to: " + rateSlider.getValue());
					player.setRate(rateSlider.getValue());
				}
			}
		});

		balanceSlider.valueProperty().addListener(new InvalidationListener()
		{
			@Override
			public void invalidated(Observable ov)
			{
				if (balanceSlider.isValueChanging())
				{
					messageArea.appendText("\nBalance changed to: " + balanceSlider.getValue());
					player.setVolume(balanceSlider.getValue());
				}
			}
		});

		// Add Handlers for End and Repeat
		player.setOnEndOfMedia(new Runnable()
		{
            public void run()
            {
            	messageArea.appendText("\nEnd of media !");
            }
		});

		player.setOnRepeat(new Runnable()
		{
            public void run()
            {
            	messageArea.appendText("\nRepeating media !");
            }
		});

		// Create the GridPane
		GridPane sliderPane = new GridPane();
		// Set horizontal and vertical Spacing
		sliderPane.setHgap(5);
		sliderPane.setVgap(10);

		// Add the details to the GridPane
		sliderPane.addRow(0, new Label("CycleCount:"), cycleSlider);
		sliderPane.addRow(1, new Label("Volume:"), volumeSlider);
		sliderPane.addRow(2, new Label("Rate:"), rateSlider);
		sliderPane.addRow(3, new Label("Balance:"), balanceSlider);

		// Create the HBox
		HBox controlBox = new HBox(5, playButton, stopButton);

		// Create the VBox
		VBox root = new VBox(5,mediaView,controlBox,sliderPane,messageArea);

		// Set the Style-properties of the HBox
		root.setStyle("-fx-padding: 10;" +
				"-fx-border-style: solid inside;" +
				"-fx-border-width: 2;" +
				"-fx-border-insets: 5;" +
				"-fx-border-radius: 5;" +
				"-fx-border-color: blue;");

		// Create the Scene
		Scene scene = new Scene(root);
		// Add the scene to the Stage
		stage.setScene(scene);
		// Set the title of the Stage
		stage.setTitle("A Media Properties Example");
		// Display the Stage
		stage.show();
	}
}
6.2 Repeating Media Playback
A media can be played repeatedly for a specified number of times or even indefinitely. The cycleCount property specifies the number of times a playback will be repeated. By default, it is set to 1. Set it to MediaPlayer.INDEFINITE to repeat the playback indefinitely until the player is paused or stopped. The readonly currentCount property is set to the number of completed playback cycles. It is set to 0 when the media is playing the first cycle. At the end of the first cycle, it is set to 1; it is incremented to 2 at the end of second cycle, and so on.
The following code would set a playback cycle of four times:
// The playback should repeat 4 times
player.setCycleCount(4);
You can receive a notification when the end of media for a cycle in playback is reached. Set a Runnable for the onEndOfMedia property of the MediaPlayer class to get the notification. Note that if a playback continues for four cycles, the end of media notification will be sent four times.
// Add Handlers for End and Repeat
player.setOnEndOfMedia(new Runnable()
{
	public void run()
	{
		messageArea.appendText("\nEnd of media !");
	}
});
You can add an onRepeat event handler that is called when the end of media for a playback cycle is reached and the playback is going to repeat. It is called after the onEndOfMedia event handler:
player.setOnRepeat(new Runnable()
{
	public void run()
	{
		messageArea.appendText("\nRepeating media !");
	}
});
6.3 Controlling the Playback Rate
The rate property of the MediaPlayer specifies the rate of the playback. The valid range is 0.0 to 8.0. For example, a rate of 2.0 plays the media two times faster than the normal rate. The default value is 1.0, which plays the media at the normal rate. The read-only currentRate property is the current rate of playback.
The following code would set the rate at three times the normal rate:
player.setRate(3.0);
6.4 Controlling the Playback Volume
Three properties in the MediaPlayer class control the volume of the audio in the media:
- volume
- mute
- balance
The volume specifies the volume of the audio. The range is 0.0 to 1.0. A value of 0.0 makes the audio inaudible, whereas a value of 1.0 plays it at full volume. The default value is 1.0.
The mute specifies whether the audio is produced by the MediaPlayer. By default, its value is false and the audio is produced. Setting it to true does not produce audio. Note that setting the mute property does not affect the volume property.
Suppose the volume is set to 1.0 and the muted is set to true. There is no audio
being produced. When the mute is set to false, the audio will use the volume property that is 1.0 and it will play at full volume. The following code would set the volume at half:
player.setVolumne(0.5);
player.setMute(true)
The balance specifies the relative volume for the left and right channels. The valid range is -1.0 to 1.0. A value of -1.0 sets the playback in the left channel at normal volume and mutes the right channel. A value of 1.0 sets the playback in the right channel at normal volume and mutes the left channel. The default value is 0.0, which sets the playback in both channels at normal volume.
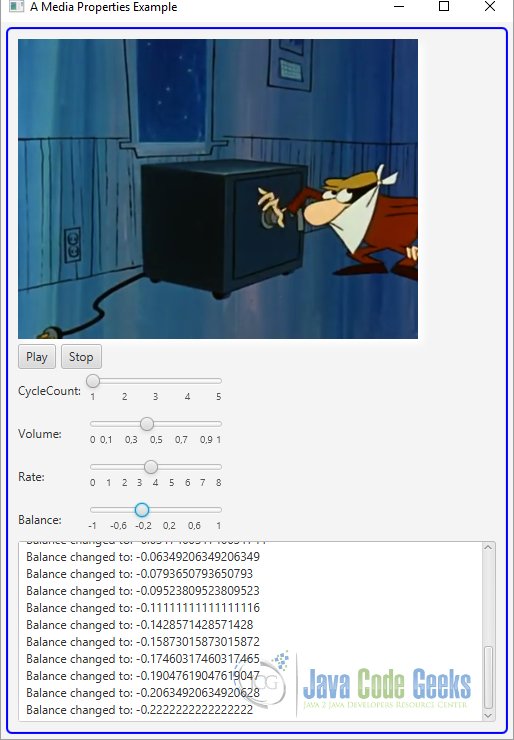
6.5 The GUI
The following GUI shows a MediaPlayer with Properties:
7. Tracking Media Time
7.1 The Code
FxMediaExample6.java
import java.net.URL;
import javafx.application.Application;
import javafx.event.ActionEvent;
import javafx.event.EventHandler;
import javafx.scene.Scene;
import javafx.scene.control.Button;
import javafx.scene.effect.DropShadow;
import javafx.scene.layout.HBox;
import javafx.scene.layout.VBox;
import javafx.scene.media.Media;
import javafx.scene.media.MediaPlayer;
import javafx.scene.media.MediaPlayer.Status;
import javafx.scene.media.MediaView;
import javafx.scene.paint.Color;
import javafx.stage.Stage;
import javafx.util.Duration;

public class FxMediaExample6 extends Application
{
	public static void main(String[] args)
	{
		Application.launch(args);
	}

	@Override
	public void start(Stage stage)
	{
		// Locate the media content in the CLASSPATH
		URL mediaUrl = getClass().getResource("Test.mp4");
		String mediaStringUrl = mediaUrl.toExternalForm();

		// Create a Media
		final Media media = new Media(mediaStringUrl);

		// Create a Media Player
		final MediaPlayer player = new MediaPlayer(media);
		// Automatically begin the playback
		player.setAutoPlay(true);

		// Set the Times of the Player
		player.setStartTime(Duration.minutes(1));
		player.setStopTime(Duration.minutes(2));

		// Create a 400X300 MediaView
		final MediaView mediaView = new MediaView(player);
		mediaView.setFitWidth(400);
		mediaView.setFitHeight(300);
		mediaView.setSmooth(true);

		// Create the DropShadow effect
		DropShadow dropshadow = new DropShadow();
		dropshadow.setOffsetY(5.0);
		dropshadow.setOffsetX(5.0);
		dropshadow.setColor(Color.WHITE);

		mediaView.setEffect(dropshadow);

		// Create the Buttons
		Button playButton = new Button("Play");
		Button stopButton = new Button("Stop");

		// Create the Event Handlers for the Button
		playButton.setOnAction(new EventHandler <ActionEvent>()
		{
            public void handle(ActionEvent event)
            {
            	if (player.getStatus() == Status.PLAYING)
            	{
            		player.stop();
            		player.play();
            	}
            	else
            	{
            		player.play();
            	}
            }
        });

		stopButton.setOnAction(new EventHandler <ActionEvent>()
		{
            public void handle(ActionEvent event)
            {
            	player.stop();
            }
        });

		// Create the HBox
		HBox controlBox = new HBox(5, playButton, stopButton);

		// Create the VBox
		VBox root = new VBox(5,mediaView,controlBox);

		// Set the Style-properties of the HBox
		root.setStyle("-fx-padding: 10;" +
				"-fx-border-style: solid inside;" +
				"-fx-border-width: 2;" +
				"-fx-border-insets: 5;" +
				"-fx-border-radius: 5;" +
				"-fx-border-color: blue;");

		// Create the Scene
		Scene scene = new Scene(root);
		// Add the scene to the Stage
		stage.setScene(scene);
		// Set the title of the Stage
		stage.setTitle("A Tracking Media Example");
		// Display the Stage
		stage.show();
	}
}
Displaying the media duration and the elapsed time for a playback are important feedback for the audience. A good understanding of these duration types is important in developing a good media playback dashboard.
Different types of Duration can be associated with a media:
- The current duration of a media playing media
- The duration of the media playback
- The duration of the media play for one cycle
- The start offset time
- The end offset time
- onStopped
- onHalted
- DISPOSE
By default, a media plays for its original duration. For example, if the duration of the media is 30 minutes, the media will play for 30 minutes in one cycle. The MediaPlayer lets you specify the length of the playback, which can be anywhere in the Duration of the media. For example, for each playback cycle, you can specify that only the middle 10 minutes (11th to 12th) of the media should be played. The length of the media playback is specified by the following two properties of the MediaPlayer class:
- startTime
- stopTime
Both properties are of the Duration type. The startTime and stopTime are the time offsets where the media should start and stop playing for each cycle, respectively. By default, the startTime is set to Duration.ZERO and the stopTime is set to the duration of the media.
The following snippet of code sets these properties, so the media will be played from the first minute to the second minute:
// Set the Times of the Player
player.setStartTime(Duration.minutes(1));
player.setStopTime(Duration.minutes(2));
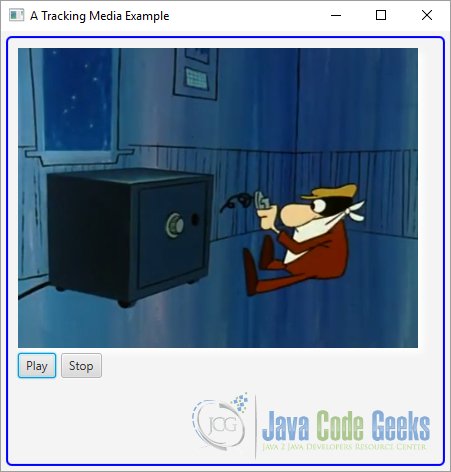
7.2 The GUI
The following GUI shows a MediaPlayer with Time Tracking:
8. Marking Positions in the Media
8.1 The Code
FxMediaExample7.java
import java.net.URL;
import javafx.application.Application;
import javafx.collections.ObservableMap;
import javafx.event.ActionEvent;
import javafx.event.EventHandler;
import javafx.scene.Scene;
import javafx.scene.control.Button;
import javafx.scene.control.TextArea;
import javafx.scene.effect.DropShadow;
import javafx.scene.layout.HBox;
import javafx.scene.layout.VBox;
import javafx.scene.media.Media;
import javafx.scene.media.MediaMarkerEvent;
import javafx.scene.media.MediaPlayer;
import javafx.scene.media.MediaPlayer.Status;
import javafx.scene.media.MediaView;
import javafx.scene.paint.Color;
import javafx.stage.Stage;
import javafx.util.Duration;
import javafx.util.Pair;

public class FxMediaExample7 extends Application
{
	// Create the Area for Logging
	private TextArea messageArea = new TextArea();

	public static void main(String[] args)
	{
		Application.launch(args);
	}

	@Override
	public void start(Stage stage)
	{
		// Locate the media content in the CLASSPATH
		URL mediaUrl = getClass().getResource("Test.mp4");
		String mediaStringUrl = mediaUrl.toExternalForm();

		// Create a Media
		final Media media = new Media(mediaStringUrl);

		// Create the Markers
		ObservableMap<String, Duration> markers = media.getMarkers();
		markers.put("START", Duration.ZERO);
		markers.put("INTERVAL", media.getDuration().divide(2.0));
		markers.put("END", media.getDuration());

		// Create a Media Player
		final MediaPlayer player = new MediaPlayer(media);
		// Automatically begin the playback
		player.setAutoPlay(true);

		// Create a 400X300 MediaView
		final MediaView mediaView = new MediaView(player);
		mediaView.setFitWidth(400);
		mediaView.setFitHeight(300);
		mediaView.setSmooth(true);

		// Create the DropShadow effect
		DropShadow dropshadow = new DropShadow();
		dropshadow.setOffsetY(5.0);
		dropshadow.setOffsetX(5.0);
		dropshadow.setColor(Color.WHITE);

		// Set the Effect on the MediaView
		mediaView.setEffect(dropshadow);

		// Create the Buttons
		Button playButton = new Button("Play");
		Button stopButton = new Button("Stop");

		// Create the Event Handlers for the Button
		playButton.setOnAction(new EventHandler <ActionEvent>()
		{
            public void handle(ActionEvent event)
            {
            	if (player.getStatus() == Status.PLAYING)
            	{
            		player.stop();
            		player.play();
            	}
            	else
            	{
            		player.play();
            	}
            }
        });

		stopButton.setOnAction(new EventHandler <ActionEvent>()
		{
            public void handle(ActionEvent event)
            {
            	player.stop();
            }
        });

		// Add a marker event handler
		player.setOnMarker(new EventHandler <MediaMarkerEvent>()
		{
            public void handle(MediaMarkerEvent event)
            {
    			Pair<String, Duration> marker = event.getMarker();
    			String markerText = marker.getKey();
    			Duration markerTime = marker.getValue();
    			messageArea.appendText("\nReached the marker " + markerText + " at " + markerTime);
            }
		});

		// Create the HBox
		HBox controlBox = new HBox(5, playButton, stopButton);

		// Create the VBox
		VBox root = new VBox(5,mediaView,controlBox,messageArea);

		// Set the Style-properties of the HBox
		root.setStyle("-fx-padding: 10;" +
				"-fx-border-style: solid inside;" +
				"-fx-border-width: 2;" +
				"-fx-border-insets: 5;" +
				"-fx-border-radius: 5;" +
				"-fx-border-color: blue;");

		// Create the Scene
		Scene scene = new Scene(root);
		// Add the scene to the Stage
		stage.setScene(scene);
		// Set the title of the Stage
		stage.setTitle("A Markers Example");
		// Display the Stage
		stage.show();
	}
}
You can associate markers with specific point on the media timeline. Markers are simply text that are useful in a number of ways. You can use them to insert advertisements.
For example, you can insert a URL as the marker text. When the marker is reached, you can pause playing the media and play another media. Note that playing another media involves creating new Media and MediaPlayer objects. You can reuse a MediaView. When you are playing the advertisement video, associate the MediaView with the new MediaPlayer. When the advertisement playback is finished, associate the MediaView back to the main MediaPlayer.
The Media class contains a getMarkers() method that returns an ObservableMap. You need to add the (key, value) pairs in the map to add markers.
The following snippet of code adds three markers to a media:
// Create the Markers
ObservableMap<String, Duration> markers = media.getMarkers();
markers.put("START", Duration.ZERO);
markers.put("INTERVAL", media.getDuration().divide(2.0));
markers.put("END", media.getDuration());
The MediaPlayer fires a MediaMarkerEvent when a marker is reached. You can register a handler for this event in the onMarker property of the MediaPlayer.
The following snippet of code shows how to handle the MediaMarkerEvent. The getMarker() method of the event returns a Pair whose key and value are the marker text and marker duration, respectively.
// Add a marker event handler
player.setOnMarker(new EventHandler <MediaMarkerEvent>()
{
	public void handle(MediaMarkerEvent event)
	{
		Pair<String, Duration> marker = event.getMarker();
		String markerText = marker.getKey();
		Duration markerTime = marker.getValue();
		messageArea.appendText("\nReached the marker " + markerText + " at " + markerTime);
	}
});
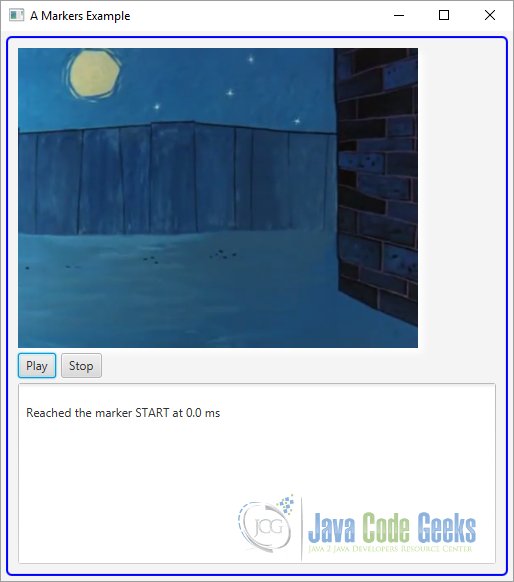
8.2 The GUI
The following GUI shows a MediaPlayer with Markers:
9. Showing Media Metadata
9.1 The Code
FxMediaExample8.java
import java.net.URL;
import javafx.application.Application;
import javafx.collections.ObservableMap;
import javafx.event.ActionEvent;
import javafx.event.EventHandler;
import javafx.scene.Scene;
import javafx.scene.control.Button;
import javafx.scene.control.TextArea;
import javafx.scene.effect.DropShadow;
import javafx.scene.layout.HBox;
import javafx.scene.layout.VBox;
import javafx.scene.media.Media;
import javafx.scene.media.MediaPlayer;
import javafx.scene.media.MediaPlayer.Status;
import javafx.scene.media.MediaView;
import javafx.scene.paint.Color;
import javafx.stage.Stage;

public class FxMediaExample8 extends Application
{
	// Create the Area for Logging
	private TextArea messageArea = new TextArea();

	public static void main(String[] args)
	{
		Application.launch(args);
	}

	@Override
	public void start(Stage stage)
	{
		// Locate the media content in the CLASSPATH
		URL mediaUrl = getClass().getResource("Test.mp3");
		String mediaStringUrl = mediaUrl.toExternalForm();

		// Create a Media
		final Media media = new Media(mediaStringUrl);

		// Create a Media Player
		final MediaPlayer player = new MediaPlayer(media);
		// Automatically begin the playback
		player.setAutoPlay(false);

		// Create a 400X300 MediaView
		final MediaView mediaView = new MediaView(player);
		mediaView.setFitWidth(400);
		mediaView.setFitHeight(300);
		mediaView.setSmooth(true);

		// Create the DropShadow effect
		DropShadow dropshadow = new DropShadow();
		dropshadow.setOffsetY(5.0);
		dropshadow.setOffsetX(5.0);
		dropshadow.setColor(Color.WHITE);

		mediaView.setEffect(dropshadow);

		// Create the Buttons
		Button playButton = new Button("Play");
		Button stopButton = new Button("Stop");

		// Create the Event Handlers for the Button
		playButton.setOnAction(new EventHandler <ActionEvent>()
		{
            public void handle(ActionEvent event)
            {
            	if (player.getStatus() == Status.PLAYING)
            	{
            		player.stop();
            		player.play();
            	}
            	else
            	{
            		player.play();
            	}
            }
        });

		stopButton.setOnAction(new EventHandler <ActionEvent>()
		{
            public void handle(ActionEvent event)
            {
            	player.stop();
            }
        });

		// Display the metadata data on the console
		player.setOnReady(new Runnable()
		{
            public void run()
            {
        		ObservableMap<String, Object> metadata = media.getMetadata();
        		for(String key : metadata.keySet())
        		{
        			messageArea.appendText("\n" + key + " = "  + metadata.get(key));
        		}
            }
		});

		// Create the HBox
		HBox controlBox = new HBox(5, playButton, stopButton);

		// Create the VBox
		VBox root = new VBox(5,mediaView,controlBox,messageArea);

		// Set the Style-properties of the HBox
		root.setStyle("-fx-padding: 10;" +
				"-fx-border-style: solid inside;" +
				"-fx-border-width: 2;" +
				"-fx-border-insets: 5;" +
				"-fx-border-radius: 5;" +
				"-fx-border-color: blue;");

		// Create the Scene
		Scene scene = new Scene(root);
		// Add the scene to the Stage
		stage.setScene(scene);
		// Set the title of the Stage
		stage.setTitle("A Metadata Example");
		// Display the Stage
		stage.show();
	}
}
Some metadata may be embedded into a media that describe the media. Typically, the metadata contains the title, artist name, album name, genre, year, and so forth.
The following snippet of code displays the metadata for the media when the MediaPlayer enters the READY status. Do not try reading the metadata just after creating the Media object, as the metadata may not be available.
// Display the metadata data on the console
player.setOnReady(new Runnable()
{
	public void run()
	{
		ObservableMap<String, Object> metadata = media.getMetadata();
		for(String key : metadata.keySet())
		{
			messageArea.appendText("\n" + key + " = "  + metadata.get(key));
		}
	}
});
You cannot be sure whether there are metadata in a media or the type of metadata a media may contain. In your application, you can just look for the title, artist, album, and year. Alternatively, you could read all of the metadata and display them in a two-column table. Sometimes the metadata may contain an embedded image of the artist. You would need to check the class name of the value in the map to use the
image.
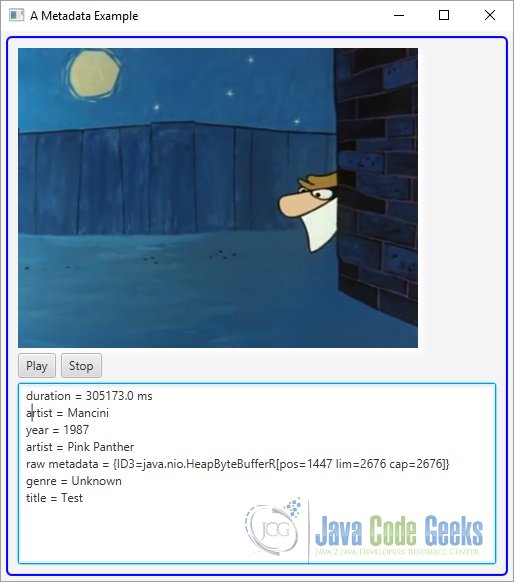
9.2 The GUI
The following GUI shows a MediaPlayer with Metadata:
10. Download Java Source Code
This was an example of javafx.scene.media
You can download the full source code of this example here: JavaFxMediaExample.zip

Hello, how can i use a slider to show the media progress following this tuto please?