This is a JavaFX FXGraph Example. FXGraph is a simple DSL for the definition of a JavaFX 2.x object graph. Instead of generating Java source or byte code, it generates FXML, a special XML format supported by the JavaFX 2.x library.
The language supports the following concepts:
- JSON-like object graph notation
- Static properties access
- Binding Expressions
- Controller Binding
- Translation Support
- Support for CSS referencing
The following table shows an overview of the whole article:
Table Of Contents
The following examples uses Java SE 8.
1. Installing the e(fx)clipse IDE
FXGraph is part of the e(fx)clipse IDE. So you have to install this IDE in Eclipse. If you want learn more about e(fx)clipse, please read my article JavaFX Applications with e(fx)clipse.
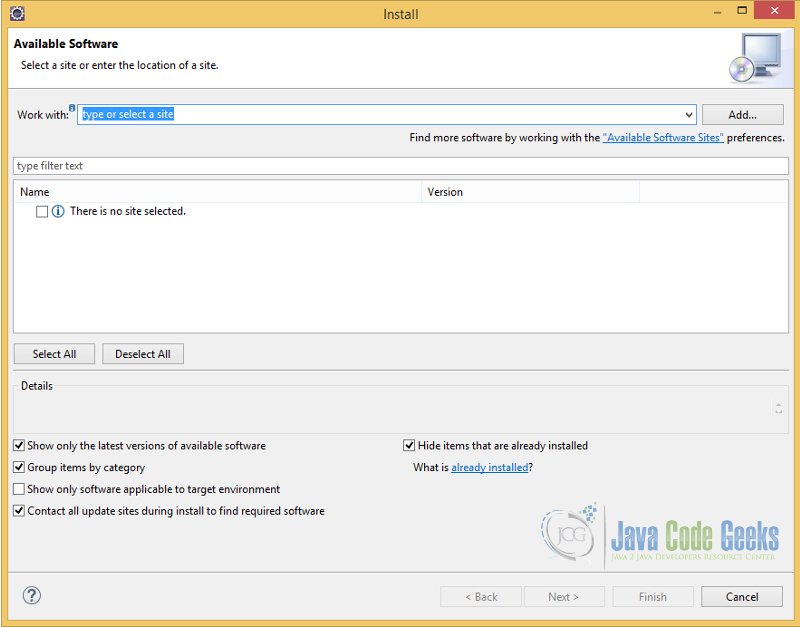
At first you have to start your Eclipse Software. Thereafter go to the Help Menu and select the “Install New Software…” option.
The following Dialog will appear:
Now you have to define a Repository for the e(fx)clipse Installation. After clicking the Add Button, the “Add Repository” Dialog will appear:
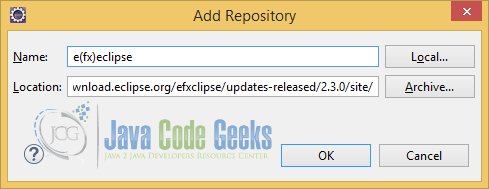
You have to enter the name of the repository and the Location of the software. I have chosen e(fx)clipse as name and http://download.eclipse.org/efxclipse/updates-released/2.3.0/site as Location for the following examples.
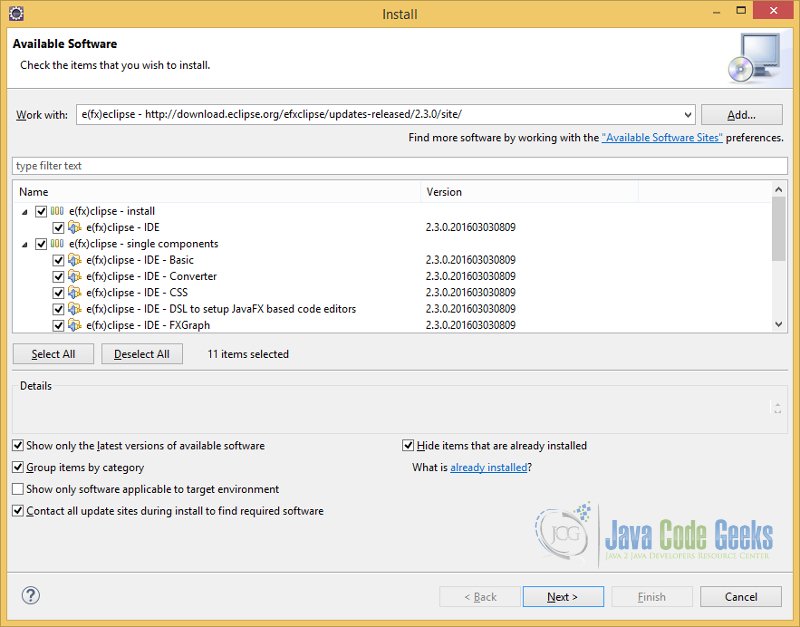
After defining the Repository, all possible items of the Update-Site will appear. Now you can choose, which items should be installed:
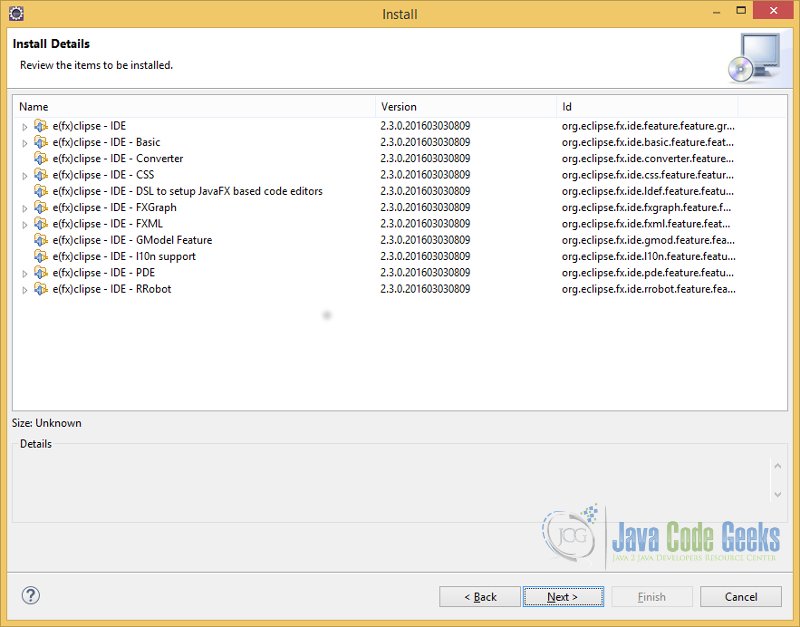
At the end of the Selection and pressing the Next Button, an Overview of the selected items will apppear:
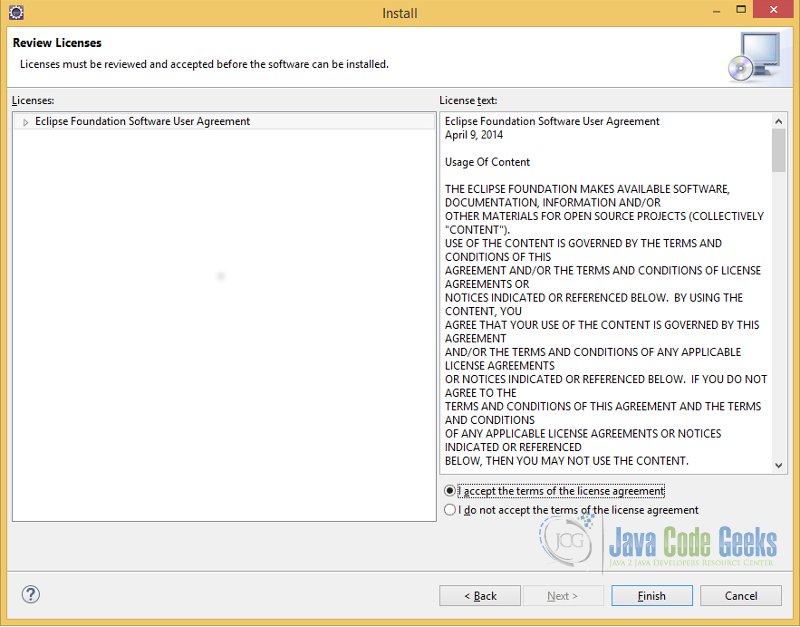
At next, the terms of the License Agreement have to be accepted:
After clicking the Finish Button, the installation will start:

When the installation process is finished, you have to restart your Eclipse. Thereafter you can create JavaFX Projects with the e(fx)clipse IDE in your Eclipse Environment.
2. Your first FXGraph Example
In this example, I only discuss how you can generate the Project and the necessary changes in the created files. If you want to learn more about JavaFX, please read my JavaFX Tutorial for Beginners.
2.1 Creation of the FXGraph Project
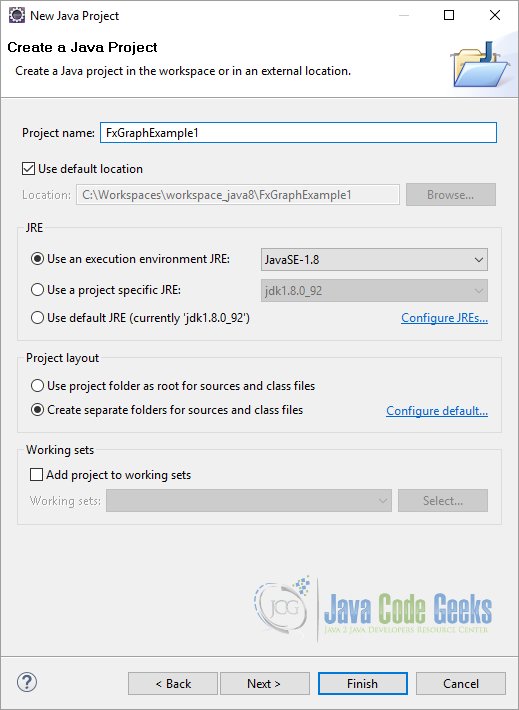
At first you have to create a JavaFx Project. Go to the File Menu and choose New Project. Select the “JavaFX Project” entry in the wizard:

Enter a project name and click Next:
Now you can add other external libraries, if it is necessary:

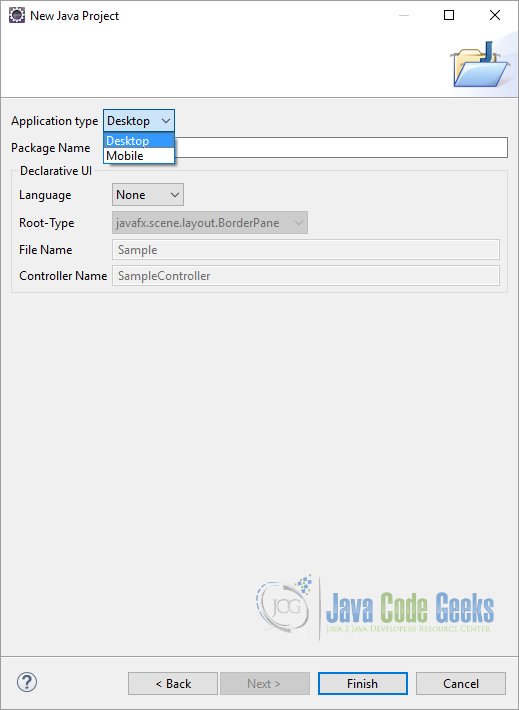
The next step represents the Selection of the “Application Type”. There exists Desktop and Mobile. For this article I have chosen Desktop for the creation of a Desktop Application.
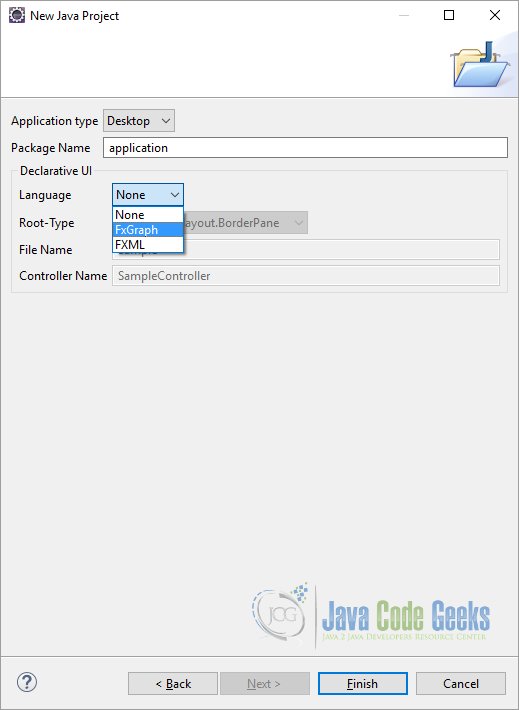
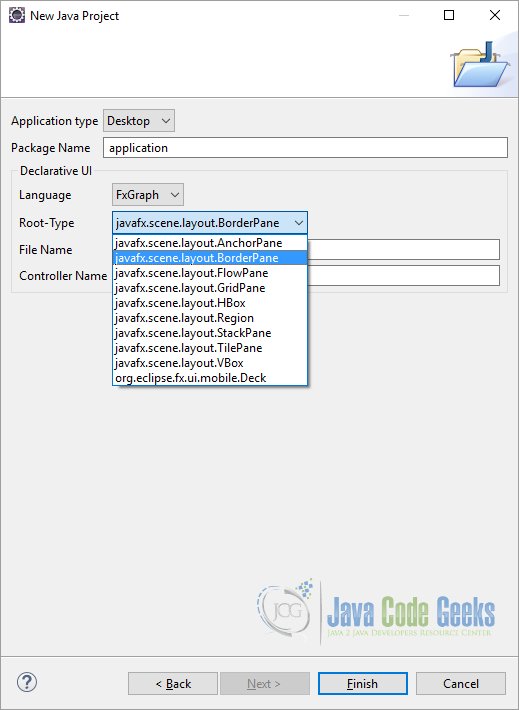
Now you have to choose the Language. You can select None, FXML and FxGraph. None means, that the Project contains only Java Files and StyleSheets. If you want to use FXML for developing your GUI, you have to select FXML. FXGraph is a simple DSL for the definition of a JavaFX 2.x object graph. Choose FXGraph.
Thereafter you have to choose the Root Type. The Root Type can be BorderPane, VBox, etc.
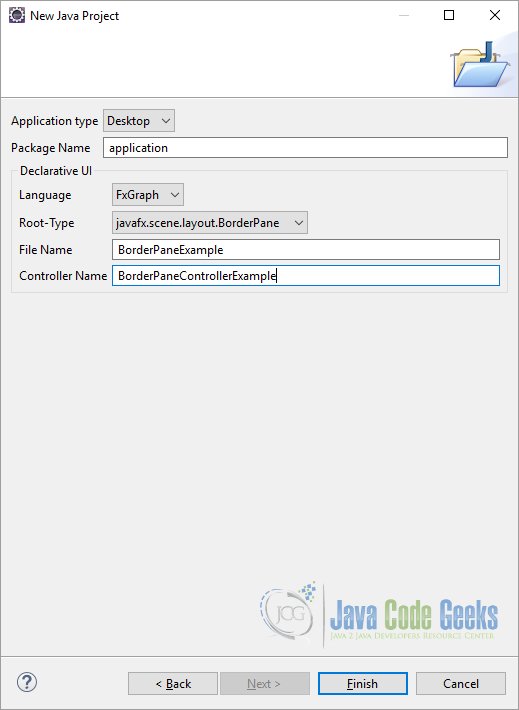
The next step contains the definition of the File Name and the Controller Name.
After a click on the Finish Button Eclipse will create the Project and some Classes and Stylesheets:
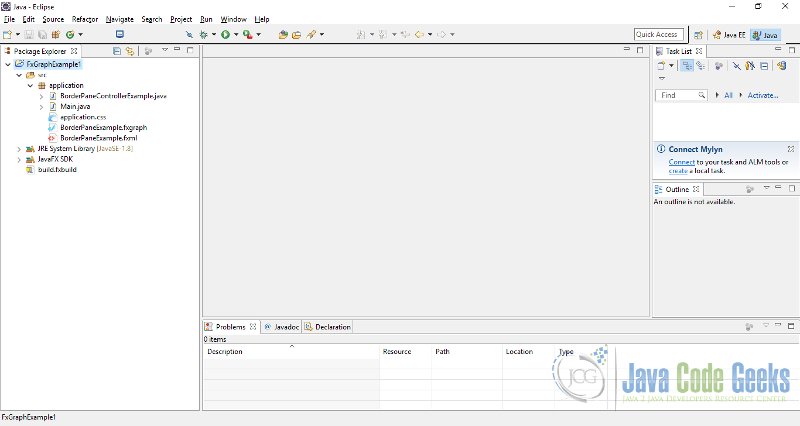
Thereafter, the application Package contains the following Files:
- Main.java
- application.css
- BorderPaneControllerExample.java
- BorderPaneExample.fxgraph
- BorderPaneExample.fxml
2.2 Changing the FXGraph File
The generated File “BorderPaneExample.fxgraph” contains the following code after generation:
BorderPaneExample.fxgraph
import javafx.scene.layout.BorderPane
import application.BorderPaneControllerExample

component BorderPaneExample controlledby BorderPaneControllerExample {
	BorderPane {
		//TODO Add Nodes
	}
}
As you can see, the definition of an object graph with FXGraph looks quite similar to JSON, but because Java has the concept of a package, you can import classes from a package so that you don’t have to specify the fully qualified name.
Another difference to JSON is that the definition starts with the component keyword which typically matches the filename.
The above file creates an empty BorderPane at this time. In this example we only want to add a Button and his corresponding Text at the center of the BorderPane. The modified file contains the following code:
BorderPaneExample.fxgraph
import javafx.scene.layout.BorderPane
import javafx.scene.control.Button
import application.BorderPaneControllerExample

component BorderPaneExample controlledby BorderPaneControllerExample
{
	BorderPane
	{
		center : Button
		{
      			text : "Hello World"
    		}
	}
}
The attribute and its value are separated by the “:” (colon) and the following simple values are supported directly:
- String
- Numbers
- Object definition
For example, the following code snippet defines the Text for the Button:
center : Button
{
	text : "Hello World"
}
2.3 Changing the FXML File
The File “BorderPaneExample.fxml” contains the following code after creation:
BorderPaneExample.fxml
<?xml version="1.0" encoding="UTF-8"?>
<!--
	Do not edit this file it is generated by e(fx)clipse from ../src/application/BorderPaneExample.fxgraph
-->

<?import java.lang.*?>
<?import javafx.scene.layout.BorderPane?>

<BorderPane xmlns:fx="http://javafx.com/fxml" fx:controller="application.BorderPaneControllerExample">

</BorderPane>
The FXGraph needs to be loaded as a FXML file JavaFX Scene. The e(fx)clipse project will translate the FXGraph “BorderPaneExample.fxgraph” specification file to a “BorderPaneExample.fxml” file. After translation, the file contains the following XML Code:
BorderPaneExample.fxml
<?xml version="1.0" encoding="UTF-8"?>
<!--
	Do not edit this file it is generated by e(fx)clipse from ../src/application/BorderPaneExample.fxgraph
-->

<?import java.lang.*?>
<?import javafx.scene.control.Button?>
<?import javafx.scene.layout.BorderPane?>

<BorderPane xmlns:fx="http://javafx.com/fxml" fx:controller="application.BorderPaneControllerExample">

	<center>
		<Button text="Hello World"/>
	</center>
</BorderPane>
In other words, we don´t have to made changes in this file.
2.4 Changing the Stylesheet
The corresponding Stylesheet is also empty after Creation:
application.css
/* JavaFX CSS - Leave this comment until you have at least create one rule which uses -fx-Property */
In this example, it is not necessary to make changes in the Stylesheet.
2.5 Changing the Controller Class
The generated File “BorderPaneControllerExample.java” is also an empty class after creation. In this example, we only have defined a BorderPane with a Button and a Text. Given the fact, that there is no Action defined on the Button, we don´t need to change the Controller Class.
BorderPaneControllerExample.java
public class BorderPaneControllerExample
{
}
2.6 Changing the Main Class
The generated Main Class contains the following Java Code after Creation:
Main.java
import javafx.application.Application;
import javafx.stage.Stage;
import javafx.scene.Scene;
import javafx.scene.layout.BorderPane;
import javafx.fxml.FXMLLoader;


public class Main extends Application
{
	@Override
	public void start(Stage primaryStage)
	{
		try
		{
			BorderPane root = (BorderPane) FXMLLoader.load
				(getClass().getResource("BorderPaneExample.fxml"));
			Scene scene = new Scene(root,400,400);
			scene.getStylesheets().add
				(getClass().getResource("application.css")
				.toExternalForm());
			primaryStage.setScene(scene);
			primaryStage.show();
		}
		catch(Exception e)
		{
			e.printStackTrace();
		}
	}

	public static void main(String[] args)
	{
		launch(args);
	}
}
At first, the FXML File will be loaded:
BorderPane root = (BorderPane) FXMLLoader.load
	(getClass().getResource("BorderPaneExample.fxml"));
Thereafter the Scene will be created and the corresponding Stylesheet will be added to the Scene:
Scene scene = new Scene(root,400,400);
scene.getStylesheets().add
	(getClass().getResource("application.css")
	.toExternalForm());
At last, the Scene will be added to the Stage and the Stage itself will be shown:
primaryStage.setScene(scene);
primaryStage.show();
In this example, I only have made two changes in the Main Class. The first part are the comments. The second part represents the definition of a Title for the Scene.
// Set the Title to the Stage
primaryStage.setTitle("A simple FXGraph Example");
The modified file looks like this:
Main.java
import javafx.application.Application;
import javafx.stage.Stage;
import javafx.scene.Scene;
import javafx.scene.layout.BorderPane;
import javafx.fxml.FXMLLoader;

public class Main extends Application
{
	@Override
	public void start(Stage primaryStage)
	{
		try
		{
			// Load the FXML File
			BorderPane root = (BorderPane)FXMLLoader.load
					(getClass().getResource("BorderPaneExample.fxml"));
			// Create the Scene
			Scene scene = new Scene(root,400,400);
			// Add the StyleSheet to the Scene
			scene.getStylesheets().add
				(getClass().getResource("application.css")
				.toExternalForm());
			// Set the Title to the Stage
			primaryStage.setTitle("A simple FXGraph Example");
			// Add the Scene to the Stage
			primaryStage.setScene(scene);
			// Show the Stage
			primaryStage.show();
		}
		catch(Exception e)
		{
			e.printStackTrace();
		}
	}

	public static void main(String[] args)
	{
		launch(args);
	}
}
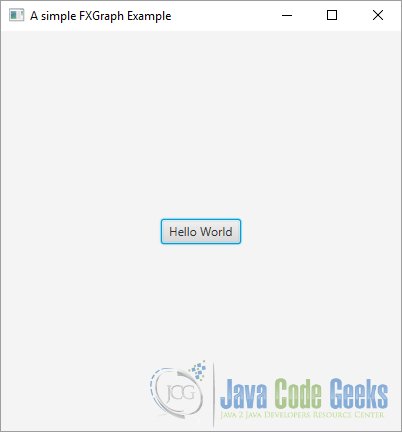
2.7 The GUI
The following Image shows the GUI after excuting the program:
3. A more complex FXGraph Example
In the second example, we will create a VBox, which contains a list of children. Another difference to the previous example is the fact, that we want to define a Style for the VBox.
3.1 Creation of the FXGraph Project
At first, you have to create the Project. The steps are the same like in the last one. Only one Dialog differs, because we want to use the VBox as the Root-Type:


3.2 Changing the FXGraph File
At first we have to modify the created “VBoxExample.fxgraph”, which contains the following code:
VBoxExample.fxgraph
import javafx.scene.layout.VBox
import application.VBoxControllerExample

component VBoxExample controlledby VBoxControllerExample
{
	VBox
	{
		//TODO Add Nodes
	}
}
After modification the file looks like this:
VBoxExample.fxgraph
import javafx.scene.control.*
import javafx.scene.layout.*

import application.VBoxControllerExample

component VBoxExample controlledby VBoxControllerExample
{
	VBox
	{
		children:
		[
			Label
			{
				alignment: "CENTER_LEFT",
				cache: "true",
				cacheHint:"SCALE",
				prefHeight:"30.0",
				prefWidth:"200.0",
				text:"Please insert Your Input here:",
				textAlignment:"LEFT"
			},
			TextField id inputText
			{
				prefWidth:"100.0"
			},
			Button
			{
				alignment:"CENTER_RIGHT",
				contentDisplay:"CENTER",
				mnemonicParsing:"false",
				onAction: controllermethod printOutput,
				text:"OK",
				textAlignment:"CENTER"
			},
			Label
			{
				alignment: "CENTER_LEFT",
				cache: "true",
				cacheHint:"SCALE",
				prefHeight:"30.0",
				prefWidth:"200.0",
				text:"Your Input:",
				textAlignment:"LEFT"
			},
			TextArea id outputText
			{
				prefHeight:"100.0",
				prefWidth:"200.0",
				wrapText:"true"
			}
		]
	}
}
At first we have defined a list of children under the Root Node:
VBox
{
	children:
	[
		Label
		{
			alignment: "CENTER_LEFT",
			cache: "true",
			cacheHint:"SCALE",
			prefHeight:"30.0",
			prefWidth:"200.0",
			text:"Please insert Your Input here:",
			textAlignment:"LEFT"
		},
		TextField id inputText
		{
			prefWidth:"100.0"
		},
		Button
		{
			alignment:"CENTER_RIGHT",
			contentDisplay:"CENTER",
			mnemonicParsing:"false",
			onAction: controllermethod printOutput,
			text:"OK",
			textAlignment:"CENTER"
		},
		Label
		{
			alignment: "CENTER_LEFT",
			cache: "true",
			cacheHint:"SCALE",
			prefHeight:"30.0",
			prefWidth:"200.0",
			text:"Your Input:",
			textAlignment:"LEFT"
		},
		TextArea id outputText
		{
			prefHeight:"100.0",
			prefWidth:"200.0",
			wrapText:"true"
		}
	]
}
A list in JSON starts with a “[” and ends with a “]”. Thus, our list contains two Labels, a Button, a TextField and a TextArea.
The attributes of an element are the same like in a FXML File, but the name and the value of the attribute are separeted by a “:”. If you want to learn more about FXML, please read my JavaFX FXML Tutorial.
The following code snippet shows an example of the definition of a Label:
Label
{
	alignment: "CENTER_LEFT",
	cache: "true",
	cacheHint:"SCALE",
	prefHeight:"30.0",
	prefWidth:"200.0",
	text:"Please insert Your Input here:",
	textAlignment:"LEFT"
}
FXML propagates a clean separation between the UI defined in the FXML file and business logic implemented in a programming language like Java. So you can use the id for accessing objects by a controller:
TextField id inputText
{
	prefWidth:"100.0"
},
TextArea id outputText
{
	prefHeight:"100.0",
	prefWidth:"200.0",
	wrapText:"true"
}
In the above code snippet, the TextField get´s the “id” inputText and the TextArea the “id” outputText.
Referencing methods in the Controller Class like in the following example is quite easy using the controllermethod keyword:
Button
{
	alignment:"CENTER_RIGHT",
	contentDisplay:"CENTER",
	mnemonicParsing:"false",
	onAction: controllermethod printOutput,
	text:"OK",
	textAlignment:"CENTER"
}
In this example, the method printOutput from the Controller Class will be called, if the Button will be clicked. The effect of the method will be described in the Controller Class.
3.3 Changing the FXML File
The generated “VBoxExample.fxml” file looks like this:
VBoxExample.fxml
<?xml version="1.0" encoding="UTF-8"?>
<!--
	Do not edit this file it is generated by e(fx)clipse from ../src/application/VBoxExample.fxgraph
-->

<?import java.lang.*?>
<?import javafx.scene.layout.VBox?>

<VBox xmlns:fx="http://javafx.com/fxml" fx:controller="application.VBoxControllerExample">

</VBox>
The following code shows the result of the translation of the FXGraph file into FXML after execution of the program:
VBoxExample.fxml
<?xml version="1.0" encoding="UTF-8"?>
<!--
	Do not edit this file it is generated by e(fx)clipse from ../src/application/VBoxExample.fxgraph
-->

<?import java.lang.*?>
<?import javafx.scene.control.Button?>
<?import javafx.scene.control.Label?>
<?import javafx.scene.control.TextArea?>
<?import javafx.scene.control.TextField?>
<?import javafx.scene.layout.VBox?>

<VBox xmlns:fx="http://javafx.com/fxml" fx:controller="application.VBoxControllerExample">

	<children>
		<Label alignment="CENTER_LEFT" cache="true" cacheHint="SCALE" prefHeight="30.0" prefWidth="200.0" text="Please insert Your Input here:" textAlignment="LEFT"/>
		<TextField fx:id="inputText" prefWidth="100.0"/>
		<Button alignment="CENTER_RIGHT" contentDisplay="CENTER" mnemonicParsing="false" onAction="#printOutput" text="OK" textAlignment="CENTER"/>
		<Label alignment="CENTER_LEFT" cache="true" cacheHint="SCALE" prefHeight="30.0" prefWidth="200.0" text="Your Input:" textAlignment="LEFT"/>
		<TextArea fx:id="outputText" prefHeight="100.0" prefWidth="200.0" wrapText="true"/>
	</children>
</VBox>
3.4 Changing the Stylesheet
The corresponding Stylesheet is also empty after creation:
application.css
/* JavaFX CSS - Leave this comment until you have at least create one rule which uses -fx-Property */
In this example, we will define a border for the VBox in the Stylesheet:
application.css
/* JavaFX CSS - Leave this comment until you have at least create one rule which uses -fx-Property */

.root
{
	-fx-padding: 10;
	-fx-border-style: solid inside;
	-fx-border-width: 2;
	-fx-border-insets: 5;
	-fx-border-radius: 5;
	-fx-border-color: blue;
}
3.5 Changing the Controller Class
The created Controller Class is empty at the beginning. In this example we have to make some changes for the Button.
VBoxControllerExample.java
public class VBoxControllerExample
{
}
The modified class contains the following Java Code:
VBoxControllerExample.java
import java.net.URL;
import java.util.ResourceBundle;

import javafx.fxml.FXML;
import javafx.scene.control.TextArea;
import javafx.scene.control.TextField;

public class VBoxControllerExample
{
	@FXML
	// The reference of inputText will be injected by the FXML loader
	private TextField inputText;

	// The reference of outputText will be injected by the FXML loader
	@FXML
	private TextArea outputText;

	// location and resources will be automatically injected by the FXML loader
	@FXML
	private URL location;

	@FXML
	private ResourceBundle resources;

	// Add a public no-args constructor
	public VBoxControllerExample()
	{
	}

	@FXML
	private void initialize()
	{
	}

	@FXML
	private void printOutput()
	{
		outputText.setText(inputText.getText());
	}
}
The most important changes are the definition of the inputText and outputText attributes. These attributes are used by the id keyword in the FXML File.
@FXML
// The reference of inputText will be injected by the FXML loader
private TextField inputText;

// The reference of outputText will be injected by the FXML loader
@FXML
private TextArea outputText;
We also have to define the method printOutput, which will be called on a Click of our Button. The method copies only the input from the TextField into the TextArea.
@FXML
private void printOutput()
{
	outputText.setText(inputText.getText());
}
The other methods and some usefull information is described in the JavaFX FXML Controller Example.
3.6 Changing the Main Class
The generated Main Class is very similar to the Main Class in the last example:
Main.java
import javafx.application.Application;
import javafx.stage.Stage;
import javafx.scene.Scene;
import javafx.scene.layout.VBox;
import javafx.fxml.FXMLLoader;


public class Main extends Application
{
	@Override
	public void start(Stage primaryStage)
	{
		try
		{
			VBox root = (VBox)FXMLLoader.load
				(getClass().getResource("VBoxExample.fxml"));
			Scene scene = new Scene(root,400,400);
			scene.getStylesheets().add(getClass()
				.getResource("application.css")
				.toExternalForm());
			primaryStage.setScene(scene);
			primaryStage.show();
		}
		catch(Exception e)
		{
			e.printStackTrace();
		}
	}

	public static void main(String[] args)
	{
		launch(args);
	}
}
The only one difference is the fact, that we are using a VBox instead of the BorderPane:
Main.java
import javafx.application.Application;
import javafx.stage.Stage;
import javafx.scene.Scene;
import javafx.scene.layout.VBox;
import javafx.fxml.FXMLLoader;

public class Main extends Application
{
	@Override
	public void start(Stage primaryStage)
	{
		try
		{
			// Load the FXML File
			VBox root = (VBox)FXMLLoader.load
				(getClass().getResource("VBoxExample.fxml"));
			// Create the Scene
			Scene scene = new Scene(root,400,400);
			// Add the StyleSheet to the Scene
			scene.getStylesheets().add(getClass()
				.getResource("application.css")
				.toExternalForm());
			// Set the Title to the Stage
			primaryStage.setTitle("A FXGraph Example with a Controller");
			// Add the Scene to the Stage
			primaryStage.setScene(scene);
			// Show the Stage
			primaryStage.show();
		}
		catch(Exception e)
		{
			e.printStackTrace();
		}
	}

	public static void main(String[] args)
	{
		launch(args);
	}
}
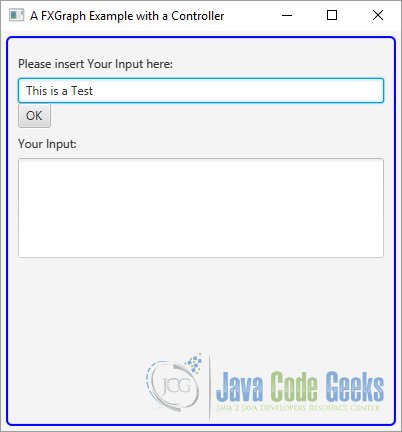
3.7 The GUI
The following image shows the GUI after starting the program and inserting a Text on the TextField:
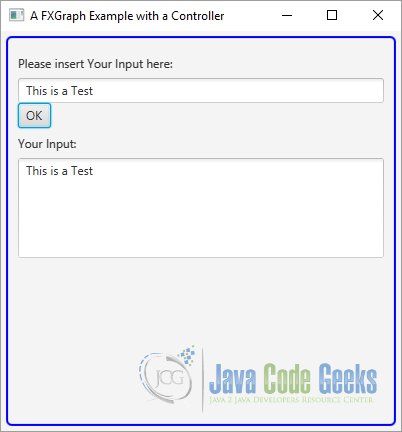
If you press the OK Button, the Text from the TextField will be copied into the TextArea:
4. Download Java Source Code
This was an example of FXGraph
You can download the full source code of this example here: JavaFXFXGraph.zip
