Hello. In this tutorial, we will explain how to deploy a website on AWS EC2 using Terraform, a popular open-source deployment automation software.
1. Introduction
Terraform is a tool for building, changing, and versioning the infrastructure safely and efficiently. It is used to manage the infrastructure of the popular cloud service providers and custom in-house solutions. It helps manage both low-level (Compute, Storage, Networking, etc.) and high-level components (such as SaaS, DNS, etc.) Terraform deployment automation is divided into different sections i.e. –
- IaaC – IaaC is popularly known as the Infrastructure as a Code wherein the infrastructure is described using a high-level configuration syntax. This allows a blueprint of the infrastructure which can be deployed, versioned, and shared for re-use
- Execution Plans – Terraform has a planning step where it generates an execution plan. The execution plan tells the administrator what Terraform will do once applied and helps to avoid any surprises when it creates the infrastructure
- Resource Graph – Terraform builds a graph of all the resources and parallelizes the creation and modification of non-dependent resources. This offers insights into learning the dependencies in their infrastructure
- Change Automation – Terraform allows to apply of complex changesets to the infrastructure with minimal human intervention
1.1 Configuration language
Terraform has its configuration language designed to meet the infrastructure automation requirements. The main purpose of this language is to declare resources and a group of resources (gathered into a module) represents a larger unit of configuration. Language syntax consists of few elements i.e. – Blocks, Arguments, and Expressions.
- Blocks – Containers for other contents and represents the object configuration
- Arguments – Assign a value to the name and appear within the blocks
- Expressions – Represents a single value, referenced value, or combination of other values
1.2 Steps
To create the infrastructure via the Terraform scripts following commands need to be executed.
terraform init– Initializing the new or existing terraform configurationterraform plan– Generate the execution plan from the resources specified in the fileterraform apply– Create the infrastructure from the resources specified in the fileterraform destroy– Destroy the created infrastructure
2. Practice
Let us dive into some practice stuff from here. You’re free to choose the IDE of your choice. I am using Visual Studio Code as my preferred IDE for the development with the HashiCorp Terraform extension installed. The extension offers syntax highlighting and other editing features for Terraform files using the Terraform language server.
2.1 Pre-requisite
To proceed we will be needing an AWS CLI user having the right set of permissions required for creating the infrastructure. I am using an existing user and attached the IAM full access policy attached to this user so that the IAM user can successfully create the required infrastructure. The access and secret key generated for the user will be used in the variables.tf file.
2.2 Variables File
The file contains the declarations to be used across the terraform module. Add the following code to the file containing information related to the region-code, CLI user access, and secret key, EC2 variables, etc. You’re free to change the values as per your need.
variables.tf
variable "cli_usr_access_key" {
  type    = string
  default = "access_key" # specify the access key
}
variable "cli_usr_secret_key" {
  type    = string
  default = "secret_key" # specify the secret key
}
variable "region" {
  type    = string
  default = "aws_region" # specify the region
}
variable "tags" {
  type        = map(string)
  description = "mapping of tags to assign to the instance"
  default = {
    terraform = "true"
    Name      = "terraform-instance"
  }
}
variable "key_name" {
  type        = string
  description = "ssh key to connect to instance"
  default     = "ssh_key_name" # specify the login key name
}
variable "instance_type" {
  type        = string
  description = "instance type for the instance"
  default     = "instance_type" # specify the instance type
}
variable "ami_id" {
  type        = string
  description = "os image id for the instance. use free-tier ami id before runnning to avoid unwanted cost"
  default     = "ami_id" # specify the image id
}
variable "subnet_id" {
  type        = string
  description = "subnet id to launch the instance in"
  default     = "subnet_id" # specify the az id like ap-south-1a, or us-west-2a, or your choice
}
variable "vpc_id" {
  type        = string
  description = "vpc"
  default     = "vpc_id" # specify the vpc id
}
variable "availability_zone" {
  type        = string
  description = "az to start the instance in"
  default     = "availability_zone_id" # specify the az id
}
variable "instance_count" {
  type        = number
  description = "instances count. under free-tier we can have 3 linux instances of 8 gb each or 1 window instance of 30 gb"
  default     = 1 # specify the instances count
}
2.3 Provider File
The provider file lists the plugin that allows for the full lifecycle management of cloud resources. In our case, we will be using the AWS provider. The block consists of the details that will be used to connect with the AWS cloud.
region– The attribute for setting up the infrastructure. This is a mandatory field that cannot be skipped and can be referenced via the variablesaccess_keyandsecret_key– The CLI user credentials will be responsible for setting up the infrastructure. Remember that the user must have the required policies assigned to set up the infrastructure. Since this is an optional field; many a time developers like to use theprofileattribute in case they don’t want to hardcode the credentials in the terraform file
Add the following code to the file.
provider.tf
provider "aws" {
  region = var.region
  # aws cli user credentials
  # user should have the administration policy or policy as per the lpp principle
  access_key = var.cli_usr_access_key
  secret_key = var.cli_usr_secret_key
}
2.4 Security Group File
The file contains the security group resource that will be attached to the EC2 instance. The security group acts as a virtual firewall for the instance to control the incoming and outgoing traffic. Make note that multiple security groups can be attached to a single instance. For example, the security group will be responsible for –
- Allowing incoming SSH and Website traffic on port
22and80respectively - Allowing the outgoing traffic for the world
securitygroup.tf
# creating security group
resource "aws_security_group" "ec2-sg" {
  vpc_id = var.vpc_id
  ingress = [
    {
      # ssh port allowed from any ip
      description      = "ssh"
      from_port        = 22
      to_port          = 22
      protocol         = "tcp"
      cidr_blocks      = ["0.0.0.0/0"]
      ipv6_cidr_blocks = null
      prefix_list_ids  = null
      security_groups  = null
      self             = null
    },
    {
      # http port allowed from any ip
      description      = "http"
      from_port        = 80
      to_port          = 80
      protocol         = "tcp"
      cidr_blocks      = ["0.0.0.0/0"]
      ipv6_cidr_blocks = null
      prefix_list_ids  = null
      security_groups  = null
      self             = null
    }
  ]
  egress = [
    {
      description      = "all-open"
      from_port        = 0
      to_port          = 0
      protocol         = "-1"
      cidr_blocks      = ["0.0.0.0/0"]
      ipv6_cidr_blocks = null
      prefix_list_ids  = null
      security_groups  = null
      self             = null
    }
  ]
  tags = {
    "Name"      = "terraform-ec2-sg"
    "terraform" = "true"
  }
}
2.5 User-data Script
The file contains the user-data script that will be used to host a simple “hello-world” website on the created EC2 instance. This file will be referenced in the instance file.
createwebsite.sh
#!/bin/bash
yum update -y
yum install httpd -y
cd /var/www/html
echo "<h1>Deployed via Terraform</h1>" > index.html
curl -s http://169.254.169.254/latest/dynamic/instance-identity/document > details.html
service httpd start
chkconfig httpd on
2.6 Instance File
The file contains the resource that will be used to create an EC2 instance. This file will get the variable details from the variables.tf file. Add the following code to it.
ec2withuserdata.tf
# creating instance
resource "aws_instance" "terraforminstance" {
  ami                         = var.ami_id
  availability_zone           = var.availability_zone
  instance_type               = var.instance_type
  key_name                    = var.key_name
  count                       = var.instance_count
  security_groups             = ["${aws_security_group.ec2-sg.id}"]
  subnet_id                   = var.subnet_id
  user_data                   = file("createwebsite.sh")
  associate_public_ip_address = true
  ebs_block_device {
    device_name           = "/dev/xvda"
    volume_size           = 8
    volume_type           = "gp2"
    delete_on_termination = true
    tags = {
      Name = "terraform-storage"
    }
  }
  tags = var.tags
}
2.7 Output File
The file returns the output values for the created resources. In this example, information like created security group id, instance id, instance state, etc will be returned on the console.
outputs.tf
output "security_grp_id" {
  description = "securitygrp-id"
  value       = aws_security_group.ec2-sg.id
}
output "instance_ids" {
  description = "id"
  value       = ["${aws_instance.terraforminstance.*.id}"]
}
output "instance_states" {
  description = "state"
  value       = ["${aws_instance.terraforminstance.*.instance_state}"]
}
output "public_dns" {
  description = "public-dns"
  value       = ["${aws_instance.terraforminstance.*.public_dns}"]
}
output "public_ips" {
  description = "public-ip"
  value       = ["${aws_instance.terraforminstance.*.public_ip}"]
}
output "instance_arns" {
  description = "arn"
  value       = ["${aws_instance.terraforminstance.*.arn}"]
}
output "keyname" {
  description = "keyname"
  value       = ["${aws_instance.terraforminstance.*.key_name}"]
}
3. Code Run
Navigate to the project directory containing the above scripts and open the terminal. Execute the below commands in the respective order within the directory.
Commands
-- step1: initializing the new or existing terraform configuration --
terraform init

-- step2: generating the execution plan --
terraform plan

-- step3: building the infrastructure --
-- auto-approve flag skips interactive approval of the plan before applying
terraform apply --auto-approve

-- step4: destroying the infrastructure --
-- auto-approve flag skips interactive approval of the plan before applying
terraform destroy --auto-approve
4. Demo
Once the terraform script is successfully executed head over the AWS console to confirm that the Security Group and EC2 instance are successfully created on the EC2 dashboard. Now to check whether the website is successfully hosted on the EC2 instance copy the Public DNS address of the instance and hit it in the browser of your choice.
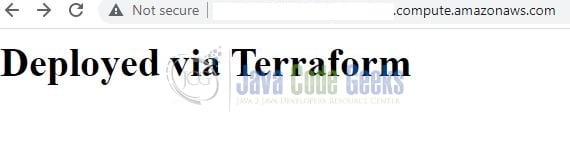
Make note that the website hosting process is slow as the instance will first download the required libs specified in the user-data script file. So wait for 2-3 minutes before hitting the Public DNS endpoint in the browser. That is all for this tutorial and I hope the article served you with whatever you were looking for. Happy Learning and do not forget to share!
5. Summary
In this tutorial, we learned an introduction to Terraform and create a simple module to create the EC2 instance in the AWS portal and host a “hello-world” website on it. You can download the source code from the Downloads section.
6. Download the Project
This was a tutorial on learning and implementing Terraform to create an EC2 instance on AWS and host a “hello-world” website on it.
You can download the full source code of this example here: Deploying Website on AWS EC2 using Terraform
