1. Introduction
MySQL is one of the most used SQL databases in many of the world-enterprise applications due to its ability to manage transactions and the ACID-behaviour which is built into its core. One of the reasons MySQL is so popular is due to the easiness it provides for its usage and its related commands. In the open source web application framework LAMP (which consist of Linux, Apache, MySQL and PHP), MySQL server is a central & important component. The MySQL Database server is written using C and C++ which internally uses a lexical analyser to parse and understand the SQL queries.
Today, when the systems have become distributed, scalable and highly fault tolerant, we cannot afford a fault in our databases like the DB servers going down and there is no way this is managed automatically. In this lesson, we will study about MySQL Replication, a concept through which we can make sure that even if the MySQL DB for a system goes down, it can shift to its replica and manage data from that as well, without letting users know what happened in the garage. This is one of the reasons that most of the systems today make use of MySQL Replication. MySQL Replication can be done for various reasons, including but not limited to:
- To ensure we have a backup of the data directly from our database
- To run analytics or check the data without disturbing the main database
- Scaling out the DB for better performance
As MySQL replication has so many uses, we must perform it in our production systems. If you want to find out what is MySQL Server and how to use it, read this lesson. Let’s get started.
Table Of Contents
2. MySQL Setup
For this lesson, we have made two new servers with different IPs which we will be using as Master and Slave in our replica set. To proceed further, we need to setup MySQL Server and Client tools on both of them. We can do this be executing the following command:
Installing MySQL Server and Client
sudo apt-get install mysql-server mysql-client
Once we run this command, the mentioned utilities will be installed on the server. We will do the same installation on both the servers we made. While installing, we also set a MySQL root password:

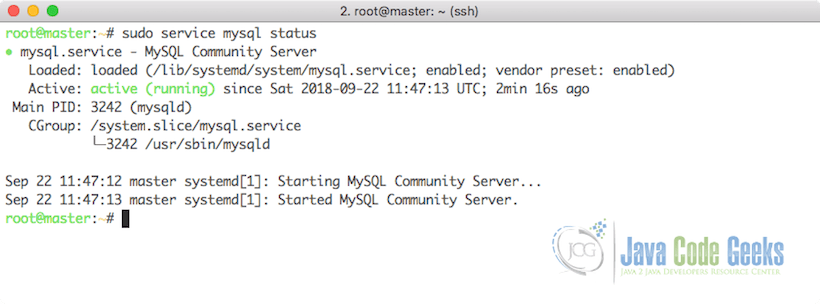
Once the installation process is completed, we can confirm if the MySQL server is up and running with the following command:
Check MySQL Service status
sudo service mysql status
We will see an output like this:
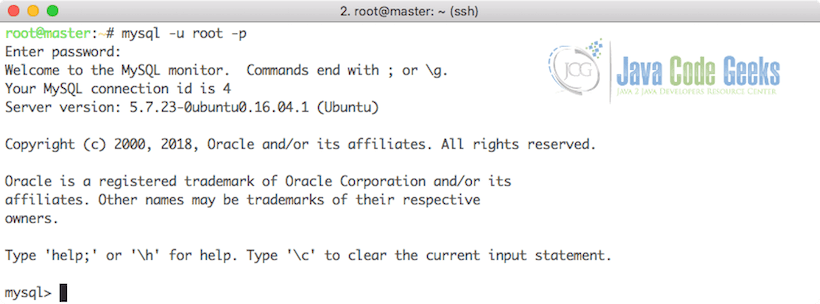
Now that we know that the MySQL server is up and running, we can connect to it using the username and password we supplied to it during the installation process. We can use the following command to do so:
Logging into MySQL
mysql -u root -p
When we press enter, MySQL Server will silently wait for us to provide the password. When we type it, the password will not be echoed back to the terminal due to security reasons. We will see the following prompt once we have logged into the MySQL command line:
When we are inside the MySQL command prompt, we can use the given command to show the databases which are present in the system and to ensure that MySQL is running fine:
Show All databases
show databases;
Here is what we get back with this command:
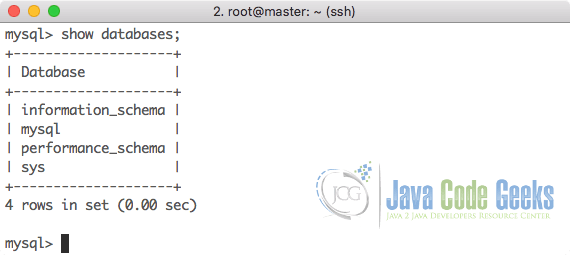
In the output, MySQL just displays the list of MySQL default databases that are used for administration purpose. Once we can see the Active status on both the servers, we can move ahead with the configuration for Master and Slave databases.
3. Master MySQL Server Configuration
Now that we have active MySQL installation, we can start with the configuration of the master database first. To do this, we need to add configuration in the master MySQL config file. To open it with the nano editor on Ubuntu, use the following command:
Edit config file
sudo nano /etc/mysql/mysql.conf.d/my.cnf
This file contains many options with which we can modify and configure the behaviour of the MySQL server we are running on the system. Firstly, we need to find the bind-address property in the file which will look like this:
Bind Address property
# Instead of skip-networking the default is now to listen only on
# localhost which is more compatible and is not less secure.
bind-address            = 127.0.0.1
We will modify this IP to the current server IP itself so that it looks like:
Updated Bind Address property
bind-address = <server_ip_here>
The next property we need to find is server-id in the file which will look like this:
Server ID property
# note: if you are setting up a replication slave, see README.Debian about
#       other settings you may need to change.
#server-id              = 1
This will be a commented property which we will uncomment:
Updated Server ID property
server-id = 1
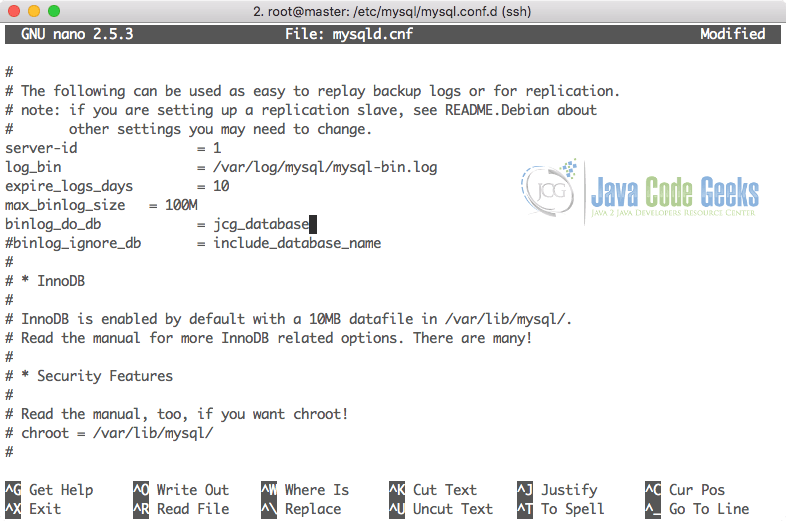
Next important property to look for is log_bin. This property informs about the file where the replica set details are actually kept. This looks like:
Log Bin property
#log_bin = /var/log/mysql/mysql-bin.log
This is the file where the slave logs about the changes it has accomodated in it from the master database. We will just uncomment the property for now. Finally, we will edit the binlog_do_db property which informs the slave database server about which DB to replicate across the Slave database. We can include more than one database by repeating this line for all of the databases we will need:
DB to backup
binlog_do_db = jcg_database
Here is a glimpse of the config file which shows some of the properties we updated:
Once all of the properties are done, we can save the file and make sure that MySQL server is restarted so that these changes are reflected in the server. To restart MySQL server, run the following command:
Restart MySQL
sudo service mysql restart
Once the MySQL Server restartes, the next changes we need to do is inside the MySQL shell itself. So log back in the MySQL command line again.
We need to grant some privileges to the Slave DB so that it can access and replicate the data from the DB we mentioned in the config file, jcg_database. We will execute the following commands to grant the privileges to the Slave DB:
Grant Privileges
GRANT REPLICATION SLAVE ON *.* TO 'root'@'%' IDENTIFIED BY 'password';
Now, flush the privileges with the command:
Flush Privileges
FLUSH PRIVILEGES;
Now, switch to the database we want to replicate after creating it:
Use new DB
mysql> CREATE SCHEMA jcg_database;
Query OK, 1 row affected (0.00 sec)

mysql> USE jcg_database;
Database changed
Now, lock the database to stop any new changes happening in it with the following command:
Apply Read Lock
FLUSH TABLES WITH READ LOCK;
Please note that we made some new tables and inserted some data before we applied this lock. Now, type the following command:
Check Master Status
SHOW MASTER STATUS;
Here is what we get back with this command:
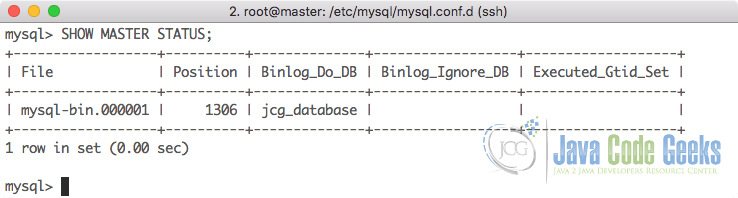
Note the position as this is the place from where the slave DB will start replicating the database. Now, if we do any changes to DB, it will unlock automatically, so do not do any new changes in same window. The next part is a little tricky. Open a new terminal window or tab (without closing the current tab) and log into the MySQL server and execute the following command:
Dump MySQL
mysqldump -u root -p --opt jcg_database > jcg_database.sql
Here is what we get back with this command:

Now we we can exit the new tab we opened separately and return to older tab. On that tab, unlock the DB and exit from MySQL:
Unlock and Quit
UNLOCK TABLES;
QUIT;
With that, we are done with all the configuration needed to be done on master database.
4. Slave MySQL Server Configuration
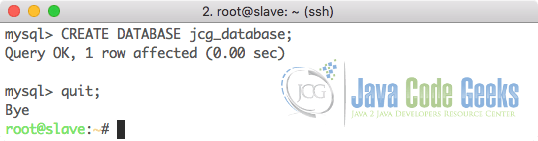
Now, we are ready to start configuring our Slave database which will replicate the data. We can log in to the Slave server and open MySQL command line in it. For now, we only need to create a DB with the same name which we want to replicate and exit from the MySQL terminal:
Now, we need to import the original database into Slave MySQL server with the SQL file we made. make sure that you bring that file on this new server and run the following command to import it into slave MySQL DB:
Import DB
mysql -u root -p jcg_database < /root/jcg_database.sql
Once you hit enter, the database content and metadata will be imported into the slave DB. Once that is done, we can configure the Slave MySQL DB as well:
Configure DB
nano /etc/mysql/mysql.conf.d/mysqld.cnf
We need to make sure that some properties in this config file are setup as well. The firt property is server-id. It is currently set to 1 which is the default value. Set it to some other value:
Server ID for Slave
server-id = 2
Here are some other properties which we need to modify as well:
Other properties for Slace
relay-log               = /var/log/mysql/mysql-relay-bin.log

log_bin                 = /var/log/mysql/mysql-bin.log

binlog_do_db            = jcg_database
We will have to add relay-log property as it is not present in the config file by default. Once this is done, we need to restart the Slave MySQL DB as well so that the configuration changes we did can come into effect. Execute the following command to do this:
Restart MySQL
sudo service mysql restart
Once the MySQL Server restartes, the next changes we need to do is inside the MySQL shell itself. So log back in the MySQL command line again.
In the MySQL shell, execute the following command:
Enable Replication
CHANGE MASTER TO MASTER_HOST='<master-server-ip>',MASTER_USER='root', MASTER_PASSWORD='hello123', MASTER_LOG_FILE='mysql-bin.000001', MASTER_LOG_POS= 1306;
This command completes various steps at a single time, which are:
- It informs current MySQL server that it is Slave to given MySQL Master Server
- It provides Slace with login credentials to Master Server
- It informs about the position from which Slave needs to start the replication process and also the log file details
We can now finally activate the slave server with the following command:
Activate MySQL Slave Server
START SLAVE;
We can now see some master details with the following command:
MySQL Master Status
SHOW SLAVE STATUS\G;
Here is what we get back with the above command:
MySQL Master Status Info
mysql> SHOW SLAVE STATUS\G;
*************************** 1. row ***************************
               Slave_IO_State: Waiting for master to send event
                  Master_Host: 206.189.133.122
                  Master_User: root
                  Master_Port: 3306
                Connect_Retry: 60
              Master_Log_File: mysql-bin.000001
          Read_Master_Log_Pos: 1306
               Relay_Log_File: mysql-relay-bin.000002
                Relay_Log_Pos: 320
        Relay_Master_Log_File: mysql-bin.000001
             Slave_IO_Running: Yes
            Slave_SQL_Running: Yes
              Replicate_Do_DB:
          Replicate_Ignore_DB:
           Replicate_Do_Table:
       Replicate_Ignore_Table:
      Replicate_Wild_Do_Table:
  Replicate_Wild_Ignore_Table:
                   Last_Errno: 0
                   Last_Error:
                 Skip_Counter: 0
          Exec_Master_Log_Pos: 1306
              Relay_Log_Space: 527
              Until_Condition: None
               Until_Log_File:
                Until_Log_Pos: 0
           Master_SSL_Allowed: No
           Master_SSL_CA_File:
           Master_SSL_CA_Path:
              Master_SSL_Cert:
            Master_SSL_Cipher:
               Master_SSL_Key:
        Seconds_Behind_Master: 0
Master_SSL_Verify_Server_Cert: No
                Last_IO_Errno: 0
                Last_IO_Error:
               Last_SQL_Errno: 0
               Last_SQL_Error:
  Replicate_Ignore_Server_Ids:
             Master_Server_Id: 1
                  Master_UUID: 3b890258-be5d-11e8-88c2-422b77d8526c
             Master_Info_File: /var/lib/mysql/master.info
                    SQL_Delay: 0
          SQL_Remaining_Delay: NULL
      Slave_SQL_Running_State: Slave has read all relay log; waiting for more updates
           Master_Retry_Count: 86400
                  Master_Bind:
      Last_IO_Error_Timestamp:
     Last_SQL_Error_Timestamp:
               Master_SSL_Crl:
           Master_SSL_Crlpath:
           Retrieved_Gtid_Set:
            Executed_Gtid_Set:
                Auto_Position: 0
         Replicate_Rewrite_DB:
                 Channel_Name:
           Master_TLS_Version:
1 row in set (0.00 sec)
If there is an issue in connecting, you can try starting slave with a command to skip over it:
MySQL Master Status
SET GLOBAL SQL_SLAVE_SKIP_COUNTER = 1; SLAVE START;
Now, we are done with MySQL replication and you should see the data being replicated across MySQL servers. To test the replication, you can try inserting some data into the Master database and check if the data is replicated to the slave database as well.
5. Replication lag
MySQL replication makes use of two threads to complete replication across master and slave databases:
- IO_THREAD
- SQL_THREAD
The IO_THREAD connects to the master MySQL server, reads the binary log to track and change events in the database, copies them to the local relay log file from where SQL_THREAD of Slave database reads and track the changes and replicate them to the Slave database. If we observe any replication lag, we must first identify if this lag is from Slave’s IO_THREAD or Slave’s SQL_THREAD.
Usually, I/O thread doesn’t cause any significant replication delay as it is just reading the binary logs from the master database but there are factors which can affect its performance like network connectivity, network latency etc. and how fast is the communication network line between the two servers. If there are high amount fo writes on Master, the replication could be slow due to bandwidth issues.
On the other side of the coin, if it is the SQL Thread on Slave which is causing the delay, the most probable reason for the same is that the SQL queries from the Master DB are taking too long to execute on Slave database which piles up the changes which need to be done. Also, take into account that slave is single threaded prior to MySQL 5.6, which would be another reason for delays on the slave SQL_THREAD.
6. Advantages of Replication
To reiterate what we stated earlier briefly, let us state here some explicit advantages of MySQL replication in a production environment:
- Performance: A Slave server can be easily used to provide READ support to any client asking for data. This means that the load on the Master database is reduced a lot as there are no reads being done on it.
- Backup Performance: If there are any backup tasks which are run, it can be run via the Slave database as data is being replicated. This means that backup jobs will not affect the Master database at all.
- Disaster Recovery: In the events of Master database going completely offline, the Slave database can quickly take its place and start performing write operations, if configured in that manner. This will allow minimal site downtime as the master server is rebuilt and restored.
7. Disadvantages of Replication
Although everything sounded so good about MySQL Replication, there are some downsides about the replication process as well, which are stated here:
- Complexity: An application with a lot of Slaves for replication can create a maintenance nightmare if not managed correctly but this can be easily overcome
- Performance: To complete the replication process, the binary logs need to be written to the disk. Although this can be minimal but it still needs to be considered while looking at overall server performance. This can be solved by making binary logs written to a separate partition of the disk to limit IO performance issues.
8. Limitations of Replication
There are some limitations (or replication design) points which needs to be stated explicitly here:
- Replication is not a backup for application logic and any changes which are done on the Master database will always replicate to Slave database and there is no way this can be limited. If a user deletes data on the master database, it will be deleted on the Slave database as well.
- In case of multiple Slaves, performance is not increased but decreased as well because the database connections are now distributed across multiple servers and the risk of issues in case of any server fails will increase.
9. Types of MySQL Replication
Essentially, MySQL support three different methods to replicate data from the master server to a slave server. All of these ways make use of the binary logs but it differs in the way the logs are written to it. Here are the ways replication is done:
- Statement-based replication: With this method, with each change in the database, the SQL statements for those changes are stored in the binary log file. The slave will read these SQL statements and execute them on its own MySQL database to produce the exact same copy fo data from the master server. This is the default replication method in MySQL 5.1.11 and earlier and MySQL 5.1.29 onwards.
- Row-based replication: In this method, the binary log file stores all of the record-level changes which occur in the master database tables. The slave server reads this data and updates its own records based on master’s data to produce an exact replica of the master database.
- Mixed-format replication: In this method, the server will dynamically select between statement-based replication and row-based replication, depending on some conditions like using a user-defined function (UDF), using an INSERT command with the DELAYED clause, using temporary tables, or using a statement that uses system variables. This is the default replication method in MySQL 5.1.12 to MySQL 5.1.28.
In a use-case when you are not sure about which replication method to move forward with, it’s best to go with Statement-based replication as it is used most commonly and simplest to carry out. Though, if you have a write-heavy system, Statement-based replication is not recommended as it applies table locks as well. In that case, you can go with Row-based replication method which requires a lot less table locks.
10. Effect on Performance
As mentioned, replication can affect the performance of your database but it can be minimal. The impact on the master server from replication is typically very small compared to all of the other things it has to do because the master only really has to accomplish two significant things in a replication environment:
- formulate and write events to the binary log on the local hard drive
- send a copy of every event it writes to the binary log to every connected slave
We cannot consider writing the binary log to be a cost of replication, because we should always have binary logging turned on even if we’re not replicating. It’s an extremely valuable troubleshooting and recovery tool.
The cost of sending the replication events to the slave(s) is also negligible because the slave is responsible for maintaining a persistent TCP connection to the master, which only has to copy the data onto the socket as the events occur. Beyond that, the master neither knows nor cares whether or when the slave gets around to executing them.
A partial exception to that last statement is semi-synchronous replication, which is not the default. In this mode, the master waits for at least one slave to acknowledge receipt and persistent storage (though not actual execution) of the binary log events from each transaction, before the master returns control to the client on each commit.
But in every case, the master is not responsible for actually executing the updates on the slave — it just sends one of two things to the slave: either a copy of the actual input query that ran (in statement-based mode) or the data for the rows actually inserted/updated/deleted by each query (in row-based mode). In mixed mode, the query optimizer will decide which format to use on a per-event basis.
11. MySQL Replication – Conclusion
MySQL Replication is an excellent choice (besides its disadvantages and limitations) when it comes to making sure that a production system runs with failover reliability which makes it a fault-tolerant system, which is a must when it comes to distributed and highly available systems today. The replication is so important to be done that even the cloud distributors like AWS support it natively.
This lesson provides with important configuration changes which need to be done for a system to replicate its data across a single slave. We can set up any number of slaves without disturbing the master server as there is no configuration on the Master server which relates or binds it to any Slave server. We also provided some knowledge about the advantages, disadvantages and limitations MySQL replication has which were important to be stated explicitly.

Thank you for the tutorial. It is great! :)
Thanks Yatin..