Mocking is a testing technique widely used not only in Java, but in any other object oriented programming language, that consists in exchanging . There are several mocking testing frameworks for Java, but this tutorial will explain how to use Mockito, probably the most popular for Java language.
For this tutorial, we will use:
- Java 1.7.0
- Eclipse Mars 2, release 4.5.2.
- JUnit 4.
- Mockito 1.10.19.
Table Of Contents
- 1. What is mocking?
- 1.1. Why should we mock?
- 2. Project creation
- 3. Mockito installation
- 3.1. Download the JAR
- 3.2. With build tools
- 4. Base code to test
- 5. Adding behavior
- 6. Verifying behavior
- 6.1. Verify that method has been called
- 6.2. Verify that method has been called n times
- 6.3. Verify method call order
- 6.4. Verification with timeout
- 7. Throwing exceptions
- 8. Shorthand mock creation
- 9. Mocking void returning methods
- 10. Mocking real objects: @Spy
- 11. Summary
- 12. Download the Eclipse Project
1. What is mocking?
Mocking is a testing technique where real components are replaced with objects that have a predefined behavior (mock objects) only for the test/tests that have been created for. In other words, a mock object is an object that is configured to return a specific output for a specific input, without performing any real action.
1.1. Why should we mock?
If we start mocking wildly, without understanding why mocking is important and how can it help us, we will probably put on doubt the usefulness of mocking.
There are several scenarios where we should use mocks:
- When we want to test a component that depends on other component, but which is not yet developed. This happens often when working in team, and component development is divided between several developers. If mocking wouldn’t exist, we would have to wait until the other developer/developers end the required component/component for testing ours.
- When the real component performs slow operations, usual with dealing with database connections or other intense disk read/write operations. It is not weird to face database queries that can take 10, 20 or more seconds in production environments. Forcing our tests to wait that time would be a considerable waste of useful time that can be spent in other important parts of the development.
- When there are infrastructure concerns that would make impossible the testing. This is similar in same way to the first scenario described when, for example, our development connects to a database, but the server where is hosted is not configured or accessible for some reason.
You may skip project creation and Mockito installation, and jump directly to the beginning of the tutorial below.
2. Project creation
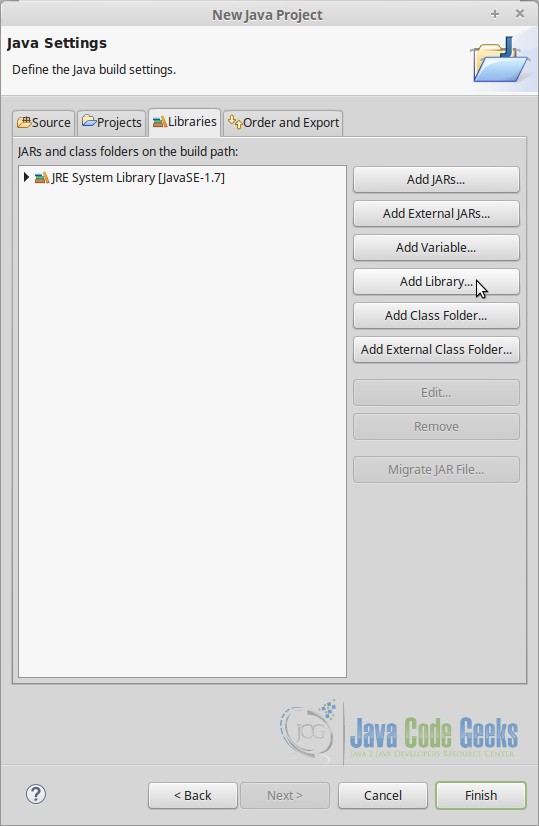
Go to “File/New/Java Project”. You will be asked to enter a name for the project. Then, press “Next”, not “Finish”.
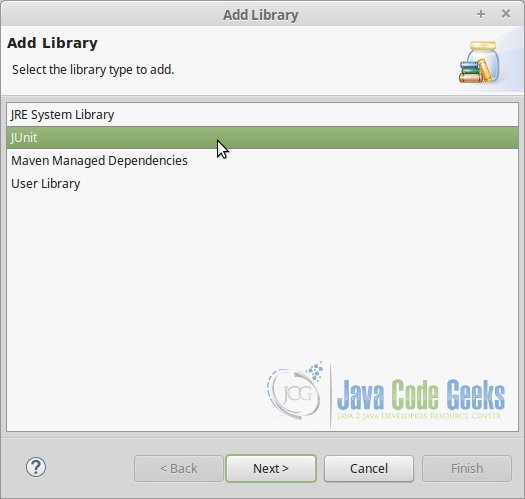
In the new window that has appeared, go to “Libraries” tab, select “Add library” button, and then select “JUnit”, as shown in the following images below:
You can now finish the project creation.
3. Mockito installation
3.1. Download the JAR
- Download Mockito JAR file from Maven Repository.
- Place it inside your working directory, for example, in a lib directory in the directory root.
- Refresh the Package Explorer in Eclipse (F5).
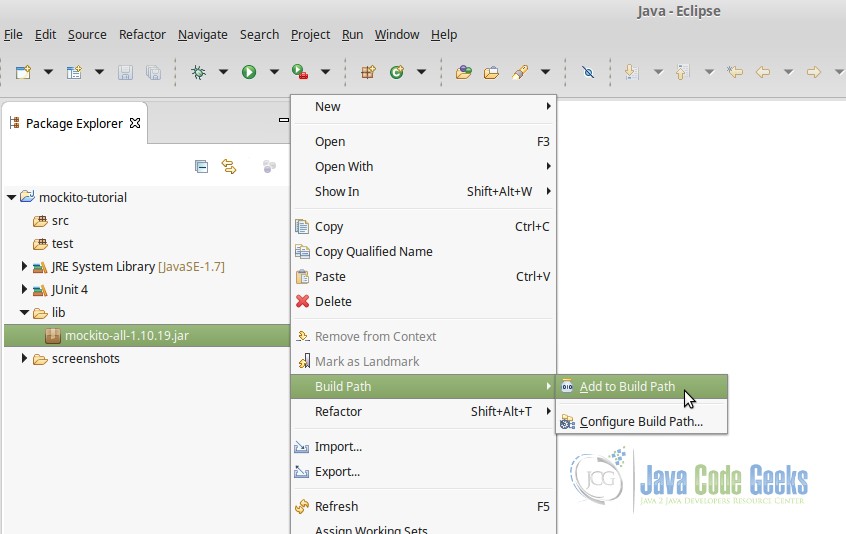
- Now, a new lib directory should be displayed, with the Mockito JAR file inside it. Right click on it an select “Build Path/Add to Build Path” (shown in image below).
3.2. With build tools
3.2.1. Maven
Just declare the dependency as it follows:
<dependency>
    <groupId>org.mockito</groupId>
    <artifactId>mockito-all</artifactId>
    <version>1.10.19</version>
</dependency>
3.2.2. Gradle
Declare the dependency as it is shown below:
repositories {
    jcenter()
}

dependencies {
    testCompile "org.mockito:mockito-core:1.+"
}
4. Base code to test
Let’s suppose that our application is for authenticating users, and that our job is to develop the interface that the final user will use, and that developing the logic is someone else’s job. For mocking, is indispensable to agree the interfaces to mock, that is, the method definitions: name, parameters, and return type. For this case, the agreed interface will be a public method authenticateUser, that receives two strings, the user name and the password; returning a boolean indicating if the authentication succeeded or not. So, the interface would be the following:
AuthenticatorInterface.java
package com.javacodegeeks.mockitotutorial.basecode;

public interface AuthenticatorInterface {

    /**
     * User authentication method definition.
     *
     * @param username The user name to authenticate.
     * @param password The password to authenticate the user.
     * @return True if the user has been authenticated; false if it has not.
     * @throws EmptyCredentialsException If the received credentials (user name, password) are
     * empty.
     */
    public boolean authenticateUser(String username, String password);

}
And the source that uses this interface:
AuthenticatorApplication.java
package com.javacodegeeks.mockitotutorial.basecode;

public class AuthenticatorApplication {

    private AuthenticatorInterface authenticator;

    /**
     * AuthenticatorApplication constructor.
     *
     * @param authenticator Authenticator interface implementation.
     */
    public AuthenticatorApplication(AuthenticatorInterface authenticator) {
        this.authenticator = authenticator;
    }

    /**
     * Tries to authenticate an user with the received user name and password, with the received
     * AuthenticatorInterface interface implementation in the constructor.
     *
     * @param username The user name to authenticate.
     * @param password The password to authenticate the user.
     * @return True if the user has been authenticated; false if it has not.
     */
    public boolean authenticate(String username, String password) {
        boolean authenticated;

        authenticated = this.authenticator.authenticateUser(username, password);

        return authenticated;
    }
}
We will suppose that this piece of code also implements the main method, but is not important for this example.
Now, we are going to code the tests for AuthenticatorApplication. The testing method returns a boolean, so we will code tests for covering both possible cases: failed login, and succeeded one.
As the code that handles the authentication is not developed, we have to make some suppositions. We are not doing any real authentication. We have to define for which values the function will succeed, and for which not.
5. Adding behavior
Let’s see how we can mock the Authenticator:
AuthenticatorApplicationTest.java
package com.javacodegeeks.mockitotutorial.basecode;

import org.junit.Test;
import org.mockito.Mockito;

import static org.junit.Assert.*;
import static org.mockito.Mockito.*;

public class AuthenticatorApplicationTest {

    @Test
    public void testAuthenticate() {
        AuthenticatorInterface authenticatorMock;
        AuthenticatorApplication authenticator;
        String username = "JavaCodeGeeks";
        String password = "unsafePassword";

        authenticatorMock = Mockito.mock(AuthenticatorInterface.class);
        authenticator = new AuthenticatorApplication(authenticatorMock);

        when(authenticatorMock.authenticateUser(username, password))
            .thenReturn(false);

        boolean actual = authenticator.authenticate(username, password);

        assertFalse(actual);
    }
}
Let’s see carefully what we are doing:
- We import the required stuff, as in lines 4 and 7. The IDE will help us to do it.
- We define the mock object, in line 18. This is how the mock “learns” the method definitions to mock.
- The key part is when we add the behavior, as in lines 21 and 22, with the
when()andthenReturn()functions. Is quite expressive: “When the mock object is called for this method with this parameters, then it returns this value“. Note that we are defining the behavior in the mock object, not to the class calling the mock object.
As we are adding the behavior to the reference that has been passed to AuthenticatorApplication instance, it doesn’t matter if we first add the behavior and then we pass the reference, or reverse.
When the AuthenticatorApplication calls to its AuthenticatorInterface, it won’t know what is actually happening, the only thing it knows is just how to deal with the defined interface, which for this case has been designed to return false when it receives "JavaCodeGeeks" and "unsafePassword" as inputs.
6. Verifying behavior
Mockito allows to make several verifications about our mock objects. Let’s see which are they.
6.1. Verify that method has been called
We can check if a method has been called with certain parameters. For that, we would do something similar to the following:
AuthenticatorApplicationTest.java
// ...

verify(authenticatorMock).authenticateUser(username, password);

// ...
To verify that authenticatorMock mock’s authenticateUser method, with username and password parameters.
Of course, this verification only makes sense if we make it after the call is supposed to be done.
Apart from checking that the method is actually being called, this verifications are useful to check that the parameters arrive to the method call as they are supposed to arrive. So, for example, if you run the test with the following verification:
AuthenticatorApplicationTest.java
// ...

verify(authenticatorMock).authenticateUser(username, "not the original password");

// ...
The test will fail.
6.2. Verify that method has been called n times
Apart from checking that the method has been called or not, we have many possibilities regarding to number of method calls. Let’s see how we can do it:
AuthenticatorApplicationTest.java
// ...

verify(authenticatorMock, times(1)).authenticateUser(username, password);
verify(authenticatorMock, atLeastOnce()).authenticateUser(username, password);
verify(authenticatorMock, atLeast(1)).authenticateUser(username, password);
verify(authenticatorMock, atMost(1)).authenticateUser(username, password);

// ...
As you can see, we have different notations available to make the verifications: specifying the number of times that the mocking method should be called, how much times should be called at least, and how much at most.
As in the previous example, the verifications are made for the exact parameters that the mocking method uses.
We can also verify that the method has never been called:
AuthenticatorApplicationTest.java
// ...

verify(authenticatorMock, never()).authenticateUser(username, password); // This will make the test fail!

// ...
Which, actually, is equivalent to times(0), but would be more expressive when we really want to verify that a method has never been called.
6.3. Verify method call order
We can also verify in which order have been executed the mock methods.
To see how it works, let’s add a dummy method in the interface:
AuthenticatorInterface.java
// ...

public void foo();

// ...
And also call it from the original AuthenticatorApplication.authenticate() method:
AuthenticatorApplication.java
// ...

public boolean authenticate(String username, String password) throws EmptyCredentialsException{
    boolean authenticated;

    this.authenticator.foo();
    authenticated = this.authenticator.authenticateUser(username, password);

    return authenticated;
}

// ...
Now, let’s see how we would verify that the foo() method is called before authenticateUser() method:
AuthenticatorApplicationTest.java
// ...

InOrder inOrder = inOrder(authenticatorMock);
inOrder.verify(authenticatorMock).foo();
inOrder.verify(authenticatorMock).authenticateUser(username, password);

// ...
We just have to create an InOrder instance for the mock object to make the verification, and then call its verify() method in the same order we want to make the verification. So, the following snippet, for the current AuthenticatorApplication.authenticate() method, will make the test fail:
AuthenticatorApplicationTest.java
// ...

InOrder inOrder = inOrder(authenticatorMock);
inOrder.verify(authenticatorMock).authenticateUser(username, password); // This will make the test fail!
inOrder.verify(authenticatorMock).foo();

// ...
Because in the method the mocking object is used, authenticateUser() is called after foo().
6.4. Verification with timeout
Mockito verification also allows to specify a timeout for the mock methods execution. So, if we want to ensure that our authenticateUser() method runs in, for example, 100 milliseconds or less, we would do the following:
AuthenticatorApplicationTest.java
// ...

verify(authenticatorMock, timeout(100)).authenticateUser(username, password);

// ...
The timeout verification can be combined with the method call, so, we could verify the timeout for n method calls:
AuthenticatorApplicationTest.java
// ...

verify(authenticatorMock, timeout(100).times(1)).authenticateUser(username, password);

// ...
And any other method call verifier.
7. Throwing exceptions
Mockito allows its mocks to throw exceptions. Is possible to make a mock method throw an exception that is not defined in the method signature, but is better to agree in a common method definition from the beginning, including exception throwing.
We could create an exception class to be thrown when, for example, empty credentials are provided:
EmptyCredentialsException.java
package com.javacodegeeks.mockitotutorial.basecode;

public class EmptyCredentialsException extends Exception {

    public EmptyCredentialsException() {
        super("Empty credentials!");
    }
}
We add it to the method signature of our AuthenticatorInterface, and also to its call in AuthenticatorApplication:
AuthenticatorInterface.java
package com.javacodegeeks.mockitotutorial.basecode;

public interface AuthenticatorInterface {

    /**
     * User authentication method definition.
     *
     * @param username The user name to authenticate.
     * @param password The password to authenticate the user.
     * @return True if the user has been authenticated; false if it has not.
     * @throws EmptyCredentialsException If the received credentials (user name, password) are
     * empty.
     */
    public boolean authenticateUser(String username, String password) throws EmptyCredentialsException;

}
For the test, we will create another test case for expecting the exception:

AuthenticatorApplicationTest.java
// ...

@Test (expected = EmptyCredentialsException.class)
public void testAuthenticateEmptyCredentialsException() throws EmptyCredentialsException {
    AuthenticatorInterface authenticatorMock;
    AuthenticatorApplication authenticator;

    authenticatorMock = Mockito.mock(AuthenticatorInterface.class);
    authenticator = new AuthenticatorApplication(authenticatorMock);

    when(authenticatorMock.authenticateUser("", ""))
        .thenThrow(new EmptyCredentialsException());

    authenticator.authenticate("", "");
}
As you can see, is almost identical to adding return values to the mock. The only difference is that we have to call thenThrow(), passing the exception instance we want to be thrown. And, of course, we have to handle the exception; in this case, we have used the expected rule to “assert” the exception.
8. Shorthand mock creation
For a few mocks, creating every mock object is not a problem. But, when there is a considerable number of them, it can be quite tedious to create every mock.
Mockito provides a shorthand notation, which is really expressive, to inject the mock dependencies.
If we want to inject dependencies with Mockito, we have to take the two things into account:
- Only works for class scope, not for function scope.
- We must run the test class with
MockitoJUnitRunner.class.
So, we would have to do the following:
AuthenticatorApplicationTest.java
// ...

@RunWith(MockitoJUnitRunner.class)
public class AuthenticatorApplicationTest {

    @Mock
    private AuthenticatorInterface authenticatorMock;

    @InjectMocks
    private AuthenticatorApplication authenticator;

    // ...
}
With the @Mock annotation, we define the dependencies to inject. And then, with @InjectMocks, we specify where to inject the defined dependencies. With only those annotations, we have an instance of AuthenticatorApplication with the AuthenticatorInterface injected.
To perform the injection, Mockito tries the following ways, in order:
- By constructor (as we have).
- By setter.
- By class field.
If Mockito is unable to do the injection, the result will be a null reference to the object to be injected, which in this case, would be AuthenticatorApplication.
But, as we have a constructor where the interface is passed, Mockito is supposed to do the injection properly. So now, we could make another test case to test it:
AuthenticatorApplicationTest.java
@Test
public void testAuthenticateMockInjection() throws EmptyCredentialsException {
    String username = "javacodegeeks";
    String password = "s4f3 p4ssw0rd";

    when(this.authenticatorMock.authenticateUser(username, password))
        .thenReturn(true);

    boolean actual = this.authenticator.authenticate("javacodegeeks", "s4f3 p4ssw0rd");

    assertTrue(actual);
}
We don’t have to do anything more than the test itself, Mockito has created an instance for the AuthenticatorApplication with the injected mock.
9. Mocking void returning methods
In the previous examples, we have used when() for adding behavior to the mocks. But this way won’t work for methods that return void. If we try to use when() with a void method, the IDE will mark an error, and it won’t let us compile the code.
First, we are going to change the previous example to make AuthenticatorInterface method return void, and make it throw an exception if the user has not been successfully authenticated, to give sense to the void return. We are going to create another package com.javacodegeeks.mockitotutorial.voidmethod, not to modify the previous working code.
AuthenticatorInterface.java
package com.javacodegeeks.mockitotutorial.voidmethod;

public interface AuthenticatorInterface {

    /**
     * User authentication method definition.
     *
     * @param username The user name to authenticate.
     * @param password The password to authenticate the user.
     * @throws NotAuthenticatedException If the user can't be authenticated.
     */
    public void authenticateUser(String username, String password) throws NotAuthenticatedException;

}
And also, its call:
AuthenticatorApplication.java
package com.javacodegeeks.mockitotutorial.voidmethod;

public class AuthenticatorApplication {

    private AuthenticatorInterface authenticator;

    /**
     * AuthenticatorApplication constructor.
     *
     * @param authenticator Authenticator interface implementation.
     */
    public AuthenticatorApplication(AuthenticatorInterface authenticator) {
        this.authenticator = authenticator;
    }

    /**
     * Tries to authenticate an user with the received user name and password, with the received
     * AuthenticatorInterface interface implementation in the constructor.
     *
     * @param username The user name to authenticate.
     * @param password The password to authenticate the user.
     * @throws NotAuthenticatedException If the user can't be authenticated.
     */
    public void authenticate(String username, String password) throws NotAuthenticatedException {
        this.authenticator.authenticateUser(username, password);
    }
}
The required exception class also:
NotAuthenticatedException.java
package com.javacodegeeks.mockitotutorial.voidmethod;

public class NotAuthenticatedException extends Exception {

    public NotAuthenticatedException() {
        super("Could not authenticate!");
    }
}
Now, to mock AuthenticatorInterface.authenticateUser, we have to use the do family methods:
AuthenticatorApplicationTest.java
package com.javacodegeeks.mockitotutorial.voidmethod;

import static org.mockito.Mockito.doThrow;

import org.junit.Test;
import org.mockito.Mockito;

public class AuthenticatorApplicationTest {

    @Test(expected = NotAuthenticatedException.class)
    public void testAuthenticate() throws NotAuthenticatedException {
        AuthenticatorInterface authenticatorMock;
        AuthenticatorApplication authenticator;
        String username = "JavaCodeGeeks";
        String password = "wrong password";

        authenticatorMock = Mockito.mock(AuthenticatorInterface.class);
        authenticator = new AuthenticatorApplication(authenticatorMock);

        doThrow(new NotAuthenticatedException())
            .when(authenticatorMock)
            .authenticateUser(username, password);

        authenticator.authenticate(username, password);
    }
}
We are doing the same thing as in the previous example, but using a different notation (lines 20, 21, 22). We could say that it’s almost the same syntax, but inverted: first, we add the behavior (a throw behavior); and then, we specify the method we are adding the behavior to.
10. Mocking real objects: @Spy
Exists the possibility of creating mocks that wrap objects, i.e., instances of implemented classes. This is called “spying” by Mockito.
When you call the method of a spied object, the real method will be called, unless a predefined behavior was defined.
Let’s create a new test case in a new package to see how it works:
SpyExampleTest.java
package com.javacodegeeks.mockitotutorial.spy;

import static org.mockito.Mockito.*;

import java.util.HashMap;
import java.util.Map;

import org.junit.Test;

public class SpyExampleTest {

    @Test
    public void spyExampleTest() {
        Map<String, String> hashMap = new HashMap<String, String>();
        Map<String, String> hashMapSpy = spy(hashMap);

        System.out.println(hashMapSpy.get("key")); // Will print null.

        hashMapSpy.put("key", "A value");
        System.out.println(hashMapSpy.get("key")); // Will print "A value".

        when(hashMapSpy.get("key")).thenReturn("Another value");
        System.out.println(hashMapSpy.get("key")); // Will print "Another value".
    }
}
As you can see, we can both delegate the method call to the real implementation, or define a behavior.
You might think that this is a quite odd feature. And you’ll probably right. In fact, Mockito documentation recommends to use this only occasionally.
11. Summary
This tutorial has explained what mocking is, and how to put in practice this technique in Java with Mockito framework. We have seen how to add predefined behaviors to our mock objects, and several ways of verifying that those mock objects behave as they are supposed to do. We also have seen the possibility of mocking real objects, a feature that should be used carefully.
12. Download the Eclipse Project
This was a tutorial of Mockito.
You can download the full source code of this example here: MockitoTutorialForBeginners

Thank you for this Mockito tutorial, Julen. I found it excellent as a gentle introduction to this mocking framework
Thank you so much!
very helpful tutorial, thanks a lot!
Great post.
Just a quick point about the timeout notes
“So, if we want to ensure that our
authenticateUser()method runs in, for example, 100 milliseconds or less”This timeout is to check the time within which the method should be called right ? It is not the timeout for the actual method execution.
Your not would make one think it is the later.