Notification is a message that doesn’t appear inside the main UI of the app but as an icon in the notification area, including more details in the notification drawer. The aim of the notifications is to keep the user informed about events or alerts in a more persistent method, as the user can view them at any time. In this tutorial, we will create two different Notifications, the first one with normal view and the second one with big view, using explicit and implicit Intents respectively.
For this tutorial, we will use the following tools in a Windows 64-bit platform:
- JDK 1.7
- Eclipse 4.2 Juno
- Android SDK 4.4
1. Create a New Android Application Project
Open Eclipse IDE and go to File → New → Project → Android Application Project.
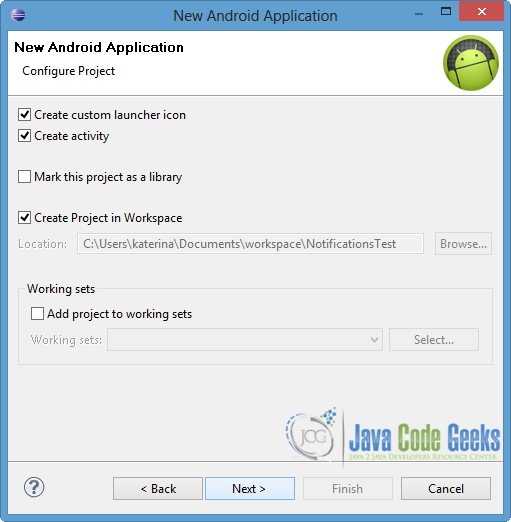
Specify the name of the application, the project and the package. Then, choose as “Minimum Required SDK” the API 17 or larger and click Next.

In the next window, the “Create Activity” option should be checked. The new created activity will be the main activity of your project. Then press Next button.
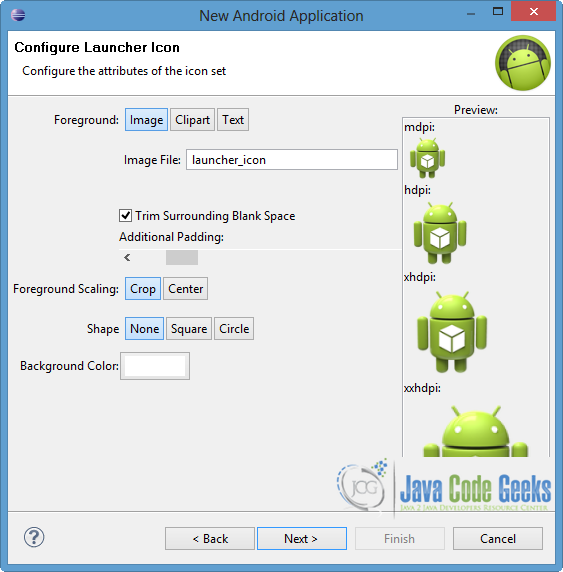
In “Configure Launcher Icon” window you should choose the icon you want to have in your app. We will use the default icon of android, so click Next.
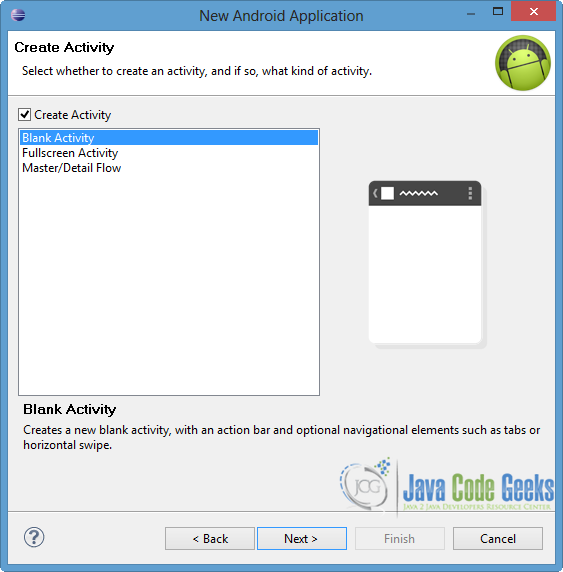
Select the “Blank Activity” option and press Next.
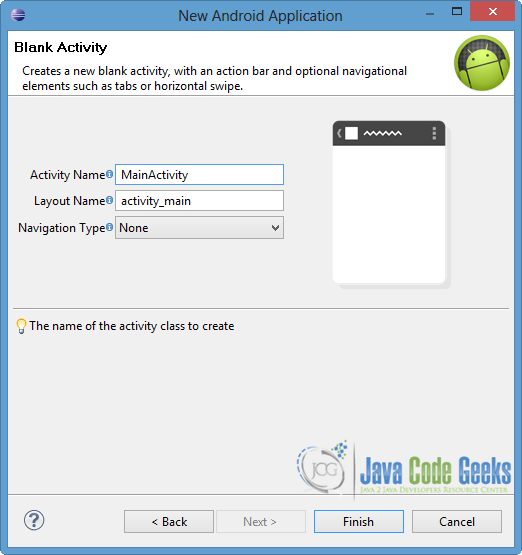
You have to specify a name for the new Activity and a name for the layout description of your app. The .xml file for the layout will automatically be created in the res/layout folder. Finally, press Finish.
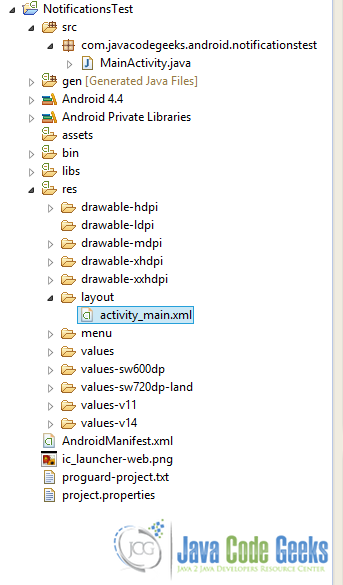
Now that the project is created, you can see the final structure of the project in the image below.
2. Create the layout of the Main Activity
As we said above, we want to define two different Notifications, so we are going to add two Buttons, that each one enables the respective notification.
Open res/layout/activity_main.xml file, go to the xml tab and paste the following code.
activity_main.xml:
<RelativeLayout xmlns:android="http://schemas.android.com/apk/res/android"
    xmlns:tools="http://schemas.android.com/tools"
    android:layout_width="match_parent"
    android:layout_height="match_parent"
    tools:context=".MainActivity" >

   <Button
        android:id="@+id/notificationOne"
   		android:layout_width="fill_parent"
   		android:layout_height="wrap_content"
   		android:text="start notification one" />

   <Button
       android:id="@+id/notificationTwo"
       android:layout_width="fill_parent"
       android:layout_height="wrap_content"
       android:layout_alignParentLeft="true"
       android:layout_alignParentTop="true"
       android:layout_marginTop="60dp"
       android:text="start notification two" />

</RelativeLayout>
3. Code the Main Activity
To facilitate the display of layout and the control of the actions of notifications, a NotificationCompat.Builder object is used. Every Notification object have to contain:
- a small icon
- a title
- a detail text
set by setSmallIcon(), setContentTitle() and setContentText() respectively. There are also more layout contents that can be used in a notification, but there are optional. For a big view notification appearance, except the contents of the normal view, a Builder.setStyle() ought to be added.
A notification action connects a notification with an Activity in the application, when the user clicks that notification. A notification can provide multiple actions but at least one should be added, although it is optional. To define the action we should use a PentingIntent, which contains an Intent that starts the Activity in the app.
In our example, we want to remove the notification every time the user enables it. We are going to use two different ways to do such thing. For the notification with the explicit intent, we will use the cancel(notificationId) method in the Activity of that Intent, so the notification will be removed when the Activity is displayed. For the notification with the implicit intent, the setAutoCancel() method is called when the user clicks the notification text in the notification drawer.
Open src/com.javacodegeeks.android.notificationstest/MainActivity.java file and paste the following code.
MainActivity.java:
package com.javacodegeeks.android.notificationstest;

import android.net.Uri;
import android.os.Bundle;
import android.app.Activity;
import android.app.NotificationManager;
import android.app.PendingIntent;
import android.app.TaskStackBuilder;
import android.content.Context;
import android.content.Intent;
import android.support.v4.app.NotificationCompat;
import android.view.View;
import android.widget.Button;

public class MainActivity extends Activity {
   private NotificationManager myNotificationManager;
   private int notificationIdOne = 111;
   private int notificationIdTwo = 112;
   private int numMessagesOne = 0;
   private int numMessagesTwo = 0;

   protected void onCreate(Bundle savedInstanceState) {
      super.onCreate(savedInstanceState);
      setContentView(R.layout.activity_main);

      Button notOneBtn = (Button) findViewById(R.id.notificationOne);
      notOneBtn.setOnClickListener(new View.OnClickListener() {
         public void onClick(View view) {
            displayNotificationOne();
         }
      });

      Button notTwoBtn = (Button) findViewById(R.id.notificationTwo);
      notTwoBtn.setOnClickListener(new View.OnClickListener() {
         public void onClick(View view) {
            displayNotificationTwo();
         }
      });

   }

   protected void displayNotificationOne() {

      // Invoking the default notification service
      NotificationCompat.Builder  mBuilder = new NotificationCompat.Builder(this);

      mBuilder.setContentTitle("New Message with explicit intent");
      mBuilder.setContentText("New message from javacodegeeks received");
      mBuilder.setTicker("Explicit: New Message Received!");
      mBuilder.setSmallIcon(R.drawable.ic_launcher);

      // Increase notification number every time a new notification arrives
      mBuilder.setNumber(++numMessagesOne);

      // Creates an explicit intent for an Activity in your app
      Intent resultIntent = new Intent(this, NotificationOne.class);
      resultIntent.putExtra("notificationId", notificationIdOne);

      //This ensures that navigating backward from the Activity leads out of the app to Home page
      TaskStackBuilder stackBuilder = TaskStackBuilder.create(this);

      // Adds the back stack for the Intent
      stackBuilder.addParentStack(NotificationOne.class);

      // Adds the Intent that starts the Activity to the top of the stack
      stackBuilder.addNextIntent(resultIntent);
      PendingIntent resultPendingIntent =
         stackBuilder.getPendingIntent(
            0,
            PendingIntent.FLAG_ONE_SHOT //can only be used once
         );
      // start the activity when the user clicks the notification text
      mBuilder.setContentIntent(resultPendingIntent);

      myNotificationManager = (NotificationManager) getSystemService(Context.NOTIFICATION_SERVICE);

      // pass the Notification object to the system
      myNotificationManager.notify(notificationIdOne, mBuilder.build());
   }

   protected void displayNotificationTwo() {
      // Invoking the default notification service
      NotificationCompat.Builder  mBuilder = new NotificationCompat.Builder(this);

      mBuilder.setContentTitle("New Message with implicit intent");
      mBuilder.setContentText("New message from javacodegeeks received...");
      mBuilder.setTicker("Implicit: New Message Received!");
      mBuilder.setSmallIcon(R.drawable.ic_launcher);

      NotificationCompat.InboxStyle inboxStyle = new NotificationCompat.InboxStyle();

       String[] events = new String[3];
       events[0] = new String("1) Message for implicit intent");
       events[1] = new String("2) big view Notification");
       events[2] = new String("3) from javacodegeeks!");

       // Sets a title for the Inbox style big view
       inboxStyle.setBigContentTitle("More Details:");
       // Moves events into the big view
       for (int i=0; i < events.length; i++) {
          inboxStyle.addLine(events[i]);
       }
       mBuilder.setStyle(inboxStyle);

      // Increase notification number every time a new notification arrives
      mBuilder.setNumber(++numMessagesTwo);

      // When the user presses the notification, it is auto-removed
      mBuilder.setAutoCancel(true);

      // Creates an implicit intent
      Intent resultIntent = new Intent("com.example.javacodegeeks.TEL_INTENT",
    		  Uri.parse("tel:123456789"));
      resultIntent.putExtra("from", "javacodegeeks");

      TaskStackBuilder stackBuilder = TaskStackBuilder.create(this);
      stackBuilder.addParentStack(NotificationTwo.class);

      stackBuilder.addNextIntent(resultIntent);
      PendingIntent resultPendingIntent =
         stackBuilder.getPendingIntent(
            0,
            PendingIntent.FLAG_ONE_SHOT
         );
      mBuilder.setContentIntent(resultPendingIntent);

      myNotificationManager = (NotificationManager) getSystemService(Context.NOTIFICATION_SERVICE);

      myNotificationManager.notify(notificationIdTwo, mBuilder.build());

   }

}
4. Create the Activity of Notification Action
We want to make the Activity of the notification, that will be started when the user clicks it.
We are going to make two different Activities for each notification, so we have to create two different files.
For the first file that concerns the explicit Intent, right click on src/com.javacodegeeks.android.notificationstest package → New → Class.
Specify the name of the class and press Finish.
Open src/com.javacodegeeks.android.notificationstest/NotificationOne.java file and paste the following.
NotificationOne.java:
package com.javacodegeeks.android.notificationstest;

import android.os.Bundle;
import android.widget.TextView;
import android.app.Activity;
import android.app.NotificationManager;
import android.content.Context;

public class NotificationOne extends Activity {
	@Override
	   public void onCreate(Bundle savedInstanceState)
	   {
	      super.onCreate(savedInstanceState);
	      setContentView(R.layout.notification_one);
	      CharSequence s = "Inside the activity of Notification one ";
	      int id=0;

	      Bundle extras = getIntent().getExtras();
			if (extras == null) {
				s = "error";
			}
			else {
				id = extras.getInt("notificationId");
			}
			TextView t = (TextView) findViewById(R.id.text1);
			s = s+"with id = "+id;
			t.setText(s);
			NotificationManager myNotificationManager =
					(NotificationManager) getSystemService(Context.NOTIFICATION_SERVICE);

			// remove the notification with the specific id
			myNotificationManager.cancel(id);
	   }

}
At this point, we will remove the notification from the notification bar, as you can notice in the highlighted lines.
For the second file that concerns the implicit Intent, we will make a similar procedure. Right click on src/com.javacodegeeks.android.notificationstest package → New → Class. Then, specify the name of the class and press Finish. We will name it NotificationTwo.java.
Now, open src/com.javacodegeeks.android.notificationstest/NotificationTwo.java file and paste the following.
NotificationTwo.java:
package com.javacodegeeks.android.notificationstest;

import android.app.Activity;
import android.net.Uri;
import android.os.Bundle;
import android.widget.TextView;

public class NotificationTwo extends Activity {

	@Override
	   public void onCreate(Bundle savedInstanceState) {
	      super.onCreate(savedInstanceState);
	      setContentView(R.layout.notification_two);

	      String output = "Inside the activity of Notification two: ";
	      TextView dataIntent = (TextView) findViewById(R.id.text2);

	      // take the data and the extras of the intent
	      Uri url = getIntent().getData();
	      Bundle extras = getIntent().getExtras();

	      output = output + url.toString();
	      // if there are extras, add them to the output string
	      if(extras != null){
	    	  output = output + " from " +extras.getString("from");

	      }
	      dataIntent.setText(output);
	   }

}
At this situation, we don’t do anything for canceling the notification, because we already did it in the displayNotificationTwo() function of MainActivity.java file, by using setAutoCancel() method.
5. Create the layouts of Notification Actions
We need to create layouts, which will be displayed when the Activity of each notification action starts.
For the NotificationOne.java we will use notification_one layout as we defined in the file, so right click on res/layout → New → Android XML File. Specify the name and choose LinearLayout as root element.
Then open res/layout/notification_one.xml file at the xml tab and paste the following.
notification_one.xml:
<?xml version="1.0" encoding="utf-8"?>
<LinearLayout xmlns:android="http://schemas.android.com/apk/res/android"
    android:layout_width="fill_parent"
    android:layout_height="fill_parent"
    android:orientation="vertical" >

     <TextView
        android:id="@+id/text1"
   		android:layout_width="fill_parent"
   		android:layout_height="fill_parent" />

</LinearLayout>
In the same way, we are going to make the layout for the NotificationTwo.java file.
Right click on res/layout → New → Android XML File. Specify the name and choose LinearLayout as root element. Lets name it notification_two.xml, as we defined it in the Activity that belongs to.
Then open res/layout/notification_two.xml file at the xml tab and paste the following.
notification_two.xml:
<?xml version="1.0" encoding="utf-8"?>
<LinearLayout xmlns:android="http://schemas.android.com/apk/res/android"
    android:layout_width="fill_parent"
    android:layout_height="fill_parent"
    android:orientation="vertical" >

    <TextView
        android:id="@+id/text2"
        android:layout_width="fill_parent"
        android:layout_height="fill_parent" />

</LinearLayout>
6. Define the rules for the Notification Activities
We are going to use <meta-data> element, in order to define the parent of the NotificationOne and NotificationTwo Activities. <meta-data> element is additional data, that can be provided to the parent component. So, we will fill in the elements with the appropriate values. For this reason, we will put android.support.PARENT_ACTIVITY in the android:name, and in the android:value we will put the name of the parent Activity. Also, we should define the rules for the implicit Intent that we use in the appropriate <activity> element.
Open AndroidManifest.xml file and choose the xml tab. Then paste the following code.
AndroidManifest.xml:
<?xml version="1.0" encoding="utf-8"?>
<manifest xmlns:android="http://schemas.android.com/apk/res/android"
    package="com.javacodegeeks.android.notificationstest"
    android:versionCode="1"
    android:versionName="1.0" >

    <uses-sdk
        android:minSdkVersion="17"
        android:targetSdkVersion="19" />

    <application
        android:allowBackup="true"
        android:icon="@drawable/ic_launcher"
        android:label="@string/app_name"
        android:theme="@style/AppTheme" >
        <activity
            android:name="com.javacodegeeks.android.notificationstest.MainActivity"
            android:label="@string/app_name" >
            <intent-filter>
                <action android:name="android.intent.action.MAIN" />

                <category android:name="android.intent.category.LAUNCHER" />
            </intent-filter>
        </activity>

        <activity android:name=".NotificationOne"
             android:label="Details of Notification One"
             android:parentActivityName=".MainActivity">
        	<meta-data
        		android:name="android.support.PARENT_ACTIVITY"
        		android:value=".MainActivity"/>
        </activity>
        <activity
            android:name=".NotificationTwo"
            android:label="Details of Notification Two"
            android:parentActivityName=".MainActivity">

           <intent-filter>
              <action android:name="com.example.javacodegeeks.TEL_INTENT" />
              <category android:name="android.intent.category.DEFAULT" />
              <data android:scheme="tel" />
           </intent-filter>
           <meta-data
        		android:name="android.support.PARENT_ACTIVITY"
        		android:value=".MainActivity"/>
        </activity>
    </application>

</manifest>
7. Run the application
To run our application, right click on our project → Run as → Android Application. The AVD will appear with the app loaded.
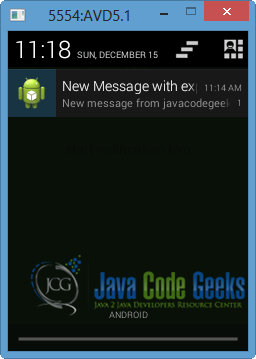
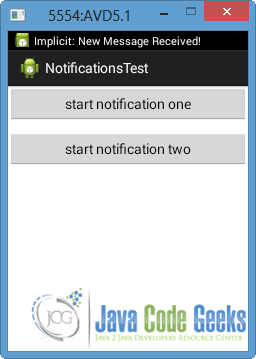
When we press the “start notification one” button, a new notification is created and it’s Ticker appears.

If we drag in the top of the screen and go to the notification drawer, we will see the normal view of the notification, as shown in the picture below.
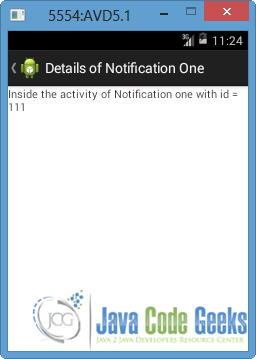
If the user presses the notification, the Activity NotificationOne will be called and the notification will be removed from the notification bar. Notice that there is a button that leads back to the MainActivity, while we defined it as the parent activity for the NotificationOne.
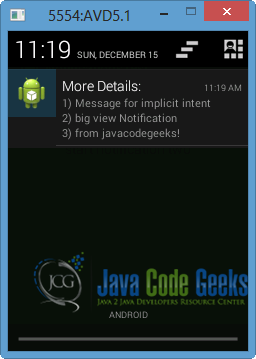
Now, press the “start notification two” button and notice the appearance of the notification Ticker in the image below.
That means that the second notification with the big view is created, as you can see in the next picture.
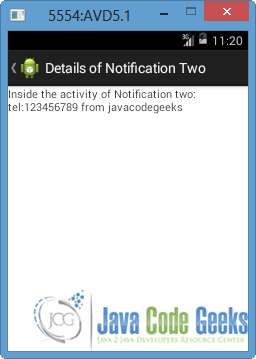
If we press it, the notification will be removed because of setAutoCancel() method, and the NotificationTwo Activity will be called. There is a button too, that goes back to the parent activity as we defined in the AndroidManifest.xml file.
Download Eclipse Project
This was an example of Notifications in Android. Download the Eclipse Project of this example: NotificationsTest.zip

Hello, Thanks for sharing this amazing information with us. keep sharing.
I was searching for this information on custom essay company
Nice post thanks a lot