MongoDB Elasticsearch Tutorial
1. Introduction
NoSQL, as Techopedia explains, “is a class of database management systems (DBMS) that do not follow all of the rules of a relational DBMS and cannot use traditional SQL to query data. A NoSQL database does not necessarily follow the strict rules that govern transactions in relational databases. These violated rules are known by the acronym ACID (Atomicity, Consistency, Integrity, Durability). For example, NoSQL databases do not use fixed schema structures and SQL joins.” NoSQL databases are your choice when your primary considerations are large data volumes, horizontal scaling and schemaless data.
As per Brewer’s Theorem, a distributed system can essentially provide only two of the three features of Consistency, Availability and Partition Tolerance. Based on your business requirements, you select two that satisfy your target goals and choose the database. If you select Consistency and Partition Tolerance, your choice of databases are those like Big Table, Hbase etc, but in this space, the leading choice is MongoDB.
The basic concepts of MongoDB, as explained in the book MongoDB: The Definitive Guide by Kristina Chodrow and Michael Dirolf are:
- A document is the basic unit of data for
MongoDB, roughly equivalent to a row in a relational database management system (but much more expressive). - Similarly, a collection can thought of as the schema-free-equivalent of a table.
- A single instance of
MongoDBcan host multiple independent databases, each of which can have its own collections and permissions. MongoDBcomes with a simple but powerfulJavaScriptshell, which is useful for the administration of MongoDB instances and data manipulation.- Every document has a special key, “_id”, that is unique across the document’s collection.
By design, MongoDB is meant for storing and retrieving data where as Elasticsearch, built on Lucene, is meant for search. Though MongoDB has text search feature, it is recommended to use MongoDB for general application use and complement it with Elasticsearch when you need rich full text searching.
2. Application
In this article, we will first discuss how to establish connectivity between MongoDB and Elasticsearch and then look at a Gradle-based Spring Boot application that persists data to a MongoDB database and queries to retrieve the same data in Elasticsearch. There are quite a few tools to integrate Mongo with Elasticsearch and the recommended one would be Transporter from Compose. However, as of the writing of this article, Transporter is not compatible with Elasticsearch 6.x and there is an issue posted in github to resolve the incompatibility. Therefore, for the purpose of this article, we will use the Python based mongo-connector. The installation instructions can be found in one of the articles given in the Useful Links section.
3. Environment
The environment I used consists of:
- Java 1.8
- Gradle 4.9
- Spring Boot 2.0.4
- Mongo DB 4.0
- Elasticsearch 6.3.0
- mongo-connector 2.5.1
- Python 3.6.5
- Windows 10
4. Source Code
Let’s look at the files and code. Our application is a Gradle based project, so we start with build.gradle.
build.gradle
buildscript {
	ext {
		springBootVersion = '2.0.4.RELEASE'
	}
	repositories {
		mavenCentral()
	}
	dependencies {
		classpath("org.springframework.boot:spring-boot-gradle-plugin:${springBootVersion}")
	}
}

apply plugin: 'java'
apply plugin: 'eclipse'
apply plugin: 'org.springframework.boot'
apply plugin: 'io.spring.dependency-management'

group = 'org.javacodegeeks'
version = '0.0.1-SNAPSHOT'
sourceCompatibility = 1.8

repositories {
	mavenCentral()
}


dependencies {
    compile('org.springframework.boot:spring-boot-starter-data-mongodb')
    compile('org.projectlombok:lombok:1.16.20')
	compile('org.springframework.boot:spring-boot-starter-data-elasticsearch')
    testCompile('org.springframework.boot:spring-boot-starter-test')
}
This file lists all libraries required for compiling and packaging our application. The key ones are the spring boot starter library packages for MongoDB and Elasticsearch along with lombok which is used to provide annotations for various functions like getters, setters and constructors.
The base domain class of the application is Article.
Article.java
package org.javacodegeeks.mongoes.domain;

import org.springframework.data.annotation.Id;
import org.springframework.data.elasticsearch.annotations.Document;

import lombok.Getter;
import lombok.NoArgsConstructor;
import lombok.Setter;
import lombok.ToString;

@Getter
@Setter
@NoArgsConstructor
@ToString
@Document(indexName = "jcg")
public class Article {

	@Id
	private String id;

	private String title;
	private String body;

	public Article(String id, String title, String body) {
		this.id = id;
		this.title = title;
		this.body = body;
	}
}
This class has three member variables, id, title and body, all of type String. The lombok annotations used are the self-explanatory @Getter, @Setter, @NoArgsConstructor and @ToString. We define a public constructor that takes in three String arguments and assigns their values to the respective class members. The key instruction here is that the document is mapped to an index called “jcg” and it is done with the @Document annotation.
We now come to the Repository interfaces which reduce boilerplate code for database operations. The first one is ArticleMongoRepository.
ArticleMongoRepository.java
package org.javacodegeeks.mongoes.domain;

import org.springframework.data.mongodb.repository.MongoRepository;

public interface ArticleMongoRepository extends MongoRepository<Article, String> {

}
We have extended the MongoRepsitory interface and not added any custom operations, since ours is a simple application and hence the available default operations suffice.
The second Repository interface we have is ArticleElasticRepository.
ArticleElasticRepository.java
package org.javacodegeeks.mongoes.domain;

import org.springframework.data.elasticsearch.repository.ElasticsearchRepository;

public interface ArticleElasticRepository extends ElasticsearchRepository<Article, String> {

}
Similar to the previous file, we have just extended the ElasticsearchRepository to use the available standard querying operations.
Next, we take a look at the application.properties file.
application.properties
spring.data.mongodb.database=jcg
spring.data.elasticsearch.cluster-nodes=localhost:9300
There are only two application level variables defined here. In the first one, we are indicating that the mongo database to interact with is “jcg“. In the second property, we indicate to Spring to use 9300 port for Elasticsearch as it is allocated for data transport. Elasticsearch uses its default port 9200 for http requests.
MongoesApplication.java
package org.javacodegeeks.mongoes;
package org.javacodegeeks.mongoes;

import java.util.concurrent.TimeUnit;

import org.javacodegeeks.mongoes.domain.Article;
import org.javacodegeeks.mongoes.domain.ArticleElasticRepository;
import org.javacodegeeks.mongoes.domain.ArticleMongoRepository;
import org.springframework.beans.factory.annotation.Autowired;
import org.springframework.boot.CommandLineRunner;
import org.springframework.boot.SpringApplication;
import org.springframework.boot.autoconfigure.SpringBootApplication;

@SpringBootApplication
public class MongoesApplication implements CommandLineRunner {

	@Autowired
	private ArticleMongoRepository amr;

	@Autowired
	private ArticleElasticRepository aer;

	public static void main(String[] args) {
		SpringApplication.run(MongoesApplication.class, args);
	}

	@Override
	public void run(String... args) throws Exception {
		// insert three articles into Mongo
		amr.save(new Article("1", "Jawaharlal Nehru", "We make a tryst with destiny"));
		amr.save(new Article("2", "Martin Luther King", "I have a dream"));
		amr.save(new Article("3", "Barack Obama", "Yes, we can"));

		// fetch all articles from Mongo
		System.out.println("Articles found in MongoDB with findAll():");
		System.out.println("-----------------------------------------");
		Iterable<Article> articles = amr.findAll();
		articles.forEach(System.out::println);
		System.out.println();

		TimeUnit.SECONDS.sleep(5);

		// fetch all articles from Elastisearch
		System.out.println("Articles found in Elasticsearch with findAll():");
		System.out.println("-----------------------------------------------");
		articles = aer.findAll();
		articles.forEach(System.out::println);
		System.out.println();
	}
}
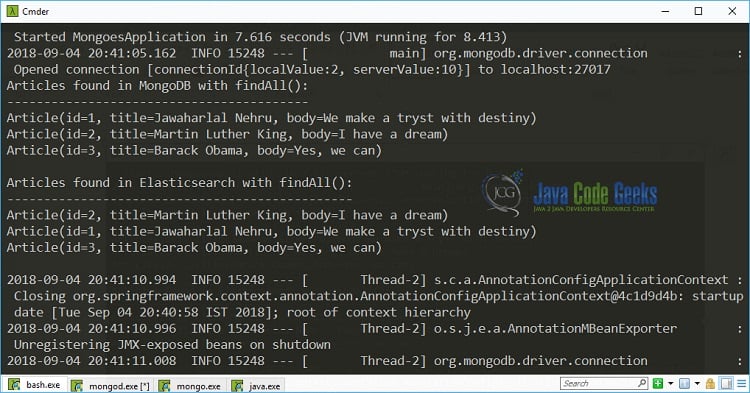
The main method invokes the run method to start the application. In the first step, three Article entities are inserted into MongoDB as documents. We then fetch the documents from the MongoDB database and print them to standard output. After that, we pause the application for five seconds so that the documents are transferred to Elasticsearch. Next, we fetch the articles from Elasticsearch and print them out.
5. How To Run
The first step is to start MongoDB in the replication mode with the following command:
> mongod --replSet development
Secondly, in a different console, we start the Mongo CLI client:
> mongo
We enter the following command to initiate the replication:
development:PRIMARY> rs.initiate()
Next, we start Elasticsearch, of course, in a different console
> elasticsearch
After this, we run the mongodb connector. On my Windows computer, I have Anaconda to manage the Python environment and at the Anaconda prompt I just run the the following command:
> mongo-connector -t localhost:9200 -d elastic2_doc_manager
The last step is to run our MongoesApplication; in a new terminal window, go to the root folder of the application and issue the following command:
> .\gradlew bootRun
In the console messages, you will see the output of the print statements as shown in the following screenshot:

6. MongoDB Elasticsearch – Summary
In this article, we have discussed the basic concepts of MongoDB, Elasticsearch and their integration. We have seen the implementation of a Spring Boot application that inserts data into MongoDB and retrieves the same data from Elasticsearch.
7. Useful Links
- NoSQL / MongoDB Basics
- mongo-connector
- Transporter
- Optimizing MongoDB Queries with Elasticsearch
- Spring Data Repositories
8. Download the Source Code
That was MongoDB Elasticsearch Tutorial.
You can download the full source code of this example here: Mongoes


How to manage transactional property for both the data sourced