JavaFX Borderpane Example
This is a JavaFX BorderPane Example. A BorderPane divides its layout area into five regions: top, right, bottom, left, and center.
The following table shows an overview of the whole article:
Table Of Contents
The following examples use Java SE 8 and JavaFX 2.2.
1. Introduction
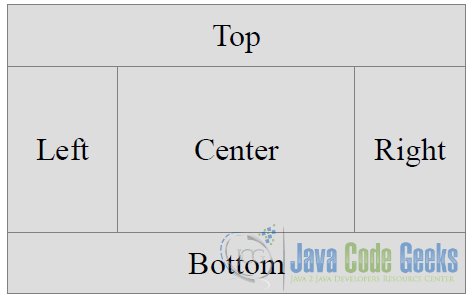
A BorderPane divides its layout area into five regions:
- Top
- Right
- Bottom
- Left
- Center
The following Figure shows the five regions of the BorderPane:
You can place at most one Node in each of the five regions. Any of the regions may be null. If a region is null, no space is allocated for it. The children are drawn in the order they are added.
This means that a child node may overlap all child nodes added prior to it. Suppose regions are populated in the order of right, center, and left. The left region may overlap the center and right regions, and the center region may overlap the right region.
In a typical Windows application, a screen uses the five regions to places its content.
- A menu or a toolbar at the top
- A status bar at the bottom
- A navigation panel on the left
- Additional information on the right
- Main content in the center
A BorderPane satisfies all the layout requirements for a typical Windows-based GUI screen. This is the reason that a BorderPane is most often used as the root node for a Scene.
Typically, you have more than five nodes in a window. If you have more than one node to place in one of the five regions of a BorderPane, add the nodes to a layout Pane.
For example, an HBox, a VBox, etc., and then add the layout pane to the desired region of the BorderPane.
A BorderPane uses the following resizing policies for its children:
- The children in the top and bottom regions are resized to their preferred heights. Their widths are extended to fill the available extra horizontal space, provided the maximum widths of the children allow extending their widths beyond their preferred widths.
- The children in the right and left regions are resized to their preferred widths. Their heights are extended to fill the extra vertical space, provided the maximum heights of the children allow extending their heights beyond their preferred heights.
- The child node in the center will fill the rest of the available space in both directions.
Children in a BorderPane may overlap if it is resized to a smaller size than its preferred size. The overlapping rule is based on the order in which the children are added. The children are drawn in the order they are added. This means that a child node may overlap all child nodes added prior to it.
Suppose regions are populated in the order of right, center, and left. The left region may overlap the center and right regions, and the center region may overlap the right region.
2. Creating BorderPane Objects
2.1 The Code
FxBorderPaneExample1.java
import javafx.application.Application;
import javafx.geometry.Pos;
import javafx.scene.Scene;
import javafx.scene.layout.BorderPane;
import javafx.scene.text.Text;
import javafx.stage.Stage;

public class FxBorderPaneExample1 extends Application
{
	public static void main(String[] args)
	{
		Application.launch(args);
	}

	@Override
	public void start(Stage stage)
	{
		// Create the Text Nodes
		Text centerText = new Text("Center");
		Text topText = new Text("Top");
		Text rightText = new Text("Right");
		Text bottomText = new Text("Bottom");
		Text leftText = new Text("Left");

		// Set the alignment of the Top Text to Center
		BorderPane.setAlignment(topText,Pos.TOP_CENTER);
		// Set the alignment of the Bottom Text to Center
		BorderPane.setAlignment(bottomText,Pos.BOTTOM_CENTER);
		// Set the alignment of the Left Text to Center
		BorderPane.setAlignment(leftText,Pos.CENTER_LEFT);
		// Set the alignment of the Right Text to Center
		BorderPane.setAlignment(rightText,Pos.CENTER_RIGHT);

		// Create a BorderPane with a Text node in each of the five regions
		BorderPane root = new BorderPane(centerText, topText, rightText, bottomText, leftText);
		// Set the Size of the VBox
		root.setPrefSize(400, 400);
		// Set the Style-properties of the BorderPane
		root.setStyle("-fx-padding: 10;" +
				"-fx-border-style: solid inside;" +
				"-fx-border-width: 2;" +
				"-fx-border-insets: 5;" +
				"-fx-border-radius: 5;" +
				"-fx-border-color: blue;");

		// Create the Scene
		Scene scene = new Scene(root);
		// Add the scene to the Stage
		stage.setScene(scene);
		// Set the title of the Stage
		stage.setTitle("A simple BorderPane Example");
		// Display the Stage
		stage.show();
	}
}
The BorderPane class provides the following constructors to create BorderPane objects with or without children.
- BorderPane()
- BorderPane(Node center)
- BorderPane(Node center, Node top, Node right, Node bottom, Node left)
The first Constructor creates an empty BorderPane layout. The second one creates a BorderPane layout with the given Node as the center of the BorderPane. The third one creates a BorderPane layout with the given Nodes to use for each of the main layout areas of the BorderPane.
The following code snippet shows the usage of the constructors:
// Create an empty BorderPane
BorderPane borderPane1 = new BorderPane();

// Create a BorderPane with a TextArea in the center
TextArea centerArea = new TextArea();
BorderPane borderPane2 = new BorderPane(centerArea);

// Create the Text Nodes
Text centerText = new Text("Center");
Text topText = new Text("Top");
Text rightText = new Text("Right");
Text bottomText = new Text("Bottom");
Text leftText = new Text("Left");

// Create a BorderPane with a Text node in each of the five regions
BorderPane borderPane3 = new BorderPane(centerText, topText, rightText, bottomText, leftText);
2.2 The GUI
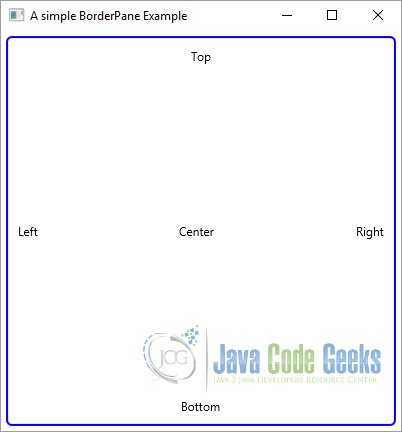
The following GUI shows a very simple BorderPane example. Each region contains a Text node with the name of the corresponding region.

3. BorderPane Properties
3.1 The Code
FxBorderPaneExample2.java
import javafx.application.Application;
import javafx.event.ActionEvent;
import javafx.event.EventHandler;
import javafx.geometry.Pos;
import javafx.scene.Scene;
import javafx.scene.control.Button;
import javafx.scene.control.TextArea;
import javafx.scene.layout.BorderPane;
import javafx.stage.Stage;

public class FxBorderPaneExample2 extends Application
{
	// Create the TextArea for the Output
	private TextArea outputArea = new TextArea();

	public static void main(String[] args)
	{
		Application.launch(args);
	}

	@Override
	public void start(Stage stage)
	{
		// Create the Buttons
		Button centerButton = new Button("Center");
		Button rightButton = new Button("Right");
		Button leftButton = new Button("Left");

		// add an EventHandler to the Left Button
		rightButton.setOnAction(new EventHandler()
		{
			@Override
			public void handle(ActionEvent event)
			{
				writeOutput("You have pressed the Right Button !!!");
			}
		});

		// add an EventHandler to the Left Button
		centerButton.setOnAction(new EventHandler()
		{
			@Override
			public void handle(ActionEvent event)
			{
				writeOutput("You have pressed the Center Button !!!");
			}
		});

		// add an EventHandler to the Left Button
		leftButton.setOnAction(new EventHandler()
		{
			@Override
			public void handle(ActionEvent event)
			{
				writeOutput("You have pressed the Left Button !!!");
			}
		});

		// Set the alignment of the Left Button to Center
		BorderPane.setAlignment(leftButton,Pos.CENTER_LEFT);
		// Set the alignment of the Right Button to Center
		BorderPane.setAlignment(rightButton,Pos.CENTER_RIGHT);
		// Set the alignment of the Center Button to Center
		BorderPane.setAlignment(centerButton,Pos.CENTER);

		// Create the upper BorderPane
		BorderPane borderPane = new BorderPane();
		// Set the Buttons to their Location
		borderPane.setLeft(leftButton);
		borderPane.setRight(rightButton);
		borderPane.setCenter(centerButton);

		// Create an empty BorderPane
		BorderPane root = new BorderPane();
		// Add the children to the BorderPane
		root.setTop(borderPane);
		root.setBottom(outputArea);

		// Set the Size of the VBox
		root.setPrefSize(400, 400);
		// Set the Style-properties of the BorderPane
		root.setStyle("-fx-padding: 10;" +
				"-fx-border-style: solid inside;" +
				"-fx-border-width: 2;" +
				"-fx-border-insets: 5;" +
				"-fx-border-radius: 5;" +
				"-fx-border-color: blue;");

		// Create the Scene
		Scene scene = new Scene(root);
		// Add the scene to the Stage
		stage.setScene(scene);
		// Set the title of the Stage
		stage.setTitle("A BorderPane Example with only a Top and Bottom Node");
		// Display the Stage
		stage.show();
	}

	// Method to log the Message to the Output-Area
	private void writeOutput(String msg)
	{
		this.outputArea.appendText("Your Input: " + msg + "\n");
	}

}
The BorderPane class declares five properties named top, right, bottom, left, and center that store the reference of five children in the five regions. Use the setters for these properties to add a child node to any of the five regions.
For example, use the setTop(Node topChild) method to add a child node to the top region. To get the reference of the children in any of the five regions, use the getters for these properties.
For example, the getTop() method returns the reference of the child node in the top region.
The following snippet of code creates a BorderPane and add´s a child node to the left, rigth and center region.
// Create the upper BorderPane
BorderPane borderPane = new BorderPane();

// Set the Buttons to their Location
borderPane.setLeft(leftButton);
borderPane.setRight(rightButton);
borderPane.setCenter(centerButton);
Recall that not all of the five regions in a BorderPane need to have nodes. If a region does not contain a Node, no space is allocated for it. Use null to remove a child Node from a region.
For example, setTop(null) will remove the already added Node to the top region. By default, all regions have null nodes as their child nodes.
3.2 The GUI
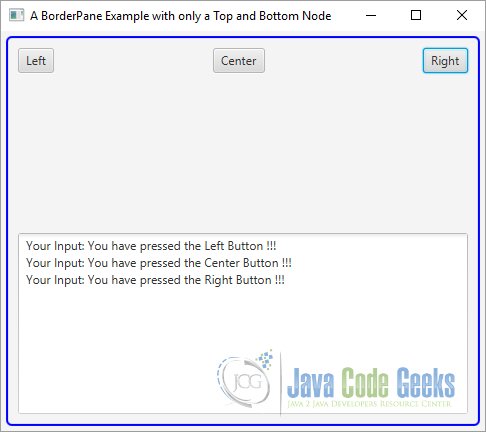
The following image shows an example of a BorderPane, which contains an inner BorderPane at the top, and a TextArea at the bottom region. The inner BorderPane contains a left, center and rigtht region. Each Region contains a specific Button with an EventHandler.

4. Setting Constraints for Children in a BorderPane
4.1 The Code
FxBorderPaneExample3.java
import javafx.application.Application;
import javafx.event.ActionEvent;
import javafx.event.EventHandler;
import javafx.geometry.Pos;
import javafx.scene.Scene;
import javafx.scene.control.Button;
import javafx.scene.control.Label;
import javafx.scene.control.TextArea;
import javafx.scene.control.TextField;
import javafx.scene.layout.BorderPane;
import javafx.stage.Stage;

public class FxBorderPaneExample3 extends Application
{
	// Create the TextField for the input
	private TextField inputArea = new TextField();
	// Create the TextArea for the Output
	private TextArea outputArea = new TextArea();

	public static void main(String[] args)
	{
		Application.launch(args);
	}

	@Override
	public void start(Stage stage)
	{
		// Create the Label for the Header
		Label headerLbl = new Label("Please insert your Message in the TextArea!");
		// Create the Label for the Input
		Label inputLbl = new Label("Input: ");
		// Create the OK-Button
		Button okBtn = new Button("OK");

		// add an EventHandler to the OK-Button
		okBtn.setOnAction(new EventHandler()
		{
			@Override
			public void handle(ActionEvent event)
			{
				writeOutput(inputArea.getText());
			}
		});

		// Create the BorderPane
		BorderPane root = new BorderPane();
		// Store the Header Label in the Top Region
		root.setTop(headerLbl);
		// Store the OK Button in the Top Region
		root.setRight(okBtn);
		// Store the Output Area in the Right Region
		root.setBottom(outputArea);
		// Store the Input Label in the Bottom Region
		root.setLeft(inputLbl);
		// Store the Input Area in the Center Region
		root.setCenter(inputArea);

		// Set the alignment of the Header Label to bottom center
		BorderPane.setAlignment(headerLbl,Pos.BOTTOM_CENTER);
		// Set the alignment of the Input Label to center left
		BorderPane.setAlignment(inputLbl,Pos.CENTER_LEFT);
		// Set the alignment of the OK Button to center right
		BorderPane.setAlignment(okBtn,Pos.CENTER_RIGHT);

		// Set the padding of the BorderPane
		root.setStyle("-fx-padding: 10;");
		// Set the border-style of the VBox
		root.setStyle("-fx-border-style: solid inside;");
		// Set the border-width of the VBox
		root.setStyle("-fx-border-width: 2;");
		// Set the border-insets of the VBox
		root.setStyle("-fx-border-insets: 5;");
		// Set the border-radius of the VBox
		root.setStyle("-fx-border-radius: 5;");
		// Set the border-color of the VBox
		root.setStyle("-fx-border-color: blue;");

		// Create the Scene
		Scene scene = new Scene(root);
		// Add the scene to the Stage
		stage.setScene(scene);
		// Set the title of the Stage
		stage.setTitle("A more complex BorderPane Example");
		// Display the Stage
		stage.show();
	}

	// Method to log the Message to the Output-Area
	private void writeOutput(String msg)
	{
		this.outputArea.appendText("Your Input: " + msg + "\n");
	}
}
A BorderPane allows you to set alignment and margin constraints on individual children. The alignment for a child node is defined relative to its region.
Examples of the most used alignments are:
- Pos.TOP_LEFT for the top child node
- Pos.BOTTOM_LEFT for the bottom child node
- Pos.TOP_LEFT for the left child node
- Pos.TOP_RIGHT for the right child node
- Pos.CENTER for the center child node
- …
Use the setAlignment(Node child, Pos value) static method of the BorderPane class to set the alignment for children.
The following snippet of code shows the usage of the constraints:
// Set the alignment of the Header Label to bottom center
BorderPane.setAlignment(headerLbl,Pos.BOTTOM_CENTER);
// Set the alignment of the Input Label to center left
BorderPane.setAlignment(inputLbl,Pos.CENTER_LEFT);
// Set the alignment of the OK Button to center right
BorderPane.setAlignment(okBtn,Pos.CENTER_RIGHT);
4.2 The GUI
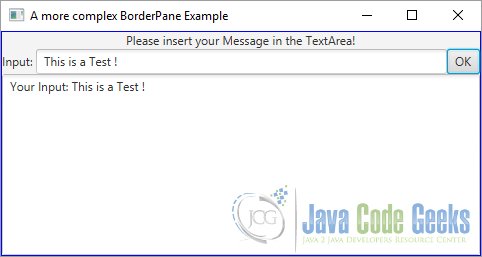
The following image shows how to create a BorderPane and add children. It adds children to the right, bottom, and center regions. Two Labels, a TextField, and a TextArea are added to the center region. A VBox with two buttons are added to the right region. A Label to show the status is added to the bottom region. The top and left regions are set to null. The BorderPane is set as the root node for the Scene.

5. Download Java Source Code
This was an example of javafx.scene.layout.BorderPane
You can download the full source code of this example here: JavaFxBorderPaneExample.zip


the code of example 2 does not work (a pity)
Error:(33, 9) java: is not abstract and does not override abstract method handle(javafx.event.Event) in javafx.event.EventHandler
The inner class new EventHandler() should be collection of type EventHandler.
….SetOnAction(new EventHandler<EventHandler>()
{
@Override
public void handle(ActionHandler event)
{
//your method in here
}
});
If you tried like this, it will work
What are the children?