Integrating ChatGPT with Spring Boot opens up exciting possibilities for natural language interaction within your Java-based applications. ChatGPT, developed by OpenAI, is a powerful language model that understands and generates text in a human-like manner. By embedding ChatGPT in a Spring Boot application, you can create chatbots, virtual assistants, or intelligent content generation systems that respond to user inputs intelligently and dynamically. This integration leverages the strength of Spring Boot’s robust framework for building scalable and maintainable applications while harnessing ChatGPT’s NLP capabilities, enhancing the user experience and functionality of your software.
1. Introduction
ChatGPT is an advanced artificial intelligence (AI) language model developed by OpenAI. It belongs to the GPT (Generative Pre-trained Transformer) family of models and represents state-of-the-art technology in the field of natural language processing (NLP). ChatGPT is designed to understand and generate human-like text, making it an incredibly versatile tool for a wide range of applications.
This AI model has been trained on vast amounts of text data from the internet, which enables it to perform various language-related tasks, such as answering questions, providing explanations, generating creative content, and engaging in natural-sounding conversations. ChatGPT can be used to automate customer support, assist with writing and editing tasks, facilitate learning and education, and even serve as a virtual assistant.
What sets ChatGPT apart is its ability to comprehend context, follow conversational nuances, and generate coherent and contextually relevant responses. It’s a testament to the rapid advancements in AI, offering a glimpse into the potential of machines to interact with humans in more meaningful and useful ways.
It’s important to note that while ChatGPT demonstrates remarkable language understanding and generation capabilities, it may not always provide perfectly accurate or unbiased information, and its responses are generated based on patterns in the data it was trained on. OpenAI continues to refine and improve models like ChatGPT to enhance their performance and safety for a wide range of practical applications.
1.1 Benefits and Usecases of ChatGPT
- Efficient Customer Support: ChatGPT can automate responses to common customer queries, reducing response times and improving customer satisfaction.
- Content Generation: It aids in generating high-quality written content for blogs, articles, or reports, saving time and maintaining consistency.
- Language Translation: ChatGPT can assist in translating text between languages, facilitating global communication.
- Education and Tutoring: It can serve as a virtual tutor, answering questions and explaining complex topics to learners.
- Code Assistance: Developers can use it to get code suggestions, debug errors, or explain programming concepts.
- Personal Assistants: ChatGPT can be the foundation for creating virtual personal assistants that help with scheduling, reminders, and information retrieval.
- Content Summarization: It can summarize lengthy documents or articles, providing concise overviews.
- Enhanced Search: ChatGPT can improve search engine results by understanding user queries more accurately.
- Medical Diagnosis Support: It can assist healthcare professionals in analyzing medical records and offering initial diagnostic insights.
- Language Learning: ChatGPT can engage users in conversation and provide language practice exercises.
2. Developing an application
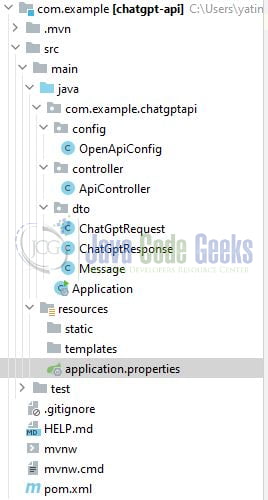
Let’s delve into some practical exercises. In case anyone is interested in understanding the project structure:
Remember to get the open api access key from the platform.openai.com portal as this key will be responsible for communicating to the open api portal via the spring boot application. We will use this key in the spring boot configuration class.
2.1 Incorporating Dependencies into pom.xml
Establish a fresh Spring Boot project using Spring Initialzr or leverage an existing one. Include the necessary dependencies in your project’s pom.xml file.
pom.xml
<dependencies>
	<dependency>
		<groupId>org.springframework.boot</groupId>
		<artifactId>spring-boot-starter-web</artifactId>
	</dependency>

	<dependency>
		<groupId>org.projectlombok</groupId>
		<artifactId>lombok</artifactId>
		<optional>true</optional>
	</dependency>

	<dependency>
		<groupId>org.springframework.boot</groupId>
		<artifactId>spring-boot-starter-test</artifactId>
		<scope>test</scope>
	</dependency>
</dependencies>
2.2 Configure Application Properties
Let us understand the application.properties.
server.port=9030– Specifies the port on which the server should listen for incoming requests.spring.application.name– Specifies the application name
application.properties
#spring property
server.port=4433
spring.application.name=springboot-chatgpt
2.3 Create Model Class
The Java class is named Message and is part of a package called com.example.chatgptapi.dto. It is a Data Transfer Object (DTO) used to represent and transfer data between different parts of a software application, between different layers or components.
Let’s break down the class and its annotations:
@Data: This annotation is from the Project Lombok library and automatically generates boilerplate code for common Java methods like getters, setters,equals,hashCode, andtoString. It simplifies the creation of Java classes by reducing the amount of repetitive code that needs to be written.@AllArgsConstructor: Another Lombok annotation, this one generates a constructor with arguments for all fields in the class. In this case, it creates a constructor that takes two arguments:roleandcontent.@NoArgsConstructor: This Lombok annotation generates a no-argument constructor. This is useful for frameworks or libraries that need to create instances of this class without providing any initial values for its fields.
Now, let’s look at the fields within the Message class:
private String role: This field represents the role of the message sender, such as “user,” “bot,” or some other identifier.private String content: This field holds the content of the message or prompt. It contains the text of a message sent by the sender, which could be user input or a response generated by a chatbot or another part of the application.
Message.java
package com.example.chatgptapi.dto;

import lombok.AllArgsConstructor;
import lombok.Data;
import lombok.NoArgsConstructor;

@Data
@AllArgsConstructor
@NoArgsConstructor
public class Message {

    private String role;
    private String content; // prompt
}
2.4 Create a ChatGPT Request Class
The provided Java class, named ChatGptRequest, resides within the com.example.chatgptapi.dto package. It serves as a data transfer object (DTO) designed to represent a request for interaction with ChatGPT. Let’s delve into its components:
@Data: Similar toMessageclass.- Fields:
private String model: This field stores the identifier or name of the ChatGPT model to be used for the conversation.private List<Message> messages: This field represents a list of messages involved in the conversation. Each message is of typeMessage.
- Constructor: The constructor,
public ChatGptRequest(String model, String prompt), accepts two arguments:modelandprompt. It initializes themodelfield with the provided identifier and creates a new ArrayList for themessagesfield. Subsequently, it adds a newMessageto the list with the “user” role and the providedprompt. This constructor simplifies the creation of request objects when initiating conversations with the ChatGPT system.
ChatGptRequest.java
package com.example.chatgptapi.dto;

import lombok.Data;

import java.util.ArrayList;
import java.util.List;

@Data
public class ChatGptRequest {

    private String model;
    private List<Message> messages;

    public ChatGptRequest(String model, String prompt) {
        this.model = model;
        this.messages = new ArrayList<>();
        this.messages.add(new Message("user", prompt));
    }
}
2.5 Create a ChatGPT Response Class
The provided Java class, named ChatGptResponse, along with its nested class Choice, serves as a structured data format for receiving responses from ChatGPT. Let’s delve into these classes and their components:
- Annotations:
@Data: Similar toMessageclass.@AllArgsConstructor: Similar toMessageclass.@NoArgsConstructor: Similar toMessageclass.
- Fields:
private List<Choice> choices: This field holds a list ofChoiceobjects, representing responses from the ChatGPT system.
The Choice class is a nested class within ChatGptResponse, designed to encapsulate details about each response choice. Let’s explore its components:
- Annotations:
@Data: Similar to theChatGptResponseclass, this annotation generates common Java methods, reducing the need for manual coding.
- Fields:
private int index: This field stores an index or identifier for the response choice, helping to identify its position within the list of choices.private Message message: This field represents aMessageobject, containing the response content and sender information.
ChatGptResponse.java
package com.example.chatgptapi.dto;

import lombok.AllArgsConstructor;
import lombok.Data;
import lombok.NoArgsConstructor;

import java.util.List;

@Data
@AllArgsConstructor
@NoArgsConstructor
public class ChatGptResponse {

    private List<Choice> choices;

    @Data
    @AllArgsConstructor
    @NoArgsConstructor
    public static class Choice {

        private int index;
        private Message message;
    }
}
2.6 Create a Configuration Class
The provided Java class, named OpenApiConfig, serves as a configuration class for our Spring application. Its primary purpose is to set up and customize a RestTemplate instance for making HTTP requests to an external API, i.e. OpenAI API. Let’s break down the class and its components:
- Annotations:
@Configuration: This annotation signifies that the class contains configuration settings for the application, instructing Spring to treat it as a source of bean definitions and configuration.
- Constants:
private final static String key: The open AI key is used for authentication when making API requests. It is essential to securely manage API keys in a production environment, but this example uses a placeholder string (“your_openai_key”) for practical purposes.
restTemplate()Method:@Bean: This annotation designates the method as creating and configuring a Spring bean, specifically aRestTemplateinstance.public RestTemplate restTemplate(): This method creates and returns aRestTemplateinstance, which is a Spring class used for making HTTP requests to external services.- Within the method, a
RestTemplateinstance is instantiated and configured with an interceptor. template.getInterceptors().add((request, body, execution) -> { ... }): An interceptor is added to theRestTemplateto modify the behavior of HTTP requests. In this case, the interceptor adds an “Authorization” header to the request, typically used for authentication.- Inside the interceptor,
request.getHeaders().add("Authorization", "Bearer " + key)adds an “Authorization” header with the API key value. - Finally, the configured
RestTemplateinstance is returned from the method.
OpenApiConfig.java
package com.example.chatgptapi.config;

import org.springframework.context.annotation.Bean;
import org.springframework.context.annotation.Configuration;
import org.springframework.web.client.RestTemplate;

@Configuration
public class OpenApiConfig {

    private final static String key = "your_openai_key";

    @Bean
    public RestTemplate restTemplate() {
        RestTemplate template = new RestTemplate();
        template.getInterceptors().add((request, body, execution) -> {
            request.getHeaders().add("Authorization", "Bearer " + key);
            return execution.execute(request, body);
        });
        return template;
    }
}
2.7 Create a Controller Class
The provided Java class, named ApiController, serves as a REST controller within a Spring-based web application. Its primary responsibility is to handle incoming HTTP requests from ChatGPT facilitating interactions with OpenAI API for generating responses to user prompts. Let’s delve into the class and its components:
- Annotations:
@RestController: This annotation designates the class as a REST controller, indicating that it handles HTTP requests and provides responses. It’s a key component of the Spring MVC framework.@RequestMapping(: This annotation specifies the base URL path (/api/chatgpt)/api/chatgpt) for all the request mappings within this controller.
- Autowiring:
@Autowired private RestTemplate template;: This field is autowired with an instance ofRestTemplate. ARestTemplateis a Spring class used for making HTTP requests to external services. It implies that this controller will useRestTemplateto interact with an external API.
chat()Method:@GetMapping("/chat"): This annotation maps thechat()method to handle HTTP GET requests at the path/api/chatgpt/chat. It expects a URL parameter named “prompt” in the request.public String chat(@RequestParam("prompt") String prompt): This method takes aStringparameter called “prompt,” which is extracted from the URL parameter with the name “prompt.” It represents the user’s input or prompt for generating a response.- Within the method, a
ChatGptRequestobject is created with two parameters: the model name (gpt-3.5-turbo) and the user’s input prompt. This object is used to structure the request to the external OpenAI API. - The
RestTemplateinstance (template) is used to send a POST request to the OpenAI API endpointhttps://api.openai.com/v1/completionswith theChatGptRequestas the request body. The response is expected to be in the format of aChatGptResponseobject. - If the request is successful and a response is received, it extracts the content of the first choice from the response and returns it as a
String. This likely represents the generated response text. - If an exception occurs during the request, it returns an error message (the exception message) as a
String.
ApiController.java
package com.example.chatgptapi.controller;

import com.example.chatgptapi.dto.ChatGptRequest;
import com.example.chatgptapi.dto.ChatGptResponse;
import org.springframework.beans.factory.annotation.Autowired;
import org.springframework.web.bind.annotation.GetMapping;
import org.springframework.web.bind.annotation.RequestMapping;
import org.springframework.web.bind.annotation.RequestParam;
import org.springframework.web.bind.annotation.RestController;
import org.springframework.web.client.RestTemplate;

@RestController
@RequestMapping("/api/chatgpt")
public class ApiController {

    @Autowired
    private RestTemplate template;

    /*
    curl 'http://localhost:4433/api/chatgpt/chat?prompt=What%20is%20spring%20framework' -H 'Content-Type: application/json'
     */
    @GetMapping("/chat")
    public String chat(@RequestParam("prompt") String prompt) {
        ChatGptRequest request = new ChatGptRequest("gpt-3.5-turbo", prompt);
        try {
            ChatGptResponse response = template.postForObject(
                    "https://api.openai.com/v1/completions", request, ChatGptResponse.class);
            return response.getChoices().get(0).getMessage().getContent();
        } catch (Exception e) {
            return e.getMessage();
        }
    }
}
2.8 Run the Application
You can now run your Spring Boot application (i.e. Application.java). When you access http://localhost:4433/api/chatgpt/chat?prompt=What%20is%20spring%20framework, the response from ChatGPT will be returned. You are free to modify the prompt as per your wish.
Curl Request
curl 'http://localhost:4433/api/chatgpt/chat?prompt=What%20is%20spring%20framework' -H 'Content-Type: application/json'
3. Conclusion
The integration of ChatGPT into a Spring Boot application offers a potent blend of advanced natural language processing and streamlined web development. It provides various benefits, including improved user interactions, efficient development, scalability, personalization, real-time communication, security, analytics, and broad applicability across industries. Together, ChatGPT and Spring Boot empower Java developers to create intelligent, user-centric applications with natural language capabilities, opening doors to innovative solutions across diverse domains.
4. Download the Project
This was a tutorial to play with the Chat GPT platform and integrate it with Spring Boot. You can download the source code from the below link.
You can download the full source code of this example here: Use ChatGPT in Springboot
