Welcome to the Spring REST Docs Example. So you have written your Web API and now you must provide documentation so that other people can use it. Spring REST Docs helps you document your RESTful services. The beauty of Spring REST Docs is whilst you are writing unit tests, you can use these tests to generate documentation for your HTTP endpoint. This approach makes your Web API documentation accurate.
1. Tools and Requirements
This Spring REST Docs Example was made using the above tools. It is assumed that the reader has basic understanding of the above tools (e.g. has done some Java coding).
2. Project Setup
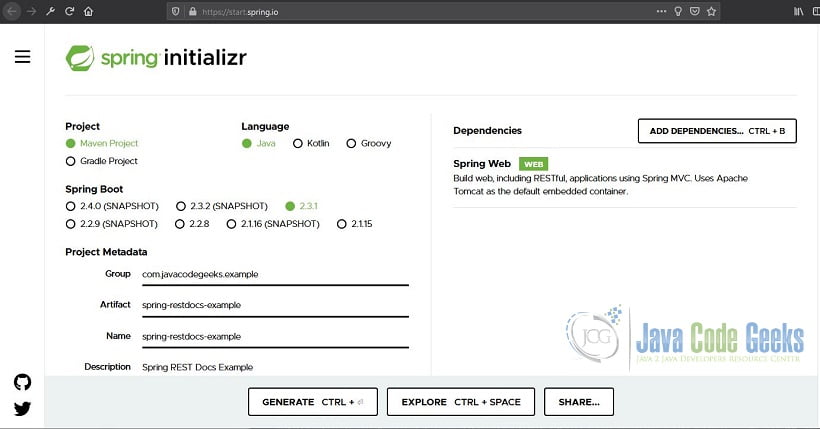
Head over to Spring Initialzr. This is a Maven project and the language is Java 8 and packaged as a Jar file. The Spring Boot version is 2.3.0 (as of this writing). The following are the project metadata but you can change it to whatever you like:
- Group:
com.javacodegeeks.example - Artifact:
spring-resdocs-example - Name:
spring-restdocs-example - Description:
Spring REST Docs Example - Package name:
com.javacodegeeks.example
You only have one dependency, which is Spring Web.
After generating the project, your pom.xml should look like the one below:
pom.xml
01 02 03 04 05 06 07 08 09 10 11 12 13 14 15 16 17 18 19 20 21 22 23 24 25 26 27 28 29 30 31 32 33 34 35 36 37 38 39 40 41 42 43 44 45 46 47 48 49 | <?xml version="1.0" encoding="UTF-8"?><project xmlns="http://maven.apache.org/POM/4.0.0" xmlns:xsi="http://www.w3.org/2001/XMLSchema-instance" xsi:schemaLocation="http://maven.apache.org/POM/4.0.0 https://maven.apache.org/xsd/maven-4.0.0.xsd"> <modelVersion>4.0.0</modelVersion> <parent> <groupId>org.springframework.boot</groupId> <artifactId>spring-boot-starter-parent</artifactId> <version>2.3.0.RELEASE</version> <relativePath/> <!-- lookup parent from repository --> </parent> <groupId>com.javacodegeeks.example</groupId> <artifactId>spring-restdocs-example</artifactId> <version>0.0.1-SNAPSHOT</version> <name>spring-restdocs-example</name> <description>Spring REST Docs Example</description> <properties> <java.version>1.8</java.version> </properties> <dependencies> <dependency> <groupId>org.springframework.boot</groupId> <artifactId>spring-boot-starter-web</artifactId> </dependency> <dependency> <groupId>org.springframework.boot</groupId> <artifactId>spring-boot-starter-test</artifactId> <scope>test</scope> <exclusions> <exclusion> <groupId>org.junit.vintage</groupId> <artifactId>junit-vintage-engine</artifactId> </exclusion> </exclusions> </dependency> </dependencies> <build> <plugins> <plugin> <groupId>org.springframework.boot</groupId> <artifactId>spring-boot-maven-plugin</artifactId> </plugin> </plugins> </build></project> |
3. Create a REST Endpoint
Import the Maven project into Spring Tool Suite. Create a simple REST controller like so:
HelloWorldController.java
01 02 03 04 05 06 07 08 09 10 11 12 13 14 15 16 17 | package com.javacodegeeks.example;import java.util.Collections;import java.util.Map;import org.springframework.web.bind.annotation.RequestMapping;import org.springframework.web.bind.annotation.RequestMethod;import org.springframework.web.bind.annotation.RestController;@RestControllerpublic class HelloWorldController { @RequestMapping(path = "/", method = RequestMethod.GET) public Map<String, Object> greeting() { return Collections.singletonMap("message", "Hello, World"); }} |
@RequestMapping is an annotation for mapping web requests onto methods in request-handling classes with flexible method signatures. The @RestController annotation is a convenient alternative to @Controller and @ResponseBody.
Now, run the application. You can right click on the project and Run As > Spring Boot App or open SpringRestdocsExampleApplication then right click on it and Run As > Spring Boot App or you can go command line (mvnw spring-boot:run) . You should then see some logging in your console. Check your exposed REST API. You can use Postman, curl, or a browser to hit the API. localhost:8080 should return the JSON data {"message":"Hello, World"}. The JSON marshalling is automatically done by Spring because the Jackson JSON API is in the classpath.
4. Test and Documentation Project Setup
Before you can create the unit tests and Spring REST documentation, you need to add the below dependency and plugin to your pom.xml.
pom.xml
01 02 03 04 05 06 07 08 09 10 11 12 13 14 15 16 17 18 19 20 21 22 23 24 25 26 27 28 29 30 31 32 33 34 35 36 37 38 39 40 | ...<dependencies> ... <dependency> <groupId>org.springframework.restdocs</groupId> <artifactId>spring-restdocs-mockmvc</artifactId> <scope>test</scope> </dependency> ...</dependencies>...<plugins> ... <plugin> <groupId>org.asciidoctor</groupId> <artifactId>asciidoctor-maven-plugin</artifactId> <version>1.5.8</version> <executions> <execution> <id>generate-docs</id> <phase>prepare-package</phase> <!-- mvnw package, target/generated-docs default output dir --> <goals> <goal>process-asciidoc</goal> </goals> <configuration> <backend>html</backend> <doctype>book</doctype> </configuration> </execution> </executions> <dependencies> <dependency> <groupId>org.springframework.restdocs</groupId> <artifactId>spring-restdocs-asciidoctor</artifactId> <version>2.0.4.RELEASE</version> </dependency> </dependencies> </plugin> ...</plugins> |
The above additions to the POM will let you use Spring’s MockMvc in your unit tests of the web layer. The resulting HTTP endpoint documentation will be in asciidoc format as generated by Asciidoctor. Documentation generation will happen on the package phase (i.e. mvnw package). The output will be in HTML and will be save in the default location which is target/generated-docs.
5. Create the Test and Documentation
Under your src/test/java folder, there should be a package and a test class autogenerated by the Spring Initilizr. The SpringRestdocsExampleApplicationTests is autogenerated by Spring. The test in this class is just a sanity check to see if the context loads.
It’s time to create your own test. Here is the meat of this example:
HelloWorldControllerTest.java
01 02 03 04 05 06 07 08 09 10 11 12 13 14 15 16 17 18 19 20 21 22 23 24 25 26 27 28 29 30 31 32 33 34 35 | package com.javacodegeeks.example;import static org.hamcrest.CoreMatchers.containsString;import static org.springframework.restdocs.mockmvc.MockMvcRestDocumentation.document;import static org.springframework.test.web.servlet.request.MockMvcRequestBuilders.get;import static org.springframework.test.web.servlet.result.MockMvcResultHandlers.print;import static org.springframework.test.web.servlet.result.MockMvcResultMatchers.content;import static org.springframework.test.web.servlet.result.MockMvcResultMatchers.status;import org.junit.jupiter.api.Test;import org.springframework.beans.factory.annotation.Autowired;import org.springframework.boot.test.autoconfigure.restdocs.AutoConfigureRestDocs;import org.springframework.boot.test.autoconfigure.web.servlet.WebMvcTest;import org.springframework.test.web.servlet.MockMvc;import static org.springframework.restdocs.payload.PayloadDocumentation.fieldWithPath;import static org.springframework.restdocs.payload.PayloadDocumentation.responseFields;@AutoConfigureRestDocs // defaults to target/generated-snippets@WebMvcTest(HelloWorldController.class)public class HelloWorldControllerTest { @Autowired private MockMvc mockMvc; @Test public void shouldReturnHelloWorld() throws Exception { this.mockMvc.perform(get("/")) .andDo(print()) .andExpect(status().isOk()) .andExpect(content().string(containsString("Hello, World"))) .andDo(document("index", responseFields(fieldWithPath("message") .description("A description goes here.")))); // asciidocs in target/generated-snippets/index/ }} |
The @AutoConfigureRestDocs enables and configures auto-configuration of Spring REST Docs. Since there are no parameters, the generated snippets will go to the target/generated-snippets folder. These snippets are still in the asciidoc format.
The @WebMvcTest focuses only on Spring MVC components. Meaning Spring will only apply configuration relevant to MVC tests. This annotation will also auto-configure Spring Security and MockMvc.
The shouldReturnHelloWorld method makes a mock HTTP request. Then prints the MvcResult details to the standard output stream. And then performs the assertion that it should expect a status of OK (HTTP 200) and the body contains “Hello, World”.
Lastly, the API documentation get’s done. The asciidoc file will be saved in the index folder. The responseFields method returns a Snippet that will document the fields of the API operation’s response payload. The response’s field path is specified by the fieldWithPath method. And finally, a description of the path.
Run the test, mvnw test. Under your target/generated-snippets/index/ folder, there should be a bunch of .adoc files.
- curl-request.adoc
- httpie-request.adoc
- http-request.adoc
- http-response.adoc
- http-response.adoc
- request-body.adoc
- response-body.adoc
- response-fields.adoc
6. Organize the Documentation
Create a src/main/asciidoc folder and create an index.adoc file.
index.adoc
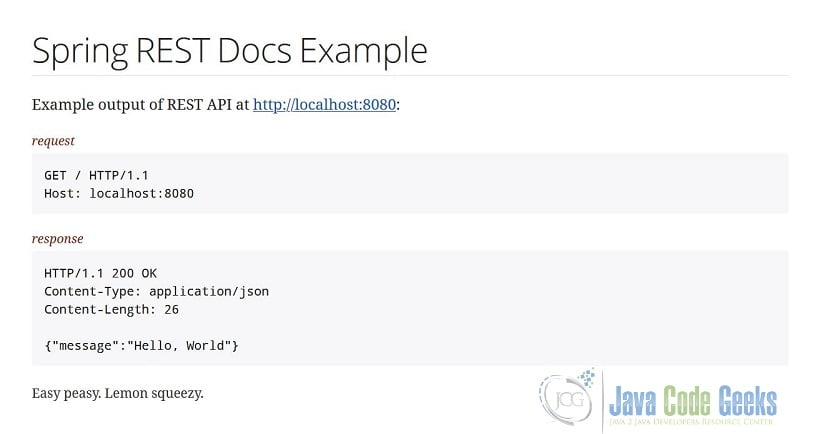
01 02 03 04 05 06 07 08 09 10 11 | = Spring REST Docs ExampleExample output of REST API at http://localhost:8080:.requestinclude::{snippets}/index/http-request.adoc[].responseinclude::{snippets}/index/http-response.adoc[]Easy peasy. Lemon squeezy. |
This index.adoc is the main file which includes the generated snippets (e.g. http-request.adoc, http-response.adoc). To build the HTML documentation, run mvnw package. A target/generated-docs will be created containing index.html. It should look like the one below:
7. Spring REST Docs Example Summary
There you have it. Your first REST API documentation verified by your unit test. To recap, you included the relevant dependencies of the project using Spring Initializr. You created an HTTP endpoint and a test that included an API documentation for it. The asciidoc snippets are created during the test phase. You then created a main page to house the snippets. The package phase created the API documentation in HTML format.
Visit Asciidoctor for more information in formatting your document. Visit Spring REST Docs for more information in configuring your documentation.
8. Download the Source Code
This is an example of Spring REST Docs.
You can download the source code of this example here: Spring REST Docs Example

Is there a way of just generating the documentation without doing the test? Because it’s counterintuitive so have 100 controllers manually typed in the test. It’s stupid design. There should have been a much simple way. Not this.
Just generating the documentation? I don’t know. Not entirely a stupid design though. Spring is all about TDD. How many times have you encountered a Web API documentation that doesn’t match what its API is actually doing? Anyway, I guess it’s designed this way because programmers forget/hate writing documentation. This approach makes your Web API documentation accurate. Not only is your documentation accurate, it’s verified by your unit test as well. This won’t be such a hassle until you get your CI/CD in place. If you don’t practice TDD then I’d suggest you use other means of documenting your API.