Hello. In this tutorial, we will look at the Spring Java Print all Post Example and log the result set while fetching it from the storage.
1. Introduction
Spring Boot 3 and Spring 6 is the recent development in the spring world where out-of-box support for native Java compilation is added and all the deprecated features are removed. Spring Boot 3 provides support for different features that were added –
- Updating baseline Java version to Java 17
- Replacing Java EE with Jakarta EE
- Support for Java Platform Module System (JPMS)
- Enhanced support for native compilation; thus making use of cloud-native applications efficient
- Observability in spring
- Support for Project Loom
- Native support for declarative HTTP client
1.1 Setting up Docker
In the present world, Docker is an important term –
- Often used in CI/CD platform that packages and runs the application with its dependencies inside a container
- Is a standard for Linux Containers
- A Container is a runtime that runs under any Linux kernel and provides a private machine-like space under Linux
2. Spring Java Print all Post Example
Let us dive into some practice stuff and I am hoping that you are aware of the Spring, Spring Boot, and RESTful web services basics.
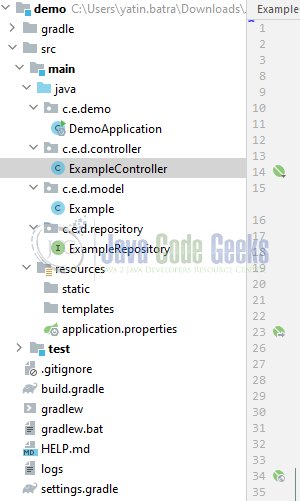
2.1 Tools Used for Spring boot application and Project Structure
We are using IntelliJ, JDK 8, and Gradle. In case you’re confused about where you should create the corresponding files or folder, let us review the project structure of the application.
Let us start building the application but before that, we need to set up postgresql.
2.2 Setting up Postgresql on Docker
I am using Docker to set up postgresql. Once the postgresql is up and running we will create a mydatabase.
Docker command
docker run -d -p 5432:5432 --name some-postgres -e POSTGRES_PASSWORD=dbpassword postgres
Once the postgresql container is up and running login to the instance with the help of any gui tool and create a database.
3. Creating a Spring Boot application
To create the base for this application I will be skipping the traditional approach of creating the project and will move toward the Spring Initializr which offers the quickest way to set up the project. To create this tutorial I will be exploring Gradle as the build tool and Java as the programming language.
3.1 Importing the project
Once the project setup is done via the Spring Initializr import it into IntelliJ. The imported project will automatically download the jars specified in the build.gradle.
3.2 Creating the implementation files
You can download the complete application from the Downloads section.
3.2.1 Setting the Properties
Create a properties file in the resources folder and add the following content to it. The file will contain the application, database, and hibernate properties. You’re free to change the properties as per your needs.
application.properties
# Application Properties
server.port=9099

# Database Configuration
spring.datasource.url=jdbc:postgresql://localhost:5432/mydatabase
spring.datasource.username=postgres
spring.datasource.password=dbpassword

# Hibernate Configuration
spring.jpa.database-platform=org.hibernate.dialect.PostgreSQLDialect
spring.jpa.hibernate.ddl-auto=update
spring.jpa.show-sql=true
3.2.2 Model class
Create the model class responsible to persist the entity into the database.
Example.java
package com.example.demo.model;

import javax.persistence.*;

@Entity
@Table(name = "example")
public class Example {

    @Id
    @GeneratedValue(strategy = GenerationType.AUTO)
    private long id;

    private String message;

    // Getters and setters

    public long getId() {
        return id;
    }

    public void setId(long id) {
        this.id = id;
    }

    public String getMessage() {
        return message;
    }

    public void setMessage(String message) {
        this.message = message;
    }
}
3.2.3 Repository class
Create the repository interface responsible for handling the database interactions with the mydatabase database.
ExampleRepository.java
package com.example.demo.repository;

import com.example.demo.model.Example;
import org.springframework.data.jpa.repository.JpaRepository;
import org.springframework.stereotype.Repository;

@Repository
public interface ExampleRepository extends JpaRepository<Example, Long> {
}
3.2.4 Controller class
Create the controller class responsible for handling client interactions. The class exposes the HTTP POST and GET endpoints.
ExampleController.java
package com.example.demo.controller;

import com.example.demo.model.Example;
import com.example.demo.repository.ExampleRepository;
import org.springframework.web.bind.annotation.*;

import java.util.List;

/**
 * The type Example controller.
 */
@RestController
@RequestMapping("/api")
public class ExampleController {

    private final ExampleRepository exampleRepository;

    /**
     * Instantiates a new Example controller.
     *
     * @param exampleRepository the example repository
     */
    public ExampleController(ExampleRepository exampleRepository) {
        this.exampleRepository = exampleRepository;
    }

    /**
     * Gets messages.
     * curl --location 'http://localhost:9099/api/messages'
     *
     * @return the messages
     */
    @GetMapping("/messages")
    public List<Example> getMessages() {
        List<Example> examples = exampleRepository.findAll();
        // Print all post example
        examples.forEach(example -> System.out.println("Id: " + example.getId() + ", Message: " + example.getMessage()));
        return examples;
    }

    /**
     * Add message example.
     * curl --location 'http://localhost:9099/api/messages' --header 'Content-Type: application/json' --data '{"message":"{{$randomLoremWords}}!"}'
     *
     * @param message the message
     * @return the example
     */
    @PostMapping("/messages")
    public Example addMessage(@RequestBody String message) {
        Example example = new Example();
        example.setMessage(message);
        return exampleRepository.save(example);
    }
}
3.2.5 Implementation class
Create an implementation class responsible to start the Spring boot application.
DemoApplication.java
package com.example.demo;

import org.springframework.boot.SpringApplication;
import org.springframework.boot.autoconfigure.SpringBootApplication;

@SpringBootApplication
public class DemoApplication {

    public static void main(String[] args) {
        SpringApplication.run(DemoApplication.class, args);
    }
}
4. Run the main class and Demo
To run the application, right-click on the DemoApplication.class class, Run As -> Spring Boot App. If everything goes well the application will be started successfully on a port number specified in the application.properties file.
Endpoints
-- Gets messages.
curl --location 'http://localhost:9099/api/messages'

-- Add message example.
curl --location 'http://localhost:9099/api/messages' --header 'Content-Type: application/json' --data '{"message":"{{$randomLoremWords}}!"}'
To test the application open the Postman tool and hit the above HTTP POST and GET endpoints to persist the data into the database and later fetch it. Once the HTTP GET endpoint is hit following logs will also be generated in the ide console.
Application logs
2023-05-21 11:30:04.187  INFO 14156 --- [nio-9099-exec-3] o.s.web.servlet.DispatcherServlet        : Completed initialization in 1 ms
Hibernate: select nextval ('hibernate_sequence')
Hibernate: insert into example (message, id) values (?, ?)
Hibernate: select example0_.id as id1_0_, example0_.message as message2_0_ from example example0_
Id: 1, Message: {"message":"Hello, Postman!"}
Id: 2, Message: {
    "message": "corporis quia magnam"
}
Hibernate: select nextval ('hibernate_sequence')
Hibernate: insert into example (message, id) values (?, ?)
Hibernate: select nextval ('hibernate_sequence')
Hibernate: insert into example (message, id) values (?, ?)
Hibernate: select example0_.id as id1_0_, example0_.message as message2_0_ from example example0_
Id: 1, Message: {"message":"Hello, Postman!"}
Id: 2, Message: {
    "message": "corporis quia magnam"
}
Id: 3, Message: {
    "message": "ut magni porro"
}
Id: 4, Message: {
    "message": "voluptate voluptas inventore"
}
That is all for this tutorial and I hope the article served you whatever you were looking for. Happy Learning and do not forget to share!
5. Summary
In this tutorial, we took a brief look at the spring boot, docker and also created a practical example to log the response fetched from the database on the ide console and show it to the user on the Postman tool or browser. You can download the sample application as an IntelliJ project in the Downloads section.
6. Download the Project
This was an example of understanding Spring Java Print all Post Example.
You can download the full source code of this example here: Spring Java Print all Post Example
