Welcome readers, in this tutorial, we will explore the @Conditional annotation of the spring framework.
1. Introduction
Spring 4.0 introduced the @Conditional annotation in spring. It supports the “if-then-else ” conditional checking for bean registration. It offers a higher support level than the existing @Profile annotation in the spring framework. Developers can use the @Conditional annotation for the following reasons:
- Conditions based on Bean Definition or object present in the Application context, some or all Bean Properties or Class or Method level bean annotations
- Conditions based on user-defined strategies
1.1 Condition Interface
For the class annotated with @Conditional annotation, developers need to have a separate class that implements the Condition interface. This interface has matches(. . . .) method and the application’s conditional logic goes inside this method. Let us see an easy code snippet to understand this interface –
|
1
2
3
4
5
6
|
public class EverydayCondition implements Condition { @Override public boolean matches(final ConditionContext context, final AnnotatedTypeMetadata metadata) { return true; }} |
1.2 Difference between @Profiles and @Conditional annotation?
Both annotations support the “if-then-else” conditional checking. However, using @Conditional annotation provides some more features –
- @Profiles annotation offer checking based on environment variables i.e. loading the application configuration based on environments
- @Conditional annotation offer checking based on user-defined strategies and can be used for conditional bean registration
To understand the above concept, let us open the eclipse ide and implement the @Conditional annotation in the spring framework using spring boot.
2. Spring @Conditional Annotation Tutorial
Here is a systematic guide for implementing this tutorial.
2.1 Tools Used
We are using Eclipse Kepler SR2, JDK 8, and Maven.
2.2 Project Structure
In case you are confused about where you should create the corresponding files or folder, let us review the project structure of the spring boot application.
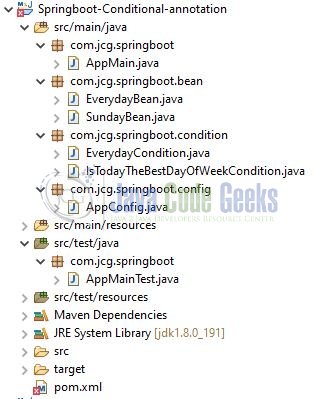
Before starting we are hoping that developers have created a Java-based Maven project with Eclipse Ide. Let us start building the application!
3. Creating a Spring Boot application
Below are the steps involved in developing the application.
3.1 Maven Dependency
Here, we specify the dependency for the spring boot. Maven will automatically resolve the other dependencies. The updated file will have the following code.
pom.xml
<project xmlns="http://maven.apache.org/POM/4.0.0"
	xmlns:xsi="http://www.w3.org/2001/XMLSchema-instance"
	xsi:schemaLocation="http://maven.apache.org/POM/4.0.0 http://maven.apache.org/xsd/maven-4.0.0.xsd">
	<modelVersion>4.0.0</modelVersion>

	<groupId>com.jcg.springboot</groupId>
	<artifactId>Springboot-Conditional-annotation</artifactId>

	<version>0.0.1-SNAPSHOT</version>
	<name>Tutorial on spring boot @conditional annotation</name>

	<parent>
		<groupId>org.springframework.boot</groupId>
		<artifactId>spring-boot-starter-parent</artifactId>
		<version>2.2.2.RELEASE</version>
	</parent>

	<properties>
		<java.version>1.8</java.version>
	</properties>

	<dependencies>
		<dependency>
			<groupId>org.springframework.boot</groupId>
			<artifactId>spring-boot-starter</artifactId>
		</dependency>
		<dependency>
			<groupId>org.springframework.boot</groupId>
			<artifactId>spring-boot-starter-test</artifactId>
			<scope>test</scope>
		</dependency>
	</dependencies>

	<build>
		<plugins>
			<plugin>
				<groupId>org.springframework.boot</groupId>
				<artifactId>spring-boot-maven-plugin</artifactId>
			</plugin>
		</plugins>
	</build>
</project>
3.2 Creating POJO Classes
Let us create the empty bean classes that will be used for our configuration.
3.2.1 Everyday Bean
This is an empty bean class.
EverydayBean.java
package com.jcg.springboot.bean;

public class EverydayBean {
	// Empty class.
}
3.2.2 Sunday Bean
This is an empty bean class.
SundayBean.java
package com.jcg.springboot.bean;

public class SundayBean {
	// Empty class.
}
3.3 Creating Condition Classes
Let us create the condition classes by implementing the Condition interface.
3.3.1 Everyday Condition
This is an everyday condition class that implements the condition interface and keeps the everyday bean as active.
EverydayCondition.java
package com.jcg.springboot.condition;

import org.springframework.context.annotation.Condition;
import org.springframework.context.annotation.ConditionContext;
import org.springframework.core.type.AnnotatedTypeMetadata;

public class EverydayCondition implements Condition {

	@Override
	public boolean matches(final ConditionContext context, final AnnotatedTypeMetadata metadata) {
		return true;
	}
}
3.3.2 BestWeek Condition
This is the best-day-of-the-week condition class that implements the condition interface to check whether today is “Sunday” or not.

IsTodayTheBestDayOfWeekCondition.java
package com.jcg.springboot.condition;

import java.time.DayOfWeek;
import java.time.LocalDate;

import org.springframework.context.annotation.Condition;
import org.springframework.context.annotation.ConditionContext;
import org.springframework.core.type.AnnotatedTypeMetadata;

public class IsTodayTheBestDayOfWeekCondition implements Condition {

	@Override
	public boolean matches(final ConditionContext context, final AnnotatedTypeMetadata metadata) {
		final DayOfWeek dayOfWeek = LocalDate.now().getDayOfWeek();
		return DayOfWeek.SUNDAY == dayOfWeek;
	}
}
3.4 Creating Configuration Class
Let us create the configuration class which is annotated with the @Configuration annotation and offer @Conditional annotation for each bean.
AppConfig.java
package com.jcg.springboot.config;

import org.slf4j.Logger;
import org.slf4j.LoggerFactory;
import org.springframework.context.annotation.Bean;
import org.springframework.context.annotation.Conditional;
import org.springframework.context.annotation.Configuration;

import com.jcg.springboot.bean.EverydayBean;
import com.jcg.springboot.bean.SundayBean;
import com.jcg.springboot.condition.EverydayCondition;
import com.jcg.springboot.condition.IsTodayTheBestDayOfWeekCondition;

@Configuration
public class AppConfig {

	private static final Logger LOGGER = LoggerFactory.getLogger(AppConfig.class);

	@Bean
	@Conditional(value= IsTodayTheBestDayOfWeekCondition.class)
	public SundayBean createSundayBean() {
		LOGGER.info("Sunday bean is created successful.");
		return new SundayBean();
	}

	@Bean
	@Conditional(value= EverydayCondition.class)
	public EverydayBean createEverydayBean() {
		LOGGER.info("Everyday bean is created successful.");
		return new EverydayBean();
	}
}
3.5 Creating Main Class
Let us write the implementation/main class involved in this application. This class is the entry point of the spring boot application containing @SpringBootApplication annotation and the static main method.
AppMain.java
package com.jcg.springboot;

import org.springframework.boot.SpringApplication;
import org.springframework.boot.autoconfigure.SpringBootApplication;

@SpringBootApplication
public class AppMain {

	public static void main(String[] args) {
		SpringApplication.run(AppMain.class, args);
	}
}
4. Run the Application
To execute the application, right-click on the AppMain.java class, Run As -> Java Application.

If everything goes well, the code shows the bean information (based on the day-of-the-week) as the output of this tutorial.
2019-12-14 15:25:02.984  INFO 68452 --- [           main] com.jcg.springboot.AppMain               : No active profile set, falling back to default profiles: default
2019-12-14 15:25:03.645  INFO 68452 --- [           main] com.jcg.springboot.config.AppConfig      : Everyday bean is created successful.
That is all for this tutorial and I hope the article served you whatever you were looking for. Happy Learning and do not forget to share!
5. Conclusion
In this section, developers learned the usage of @Conditional annotation. That is all for this tutorial and I hope the article served you whatever you were looking for. Developers can download the sample application as an Eclipse project in the Downloads section.
6. Download the Eclipse Project
This was an example of @Conditional annotation in the spring framework.
You can download the full source code of this example here: Spring @Conditional Annotation Example
