Hello. In this tutorial, we will understand file upload in the Spring boot application.
1. Introduction
Spring Boot is an open-source Java framework. It is built on top of the Spring Framework, providing a simplified and opinionated approach to developing Java applications. Spring Boot aims to accelerate application development and reduce the complexity of configuring and deploying Spring applications. It promotes convention over configuration, which means that developers can focus more on writing business logic and less on boilerplate code and configuration. Key features of Spring Boot include auto-configuration, standalone executables, and production-ready monitoring and metrics. It provides an embedded Tomcat, Jetty, or Undertow web server, eliminating the need for manual server setup. Spring Boot offers a powerful dependency management system that simplifies the management of project dependencies. It includes Spring Boot Starters, which are pre-configured dependencies for various frameworks and libraries (e.g., Spring Data, Spring Security) that make it easy to integrate them into your application. Spring Boot provides a command-line interface (CLI) and a web-based graphical interface (Actuator) to manage and monitor applications. It supports building microservices and facilitates the development of cloud-native applications with its support for containerization technologies like Docker and orchestration frameworks like Kubernetes.
1.1 Advantages and Disadvantages of Spring Boot
| Advantages | Disadvantages |
|---|---|
| Accelerates application development | Increased learning curve for beginners |
| Simplifies configuration and deployment | Lack of flexibility for complex and customized requirements |
| Convention over configuration approach reduces boilerplate code | Increased memory consumption due to embedded containers |
| Provides auto-configuration for common dependencies | Limited control over certain low-level configurations |
| Embedded web servers eliminate the need for manual setup | Potential for over-configuration and unnecessary features |
| Powerful dependency management system | Possible performance overhead due to auto-configuration |
| Pre-configured starters simplify integration with frameworks and libraries | Difficulty in troubleshooting complex issues |
| Command-line interface (CLI) and Actuator for management and monitoring | Incompatibility with legacy or non-Spring applications |
| Supports building microservices and cloud-native applications | Dependency on Spring Ecosystem and learning curve for alternative frameworks |
This table summarizes the advantages and disadvantages of Spring Boot, highlighting its benefits in terms of rapid development, simplified configuration, and integrated tooling, as well as potential drawbacks such as reduced flexibility, increased memory consumption, and potential performance overhead.
2. Spring Boot File Upload REST API Example
Let us dive into some practice stuff. To get started with Spring Boot File Upload REST API, you can follow these steps.
2.1 Create a Spring Boot Project
Set up a new Spring Boot project or use an existing one. Include the necessary dependencies in your project’s build.gradle file.
build.gradle
implementation 'org.springframework.boot:spring-boot-starter-web'
implementation group: 'org.apache.commons', name: 'commons-lang3', version: '3.0'
2.2 Configure Application Properties
In this example, we have added the property server.port with the value 9444 to specify the port number for the server to listen on. You can change the port number to any desired value according to your application’s needs.
application.properties
# Server Configuration
server.port=9444
spring.main.banner-mode=off
2.3 Create Response DTO
Design a class that encapsulates the data related to a file upload operation and offers methods to access the name, download URL, and size of the uploaded file.
FileUploadResponse.java
package com.example.demo.dto;

/**
 * The type File upload response.
 */
public class FileUploadResponse {

    private final String name;
    private final String downloadUrl;
    private final long size;

    /**
     * Instantiates a new File upload response.
     *
     * @param name        the name
     * @param downloadUrl the download url
     * @param size        the size
     */
    public FileUploadResponse(String name, String downloadUrl, long size) {
        this.name = name;
        this.downloadUrl = downloadUrl;
        this.size = size;
    }

    /**
     * Gets name.
     *
     * @return the name
     */
    public String getName() {
        return name;
    }

    /**
     * Gets download url.
     *
     * @return the download url
     */
    public String getDownloadUrl() {
        return downloadUrl;
    }

    /**
     * Gets size.
     *
     * @return the size
     */
    public long getSize() {
        return size;
    }
}
2.4 Create a Utility class
Create a utility class that is responsible for reading multipart file data from a request and saving the file onto disk.
FileUploadUtil.java
package com.example.demo.util;

import org.apache.commons.lang3.RandomStringUtils;
import org.springframework.web.multipart.MultipartFile;

import java.io.IOException;
import java.io.InputStream;
import java.nio.file.Files;
import java.nio.file.Path;
import java.nio.file.Paths;
import java.nio.file.StandardCopyOption;

/**
 * The type File upload util.
 */
public class FileUploadUtil {

    private static final String UPLOADS = "uploads";

    /**
     * Save file string.
     *
     * @param fileName      the file name
     * @param multipartFile the multipart file
     * @return the string
     * @throws IOException the io exception
     */
    public static String saveFile(String fileName, MultipartFile multipartFile)
            throws IOException {
        Path uploadPath = Paths.get(UPLOADS);

        if (!Files.exists(uploadPath)) {
            Files.createDirectories(uploadPath);
        }

        String fileCode = RandomStringUtils.randomAlphanumeric(8);
        try (InputStream inputStream = multipartFile.getInputStream()) {
            Path filePath = uploadPath.resolve(fileCode + "-" + fileName);
            Files.copy(inputStream, filePath, StandardCopyOption.REPLACE_EXISTING);
        } catch (IOException ioe) {
            throw new IOException("COULD_NOT_SAVE_FILE: " + fileName, ioe);
        }
        return fileCode;
    }
}
2.5 Create REST API
Create a controller package and implement a file upload API by creating a class annotated with @RestController and defining the necessary methods.
FileUploadController.java
package com.example.demo.controller;

import com.example.demo.dto.FileUploadResponse;
import com.example.demo.util.FileUploadUtil;
import org.springframework.http.ResponseEntity;
import org.springframework.util.StringUtils;
import org.springframework.web.bind.annotation.PathVariable;
import org.springframework.web.bind.annotation.PostMapping;
import org.springframework.web.bind.annotation.RequestParam;
import org.springframework.web.bind.annotation.RestController;
import org.springframework.web.multipart.MultipartFile;

import java.io.IOException;

/**
 * The type File upload controller.
 */
@RestController
public class FileUploadController {

    /**
     * Upload response entity.
     *
     * @param multipartFile the multipart file
     * @return the response entity
     * @throws IOException the io exception
     */
    @PostMapping(value = "/upload")
    public ResponseEntity<FileUploadResponse> upload(@RequestParam("file") MultipartFile multipartFile)
            throws IOException {
        String filename = StringUtils.cleanPath(multipartFile.getOriginalFilename());
        long size = multipartFile.getSize();

        String fileCode = FileUploadUtil.saveFile(filename, multipartFile);
        FileUploadResponse response = new FileUploadResponse(filename, "/download/" + fileCode, size);
        return ResponseEntity.ok(response);
    }

    /**
     * Download response entity.
     *
     * @param fileCode the file code
     * @return the response entity
     */
    @PostMapping(value = "/download")
    public ResponseEntity<?> download(@PathVariable(value = "fileCode") String fileCode) {
        // YET_TO_BE_IMPLEMENTED
        return ResponseEntity.ok().build();
    }
}
2.6 Create Main class
The main class is responsible for starting the Spring Boot application and initializing the necessary configurations and beans. It serves as the entry point for the application and triggers the execution of the application’s components, such as controllers, services, and repositories.
SpringbootFileuploadApplication.java
package com.example.demo;

import org.springframework.boot.SpringApplication;
import org.springframework.boot.autoconfigure.SpringBootApplication;

/**
 * The type Springboot fileupload application.
 */
@SpringBootApplication
public class SpringbootFileuploadApplication {

	/**
	 * The entry point of application.
	 *
	 * @param args the input arguments
	 */
	public static void main(String[] args) {
		SpringApplication.run(SpringbootFileuploadApplication.class, args);
	}
}
3. Output
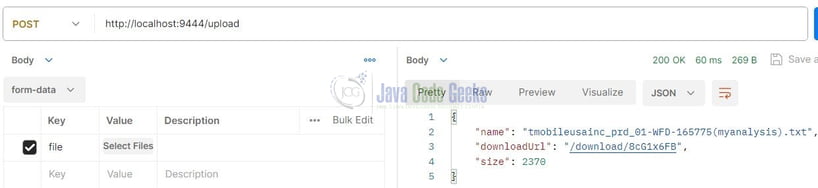
You can now run the Spring Boot application and trigger the below curl request from the Postman tool.
curl --location 'http://localhost:9444/upload' \
--form 'file=@"/path_to_file/someanalysis.txt"'
Assuming successful execution, the controller will handle the request and save the file in the “uploads” folder located in the project’s root directory. Subsequently, the corresponding output will be sent back to the user.
4. Conclusion
In conclusion, the Spring Boot File Upload REST API provides a convenient solution for handling file uploads in web applications. Leveraging the power of Spring Boot and its extensive features, developers can easily implement file upload functionality with minimal effort.
The API utilizes the Spring framework’s capabilities, including the @RestController annotation, to define and map the required endpoints for file upload and download operations. By accepting multipart file data using the MultipartFile class, the API simplifies the handling of file uploads from client applications.
When a file upload request is received, the API extracts essential information such as the file name, size, and content. It then processes the request by saving the file onto the disk, typically in a designated folder, such as uploads, in the project’s root directory. This functionality can be achieved using utility classes or methods specifically designed for file handling, such as the provided FileUploadUtil class.
Upon successful file saving, the API generates a response containing relevant details about the uploaded file, including the file name, download URL, and size. This response is encapsulated within a custom class, like the FileUploadResponse class, which provides convenient methods to access the file details.
Adhering to the principles of the REST architecture, the API offers clear and intuitive endpoints that follow industry best practices. By utilizing the ResponseEntity class, the API ensures proper communication between the server and client applications by returning appropriate HTTP status codes and response bodies.
To summarize, the Spring Boot File Upload REST API simplifies the implementation of file upload functionality in web applications. It provides a robust and efficient solution for handling file uploads, allowing developers to focus on other aspects of their application’s logic while maintaining a secure and user-friendly file upload experience.
You can download the source code from the Downloads section.
5. Download the Project
This was a tutorial to demonstrate the file upload functionality in Spring Boot.
You can download the full source code of this example here: Spring Boot File Upload REST API Example
