1. Introduction
In this example, we will go over an easy way to set up EhCache without the XML hassle. This example utilizes the simplicity of Spring Boot and Spring’s Cache annotations.
If you are on this page, I can assume you are likely familiar with EhCache. But, just in case, let’s do a short recap. EhCache is an open-source, Java-based, cache library. Caching helps offload the burden of database and web client calls by storing results locally for rapid lookup.
EhCache normally utilizes an ehcache.xml file to configure your caches. This was a great solution in the past. This seems tedious now when utilizing the newer Spring versions. Spring has eliminated the need for its previous applicationContext.xml file by converting that logic to annotations.
In the example we are about to walkthrough, we will utilize Spring Boot, Maven, and EhCache. I prefer web apps, but for this example, I used the command-line to reduce complexity.
Here is the breakdown of the versions on my machine:
- Eclipse 2019-09 R (4.13.0)
- Spring Boot 2.2.2.RELEASE
- Java 11
- Maven 3.6.1
2. The Example
The example is simplified since the actual data being cached is less important than creating the cache. In the example, we are going to have a method return an incrementing value. To prove the cache is working, we will ensure that we end up getting the same value instead of the incremented one. Then we will test that our cache configuration is working as expected by testing the eviction policy.
2.1 Setting Up
Let’s start by bringing in the required dependencies with Maven. If you are using Eclipse, create a new maven project and edit the pom file. First, we will add a parent of Spring Boot Starter. If you have not used a parent dependency before, it allows you to apply the parent’s configuration to your project. Learn more about Maven and pom configurations here. If you are not familiar with the Spring Boot Starter Parent, it will provide some default configurations. It will also allow you to specify dependencies without explicitly giving a version since the Spring Boot Starter Parent will implicitly use the versions that it provides. You can learn more about Spring Boot and the starter projects here. Now, utilizing the parent’s versions, you will also bring in the spring boot starter cache, Ehcache, and JUnit dependencies.
pom.xml
  <parent>
  	<groupId>org.springframework.boot</groupId>
  	<artifactId>spring-boot-starter-parent</artifactId>
  	<version>2.2.2.RELEASE</version>
  </parent>

  <dependencies>
  	<dependency>
        <groupId>org.springframework.boot</groupId>
        <artifactId>spring-boot-starter</artifactId>
    </dependency>
  	<dependency>
	    <groupId>org.springframework.boot</groupId>
	    <artifactId>spring-boot-starter-cache</artifactId>
	</dependency>
	<dependency>
	    <groupId>net.sf.ehcache</groupId>
	    <artifactId>ehcache</artifactId>
	</dependency>
    <dependency>
      <groupId>junit</groupId>
      <artifactId>junit</artifactId>
      <scope>test</scope>
    </dependency>
  </dependencies>
2.2 Service Code
Next, we can create a simple service class wired up with Spring. We will use the @Service annotation from Spring so that it will handle the instantiation of the class for us. We will also utilize Spring’s @Cacheable annotation to indicate this method will be cached and provide it a name to call the cache. You will see that code is very simple in that it just returns an increasing value.
EhCacheExampleService.java
package com.jcg.example.ehcache_no_xml.service;

import org.springframework.cache.annotation.Cacheable;
import org.springframework.stereotype.Service;

@Service
public class EhCacheExampleService {
	int value = 0;

	@Cacheable("testCache")
	public int getCachedValue() {
		return value++;
	}
}
2.3 Main Class
First, let me outline a few of the annotations provided in this file. We start off with the @SpringBootApplication, which is a collection of other Spring annotations under the hood. It marks this class as a configuration class for Spring to wire up. It also creates a Spring scanner for Spring to explore underlying directories looking for more Spring annotations to configure. One of the annotations it finds is our @Service from the previous Java class and the @Autowired listed in the class below. Spring will instantiate the Service and insert it the references it finds. If you want to know more about these annotations, visit Spring’s website to learn more about Spring Boot.
Next, we have the @EnableCaching. This is the indicator for Spring to enable and configure all the caching configurations for the @Cacheable annotation we used in the first class. In short, these annotations do all the magic under the hood to wire up our project so we don’t have to. This magic is commonly referred to as Spring’s ‘Auto-Magic‘.
Then there is the CommanLineRunner. This CommandLineRunner is the hook to let Spring Boot know we need to run this main method to start the application. So although Spring has lots of ‘Auto-Magic‘, we have still had to lay out a few lines for it know what we want to perform magic on. Now that we included that, Spring knows to start the application by calling the main method and then Spring will call the run method to start firing off the logic for us.
Last but not least for this file, let’s discuss the actual looping and calling logic of the cached method. For simplicity, I used the IntStream to loop 5 times over the cached method and print its results. After calling the method 5 times, we then tell the Thread to sleep for 3 seconds and then call the cached method another 5 times.
EhCacheNoXMLExample.java
package com.jcg.example.ehcache_no_xml;

import java.util.stream.IntStream;

import org.springframework.beans.factory.annotation.Autowired;
import org.springframework.boot.CommandLineRunner;
import org.springframework.boot.SpringApplication;
import org.springframework.boot.autoconfigure.SpringBootApplication;
import org.springframework.cache.annotation.EnableCaching;

import com.jcg.example.ehcache_no_xml.service.EhCacheExampleService;

/**
 * EhCache Example App with no XML Config
 *
 */
@SpringBootApplication
@EnableCaching
public class EhCacheNoXMLExample implements CommandLineRunner {

	@Autowired
	private EhCacheExampleService ehCacheExampleService;

	public static void main(String[] args) {
		System.out.println( "EhCache Example Running" );
        SpringApplication.run(EhCacheNoXMLExample.class, args);

	}

	@Override
	public void run(String... args) throws Exception {
		IntStream.range(0,5).forEach(i -> System.out.println(ehCacheExampleService.getCachedValue()));
		Thread.sleep(3000);
		IntStream.range(0,5).forEach(i -> System.out.println(ehCacheExampleService.getCachedValue()));
	}

}
To test what we have done, we have to run this as a Spring Boot Application. We can do this on the command line or in Eclipse if you have Spring plugins installed. Let’s give both examples.
Command Line Execution with maven
mvn spring-boot:run
or
Eclipse -> Run As -> Spring Boot App
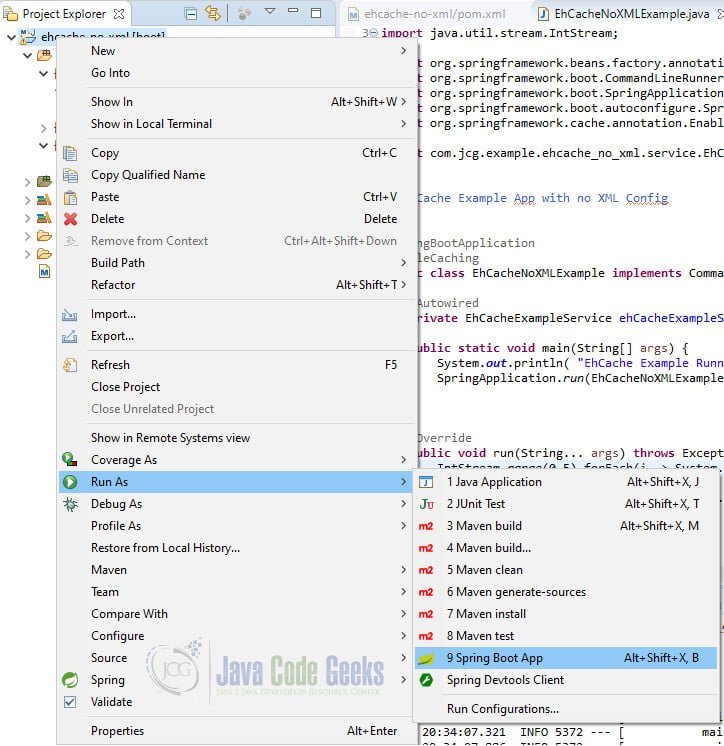
That will execute your project and if you check the console, you should see the output.
The Results
EhCache Example Running

  .   ____          _            __ _ _
 /\\ / ___'_ __ _ _(_)_ __  __ _ \ \ \ \
( ( )\___ | '_ | '_| | '_ \/ _` | \ \ \ \
 \\/  ___)| |_)| | | | | || (_| |  ) ) ) )
  '  |____| .__|_| |_|_| |_\__, | / / / /
 =========|_|==============|___/=/_/_/_/
 :: Spring Boot ::        (v2.2.2.RELEASE)

2019-12-16 20:34:07.319  INFO 5372 --- [           main] c.j.e.e.EhCacheNoXMLExample              : Starting EhCacheNoXMLExample on ...
2019-12-16 20:34:07.321  INFO 5372 --- [           main] c.j.e.e.EhCacheNoXMLExample              : No active profile set, falling back to default profiles: default
2019-12-16 20:34:07.886  INFO 5372 --- [           main] c.j.e.e.EhCacheNoXMLExample              : Started EhCacheNoXMLExample in 0.902 seconds (JVM running for 3.359)
0
0
0
0
0
0
0
0
0
0
As you can see, the cache worked successfully and gave you a 0 every time! Success! You have a working EhCache with no XML in this project. You could have even stripped out the Spring Boot and had even less code. But wait! How do you plan on configuring this cache to get new elements? Well, that is when the ehcache.xml file is normally needed. Now, we need to do what the ehcache.xml normally does but programmatically. This is where the fun comes in.
2.4 The EhCache Configuration!
We will use some more of Spring’s ‘Auto-Magic‘ and some of EhCache’s classes to configure our cache settings on startup. We start off by using another Spring annotation of @Configuration. This is so Spring finds this file in its scan and configures it on startup. Next, we use the @Bean, twice. If you have not used this annotation before, it is how we tell Spring to instantiate, configure, and manage this object so we don’t have to. So now that we have Spring creating and managing these objects, what type of objects are they and what do they do?

The first object in the class we want Spring to control is the EhCacheManagerFactoryBean. This is an EhCache Cache Manager. By exposing this as a bean, we are telling Spring to configure the defaults for this instance and manage it for us. In the inner workings, this means that Spring will go look for the infamous ehcache.xml file to configure all the caches we have defined. But wait, we don’t have one of those files. What does Spring do when it cannot find one? It ‘Auto-Magically‘ plugs in the defaults for us. That is how we eliminated the ehcache.xml file, by using Spring’s ‘Auto-Magic‘. (Just to clarify, no actual magic takes place. Just some cool Java code is executed behind the scenes.)
The second object is how we define settings for our specific caches when there is no ehcache.xml file. We create a new CacheConfiguration to define the settings. Then we create a new Cache and pass the cache configuration to its constructor. Next, we grab the cache manager created above and insert the newly created cache inside of it. Lastly, we return the EhCacheCacheManager with the updated managed cache inside of it. We could have done both of these inside a single method, but I like to separate each cache I create into its own method. I find this setup easier to manage and edit when having multiple caches.
By creating this configuration class with these two beans, EhCacheManagerFactoryBean and EhCacheCacheManager, we have told Spring to no longer give us a cache with the defaults but to use these Cache Managers instead. You will notice on line 28 of this class, we named the cache we just created as ‘testCache’. This is the same name we used in our Service class where we said, @Cacheable(“testCache”). By using this name in the service class and in this cache creation, Spring will associate the two and insert any cached values from that method into this cache using the settings we defined.
If you have used EhCache before, the cache configuration setting’s options should not be new. I have provided comments in the code to explain what each setting does for the cache. The main takeaway for this example is that we set the timeToIdleSeconds to 3. If you remember from our test code above, we have the thread wait for 3 seconds. This means that when we wait for those seconds, the cache will flag our cached value for removal and remove it. So in the set of results, we should not have all 0s.
EhCacheConfig.java
package com.jcg.example.ehcache_no_xml.config;

import org.springframework.cache.ehcache.EhCacheCacheManager;
import org.springframework.cache.ehcache.EhCacheManagerFactoryBean;
import org.springframework.context.annotation.Bean;
import org.springframework.context.annotation.Configuration;

import net.sf.ehcache.Cache;
import net.sf.ehcache.config.CacheConfiguration;

@Configuration
public class EhCacheConfig {

	@Bean
	public EhCacheManagerFactoryBean cacheManager() {
		return new EhCacheManagerFactoryBean();
	}

	@Bean
	public EhCacheCacheManager testEhCacheManager() {
		// testEhCache Configuration - create configuration of cache that previous required XML
		CacheConfiguration testEhCacheConfig = new CacheConfiguration()
			.eternal(false)						// if true, timeouts are ignored
			.timeToIdleSeconds(3)				// time since last accessed before item is marked for removal
			.timeToLiveSeconds(5)				// time since inserted before item is marked for removal
			.maxEntriesLocalHeap(10)			// total items that can be stored in cache
			.memoryStoreEvictionPolicy("LRU")	// eviction policy for when items exceed cache. LRU = Least Recently Used
			.name("testCache");

		Cache testCache = new Cache(testEhCacheConfig);

		cacheManager().getObject().addCache(testCache);
		return new EhCacheCacheManager(cacheManager().getObject());
	}
}
2.5 Final Results!
The moment of truth. As before, run your application with the command line or with Eclipse.
The Final Results
EhCache Example Running

  .   ____          _            __ _ _
 /\\ / ___'_ __ _ _(_)_ __  __ _ \ \ \ \
( ( )\___ | '_ | '_| | '_ \/ _` | \ \ \ \
 \\/  ___)| |_)| | | | | || (_| |  ) ) ) )
  '  |____| .__|_| |_|_| |_\__, | / / / /
 =========|_|==============|___/=/_/_/_/
 :: Spring Boot ::        (v2.2.2.RELEASE)

2019-12-17 20:59:14.422  INFO 4752 --- [           main] c.j.e.e.EhCacheNoXMLExample              : Starting EhCacheNoXMLExample on ...)
2019-12-17 20:59:14.422  INFO 4752 --- [           main] c.j.e.e.EhCacheNoXMLExample              : No active profile set, falling back to default profiles: default
2019-12-17 20:59:14.877  INFO 4752 --- [           main] o.s.c.ehcache.EhCacheManagerFactoryBean  : Initializing EhCache CacheManager
2019-12-17 20:59:14.877  WARN 4752 --- [           main] n.s.ehcache.config.ConfigurationFactory  : No configuration found. Configuring ehcache from ehcache-failsafe.xml  found in the classpath: jar:file:.../.m2/repository/net/sf/ehcache/ehcache/2.10.6/ehcache-2.10.6.jar!/ehcache-failsafe.xml
2019-12-17 20:59:15.113  INFO 4752 --- [           main] c.j.e.e.EhCacheNoXMLExample              : Started EhCacheNoXMLExample in 0.957 seconds (JVM running for 2.231)
0
0
0
0
0
1
1
1
1
1
2019-12-17 20:59:18.151  INFO 4752 --- [extShutdownHook] o.s.c.ehcache.EhCacheManagerFactoryBean  : Shutting down EhCache CacheManager
There is the increment we were looking for! You have successfully implemented a programmatic cache with Spring!
3. Download the Source Code
Download the source code and add some caches of your own!
You can download the full source code of this example here:
Setting Up EhCache Without the XML Hassle

Hey Joseph Jones, thanks for this informative post on the process of Setting Up EhCache Without the XML Hassle. It’s been very easy for me through these steps.
Are you not worry about this line in logs ?
The configuration you implement seems not used ???
Im also getting the same issue. Is this working even with that warning?