Spring Data Cassandra is a powerful extension of the Spring Data project, designed to simplify the integration of Apache Cassandra with the Spring framework. This innovative technology offers developers a streamlined approach to working with Cassandra databases, reducing boilerplate code and enhancing productivity. Spring Data Cassandra provides features like simplified data access through annotations, seamless integration with the broader Spring ecosystem, repository support for CRUD operations, a Query DSL for type-safe queries, and automatic schema generation. With these capabilities, developers can efficiently harness the benefits of Cassandra’s distributed architecture within a familiar and cohesive Spring-based programming model. Let us delve into a practical approach to understanding the Spring Cassandra Query IN clause.
1. Understanding Apache Cassandra
Apache Cassandra is a highly scalable, distributed NoSQL database system designed to handle large amounts of data across multiple commodity servers without a single point of failure. It excels in providing high availability, fault tolerance, and linear scalability, making it a popular choice for applications requiring massive amounts of data storage and retrieval. Below are several advantages provided by Apache Cassandra:
- Distributed Architecture:
- Cassandra follows a peer-to-peer architecture, distributing data across multiple nodes in the cluster.
- No single point of failure, as data is replicated across nodes for fault tolerance.
- NoSQL Model:
- Cassandra is a NoSQL database, meaning it does not use the traditional relational database model.
- It employs a wide-column store data model, providing flexibility in managing different types of data.
- High Availability:
- Due to its decentralized nature, Cassandra ensures high availability even during node failures.
- It provides automatic data partitioning and replication, allowing continued operation in the face of hardware or network issues.
- Linear Scalability:
- Cassandra scales linearly by adding more nodes to the cluster, making it suitable for handling increasing data loads.
- Horizontal scaling allows seamless expansion without compromising performance.
- Tunable Consistency:
- Cassandra allows developers to choose between strong and eventual consistency based on their application’s requirements.
- This flexibility is crucial for balancing data consistency and system performance.
2. Understanding Spring Data Cassandra
Spring Data Cassandra is part of the broader Spring Data project, providing seamless integration between the Spring framework and Apache Cassandra. It simplifies the development process by offering a higher-level abstraction for working with Cassandra databases, reducing boilerplate code and enhancing productivity. Below are several advantages provided by Spring Data Cassandra:
- Simplified Data Access:
- Spring Data Cassandra abstracts the complexities of interacting with Cassandra, providing a familiar Spring-based programming model.
- Developers can leverage annotations and templates for streamlined data access.
- Seamless Integration with Spring Ecosystem:
- Spring Data Cassandra seamlessly integrates with other Spring projects, such as Spring Boot, making it easier to build robust and scalable applications.
- Developers can leverage the powerful features of the Spring ecosystem, including dependency injection and transaction management.
- Repository Support:
- Spring Data Cassandra supports the repository pattern, allowing developers to define repositories for their entities with minimal effort.
- This enables common CRUD (Create, Read, Update, Delete) operations without the need for boilerplate code.
- Query DSL:
- Spring Data Cassandra provides a Query DSL (Domain-Specific Language) that allows developers to express queries in a type-safe manner.
- This enhances code readability and reduces the risk of runtime errors.
- Automatic Schema Generation:
- Spring Data Cassandra can automatically generate Cassandra schema based on the domain model, reducing the need for manual schema management.
- This feature streamlines the development process and ensures consistency between the application and database schema.
3. Cassandra on Docker
To create a Spring Boot application that queries Cassandra using the IN operator with Spring Data Cassandra, you’ll need to follow these steps.
3.1 Setting up Cassandra container on Docker
Running Apache Cassandra on Docker can be a convenient way to set up and manage Cassandra clusters. Docker allows you to create containers that encapsulate Cassandra and its dependencies, making it easy to deploy, scale, and manage Cassandra instances.
First, you need to pull the official Cassandra Docker image from Docker Hub. Open a terminal and run the following command:
docker pull cassandra
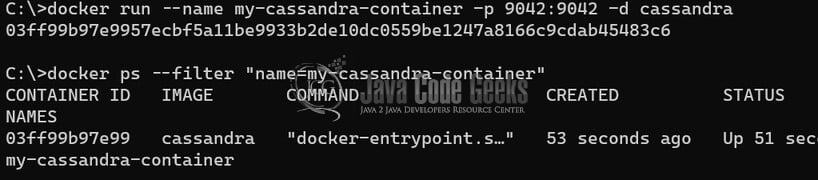
After pulling the image, you can create and run a Cassandra container with the following command:
docker run --name my-cassandra-container -p 9042:9042 -d cassandra
--name my-cassandra-container: Assign a name to your container (you can use any name)-p 9042:9042: Maps the Cassandra default port (9042) from the container to the host.-d: Runs the container in the background (detached mode).
Make note that when you’re done using Cassandra, you can stop and remove the container.
-- Stop the container.
docker stop my-cassandra-container

-- Remove the container.
docker rm my-cassandra-container
3.2 Adding data in Cassandra
To create sample data in Cassandra, you can use CQL (Cassandra Query Language) to insert records into a keyspace and table. Below is a simple example to create a keyspace, define a table, and insert sample data into it.
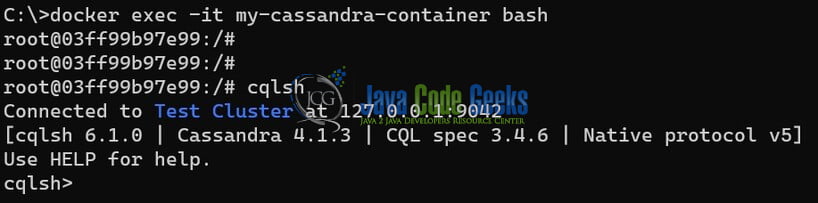
If you’ve followed the previous steps to run Cassandra in a Docker container, access the CQLSH shell inside the container:
docker exec -it my-cassandra-container bash

Once inside the container type cqlsh and press Enter to connect to the Cassandra cluster.
In Cassandra, a keyspace is the top-level container for data. Create a keyspace for your sample data. You can replace mykeyspace with the desired keyspace name.
CREATE KEYSPACE mykeyspace WITH replication = {'class': 'SimpleStrategy', 'replication_factor': 1};

Switch to the newly created keyspace and create a table structure. We will simple table for storing user information. The table has three columns: user_id as the primary key, username, and email.
USE mykeyspace;

CREATE TABLE users (user_id UUID PRIMARY KEY, username text, email text);

Insert some sample data into the table. Replace the values with your sample data or add more rows as needed. Once data is inserted you can query the data from the table.
INSERT INTO users (user_id, username, email) VALUES (uuid(), 'john_doe', 'john.doe@example.com');

INSERT INTO users (user_id, username, email) VALUES (uuid(), 'jane_smith', 'jane.smith@example.com');

SELECT * FROM users;
The SELECT SQL query should display the inserted sample data.

4. Application Code
Create a new Spring Boot project or use an existing one. You can use Spring Initializr (https://start.spring.io/) to generate a new project with the necessary dependencies, including “Spring Data Cassandra” and “Spring Web”. The Spring Initializr will automatically create a main class for you in the com.jcg package.
4.1 Configure Cassandra Connection
In your application.properties or application.yml file, configure the application and Cassandra connection properties:
## Application properties
server.port=10093
spring.application.name=spring-data-for-apache-cassandra

## Cassandra properties
spring.data.cassandra.contact-points=localhost
spring.data.cassandra.port=9042
spring.data.cassandra.keyspace=mykeyspace
Make a note to replace the values with your Cassandra contact points, port, and keyspace.
4.2 Create an Entity Class
Define a simple entity class that represents the Cassandra table you want to query. For example:
package com.jcg.entity;

import org.springframework.data.cassandra.core.mapping.PrimaryKey;
import org.springframework.data.cassandra.core.mapping.Table;

import java.util.UUID;

@Table("users")
public class User {
@PrimaryKey
private UUID userId;

private String username;

private String email;

// getters and setters
}
4.3 Create a Spring Data Cassandra Repository
Create a repository interface that extends CassandraRepository or CassandraCrudRepository. Define a custom method with the IN operator. For example:
package com.jcg.repository;

import org.springframework.data.cassandra.repository.AllowFiltering;
import org.springframework.data.cassandra.repository.CassandraRepository;

import java.util.List;
import java.util.UUID;

public interface UserRepository extends CassandraRepository<User, UUID> {
@AllowFiltering
List<User> findByUserIdIn(List<UUID> userIds);
}
The @AllowFiltering annotation is required when using the IN operator in Cassandra.
4.4 Create a Service Class
Create a service class that uses the repository to perform the query. For example:
package com.jcg.service;

import org.springframework.beans.factory.annotation.Autowired;
import org.springframework.stereotype.Service;

import java.util.List;
import java.util.UUID;

@Service
public class UserService {
private final UserRepository userRepository;

@Autowired
public UserService(UserRepository userRepository) {
   this.userRepository = userRepository;
}

public List<User> getUsersByIds(List<UUID> userIds) {
   return userRepository.findByUserIdIn(userIds);
}
}
4.5 Create a Controller
Create a controller to handle HTTP requests from clients. For example:
package com.jcg.controller;

import org.springframework.beans.factory.annotation.Autowired;
import org.springframework.web.bind.annotation.GetMapping;
import org.springframework.web.bind.annotation.RequestParam;
import org.springframework.web.bind.annotation.RestController;

import java.util.List;
import java.util.UUID;

@RestController
public class UserController {
private final UserService userService;

@Autowired
public UserController(UserService userService) {
   this.userService = userService;
}

@GetMapping("/users")
public List<User> getUsersByIds(@RequestParam List<UUID> userIds) {
   return userService.getUsersByIds(userIds);
}
}
4.6 Run the Application
Run your Spring Boot application and the application will be started on a port number – 10093. You can use tools like Postman or cURL to make HTTP requests to the /users endpoint, passing a list of UUIDs as query parameters.
5. Conclusion
In conclusion, developing a Spring Boot application to query Cassandra using the IN operator with Spring Data Cassandra involves a systematic process of setting up the project, configuring the Cassandra connection, defining entity classes and repositories, and implementing service and controller layers. Leveraging the IN operator in Cassandra queries is facilitated through the creation of custom methods in the repository, with necessary annotations such as @AllowFiltering to ensure proper functionality. This approach provides a structured and modularized architecture, allowing for efficient querying of data from a Cassandra database. The Spring Boot framework, coupled with Spring Data Cassandra, simplifies the development process, offering flexibility and scalability. Developers can further tailor the application to specific use cases by adjusting entity structures, custom queries, and other components. Overall, this example serves as a foundation for building robust and efficient Spring Boot applications that interact with Cassandra databases using the powerful IN operator.
