Hello. In this tutorial, we will cover an e2e MERN Stack Technologies application. In the MERN stack application; NodeJs-ExpressJs will serve as a backend application that will talk to a NoSQL database (i.e. Mongodb) and ReactJs will serve as a frontend application to interact with the backend application endpoints and display the data on the page.
1. Introduction
The MERN stack is a popular web development technique that consists of four key technologies: MongoDB, ExpressJs, ReactJs, and NodeJs. Each component serves a specific purpose in building dynamic and scalable web applications. Using the MERN (MongoDB, ExpressJs, ReactJs, NodeJs) stack for web development has several benefits.
- Full-stack JavaScript: MERN stack allows you to use JavaScript throughout the entire development process, from the front end to the back end. This means you can write code in a single language, which simplifies the development workflow and reduces the learning curve.
- Efficiency and productivity: MERN stack offers a comprehensive set of tools and libraries that work seamlessly together. With a unified technology stack, developers can work more efficiently and deliver projects faster. Reusing code components and modules also save development time.
- React.js for dynamic user interfaces: React.js, a JavaScript library for building user interfaces, is a central part of the MERN stack technologies. It provides a component-based approach to UI development, enabling developers to create interactive and dynamic web applications easily. React’s virtual DOM helps optimize performance by efficiently updating only the necessary components.
- Node.js for server-side development: Node.js is a server-side JavaScript runtime environment that allows developers to build scalable and high-performance web applications. It offers a non-blocking, event-driven architecture that can handle a large number of concurrent connections efficiently. With Node.js, you can use JavaScript both on the client and server, ensuring a consistent development experience.
- Express.js for robust back-end development: Express.js is a lightweight and flexible web application framework that runs on top of Node.js. It simplifies the process of building RESTful APIs and handling server-side logic. Express.js provides a range of features, including routing, middleware support, and easy integration with databases, making it an excellent choice for back-end development in the MERN stack.
- MongoDB for flexible and scalable data storage: MongoDB is a NoSQL database that stores data in flexible, JSON-like documents. It offers high scalability, allowing you to handle large amounts of data and easily scale your application as needed. MongoDB’s flexible schema and powerful querying capabilities make it well-suited for agile development and evolving data requirements.
- Rich ecosystem and community support: The MERN stack technologies has a vast and active community of developers. This means you can find abundant learning resources, tutorials, and libraries to support your development efforts. The ecosystem is continuously evolving, ensuring that you have access to the latest tools and best practices.
In summary, the MERN stack provides a cohesive JavaScript-based development environment that promotes productivity, scalability, and flexibility. Whether you’re building a simple web application or a complex enterprise system, the MERN stack offers a robust set of tools and technologies to meet your needs.
1.1 Advantages of MERN stack
- Full JavaScript Stack: With the MERN stack, developers can use JavaScript throughout the entire application, from the front end (ReactJs) to the back end (NodeJs). This eliminates the need for context-switching between different programming languages and promotes a consistent development workflow.
- Modularity and Reusability: ReactJs allows for the creation of reusable UI components, which can be easily managed and maintained. This promotes code modularity, reduces redundancy, and enhances the development process.
- Efficient Development: The MERN stack provides a streamlined development experience by offering a range of tools, libraries, and frameworks that work seamlessly together. This accelerates the development process, increases productivity, and reduces development time.
- Scalability: The MERN stack allows for easy scalability as the application grows. MongoDB, as a NoSQL database, offers horizontal scalability, allowing applications to handle increased data volumes and user traffic efficiently.
- Rich Ecosystem: The MERN stack has a vibrant and active community, providing a wide range of resources, tutorials, and open-source libraries. Developers can leverage this ecosystem to find solutions, address challenges, and collaborate with other developers.
- Real-time Updates: With the combination of React.js and Node.js, developers can easily implement real-time communication using technologies like WebSockets or server-sent events. This enables the creation of interactive and dynamic applications that can update and display data in real time without requiring page refreshes.
- Flexibility: The MERN stack is flexible and can be easily customized to fit specific project requirements. Developers have the freedom to choose additional libraries, frameworks, or tools that complement the MERN stack and enhance functionality.
- Strong Community Support: The MERN stack has a large and active community, which means there are abundant resources, tutorials, and documentation available. Developers can benefit from community support, find solutions to problems, and stay updated with the latest trends and best practices.
1.2 Limitation of MERN stack
- Learning Curve: The MERN stack requires developers to have a strong understanding of JavaScript and its associated frameworks. The learning curve can be steep for beginners or developers who are not familiar with these technologies.
- Complexity: As a full stack solution, the MERN stack introduces complexity compared to using a single technology or framework. Coordinating the different components of the stack and managing data flow between them can be challenging, especially for large-scale applications.
- Performance: While the MERN stack can provide high-performance applications, improper implementation or inefficient code can impact performance. It requires careful optimization and consideration of factors like server response time, data retrieval, and rendering on the client side.
- Memory Consumption: Node.js, as the runtime environment for the backend, can consume significant memory resources, especially when handling large-scale applications or concurrent user requests. Proper memory management and scaling strategies are crucial to mitigate potential issues.
- Scalability Challenges: Although the MERN stack allows for horizontal scalability by leveraging MongoDB, scaling can still be complex. Ensuring efficient database scaling and managing increased user traffic requires careful planning, monitoring, and optimization.
- Limited Documentation: While the MERN stack has a strong community, the documentation and resources may not be as extensive or comprehensive as those for more established frameworks. Developers may encounter challenges in finding specific solutions or guidance for niche use cases.
- Security: Security is an essential consideration in web applications, and the MERN stack is not immune to security vulnerabilities. Developers need to pay close attention to implementing proper security measures, such as input validation, authentication, and protection against common attacks like cross-site scripting (XSS) or SQL injection.
- Dependency Management: With the use of multiple frameworks and libraries within the MERN stack, managing dependencies and ensuring compatibility between different versions can be challenging. Careful attention must be given to dependency management and keeping dependencies up to date to avoid conflicts or compatibility issues.
2. Setting up the environment
2.1 Setting up NodeJs and NPM
Follow the below steps to set up the nodejs and npm.
- Visit the official Node.js website: https://nodejs.org/
- On the homepage, you will see two download options: LTS (Long-Term Support) and Current. It is generally recommended to choose the LTS version, as it provides stability and support for a longer duration. Click on the “LTS” button to download the installer for your operating system.
- Once the installer is downloaded, run it and follow the installation wizard instructions. The installation process may vary slightly depending on your operating system.
- During the installation, you may be prompted to choose additional features or customize the installation settings. The default settings are typically suitable for most users, so you can proceed with the default options unless you have specific requirements.
- After completing the installation, open your command-line interface (Terminal on macOS and Linux, Command Prompt or PowerShell on Windows) to verify that Node.js and npm are installed correctly.
- To check if Node.js is installed, type the following command and press Enter:
node -v
- To check if npm is installed, type the following command and press Enter:
npm -v
2.2 Setting up Docker
If someone needs to go through the Docker installation, please watch this video.
3. Setting up Mongo instance on Docker
As we have already installed Docker we will use it to bring a mongodb instance and a gui for mongodb. Add the following code to the below stack.yml file. Once the docker container is started –
- The mongodb will be available at port number – 27017 and the UI will be available at this host –
localhost:10091 - The mongodb instance will also be initialized with an empty database –
employeedb. The reference of this db will be given in the backend application index.js file
stack.yml
services:
  mongodb:
    container_name: mongodb
    image: mongo
    environment:
      MONGO_INITDB_DATABASE: employeedb
    ports:
      - "27017:27017"
  express:
    container_name: express_1
    image: mongo-express
    ports:
      - "10091:8081"
    environment:
      - ME_CONFIG_MONGODB_SERVER=mongodb
      - ME_CONFIG_MONGODB_PORT=27017
      - ME_CONFIG_MONGODB_ENABLE_ADMIN=true
    depends_on:
      - mongodb
version: "3"
The port exposed for mongodb at the Docker end will be used to bind from the express js application. The connection details are mentioned in the index.js file.
3.1 Running Mongo db instance on Docker
To start, stop, and remove the containers arrangement use the below commands.
- Start command will pull the images (if not already available) from the Docker Hub and start the containers. If the image will be already present locally the pull part will be skipped
- Stop command will stop the running containers
- Remove the containers and related setup
-- Start the containers
docker-compose -f stack.yml up -d

-- Stop the containers
docker-compose -f stack.yml stop

-- Remove the containers
docker-compose -f stack.yml rm -f
4. Creating a NodeJs and ExpressJs project
Let us start by creating a NodeJs and ExpressJs project.
4.1 Setup the project directory
Create a new directory for your project and navigate into it using your command-line interface.
Snippet
-- Create a new project directory and enter to it
mkdir node-mongodb && cd node-mongodb
4.2 Initialize a project
Initialize a new NodeJs project by running the following command. This will create a package.json file with default configurations for your project in the project’s root folder.
Initialize
npm init -y
4.3 Install packages
Install the required packages for your project by running the following command. The command will install the required packages in the node_modules folder and also make an entry of the installed packages in the package.json file.
Install project dependencies
npm install --save body-parser express mongoose cors dotenv
If you’re interested to look at the already created package.json file you can download it from the Downloads section.
4.4 Create the model definition
Create a file in models/employee.js path. The file represents the employee model definition to be persisted in mongodb for an employee.
models/employee.js
const mongoose = require("mongoose");

const EmployeeSchema = mongoose.Schema({
  first_name: {
    type: String
  },
  last_name: {
    type: String
  },
  email_address: {
    type: String,
    required: [true, "Email address is required"]
  },
  phone_number: {
    type: String
  },
  date_of_joining: {
    type: Date,
    default: Date.now
  }
});

module.exports = mongoose.model("Employees", EmployeeSchema);
4.5 Exposing the routes
Create a file in routes/employee.js path. The javascript file exposes the CRUD api endpoints for an employee. The HTTP methods only handle the database interactions and skip the basic logical and business validations. You’re free to include the required validations as a part of your learning.
- Save a new employee
- Get an employee
- Get all employees
- Patch an employee
- Delete an employee
- Delete all employees
routes/employee.js
const express = require("express");
const router = express.Router();
const Employee = require("../models/employee");

// submit employee details
router.post("/", (req, res) => {
  console.log("Creating a new employee.");
  // todo - skipping request body validation for brevity

  // creating employee obj
  var employee = new Employee({
    first_name: req.body.first_name,
    last_name: req.body.last_name,
    email_address: req.body.email_address,
    phone_number: req.body.phone_number
  });

  employee
    .save()
    .then((response) => {
      res.status(201).json({ message: response });
    })
    .catch((err) => {
      res.status(500).json({ message: err });
    });
});

// get back all employees
router.get("/", (req, res) => {
  console.log("Getting all employees.");
  Employee.find()
    .then((response) => {
      res.status(200).json({ message: response });
    })
    .catch((err) => {
      res.status(500).json({ message: err });
    });
});

// get back a single employee
router.get("/:id", (req, res) => {
  console.log("Searching id = %s", req.params.id);

  Employee.findById(req.params.id)
    .then((response) => {
      if (!response) {
        res.status(404).json({ message: "Resource not found" });
      } else {
        res.status(200).json({ message: response });
      }
    })
    .catch((err) => {
      res.status(500).json({ message: err });
    });
});

// delete all employees
router.delete("/", (req, res) => {
  console.log("Deleting all employees.");
  Employee.deleteMany()
    .then((response) => {
      res.status(200).json({ message: response });
    })
    .catch((err) => {
      res.status(500).json({ message: err });
    });
});

// delete an employee
router.delete("/:id", (req, res) => {
  console.log("Deleting id = %s", req.params.id);

  // todo - skipping find-by-id validation for brevity

  Employee.deleteOne({ _id: req.params.id })
    .then((response) => {
      res.status(200).json({ message: response });
    })
    .catch((err) => {
      res.status(500).json({ message: err });
    });
});

// update an employee
router.patch("/:id", (req, res) => {
  console.log("Updating id = %s", req.params.id);

  // todo - skipping find-by-id validation for brevity
  // todo - add update functionality for other employee fields

  Employee.updateOne(
    { _id: req.params.id },
    { $set: { phone_number: req.body.phone_number } }
  )
    .then((response) => {
      res.status(204).json({ message: response });
    })
    .catch((err) => {
      res.status(500).json({ message: err });
    });
});

module.exports = router;
4.6 Create the ExpressJs server file
Create a file named index.js in the project’s root directory. The file contains the api routes, cors, and Mongo db connection configuration, and exposes the 3100 as the default application port. If you have the .env file in the project’s root directory it will read from there otherwise pick up the default. The server file also has the CORS configuration to allow requests from any domain. Add the following code to the file.
- Note: I have
.envfile in the project’s root directory with the default application port set to8100for NodeJs application
index.js
const express = require("express");
const cors = require("cors");
const bodyParser = require("body-parser");

const mongoose = require("mongoose");

const dotenv = require("dotenv");
dotenv.config();

const app = express();
// parsing request of content-type as application/json
app.use(bodyParser.json());
app.use(
  cors({
    origin: "*" // helps to receive a request from any domain
  })
);

// import routes
const employeeRoutes = require("./routes/employees");
app.use("/api/employees", employeeRoutes);

// mongodb ui
const mongogui_port = 10091; // fix me - read the port dynamically.
// connect to db
const database_name = "employeedb";
const database_host = "localhost";
const database_port = 27017; // fix me - change mongodb port number.
const connection_string =
  "mongodb://" + database_host + ":" + database_port + "/" + database_name;
mongoose
  .connect(connection_string, {
    useNewUrlParser: true,
    useUnifiedTopology: true
  })
  .then(() => {
    console.log(
      `Connected to ${database_name} on ${database_port}. Mongodb ui available on port ${mongogui_port}.`
    );
  })
  .catch((err) => {
    console.log("Error while connecting to %s", database_name, err);
  });

// start app
const app_port = process.env.port || 3100;
app.listen(app_port, () => {
  console.log("Server started on port %s", app_port);
});
5. Creating a ReactJs application
Let us start by creating a ReactJs project.
5.1 Initialize a project
Initialize a new ReactJs project by running the following command. This will create a package.json file with default configurations for your project in the project’s root folder.
Initialize
npx create-react-app my-mongodb-app
5.2 Install package
Install the required package for your project by running the following command. The Axios package is used to make the http requests from react frontend to the node backend.
Install project dependency
npm install --save axios
If you’re interested to look at the already created package.json file you can download it from the Downloads section.
5.3 Make api requests from react to node backend
Create a folder named EmployeeList under src folder. Once the folder is created; create an empty EmployeeList.js file. The file includes –
- Use of the
useEffecthook to a get call to the backend api when the component is mounted. The call fetches all employees and displays it in the html table - The component also supports the update, delete, and delete all functionality via different handlers. The handlers are responsible to interact with the backend apis
- The
handlePost(…)method is left for the readers to play and experiment
Add the following code to it:
src/EmployeeList/EmployeeList.js
import axios from "axios";
import React, { useEffect, useState } from "react";
import { formatDate, maskEmail } from "./helpers";

const BASE_URI = "http://localhost:8100/api";
const EMPLOYEES_ENDPOINT = `${BASE_URI}/employees`;
const GET_ALL_EMPLOYEES_URL = EMPLOYEES_ENDPOINT;
const DELETE_EMPLOYEE_URL = EMPLOYEES_ENDPOINT;
const UPDATE_EMPLOYEE_URL = EMPLOYEES_ENDPOINT;

const EmployeeList = () => {
  const [employees, setEmployees] = useState([]);
  const [error, setError] = useState(null);
  const [editEmployeeId, setEditEmployeeId] = useState(null);
  const [editedPhoneNumber, setEditedPhoneNumber] = useState("");

  useEffect(() => {
    fetchData();
  }, []);

  // Fetch all employees
  const fetchData = async () => {
    try {
      const response = await axios.get(GET_ALL_EMPLOYEES_URL);
      const formattedEmployees = response.data.message.map((employee) => ({
        ...employee,
        maskedEmail: maskEmail(employee.email_address),
        dateOfJoining: formatDate(employee.date_of_joining)
      }));
      setEmployees(formattedEmployees);
    } catch (error) {
      setError(error);
    }
  };

  // Handle delete all employees
  const handleDeleteAll = async () => {
    try {
      await axios.delete(DELETE_EMPLOYEE_URL);
      setEmployees([]); // Clear the employees array in the state
    } catch (error) {
      setError(error);
    }
  };

  // Handle delete employee
  const handleDelete = async (id) => {
    try {
      await axios.delete(DELETE_EMPLOYEE_URL + "/" + id);
      //setEmployees(employees.filter((employee) => employee._id !== id));
      fetchData();
    } catch (error) {
      setError(error);
    }
  };

  // Handle update employee
  const handleEdit = (employee) => {
    setEditEmployeeId(employee._id);
    setEditedPhoneNumber(employee.phoneNumber);
  };

  const handleUpdate = async () => {
    try {
      await axios.patch(UPDATE_EMPLOYEE_URL + "/" + editEmployeeId, {
        phone_number: editedPhoneNumber
      });
      fetchData();
      setEditEmployeeId(null);
      setEditedPhoneNumber("");
    } catch (error) {
      setError(error);
    }
  };

  const handleCancel = () => {
    setEditEmployeeId(null);
    setEditedPhoneNumber("");
  };

  // Handle new employee
  const handlePost = () => {
    alert("The handlePost method needs to be implemented.");
  };

  // todo - add post operation

  if (error) {
    return <div>Error: {error}</div>;
  }

  return (
    <div style={styles.container}>
      <h1>Employee List</h1>
      <button style={styles.addButton} onClick={handlePost}>
        Add Employee
      </button>
      {employees.length > 0 ? (
        <>
          <button style={styles.deleteButton} onClick={handleDeleteAll}>
            Delete All
          </button>
          <table style={styles.table}>
            <thead>
              <tr>
                <th style={styles.header}>Index</th>
                <th style={styles.header}>First name</th>
                <th style={styles.header}>Last name</th>
                <th style={styles.header}>Email</th>
                <th style={styles.header}>Phone number</th>
                <th style={styles.header}>Date of joining</th>
                <th style={styles.header}>Actions</th>
                {/* Add more table headers/columns as needed */}
              </tr>
            </thead>
            <tbody>
              {employees.map((employee, index) => (
                <tr key={employee._id} style={styles.row}>
                  <td>{index + 1}</td>
                  <td>{employee.first_name}</td>
                  <td>{employee.last_name}</td>
                  <td>{employee.maskedEmail}</td>
                  <td>
                    {editEmployeeId === employee._id ? (
                      <input
                        type="text"
                        value={editedPhoneNumber}
                        onChange={(e) => setEditedPhoneNumber(e.target.value)}
                        style={styles.deleteInput}
                      />
                    ) : (
                      employee.phone_number
                    )}
                  </td>
                  <td>{employee.dateOfJoining}</td>
                  <td>
                    {editEmployeeId === employee._id ? (
                      <div>
                        <button
                          style={styles.updateButton}
                          onClick={handleUpdate}
                        >
                          Update
                        </button>
                        <button
                          style={styles.cancelButton}
                          onClick={handleCancel}
                        >
                          Cancel
                        </button>
                      </div>
                    ) : (
                      <button
                        style={styles.editButton}
                        onClick={() => handleEdit(employee)}
                      >
                        Edit
                      </button>
                    )}
                    <button
                      style={styles.deleteButton}
                      onClick={() => handleDelete(employee._id)}
                    >
                      <i className="fa fa-trash" aria-hidden="true"></i> Delete
                    </button>
                  </td>
                  {/* Add more table cells/columns as needed */}
                </tr>
              ))}
            </tbody>
          </table>
        </>
      ) : (
        <div style={styles.noRecords}>No records found.</div>
      )}
    </div>
  );
};

export default EmployeeList;

const styles = {
  table: {
    borderCollapse: "collapse",
    width: "100%"
  },
  header: {
    backgroundColor: "#f2f2f2",
    fontWeight: "bold",
    padding: "8px",
    textAlign: "center",
    borderBottom: "1px solid #ddd"
  },
  row: {
    backgroundColor: "#fff"
  },
  noRecords: {
    fontStyle: "italic",
    color: "#888",
    marginTop: "16px"
  },
  deleteButton: {
    backgroundColor: "#f44336",
    color: "#fff",
    padding: "4px 8px",
    border: "none",
    borderRadius: "4px",
    cursor: "pointer"
  },
  editButton: {
    backgroundColor: "#4CAF50",
    color: "#fff",
    padding: "4px 8px",
    border: "none",
    borderRadius: "4px",
    marginRight: "4px",
    cursor: "pointer"
  },
  updateButton: {
    backgroundColor: "#2196F3",
    color: "#fff",
    padding: "4px 8px",
    border: "none",
    borderRadius: "4px",
    marginRight: "4px",
    cursor: "pointer"
  },
  deleteInput: {
    padding: "4px 8px",
    border: "1px solid #ddd",
    borderRadius: "4px",
    marginRight: "4px"
  },
  cancelButton: {
    backgroundColor: "#ccc",
    color: "#fff",
    padding: "4px 8px",
    border: "none",
    borderRadius: "4px",
    marginRight: "4px",
    cursor: "pointer"
  },
  addButton: {
    backgroundColor: "#4caf50",
    color: "#fff",
    padding: "4px 8px",
    display: "inline-block",
    border: "none",
    borderRadius: "4px",
    marginRight: "4px",
    cursor: "pointer"
  },
  container: {
    maxWidth: "auto",
    margin: "0 auto",
    padding: "20px"
  }
};
5.4 Include component into App.js
Add the following code to the file to include the employee list component in the App.js file.
App.js
import "./App.css";
import EmployeeList from "./EmployeeList/EmployeeList";

function App() {
  return (
    <div className="App">
      <h1>My react app!</h1>
      <EmployeeList />
    </div>
  );
}

export default App;
6. Starting NodeJs and ReactJs application
Open the terminal or the command prompt and navigate to the backend code directory. Start the backend server by running the following command. Once the application will be started successfully it will connect to the Mongodb instance running on the port number – 27017. If the application will be unable to bind to the Mongodb instance an error will be thrown.
Starting backend application
npm run start
Once the backend application is up and running, open the terminal or the command prompt again. Navigate to the frontend directory and start the react development server by running the following command. If your reactjs project does not contain a .env file in the project’s root directory the react server will be started on the default port.
- Note: I have
.envfile in the project’s root directory with the default application port set to6500for react development server
Starting frontend application
npm run start
7. MERN Stack Technologies Demo
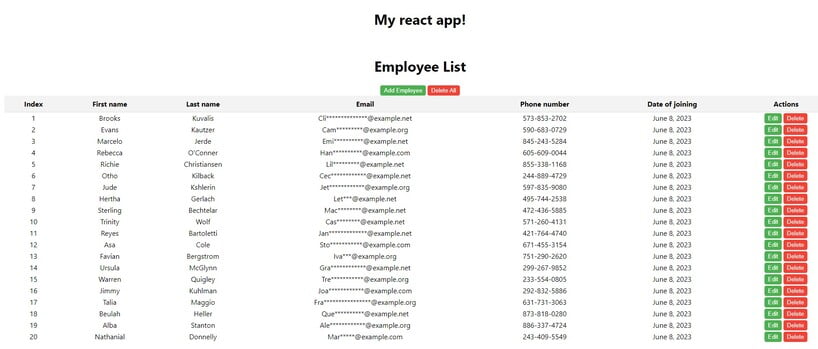
Once the backend and frontend applications are running navigate to the browser and hit the following endpoint – http://localhost:6500/. The reactjs application fetchData(…) method will communicate with the nodejs backend at the following endpoint – http://localhost:8100/api/employees. The response from the backend application will be parsed and displayed on the react application html page.
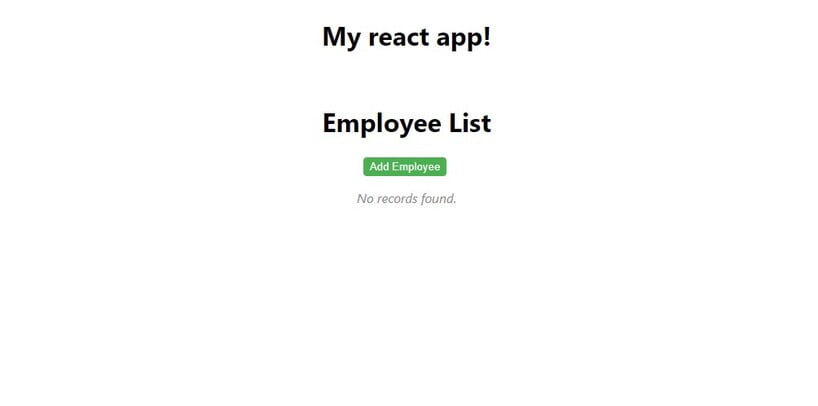
If no response is received from the backend application an information message will be shown.
You can click on the Edit, Delete, Delete All, and Add Employee buttons to explore the other crud operations. That is all for this tutorial and I hope the article served you with whatever you were looking for. Happy Learning and do not forget to share!
8. Conclusion & Summary
In conclusion, a MERN (MongoDB, Express.js, React.js, Node.js) stack technologies application is a powerful and popular choice for developing modern web applications. It combines the strengths of each technology to provide a seamless and efficient development experience.
MongoDB serves as the NoSQL database, offering flexibility, scalability, and easy integration with JavaScript applications. Express.js acts as the backend framework, providing features for routing, middleware, and handling server-side operations. React.js, the frontend library, enables the creation of dynamic and interactive user interfaces through reusable components. Node.js serves as the server-side runtime environment, allowing JavaScript to run on the server and handle data processing and API integration.
The MERN stack technologies promote a consistent JavaScript-based development workflow, reducing the need for switching between different programming languages or frameworks. It facilitates the development of feature-rich and responsive web applications that can handle real-time data updates and provide a seamless user experience.
By leveraging the MERN stack, developers can build robust, scalable, and high-performance applications that encompass both the front end and back end. The flexibility of the MERN stack technologies allows for easy customization and integration with other libraries and frameworks, making it suitable for a wide range of project requirements.
In summary, the MERN full-stack application offers a comprehensive and efficient solution for building modern web applications. Its combination of MongoDB, Express.js, React.js, and Node.js provides a unified development experience, allowing developers to create powerful, interactive, and scalable applications that meet the demands of today’s web development landscape.
9. Download the Project
This was a tutorial on creating a full-stack MERN application.
You can download the full source code of this example here: MERN Stack Technologies Full Example
10. Resources
Here are some resources for MERN Stack Technologies.
10.1 Official documents
- MongoDB: https://docs.mongodb.com/
- Express.js: https://expressjs.com/
- React.js: https://reactjs.org/
- Node.js: https://nodejs.org/
10.2 Books
- “Pro MERN Stack” by Vasan Subramanian
- “MERN Quick Start Guide” by Eddy Wilson Iriarte Koroliova
10.3 Open source projects and example
- GitHub: Explore repositories tagged with “MERN” here
