Grails is a web development framework integrated with JVM that lets developers to develop applications by using built-in features like integrated ORM, DSL (Domain Specific Languages), runtime and compile time meta programming, and concurrent programming.
In this tutorial, I will show you how to develop Grails application step by step with extra theoretical informations about Grails.
Table Of Contents
1. Development Environment Setup
In this section we will install JDK 8, Grails, Groovy/Grails Tool Suite and make some environmental configurations to be able to use those tools. At the end, we will run our first sample application. By the way, I will proceed my installation with Mac OSX, and this means I will give you the clue here and you can find documentation about how to install it according to your operating system.
1.1. JDK Install
Since Grails runs on JVM, we need to install JDK on our environment. Go to JDK download page here and download JDK 8 according to your operating system and architecture. After download, you need to specify JAVA_HOME environment variable as JDK home directory. You can also add $JAVA_HOME/bin path to your PATH to run java on command line. Now, our environment knows how to use java, let’s continue with Grails installation
1.2. Groovy Install
In order to install Groovy, you can go here to download Groovy package.

1.3. Grails Install
Go to Grails download page here and download latest Grails package.

After package download, extract the download content to folder you desired. We will use jdk and grails folders for environment variable setting.
1.4. Environment Variables
We have downloaded the JDK 8 and Grails, and the current version of JDK of mine is JDK 1.8.0_51 and Grails is 3.0.9, lastly Groovy 2.4.5. So, you need to set following environment variables;
JAVA_HOME="/path/to/jdk_1.8.0_51"
GROOVY_HOME="/path/to/groovy-2.4.5"
GRAILS_HOME="/path/to/grails-3.0.9"
Also, you need to add those home variables to the path if you want like below;
PATH=$PATH:$JAVA_HOME/bin
PATH=$PATH:$GROOVY_HOME/bin
PATH=$PATH:$GRAILS_HOME/bin
Remember that, all the environment settings above is Linux specific, you need to use os specific environment setting operation for your operating system.
1.5. Grails/Groovy Tool Suite
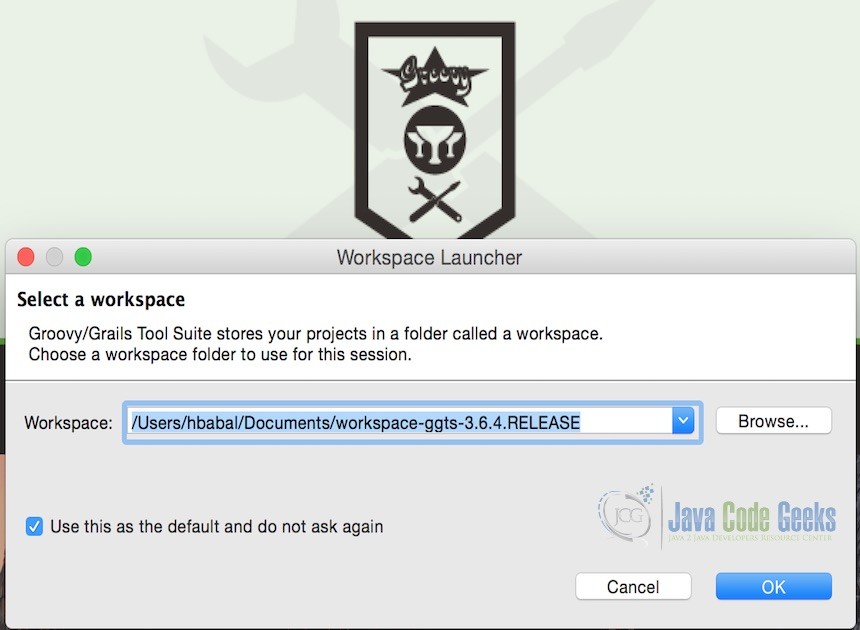
Groovy/Grails Tool Suite is the most used IDE for Grails development. You can go grab from here. After download, you can see executable inside ggts bundle folder and double click to open IDE. It will ask you the workspace before creating projects.
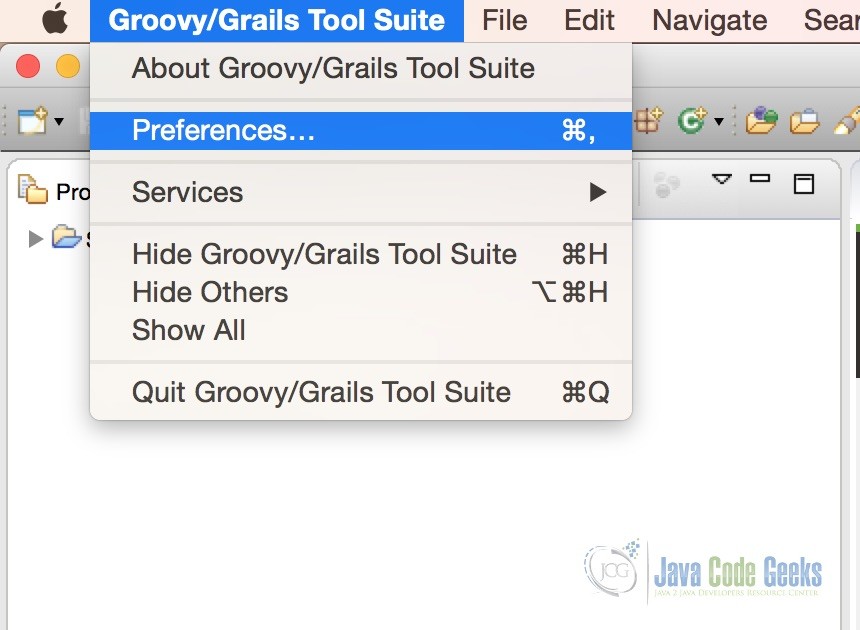
Now, we need to be sure about GGTS knows your JRE and Grails installation. In order to check JRE configuration on GGTS, Go to Preferences
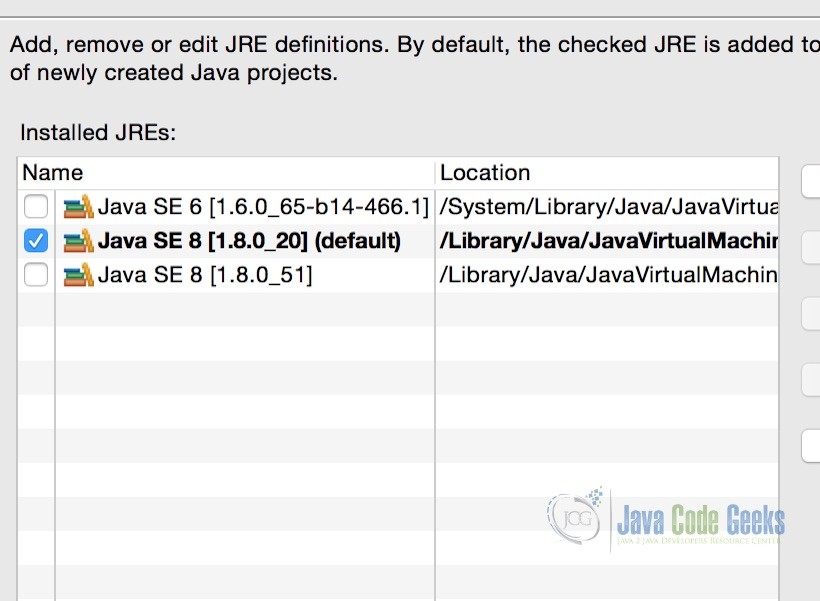
And then check Installed JREs. You need to see JRE path if you successfully defined JAVA_HOME, if not, you need to point out installed JRE location.
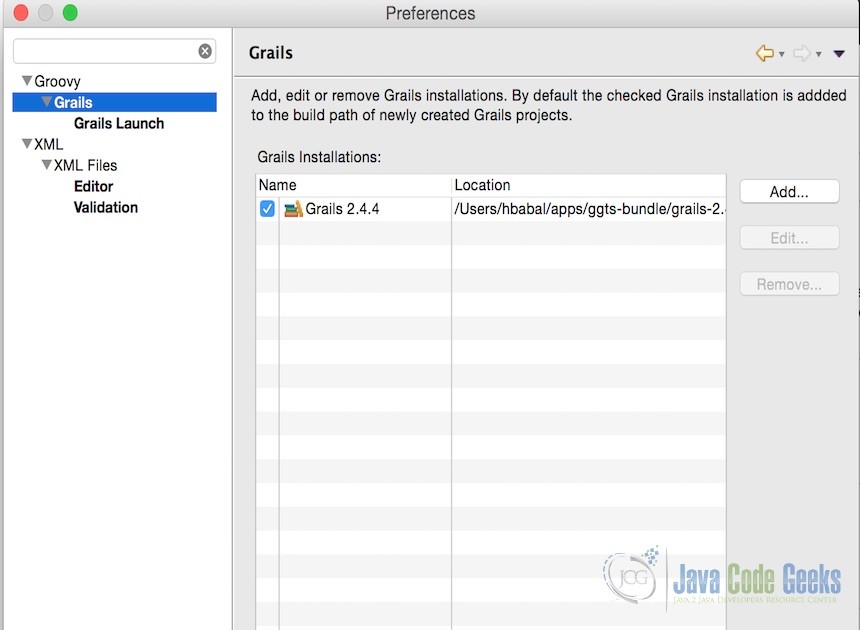
It is same for Grails. Go to Preferences and then Grails. You need to point Grails installation location if it is not listed on the screen.
Now, we are able to create our first application.
1.6. Running First Application
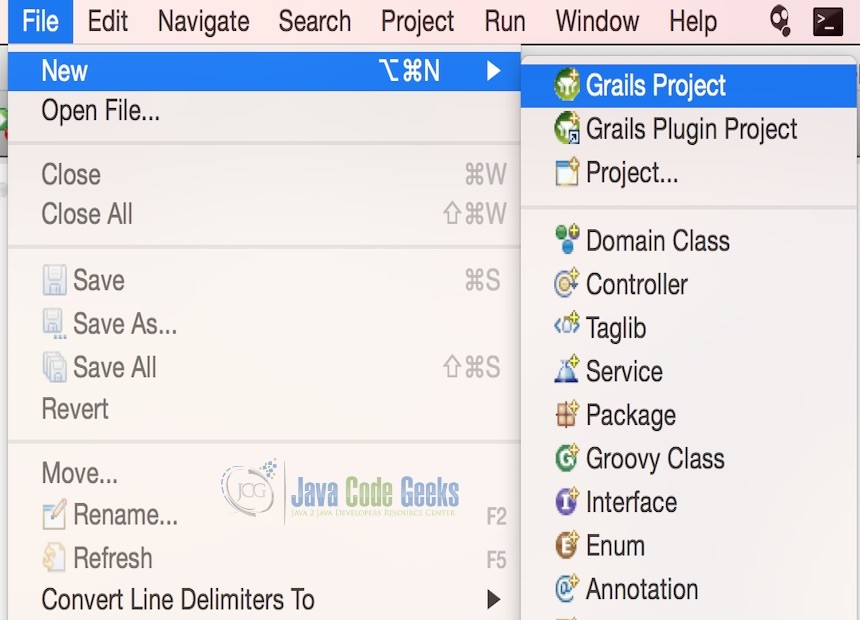
In order to create Grails project, go to File > New > Grails Project
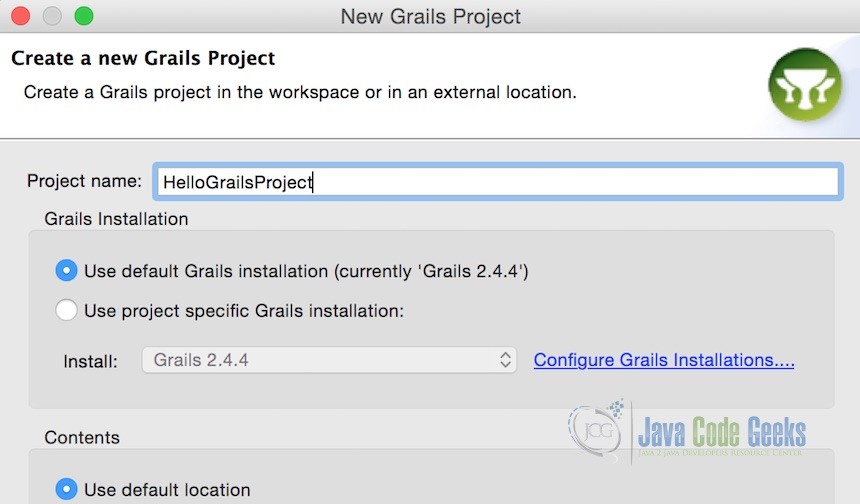
Provide a name for new project and click Finish to create new project.
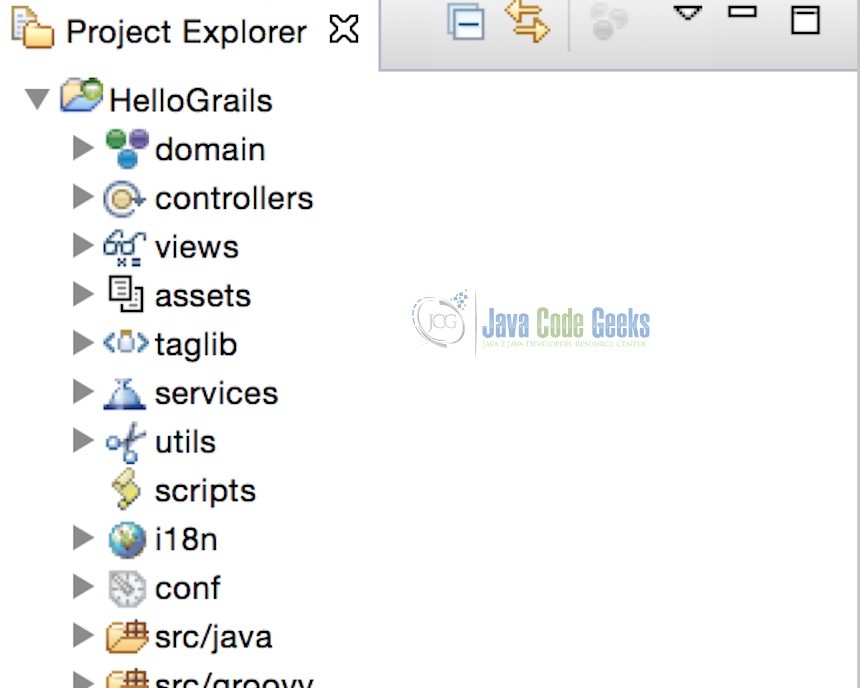
You will see a project structure like below after project creation.
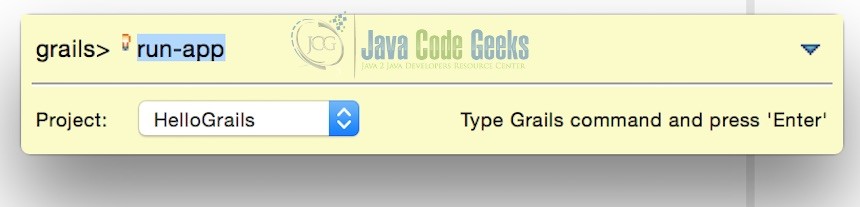
In order to run application click run grails button in the toolbar like below.

You will see a popup to execute specific task, enter run-app and click Enter to run project.
Now you can see running project by going this url: http://localhost:8080/HelloGrails. The application is running on port 8080 and context path is same with name of your project name.
2. MVC Structure
Nearly all of us know what is MVC pattern is, and Grails also uses MVC pattern to setup a basic web application in order to write clean code. Let’s have a look at MVC structure in Grails together.
Model helps us to define our business model to handle data representation and handling. View is for showing data to end users. Controller helps us to transfer data between Model and View. By using those theoretical informations, we can proceed to some examples.
Let say that you have a model called User to handle user specific data. We can implement it like below.
User.groovy
class User {
    String name
    String email
    String password
}
If you want to fetch some user data from datasource and display it on the view, you need to apply operation in controller section. Let say that it is like below.
UserController.groovy
class UserController {
    def list() {
        def userList = User.list()
        [userList:userList]
    }
}
Here we are simply getting the list of users through Customer domain model to be able to use in controller. There is a naming convention in Grails that, whenever you go to /user/list , list method inside UserController will be automatically be invoked. I mean that the pattern is;
{url_section_1}/{url_section_2} => {url_section_1}Controller.groovy and {url_section_2} action method. Also, the rendered view has a naming convention, in a way that it has same name with actions inside controllers. For example, when you go to /user/list, list.gsp automatically will be rendered. In controllers, we are passing model data to the views, so you can use following code to show model data to end users by make it rendered inside view layer.
list.gsp
<ul>
   <g:each in="${userList}" var="user">
	<li>${user.name}, ${user.email}</li>
   </g:each>
</ul>
This will render html something like below
<ul>
	<li>John, john@gmail.com</li>
</ul>
<ul>
	<li>Doe, doe@gmail.com</li>
</ul>
3. Controllers
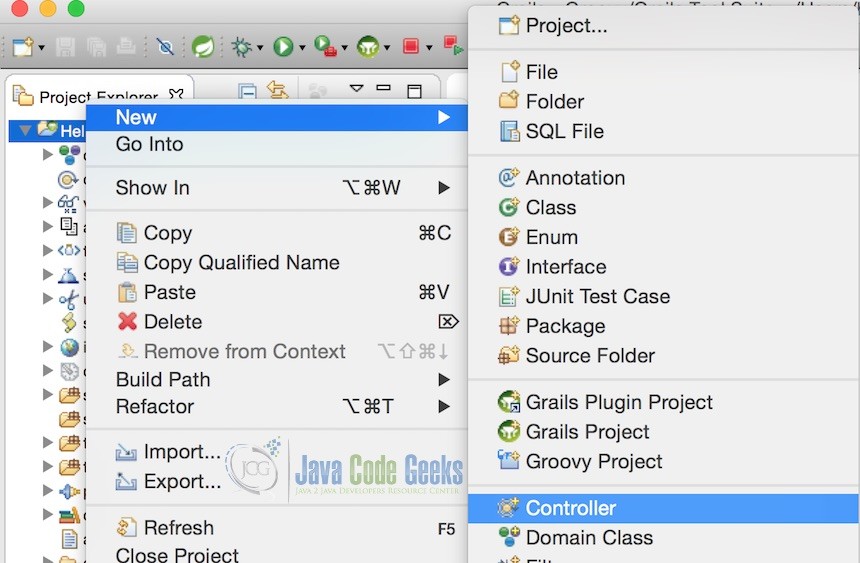
We have already seen how a controller structure looks like, now let’s create a simple controller by using GGTS. Let say that, we want to create a controller in order to perform user related operations. In order to create a controller, Right-Click on project and New > Controller as below.
I assume you have provided controller name as UserController and you will end up with following screen.

When you look at screen, you can see that a default action called index() created and also user related view folder is created in views folder. Let say that, you want to display something when user go to default action of user controller. You can use following to do so.
UserController.groovy
package hellograils

class UserController {

    def index() {
		render "This is the index page of UserController"
	}
}
When you go to http://localhost:8080/HelloGrails/user, default action index() will be executed and the text will be rendered on the browser by using render() function.
Let’s do another example that whenever you go to user view action with a username provided in the url, it will be displayed on the page. In order to get url params in Grails, you can use params.key. You can see full code to fetch username and display it on the page below.
UserController.groovy
package hellograils

class UserController {

    def view() {
		render "Hello, ${params.username}"
	}
}
When you go to http://localhost:8080/HelloGrails/user/view?username=huseyinbabal you will see following.

4. Views
Views layer in a simple web application is used for the interaction with end user. You can use views to show your domain data after you have applied some rules inside your controller. In previous section we have created controller and it has automatically created specific view folder. We will use Groovy Server Pages to render and show your business data to end users in your Grails application.
4.1. Groovy Server Pages
Groovy Server Pages (GSP) is the default template engine for the Grails. It is very simple and similar to JSP that allows you to show your data to user after rendered on server side. Let’s have a look at some examples for usage.
If you want to show user related data on web page, you need a controller that we have already created in previous sections and you will need a specific view file. We have created an action called view() on UserController and let say that you want to display user data in view. You need to assign user model to view firs like below.
UserController.groovy
package hellograils

class UserController {

    def view() {
        def user = [name: "John", surname: "Doe", email: "johndoe@gmail.com"]
	    [user: user]
    }
}
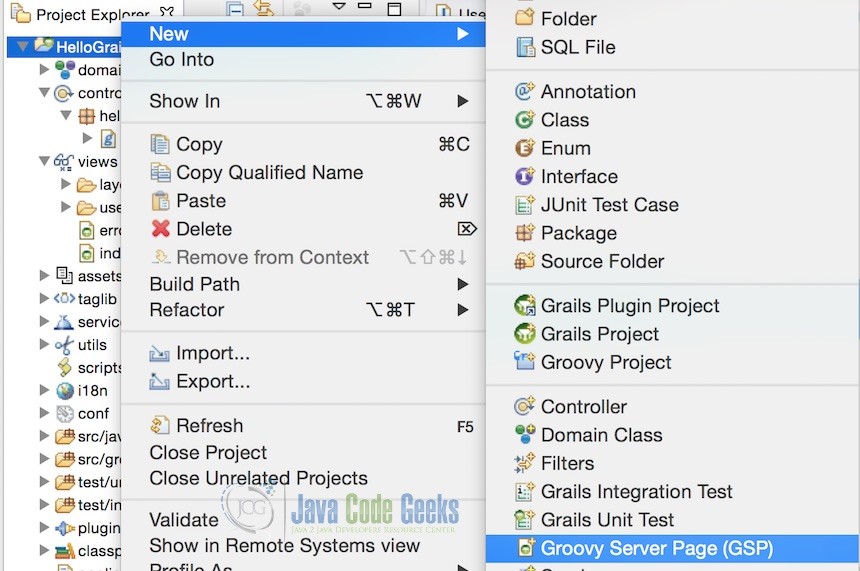
In above code, we simply created a Groovy map for user properties and returned as map. In Groovy, the last line is returned by default. The key name returned in this function is user, this means, you can access user data in the view by using user. Since the action name is view, we need to have a view file called view.gsp in views > user folder. In order to create a GSP file, Right-Click on the project and New > Groovy Server Pages like below.
After view file creation, add following gsp file content to view.gsp file.
view.gsp
<!DOCTYPE html>
<html>
	<head>
		<meta name="layout" content="main"/>
		<title>User Profile</title>
	</head>
	<body>
		<table>
			<tr>
				<td>Name: </td><td>${user.name}</td>
			</tr>
			<tr>
				<td>Surname: </td><td>${user.surname}</td>
			</tr>
			<tr>
				<td>Email: </td><td>${user.email}</td>
			</tr>
		</table>
	</body>
</html>
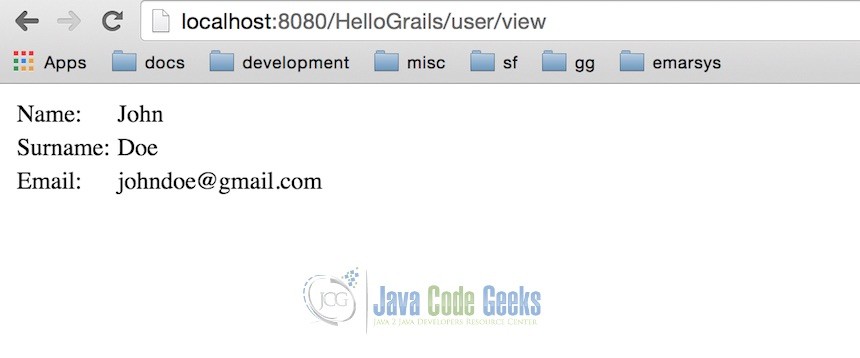
In this file, as you can see we have used user.{} notation to access user related data passed from controller. Another important point in this view file is . Here we are saying that, this file will be use the layout called main. And layout templates exists under views > layouts folder. When you go to http://localhost:8080/HelloGrails/user/view, you will see following screen.

If you haven’t used a layout, you would see user detail in a blank page without any layout like below.
4.2. Layouts
Layouts are used for the commonly used areas for different views. Let say that, you have 10 views and all those views contains left menu, footer, and header section. You don’t need to define those sections for each views, you can create a layout and make those views use this layout instead. In order to create layout, create a file under views > layouts. By default, we have main.gsp. In order to use layout inside view file, you can use following example.
<meta name="layout" content="main"/>
5. Models and GORM
Models are used for defining your business data in software world. Let say that you have user data and want to define it in your application. You can use User model to make CRUD operations along side the database or any other external data store. You can see a sample model below.
User.groovy
class User {
    String name
    String surname
    String email
}
While we are performing database related operations, we will use this model. If you are already familiar with ORM, you know what is GORM too. GORM is the ORM layer for the Grails applications, and it isolates your db layer operations from your application. You can use domain models to perform db operations instead of constructing and executing SQL queries.
5.1. HQL Queries
Grails uses Embedded H2 Database by default, that means you can directly use db related operations by simply defining your domain model. If you want to use custom datasource, you can configure DataSource.groovy under conf folder file to connect custom database. We will continue with H2 Database to keep context simple.
In order to create user in database, you can use following.
    User user = new User();
    user.name = "Huseyin"
    user.surname = "BABAL"
    user.email = "huseyin@gmail.com"
    user.save()
In above example, we are simply creating instance of the User model and then setting field values and finally performing save() function on final User model. In order to get specific User data, you can simply execute following code.
User user = User.get(1)
You can also update fetched model by using following.
    User user = User.get(1)
    user.email = "huseyinbabal@gmail.com"
    user.save()
Here, simply user data is fetched, email information updated on model and user model is persisted to the database. As you can guess, you can delete data by using following.
    User user = User.get(1)
    user.delete()
You can also perform named query like expression;
Find user by email:
User user = User.findByEmail("john@gmail.com")
Find by name and surname:
User user = User.findByNameAndSurname("john", "doe")
List all the users that has name:
User user = User.findAllByName("john")
Named queries are easy to use, just be careful about using correct field name on named conditions. For example, the email field is email in User class, and you need to use findByEmail not findByemail.
5.2. Form Submission
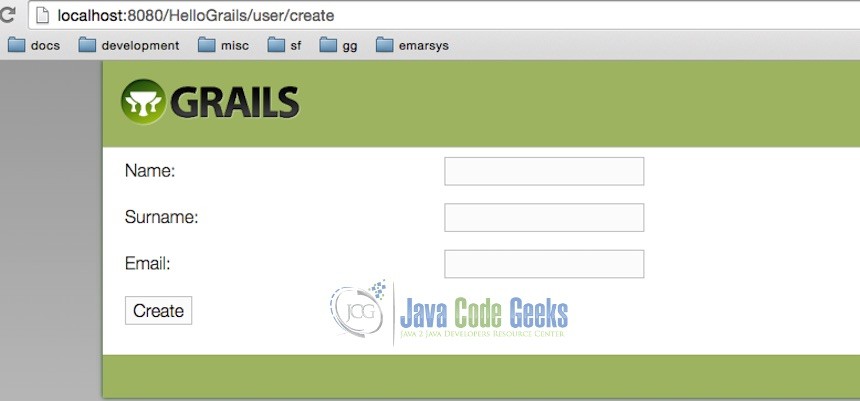
We saw how to perform db queries by using HQL and this time let’s perform some form submission to create, list, and view user on our application. Our first step will be creating a page for user create form. Create a view called userForm.gsp and paste following form code inside it.
userForm.gsp
<!DOCTYPE html>
<html>
	<head>
		<meta name="layout" content="main"/>
		<title>Create New User</title>
	</head>
	<body>
		<g:form controller="user" action="create">
			<table>
				<tr>
					<td>Name: </td><td><g:textField name="name"/></td>
				</tr>
				<tr>
					<td>Surname: </td><td><g:textField name="surname"/></td>
				</tr>
				<tr>
					<td>Email: </td><td><g:textField name="email"/></td>
				</tr>
				<tr><td colspan="2"><g:actionSubmit value="Create"/></td></tr>
			</table>
		</g:form>
	</body>
</html>
In above form we created a form by using Groovy Server Pages as you can see in the tags g:.... In this form, we provided the controller and action name to post user form to defined controller and action. When you enter required fields and click Create button, form will be posted to UserController controller create action. In order to open this form, you can go http://localhost:8080/HelloGrails/user/userForm, and you will see a screen like below.
As you can see there is an empty action called userForm in UserController. This will help us to render specific view with same name which is userForm.gsp.
Let’s implement the create action to handle form post to create user in database. You can use following to get form data and save it to the database.
UserController.groovy
def create() {
    def user = new User(params)
    user.save()
    render "User created successfully"
}
We have created an action called create because we have provided action name as create in user form and here we are getting form data by using params. Form field names are same as User class field names, so we directly passed form post body to User class as constructor. When you click Create button you will see User created successfully message
This time, we will list all the users in the database. You can do by first create an action and view called list and list.gsp respectively. You can see following.
UserController.groovy
def list() {
    def list = User.list()
    [userList: list]
}
and view file content is following.
list.gsp
<!DOCTYPE html>
<html>
	<head>
		<meta name="layout" content="main"/>
		<title>User List</title>
	</head>
	<body>
		<g:if test="${userList.size == 0}">
			There is no user yet, <g:link action="userForm">Create New User?</g:link>
		</g:if>
		<g:else>
			<table>
				<tr>
					<g:each in="${userList}" var="user">
						<td>${user.name}</td>
						<td>${user.surname}</td>
						<td>${user.email}</td>
						<td><g:link action="edit" id="${user.id}">Edit</g:link></td>
					</g:each>
				</tr>
			</table>
		</g:else>
	</body>
</html>
In controller action, we fetched entire user list and assigned that list to the view with a name userList. In view file, we simply checked the size of user list, if it is zero, we have suggested user to create new one, else all the user list rendered on the page like below
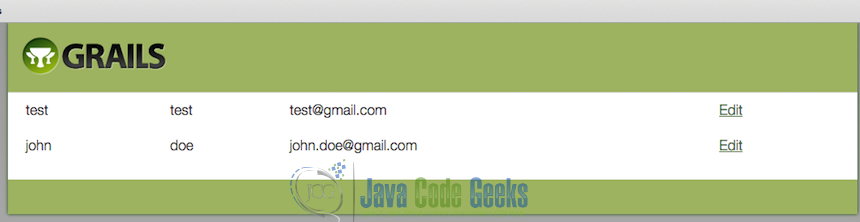
As you can see, there is an edit link on each user row, and this link is generated by using . In this element, we have provided action and an id. When you click Edit link, you will go to edit form of user which has id specified in id attribute. Let’s create editForm and edit action for user now. You can use following for user edit form.
editForm.gsp
<!DOCTYPE html>
<html>
	<head>
		<meta name="layout" content="main"/>
		<title>Edit User</title>
	</head>
	<body>
		<g:form controller="user" action="update">
			<g:hiddenField name="id" value="${user.id}"/>
			<table>
				<tr>
					<td>Name: </td><td><g:textField name="name" value="${user.name}"/></td>
				</tr>
				<tr>
					<td>Surname: </td><td><g:textField name="surname" value="${user.surname}"/></td>
				</tr>
				<tr>
					<td>Email: </td><td><g:textField name="email" value="${user.email}"/></td>
				</tr>
				<tr><td colspan="2"><g:actionSubmit value="Update"/></td></tr>
			</table>
		</g:form>
	</body>
</html>
In this form there is a hidden field called id and this will be used for updating user instance from database. When we go to editForm url, the specified action in UserController will be executed and user that has an id specified in url will be assigned to editForm and form will be populated with current user data. You can see editForm action below.
UserController.groovy
    def user = User.get(params.id)
    [user: user]
Simply, get user by id and then assign it to editForm. When you click Update button, updated user data will be posted to the update action in UserController.
UserController.groovy
    def update() {
        User user = User.get(params.id)
        user.properties = params
        user.save(flush: true)
        render "User updated successfully"
    }
Here, we get user data first, and update all field values with the data posted from form, and we saved data to database with flush parameter to update data in session also. As you can see, it is very easy to update class field values by using user.properties = params. We are saying that, update all the fields of user data with form post body.
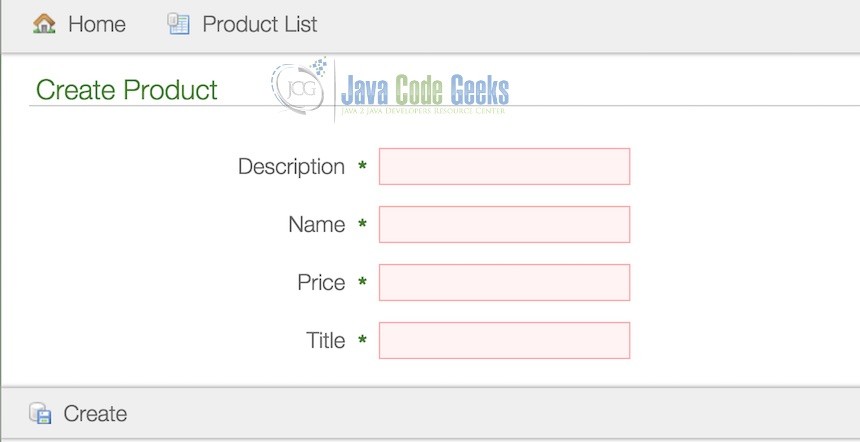
6. Scaffolding
You will like this part very much because we will do the magic by using Grails in this section. By using Scaffolding property, we will auto generate forms for CRUD operations by using your domain class and simple controller. Let’s get started.
Let say that we have another domain class called Product and it has following fields.
Product.groovy
class Product {
	String title
	String name
	String price
	String description
}
Then create a controller called ProductController, and it will have following content.
ProductController.groovy
class ProductController {

    static scaffold = true
}
And, If you go to http://localhost:8080/HelloGrails/product, you will see following.
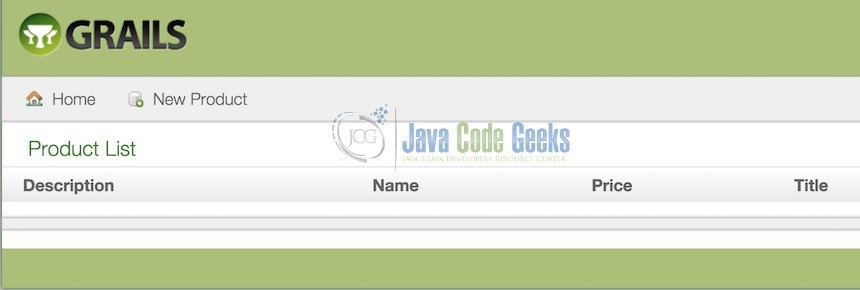
Yes that is true. Grails auto generates form components for CRUD operations by using your domain class. The only thing you need to do is adding static scaffolding = true inside your controller belongs to domain class. It uses the field names inside your domain class to setup form like below.
7. Application Service Layer
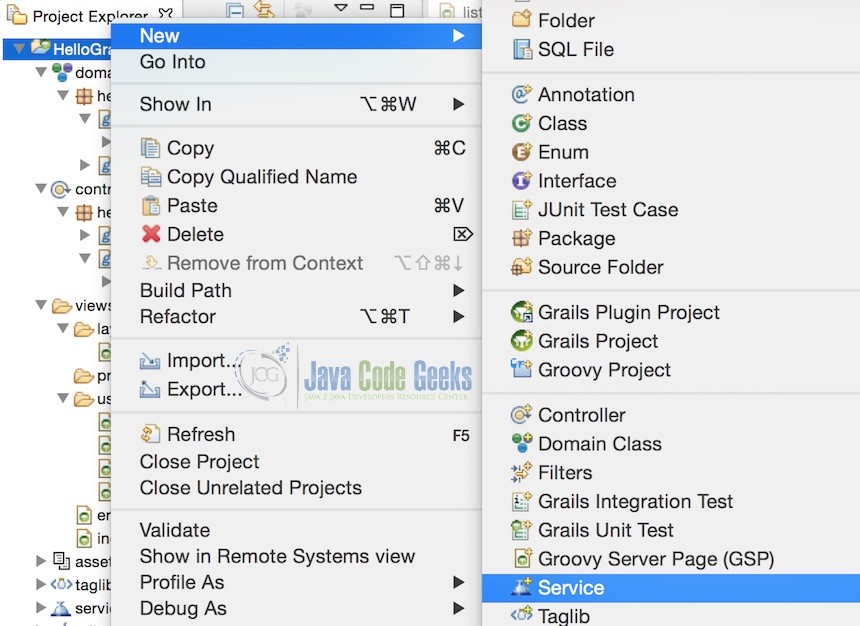
Until this part, we used domain class operations inside the controllers. However, it will be better if we separate our service layers like n-tier applications. For example, in order to create user in database, we can create a UserService and inject it inside controller to user service methods. In order to create Service Right-Click project and New > Service give it a name like UserService and Finish.
Open up UserService and create following method inside it.
UserService.groovy
package hellograils

import grails.transaction.Transactional

@Transactional
class UserService {

    def createUser(String name, String surname, String email) {
		User user = new User(name: name, surname: surname, email: email)
		user.save()
		user
    }
}
In order to use this service, we need to inject it inside UserController. Simply inject it by defining it inside controller like below.
UserController.groovy
package hellograils

class UserController {

    def userService

    def create() {
        userService.createUser(params.name, params.surname, params.email)
        render "User created successfully"
    }
}
By doing this, you can easily separate your business logic from your controllers and let controllers very clean and simple.
8. Conclusion
After some theoretical informations and code example, we can say that Grails helps us to create simple web applications in an easy way. It uses the power of Groovy, separates concerns by using MVC pattern, lets you to create views by using Groovy Server Pages, event it auto generates forms with a simple config. Even if you do not have installed database, it is very easy to do db related operations with embedded H2 database with zero config.
You can download the full source code of this example as an Eclipse project here: HelloGrails
