Property-based testing is a powerful software testing technique that allows you to check the behavior of your code by specifying properties that should hold true for a wide range of input values. One tool that can help you implement property based testing in Java is jqwik. In this article, we will explore what property-based testing is, why it’s valuable, and how to use jqwik to perform property-based testing.
1. What is Parameterized Testing?
Parameterized testing is a crucial technique in software testing that allows you to run the same test with multiple sets of input data and expected outcomes. This helps ensure that your code behaves correctly across a range of scenarios. In Java, the jqwik library provides a convenient way to perform parameterized testing. In this article, we’ll explore what parameterized testing is, why it’s valuable, and how to use jqwik for parameterized testing.
Parameterized testing, also known as data-driven testing, is a testing technique where you run the same test method with different sets of input data and expected results. Instead of writing multiple test methods for similar scenarios, you create a single parameterized test that takes input data as parameters and asserts that the output matches the expected result.
The key benefits of parameterized testing include:
- Code Reusability: You write a single test method that can be reused with various inputs, reducing code duplication.
- Increased Test Coverage: Parameterized tests allow you to cover a wide range of input scenarios, ensuring comprehensive testing.
- Easy Maintenance: When you need to add or modify test cases, you only need to update the test data, not the test method itself.
- Clear Reporting: Test frameworks can provide detailed information about which specific parameter sets failed, making it easier to diagnose issues.
2. What is Property-Based Testing?
Traditional unit testing involves writing specific test cases to verify that your code behaves correctly for predefined input values. Property-based testing takes a different approach. Instead of specifying individual test cases, you define properties or invariants that your code should satisfy for a range of inputs.
For example, if you were testing a sorting algorithm, a property-based test might specify that for any input list, the output should be a sorted list, and the length of the output should be the same as the length of the input. Property-based testing tools then generate a multitude of random test cases, checking if these properties hold true for all of them.
Property-based testing is particularly useful for finding edge cases and uncovering subtle bugs that might not be caught by traditional testing methods.
3. Why Use Property-Based Testing?
Property-based testing offers several benefits:
- Increased Test Coverage: Property-based tests generate a large number of test cases, covering a wide range of input values. This helps ensure that your code is thoroughly tested.
- Finding Edge Cases: Property-based tests often uncover edge cases and unexpected input combinations that you might not have considered when writing traditional unit tests.
- Quick Feedback: Property-based testing can quickly find failing test cases, allowing you to identify and fix bugs early in the development process.
- Minimal Test Maintenance: As your code evolves, you don’t need to update individual test cases. Instead, you only need to maintain the properties, making your tests more resilient to code changes.
4. Starting with jqwik
Now, let’s dive into jqwik, a Java library that enables property-based testing. To get started, you’ll need to add the jqwik and junit libraries to your project. You can do this by adding the following Maven dependency to your pom.xml:
    <dependencies>
        <!-- https://mvnrepository.com/artifact/net.jqwik/jqwik -->
        <dependency>
            <groupId>net.jqwik</groupId>
            <artifactId>jqwik</artifactId>
            <version>1.8.0</version>
            <scope>test</scope>
        </dependency>

        <!-- https://mvnrepository.com/artifact/org.junit.jupiter/junit-jupiter-api -->
        <dependency>
            <groupId>org.junit.jupiter</groupId>
            <artifactId>junit-jupiter-api</artifactId>
            <version>5.10.0</version>
            <scope>test</scope>
        </dependency>

    </dependencies>
Once you’ve added the dependency, you can start writing property-based tests with jqwik. Let’s look at an example where we’ll test the properties of a simple reverse function.
package org.example;

import net.jqwik.api.ForAll;
import net.jqwik.api.Property;

import java.util.ArrayList;
import java.util.Collections;
import java.util.List;

import static org.junit.jupiter.api.Assertions.assertEquals;

public class Main {
    public static void main(String[] args) {
        System.out.println("Hello world!");
    }

    @Property
    void reverseList(@ForAll List inputList) {
        List reversed = reverse(inputList);
        Collections.reverse(inputList); // Reverse the input using a known method

        assertEquals(inputList, reversed);
    }

    // A simple function to reverse a list
    public static List reverse(List list) {
        List reversedList = new ArrayList<>();
        for (int i = list.size() - 1; i >= 0; i--) {
            reversedList.add(list.get(i));
        }
        return reversedList;
    }


}
In this example:
- We annotate our test method with
@Propertyto indicate that it’s a property-based test. - We use
@ForAllto specify thatinputListshould be generated with random values by jqwik. - Inside the test method, we reverse the
inputListusing ourreversefunction and the knownCollections.reversemethod. - Finally, we assert that the reversed list matches the list reversed by
Collections.reverse.
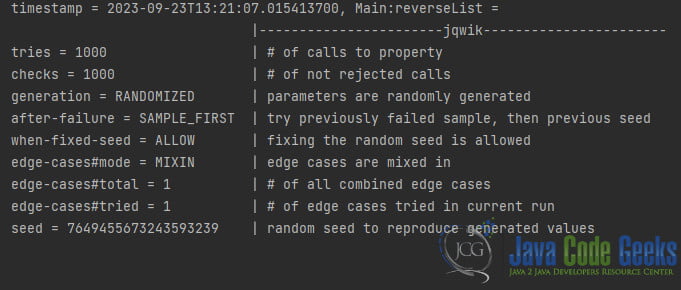
When you run this test, jqwik will generate numerous random lists, reversing them using both methods, and ensuring that the properties hold true for all cases.
5. Customizing Test Data
Customizing test data in jqwik is an essential aspect of property-based testing. It allows you to define specific constraints, generate data that meets your requirements, and ensure that your properties hold true under different scenarios. In this article, we’ll explore how to customize test data in jqwik, using various annotations and strategies.
5.1 Basic Data Generation
Before diving into customization, let’s review how jqwik generates data by default. When you define a property-based test, jqwik automatically generates random data for the annotated parameters. For example:
@Property
void testAddition(@ForAll int a, @ForAll int b) {
    int result = a + b;
    // Property assertions go here
}
In this example, jqwik generates random integers a and b for each test run. While this is useful, you might need more control over the data being generated.
5.2 Customizing Data Generation
5.2.1 Specifying Arbitrary Generators
To customize the data generation process, you can use the @ForAll annotation and provide an arbitrary generator for a parameter. An arbitrary generator allows you to specify how data should be generated for that parameter. For example, let’s say you want to test a method that calculates the square of a number, but you only want positive numbers:
    @Property
    void testSquareOfPositiveNumber(@ForAll("positiveIntegers") int num) {
        assertTrue(num > 0);
        int result = square(num);
        assertEquals(square(num), result);
    }

    int square(int num) {
        return num * num;
    }}
In this case, we’ve used the @ForAll annotation to specify a custom generator named “positiveIntegers.” You can define this generator as follows:
    @Provide("positiveIntegers")
    Arbitrary<Integer> positiveIntegers() {
        return Arbitraries.integers().greaterOrEqual(1); // Generate positive integers
    }
By defining your arbitrary generator, you ensure that the num parameter always receives positive integers for testing.
5.2.2 Combining Generators
jqwik allows you to combine multiple generators to create more complex data sets. For instance, you might want to test a method that accepts a string with a specific length:
    @Property
    void testStringLength(@ForAll("customStrings") String text) {
        System.out.println(text);
        // Property assertions go here
    }
To generate strings of a specific length, you can combine generators like this:
    @Provide
    Arbitrary customStrings() {
        return Arbitraries.strings().withCharRange('a', 'z').ofLength(5); // Generate 5-character strings
    }
This code generates strings composed of lowercase letters with a length of 5. As you may have noticed, this time we passed our Arbitrary Generator by giving the name of the method, customStrings.
5.2.3 Predefined Generators
Here is a table of some of the predefined generators of jqwik:
| Generator | Description |
|---|---|
Arbitraries.of() | Returns an arbitrary generator for the given type. |
Arbitraries.ints() | Returns an arbitrary generator for integers. |
Arbitraries.doubles() | Returns an arbitrary generator for doubles. |
Arbitraries.booleans() | Returns an arbitrary generator for booleans. |
Arbitraries.strings() | Returns an arbitrary generator for strings. |
Arbitraries.chars() | Returns an arbitrary generator for characters. |
Arbitraries.objects() | Returns an arbitrary generator for objects. |
Arbitraries.listOf() | Returns an arbitrary generator for lists of elements of the given type. |
Arbitraries.setOf() | Returns an arbitrary generator for sets of elements of the given type. |
Arbitraries.mapOf() | Returns an arbitrary generator for maps of elements of the given key type and the given value type. |
Combinators.combine() | Combines multiple arbitrary generators into a single arbitrary generator. |
Combinators.map() | Applies a function to the values generated by an arbitrary generator. |
Combinators.filter() | Filters the values generated by an arbitrary generator based on a predicate. |
In addition to the predefined generators, jqwik also provides a number of combinators that can be used to create more complex generators. For example, the Combinators.combine() combinator can be used to combine multiple generators into a single generator that produces values of a composite type. The Combinators.map() combinator can be used to apply a function to the values generated by a generator. And the Combinators.filter() combinator can be used to filter the values generated by a generator based on a predicate.
6. How to Result Shrinking
Result shrinking is a fundamental concept in property-based testing, and it plays a crucial role in tools like jqwik. In this article, we’ll explore what result shrinking is, why it’s important, and how jqwik uses it to simplify the debugging process when a property-based test fails.
6.1 What is Result Shrinking?
Result shrinking is a technique used in property-based testing to simplify the failing test cases generated during testing. When a property-based test fails, the testing framework aims to provide the simplest, most concise input values that still trigger the failure. The goal is to reduce the complexity of the failing case while preserving the essence of the failure.
Consider this scenario: You have a property-based test that generates random input data, and one of these generated inputs causes a failure in your code. The generated input data might be complex and contain many values. Result shrinking is the process of systematically simplifying this input data to a minimal set of values that still reproduces the failure.
The benefits of result shrinking include:
- Simpler Debugging: By reducing the failing input to its minimal form, it becomes easier to understand the root cause of the failure.
- Faster Diagnosis: Shrinking helps you identify the specific conditions or values that trigger the failure, saving time during debugging.
- Improved Bug Reports: When you report a bug to developers or maintainers, providing a minimal failing input makes it easier for them to reproduce and fix the issue.
6.2 How jqwik Uses Result Shrinking
jqwik, like many property-based testing frameworks, uses result shrinking to simplify failing test cases. When a property-based test fails, jqwik starts the result shrinking process to minimize the input data.
Here’s an example using jqwik to demonstrate result shrinking:
    @Property
    void testSumIsAlwaysGreaterThanInput(
            @ForAll @IntRange(min = -100, max = 100) int a,
            @ForAll @IntRange(min = -100, max = 100) int b
    ) {
        assertTrue(a + b > a);
    }
In this example:
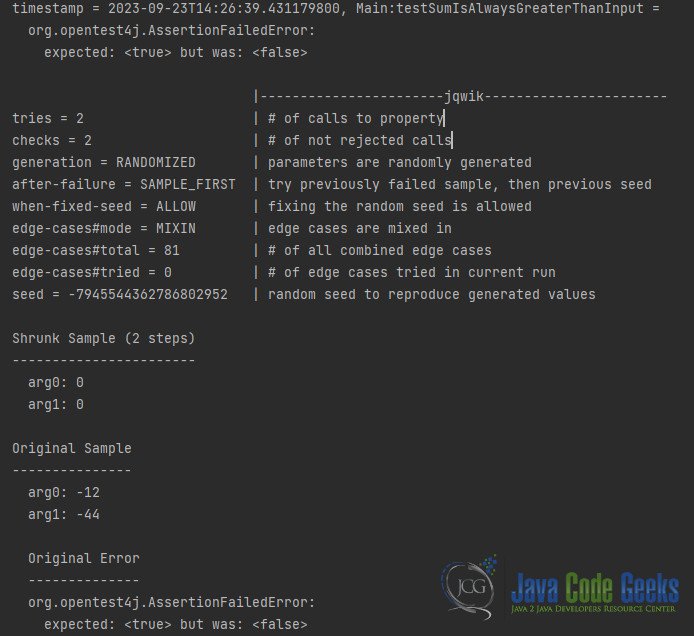
- We’re testing a property that states the sum of two integers
aandbshould always be greater thana. - We use
@ForAllto generate random integers within the specified range (-100 to 100). - If this test fails, jqwik will perform result shrinking to simplify the input values. It might find a minimal set of inputs, such as
a = 0andb = 0, that still triggers the failure. - By shrinking the input values to a minimum, jqwik helps you understand why the property failed and provides a concise example of the failure.
6.3 Customizing Shrinking
jqwik provides various options for customizing the result shrinking process. You can specify custom shrinking functions or use built-in strategies to control how jqwik shrinks the input data.
    @Property(shrinking = ShrinkingMode.FULL)
    void testSumIsAlwaysGreaterThanInput(
            @ForAll @IntRange(min = -100, max = 100) int a,
            @ForAll @IntRange(min = -100, max = 100) int b
    ) {
        assertTrue(a + b > a);
    }
In this example, we specify ShrinkingMode.FULL to enable full shrinking, which attempts to find the smallest input that still reproduces the failure.
7. Re-Running Failed Tests
Re-running tests is a common practice in software development to ensure that your code changes haven’t introduced new bugs or caused existing tests to fail. In the context of property-based testing with jqwik, re-running tests can be especially useful to validate the stability of your code. In this article, we’ll explore how to re-run tests using jqwik and why it’s important.
7.1 Why Re-Run Tests with jqwik?
Re-running tests, especially property-based tests, offers several benefits:
- Regression Detection: After making changes to your codebase, re-running tests helps you quickly detect regressions—unintended side effects or new issues introduced by your changes.
- Stability Validation: Property-based tests are sensitive to changes in code behavior. Re-running these tests ensures that your code remains stable as you make modifications.
- Random Input Verification: Property-based tests rely on random input generation. Re-running tests helps verify that your code can handle various input scenarios consistently.
- Continuous Integration (CI): In CI/CD pipelines, tests are typically re-run after each code commit to ensure the codebase’s health and prevent regressions from reaching production.
Now, let’s see how you can re-run tests using jqwik.
7.2 Re-Running Tests with jqwik
Re-running tests with jqwik is straightforward and can be done using your preferred testing framework (e.g., JUnit or TestNG). Here, we’ll use JUnit to demonstrate how to re-run jqwik tests.
Assuming you have a jqwik test class like this:
    @Property(shrinking = ShrinkingMode.FULL)
    void testSumIsAlwaysGreaterThanInput(
            @ForAll @IntRange(min = -100, max = 100) int a,
            @ForAll @IntRange(min = -100, max = 100) int b
    ) {
        assertTrue(a + b > a);
    }
You can re-run these tests using JUnit’s test runner. Typically, you’d configure your IDE or build tool (such as Maven or Gradle) to run your JUnit tests. Here’s how you can do it in an IDE:
- Open your IDE (e.g., IntelliJ IDEA, Eclipse, or Visual Studio Code).
- Locate and Run the Test Class: Find the test class containing your jqwik tests (in this case,
MyPropertyTest). Right-click on the class or method and select “Run” or “Run ‘MyPropertyTest’.” - Review the Test Results: The test runner will execute the tests, and you can review the results in the IDE’s test runner window. It will show you which tests passed and which ones failed, if any.
- Re-Run Tests: If any tests failed or if you want to ensure the stability of your code after making changes, you can re-run the tests by clicking the “Re-run” or “Re-run Failed Tests” button in your test runner window.
- Analyze Failures: If any tests continue to fail, you should investigate and fix the issues in your code. Re-running the tests helps you confirm that the issues have been resolved.
By following these steps, you can easily re-run your jqwik tests using your preferred IDE or build tool.
7.3 Automating Test Re-Runs in CI/CD
In a CI/CD pipeline, you can automate test re-runs after each code commit. This ensures that your tests are run consistently, and any regressions are detected early in the development process.
You can configure your CI/CD tool (e.g., Jenkins, Travis CI, CircleCI) to run the jqwik tests as part of your build process. Most CI/CD tools provide built-in support for running tests and reporting the results.
8. Choosing the Right Approach
The choice of approach for customizing test data depends on your specific testing requirements:
- For simple, predefined values, annotations like
@ValueSourceand@CsvSourceare sufficient. - If you need dynamic or complex data, creating custom methods is a flexible option.
- Argument converters are useful when you need to transform data types.
- Libraries and external sources come into play when you require random, realistic, or external data.
Customizing test data is a fundamental aspect of writing effective tests. It allows you to thoroughly validate your code under various conditions and ensures that it behaves correctly in a wide range of scenarios, from common cases to edge cases. By mastering these techniques, you can enhance the quality and coverage of your test suite and ultimately deliver more robust and reliable software.
9. Conclusion
Property-based testing with jqwik is a valuable addition to your testing toolbox. It allows you to thoroughly test your code by specifying properties that should hold true for a wide range of input values. This approach can help you discover edge cases and uncover subtle bugs that traditional unit tests might miss.
To get started with jqwik, add it as a dependency in your project, and begin writing property-based tests by annotating your test methods with @Property and using jqwik’s data generation features. By incorporating property-based testing into your testing strategy, you can enhance the robustness and reliability of your code.
10. Download the Source Code
This was an example about using Java jqwik for Property Based Testing, including the concepts of property-based testing, result shrinking, customizing test data generation, and the importance of re-running tests to ensure code stability and catch regressions.
You can download the full source code of this example here: Java jqwik Property Based Testing
