In this article, we’re going to talk about the Java tools used for Android development.
Table Of Contents
1. Introduction
Since Java is not so used in Android development these days, we still use some features and tools to build apps on the Android environment.
The next steps we’ll some these aspects as following.
2. Android Build System
The Android build system compiles app resources and source code and packages them into Android Application Package (APK) that you can test, deploy, sign, and distribute.
To build an APK, Android uses Gradle, a powerful build toolkit that automates and manages the build process. Nowadays, Android developers use mostly Android Studio to develop and build their apps.
Nevertheless, as Gradle is independent of Android Studio, we can use it to build our apps from the command line from our machine or on machines where Android Studio is not installed (like a continuous integration/delivery server).
2.1 The build process
The build process has several steps and involves many tools and processes to transform all our code and resources into an APK. The general steps of a build process are the following:
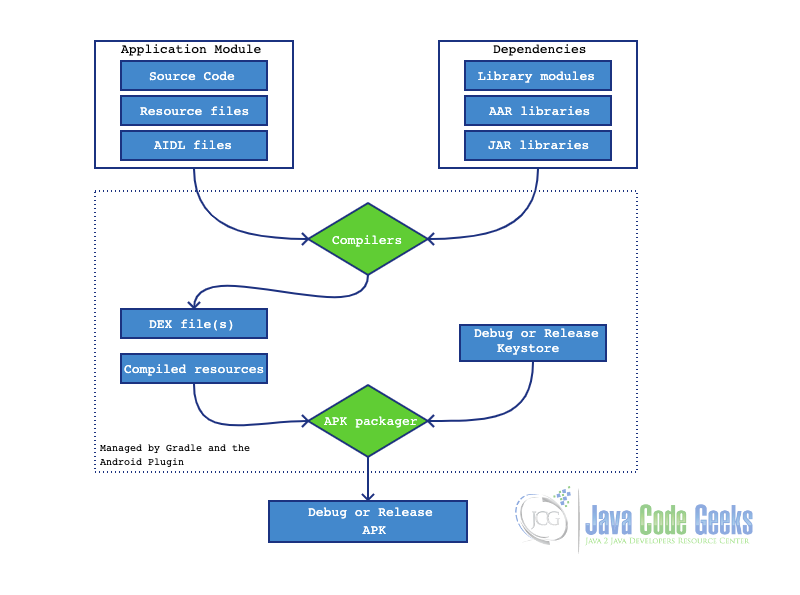
- The compilers convert the Java source code into DEX (Dalvik Executable) files, where are the bytecodes that run on Android devices, and everything else.
- The APK Packager gathers the DEX files and compiled resources into a unique APK, but before install onto an Android device, the APK must be signed.
- For signing the APK, two options exist:
- a. Debug Keystore: this option is only for testing or profiling your app.
- b. Release Keystore: this option is for release externally your app (on Play Store e.g.).For more details to create a release Keystore, see here.
- Before generating your final APK, the packager uses the zipalign tool, optimizing the app to use less memory when running on a device.
At the end of the build process, we’ll have either a debug APK or release APK that can use to deploy, test or release to final users.
3. Build configurations
Now, we see a little about the build process, let’s take a look at how Gradle and Android Plugin works to build our app using some configurations. The build configurations are dived in some files as following.
3.1 The settings.gradle file
This file located in root the project root directory, includes through Gradle the modules when we build our app. It’s a very simples file that can include this configuration:
setting.gradle
include ':app'
3.2 The build.gradle files
The build.gradle files are a DSL (Domain Specific Language) used to describe and handle the build logic using Groovy, which is a JVM-based language. However, Android Studio automatically creates the build.gradle file for us inside our project app.
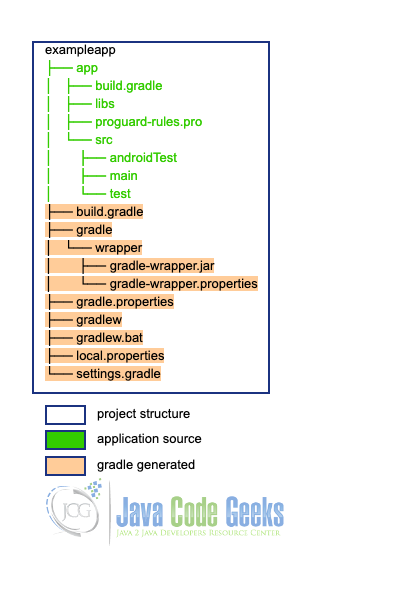
We can see that exists 2 build.gradle files, one in the root project directory and the other in the application (module) directory.
3.2.1 The Top-level file
The build.gradle file in the root directory, also known as the top-level file, defines the build configurations that apply to all modules in the project. That means, everything in this file will be used in all application modules.
top-level build.gradle example
// Top-level build file where you can add configuration options common to all sub-projects/modules.
buildscript {
    repositories {
        google()
        jcenter()
    }
    dependencies {
        classpath "com.android.tools.build:gradle:4.1.2"

    }
}

allprojects {
    repositories {
        google()
        jcenter()
    }
}

task clean(type: Delete) {
    delete rootProject.buildDir
}
Above we notice some basic configurations in the top-level file. Let’s discuss about it:
- buildscript – this block defines the Gradle repositories that are used in the build process. Here we insert where the common dependencies will be downloaded to use in the module’s building. Do not put the module dependencies here. For that, use the file in the module directory.
- allprojects – this block is where we put all modules repositories and dependencies configuration, such as third-party libraries or plugins.
- task clean – this is an example of a task that Gradle can execute. The clean task is used to remove all the build files from the project, which includes the APK, resources, and other files generated in the build process, keeping our project just with the necessary stuff.
3.2.2 The module-level file
The module-level file is located in each module of our project. This file configures the build setting for the specific module where it owns. Also, it provides custom packaging options, such as additional build types, product flavors (we’ll discuss this later), and override settings in the app manifest and/or top-level file.
module-level build.gradle example
plugins {
    id 'com.android.application'
}

android {
    compileSdkVersion 30
    buildToolsVersion "30.0.3"

    defaultConfig {
        applicationId "com.example.javacodegeeks"
        minSdkVersion 16
        targetSdkVersion 30
        versionCode 1
        versionName "1.0"
    }

    buildTypes {
        release {
            minifyEnabled false
            proguardFiles getDefaultProguardFile('proguard-android-optimize.txt'), 'proguard-rules.pro'
        }
    }
    compileOptions {
        sourceCompatibility JavaVersion.VERSION_1_8
        targetCompatibility JavaVersion.VERSION_1_8
    }
}

dependencies {

    implementation 'androidx.appcompat:appcompat:1.1.0'
    implementation 'com.google.android.material:material:1.1.0'
    implementation 'androidx.constraintlayout:constraintlayout:1.1.3'
    implementation 'androidx.navigation:navigation-fragment:2.2.2'
    implementation 'androidx.navigation:navigation-ui:2.2.2'
    testImplementation 'junit:junit:4.+'
    androidTestImplementation 'androidx.test.ext:junit:1.1.1'
    androidTestImplementation 'androidx.test.espresso:espresso-core:3.2.0'
}
Let’s check the details about the example:
- plugins – it’s here where we put the Android plugin, which tells Gradle to build and makes the android block and specifies the Android-specific build options. Another form of this configuration is:
plugins block another form
apply plugin: 'com.android.application'
3.2.2.1 The Android block
This is maybe the most important block in the file. All the specific build options stay here. Let’s find each one that we must need to know:
- compileSdkVersion – specifies the Android API level Gradle should use to compile your app. This means your app can use the API features included in this API level and lower.
- buildToolsVersion (optional) – specifies the version of the SDK build tools, command-line utilities, and compiler that Gradle should use to build your app.
- defaultConfig – still inside the android block, this configuration has the common settings and entries for all build variants and can override some attributes from the main/AndroidManifest.xml file. This block e also includes these properties:
- applicationId – uniquely identifies the package for publishing. However, your source code should still reference the package name defined by the package attribute in the main/AndroidManifest.xml file.
- minSdkVersion – defines the minimum API level required to run the app.
- targetSdkVersion – specifies the API level used to test the app.
- versionCode – defines the version number of your app.
- versionName – defines a user-friendly version name for your app.
buildTypes – here is where we configure the build types, as discussed before in the build process. By default, Android Studio configures the release build type to enable code shrinking, using minifyEnabled, and specifies the default Proguard rules file
Outside the android block, we have the dependencies block, which specifies dependencies required to build only in the module itself.
3.2.2.2 Product Flavors
Similar to build types, we have the product flavors. Basically, flavors have the same buildTypes configuration because both belong to the ProductFlavor class.
In this block, we can provide the base configuration to all application’s “flavors”, like enable something in the demo version and others in full. Below, we see some basic productFlavors block:
productFlavors example
flavorDimensions "tier"
  productFlavors {
    free {
      dimension "tier"
      applicationId 'com.example.myapp.free'
    }

    paid {
      dimension "tier"
      applicationId 'com.example.myapp.paid'
    }
  }
Every time we put the productFlavor block, we must insert the flavorDimensions properties. The flavorDimensions allows us to define groups of flavors. That is to say, we can create application versions for specific environments or dedicated groups.
For the example above, we create a uni-dimensional flavor, which means is just a group of version (“tier”). Therefore, Gradle creates every combination between these groups for us.
Furthermore, we could see that applicationId from defaultConfig is overridden in the flavor. More about product flavors, find here.
4. Dalvik VM
To execute applications, the Android operating system used the Dalvik VM in its first versions. It was designed to run multiple instances of the VM efficiently in a device.
After javac compiles the Java code (.class), using a tool called dx, the compiled Java classes are converted into Dalvik Executable (.dex) and Optimized Dalvik Executable (.odex).
Dalvik VM uses register-based architecture. Therefore, Dalvik VM has few advantages over JAVA Virtual Machine (JVM) such as:
- Use of own 16-bit instruction set than Java 8-bit stack instructions, which reduce the Dalvik instruction count and raised its interpreter speed.
- Less space used, which means an uncompressed .dex file is smaller in size than a compressed Java archive file (.jar).
5. Android Run-Time (ART)
Android Run Time (ART) is an application runtime environment used by the Android operating system. It performs the translation of the application’s bytecode into native instructions, that are later executed by the device’s runtime environment.
Since Android 4.4 (Kit-Kat), ART succeeds Dalvik VM on Android systems. ART brings some improvements features for the Android environment, which we are going to see next.
5.1 Ahead-of-time (AOT) compilation
This type of compilation produces the entire application into native machine code upon their installation.
Basically, this feature will take the high-level programming language of our application (Java/Kotlin) and transform it into the low-level language (only DEX) before the program execution.
5.2 Garbage collection improvement
The Garbage Collection (GC) in ART has several improvements as below:
- Single GC pause for concurrent design
- Concurrent copying to reduce background memory usage and fragmentation
- Independent GC pause’s length from heap size
- Collector with lower total GC time for the special case of cleaning up recently-allocated
- Improved garbage collection ergonomics, making concurrent garbage collections more timely
As developers, is very important to have tools to develop our application and debugging when necessary. ART brings these improvements to the Android environment:
5.3 Development and Debugging improvements
5.3.1 Support for sampling profiler
The sampling profiler is a more accurate method to help developers to inspect the application performance.
The Android Profiler can be used to analyze CPU activities, Java heap and memory allocation, network traffic, and energy usage.
5.3.2 Support for more debugging features
Some features in ART debugging options are:
- See what locks are held in stack traces, then jump to the thread that holds a lock.
- Ask how many live instances there are of a given class, ask to see the instances, and see what references are keeping an object live.
- Filter events (like breakpoint) for a specific instance.
- See the value returned by a method when it exits (using “method-exit” events).
- Set field watchpoint to suspend the execution of a program when a specific field is accessed and/or modified.
5.3.3 Improved diagnostic detail in exceptions and crash reports
ART offers much details when runtime exceptions occur. Classes like java.lang.ClassCastException, java.lang.ClassNotFoundException, and java.lang.NullPointerException now have support for exanded exception details.
A complete list about classes exceptions can be found here.
6. Where start learning Android development?
Well, the internet has a lot of places where you can start your learning. But, I can enumerate a few places to start your knowledge.
First, take a look at this roadmap. That guides you to start your learning path and follow some progression through your studies.
I think another good place to start is the official Android Developers site. They have a lot of guides that you can follow and a Build your First App tutorial to start learning.
Java Code Geeks also has some great articles and tutorials for Android development. Stay tuned and follow our official channels.
7. Conclusion
In conclusion, we saw how Java is used in Android nowadays. Furthermore, we learn about Android Build System and how Gradle uses configurations during the build processes.
Also, we know how Dalvik VM works in Android devices, and see its successor the Android Run-Time (ART) with new features and improvements.
