In this tutorial, we will introduce you to the concepts of the Java Web Start technology. The Java Web Start software allows you to download and run Java applications from the web. It is included in the Java Runtime Environment (JRE) since release of Java 5.0 and:
- Provides an easy, one-click activation of applications
- Guarantees that you are always running the latest version of the application
- Eliminates complicated installation or upgrade procedures
The Java Web Start software is launched automatically, when a Java application using Java Web Start technology is downloaded for the first time. The Java Web Start software caches the entire application locally on your computer. Thus, any subsequent launches are being executed directly from the local cache. Every time you start the application, the Java Web Start software component checks the application’s website to see if a new version is available, and if so, automatically downloads and launches it.
In this example, we use the following tools on a Windows 7 platform:
- Eclipse Kepler Service Release 1
- Apache Tomcat 7
- JDK 1.7
Deploying Java Web Start Applications
Java Web Start is an implementation of the Java Network Launching Protocol (JNLP) specification. Java Web Start works by using a special file called the JNLP descriptor, which is a small XML document that contains elements and attributes that tell Java Web Start how to run the application. That JNLP file instructs Java Web Start software to download, cache, and run the application.
In order to create and deploy an application, we must undergo the following steps:
- Create a simple application and package it into a
.jarfile. - Sign the newly created
.jarfile. - Create the
.jnlpfile of our application. - Place all files inside a Web Server, such as Apache Tomcat 7.
- Access, download and execute our created
.jarfile from the web.
First of all, we need to develop an application and package it into a .jar file. A sample example is shown below:
JNLPExample.java:
package main.javacodegeeks;

import javax.swing.JFrame;
import javax.swing.JLabel;

public class JNLPExample extends JFrame {

     private static final long serialVersionUID = 4968624166243565348L;

     private JLabel label = new JLabel("Hello from Java Code Geeks!");

     public JNLPExample() {
          super("Jave Web Start Example");
          this.setSize(350, 200);
          this.setDefaultCloseOperation(JFrame.EXIT_ON_CLOSE);
          this.setLayout(null);
     }

     public void addButtons() {
          label.setSize(200, 30);
          label.setLocation(80, 50);
          this.getContentPane().add(label);
     }

     public static void main(String[] args) {
          JNLPExample exp = new JNLPExample();
          exp.addButtons();
          exp.setVisible(true);
     }
}
In this sample application, we create a JFrame and we place a JLabel with a text message in its center. Then, using the command prompt, we navigate to the folder where our project is located and we execute the following command:
jar -cf JNLPExample.jar *.*
This command packages our application into an executable .jar file, called JNLPExample.jar. Then, we execute the following two commands, in order to create a keystore and sign our executable .jar file with it:
keytool -genkey -keystore testkeys -alias stathis
jarsigner -keystore testkeys JNLPExample.jar stathis
Important: Be sure that you answer all the required questions that may pop up when you execute the 1st command.
Then, we create our .jnlp file of our application. A sample example of a JNLP file is shown below:
JNLPExample.jnlp:
<?xml version="1.0" encoding="utf-8"?>
<jnlp spec="1.0+" codebase="http://localhost:8080/" href="JNLPExample.jnlp">

     <information>
          <title>JNLP Example</title>
          <vendor>Java Code Geeks</vendor>
          <homepage href="http://localhost:8080/" />
          <description>JNLP Testing</description>
     </information>

     <security>
          <all-permissions/>
     </security>

     <resources>
          <j2se version="1.6+" />
          <jar href="JNLPExample.jar" />
     </resources>

     <application-desc main-class="main.javacodegeeks.JNLPExample" />
</jnlp>
In the above code snippet, inside the jnlp element, we have two attributes, one for the href of the jnlp itself and one for the codebase, which denotes where the .jar files and all other resources will be downloaded from. Inside the jnlp element are three sections:
- Information
- Security
- Resources
- Application’s description
The Information section has purely descriptive content and may contain other things like icons, a splash screen, or longer descriptions. Inside the Security section, we define which user can execute the application. The resources section tells Java Web Start which .jar files and other resources are required, in order for our program to be executed. The resources section can also contain native libraries, extensions, properties, and other elements, but the .jar files are the most important. The last section, application-desc, specifies some attributes about the application. In this case, we define that the main class of our application resides in the com.javacodegeeks.JNLPExample class.
A full list of all elements and attributes of a JNLP file can be found in the Java Network Launching Protocol API Specification (JSR-56). Also, the Java Web Start supports the encoding of JNLP files in any character encoding supported by the Java platform. For more information on character encoding in Java, see the Supported Encodings Guide.
The next step is to copy all the application’s .jar files, the JNLP file and all necessary resources in a Web server. We must ensure that the .jar files are copied in the locations specified by the href attribute inside the JNLP file.
We copy both the JNLPExample.jar and JNLPExample.jnlp files to Apache Tomcat, inside the following folder:
C:\Tomcat\webapps\ROOT
and launch the Apache Tomcat from the Windows command line, using the command:
C:\tomcat\bin\startup.bat
Access the following URL:
http://localhost:8080/JNLPExample.jnlp
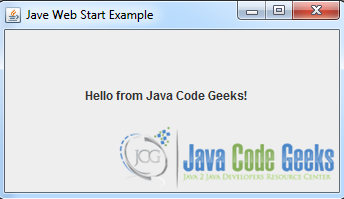
in order to download and execute our newly created application. If all steps are executed successfully and assuming that Java Web Start is installed on the client’s computer, you shall see the following screen:

Check the I accept the risk and want to run this application choice and click on Run. The following window shall appear:
For those users who might not have Java Web Start installed, you may write scripts in your Web page that:
- Detect which browser the user has.
- Detect whether Java Web Start is installed.
- If Java Web Start is not installed, either auto-install it, or direct the user to a download page.
Pack200 Compression
Sun Microsystems introduced a compression system called Pack200 in Java 1.5.0, in order to reduce the size of a Java Web Start application. Pack200 compresses large files very efficiently, depending on the density and size of the class files in the .jar file.
Methods to Launch an Application
An application that uses the Java Web Start technology can be launched using one of the following methods:
- From a browser.
- From a desktop icon: If you use an application frequently, you can create a shortcut on your personal computer.
- From command prompt or terminal: You can launch an application from a command prompt or terminal, by typing:
javaws <URL>
where
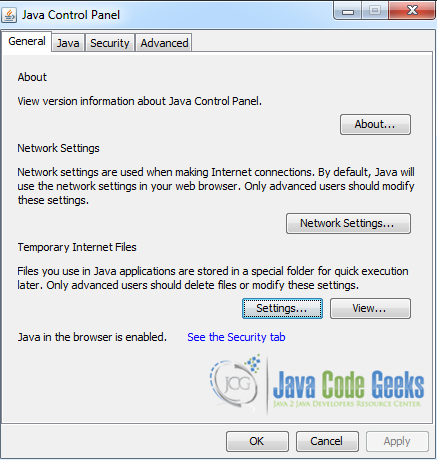
URLpoints to the.jnlpfile of the application. - From Java Cache Viewer: Java Web Start provides a Cache Viewer, which can be launched from the Java Control Panel. The Cache Viewer enables the user to directly launch a downloaded application.
Launch an application using the Java Cache Viewer
- Open the Windows
Control Panel. - In the
Control Panel Searcharea, enterJava Control Panel. - Click on the Java icon that appears, in order to open the
Java Control Panel.
If all steps were executed properly, you should see the following window:
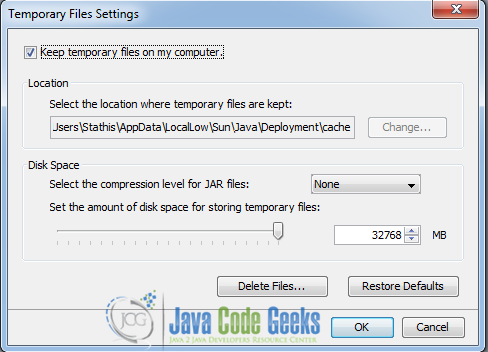
- Click on the
View…button from theTemporary Internet Filessection. TheJava Cache Viewerwill pop up. - Double click on the specific application that you want to launch.
Delete temporary files from the Java Cache Viewer
- Inside the
Java Control Panel, click on theSettings…button from theTemporary Internet Filessection. TheTemporary Files Settingsdialog box appears:
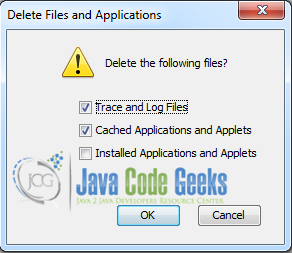
- Click on the
Delete Files…button. TheDelete Files and Applicationsdialog box appears:
- Click OK on the
Delete Files and Applicationsdialog. This deletes all the downloaded applications and applets from the cache. - Close the
Temporary Files Settingsdialog.
Delete a specific application or applet from the Java Cache Viewer
- Inside the
Java Control Panel, click on theView…button from theTemporary Internet Filessection. - Choose your application, press right click on it and then, click on
Delete.
This was a tutorial on how to use the Java Web Start technology.

hi. i am getting this exception.
reason: your security settings have blocked a self-signed application from running.
please help me as it is urgent.
use java 7 of 32 bit version and set security level in java as medium,,then try
In the Java settings in Windows control panel, add the url to the JNLP file to the list of exceptions (security tab). It should work
Good day
I am new to java, but i am getting this error when i run this error: main.javacodegeeks.JNLPExample
I suspect the problem is on the JNLP’s application-desc
Regards