How to Start Developing Layered Web Applications with Spring
Spring is a great framework to develop enterprise Java web applications. It really eases life of Java developers by providing tons of features. In this example, we will show you how to start developing layered web applications with Spring.
Table Of Contents
- 1. Create a new Maven WebApp project
- 2. Add necessary dependencies in your project
- 3. Create log4j.xml
- 4. Prepare DDL and DML scripts to initialize database
- 5. Write Domain Class, Service and DAO Classes
- 6. Write Controller Classes and JSPs to handle UI logic
- 7. Configure your web application to bootstrap with Spring
- 8. Configure your IDE to run Tomcat instance
- 9. Run Tomcat instance and access your webapp through your browser
- 10. Summary
- 11. Download the Source Code
Our preferred development environment is Spring Tool Suite 3.8.2 based on Eclipse 4.6.1 version. However, as we are going to create the example as maven project, you can easily work within your own IDE as well. We are also using Spring Application Framework 4.3.1.RELEASE along with JDK 1.8_u112, Apache Tomcat 8.5.8, JSTL 1.2, and H2 database version 1.4.192.
Let’s begin.
1. Create a new Maven WebApp project
Write click on Package Explorer and select New>Maven Project to create an new maven project.
Click Next button, and select maven-archetype-webapp from among available archetypes.
Click next button again, and provide group id and artifact id values as seen in the following screenshot.

Finally, click Finish button to finish creating your web application. Maven-archetype-webapp only create minimum number of files and directories required to run the web application in a Servlet Container. You have to manually create src/main/java, src/test/java and src/test/resources standard maven source folders in your project.
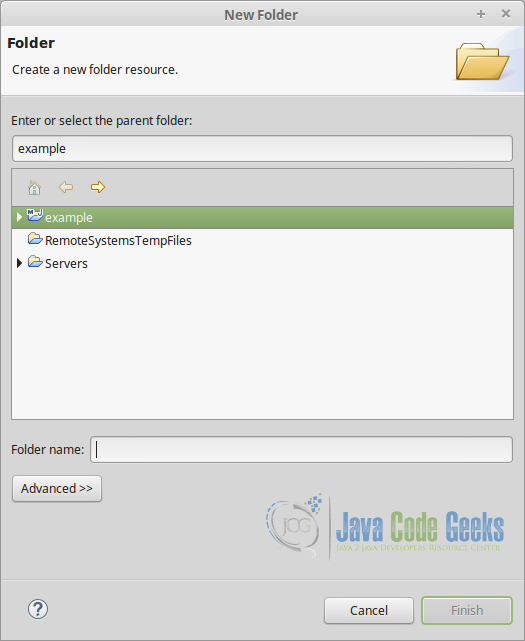
Write click on your project example and select New>Folder to create src/main/java, src/test/java and src/test/resources source folders consecutively.
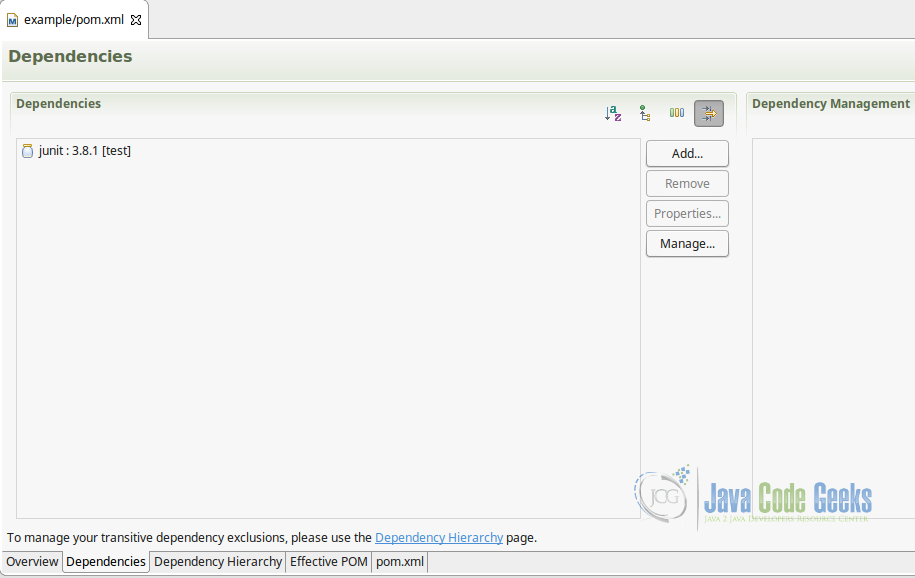
After creating those source folders, click pom.xml in the project root folder in order to open up pom.xml editor, and add maven.compiler.source and maven.compiler.target properties with value 1.8 into it.
2. Add necessary dependencies in your project
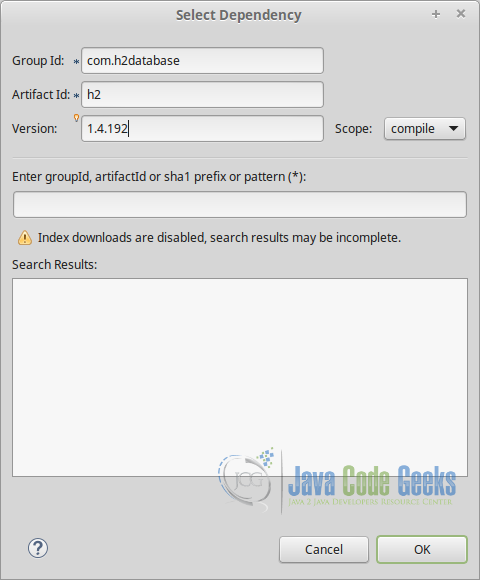
Add following dependencies into your pom.xml. You can make use of pom.xml editor you opened up in the previous step.
<dependency>
			<groupId>javax.servlet</groupId>
			<artifactId>javax.servlet-api</artifactId>
			<version>3.1.0</version>
			<scope>provided</scope>
		</dependency>

		<dependency>
			<groupId>javax.servlet.jsp</groupId>
			<artifactId>javax.servlet.jsp-api</artifactId>
			<version>2.3.1</version>
			<scope>provided</scope>
		</dependency>

		<dependency>
			<groupId>javax.servlet</groupId>
			<artifactId>jstl</artifactId>
			<version>1.2</version>
		</dependency>

		<dependency>
			<groupId>org.springframework</groupId>
			<artifactId>spring-webmvc</artifactId>
			<version>4.3.1.RELEASE</version>
		</dependency>
		<dependency>
			<groupId>org.springframework</groupId>
			<artifactId>spring-jdbc</artifactId>
			<version>4.3.1.RELEASE</version>
		</dependency>
		<dependency>
			<groupId>log4j</groupId>
			<artifactId>log4j</artifactId>
			<version>1.2.17</version>
		</dependency>
		<dependency>
			<groupId>com.h2database</groupId>
			<artifactId>h2</artifactId>
			<version>1.4.192</version>
		</dependency>
		<dependency>
			<groupId>junit</groupId>
			<artifactId>junit</artifactId>
			<version>4.12</version>
			<scope>test</scope>
		</dependency>
Note that junit dependency already exists in your pom.xml when you first create your webapp project. It is added by webapp archetype by default. We only change its version to a newer value.
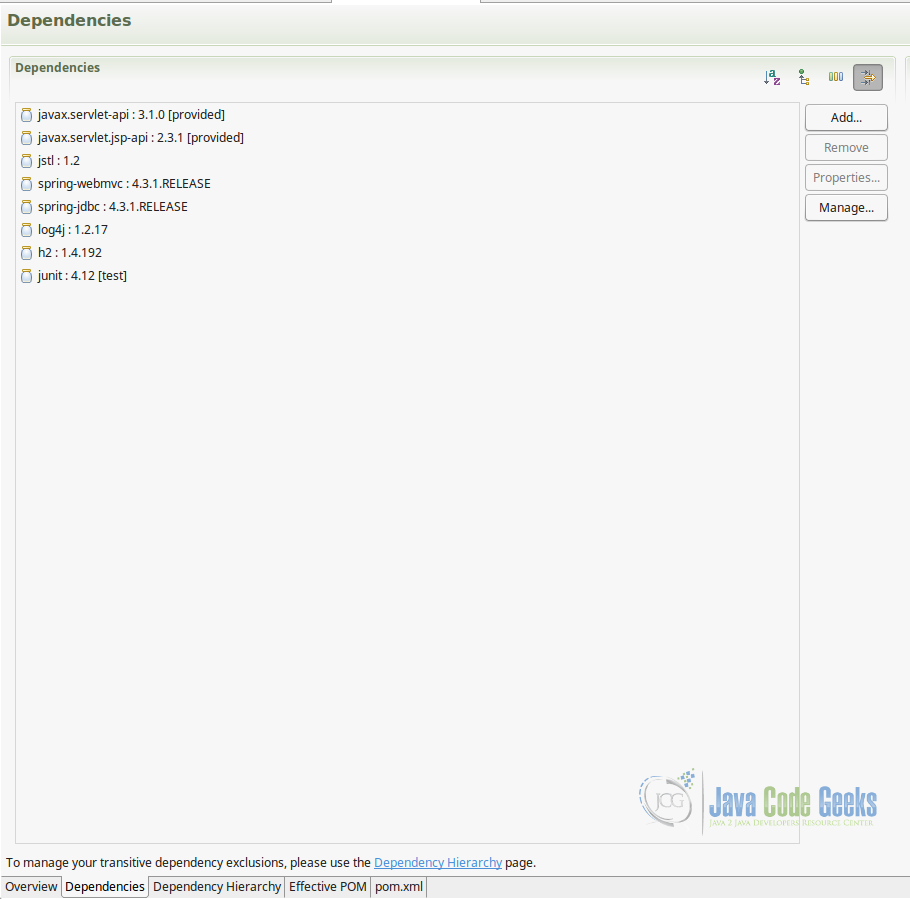
You can either add those dependencies via add Dependency dialog, or switch into source view of pom.xml and copy all of them into <dependencies></dependencies> section. After this step, added dependencies should have been listed as follows.
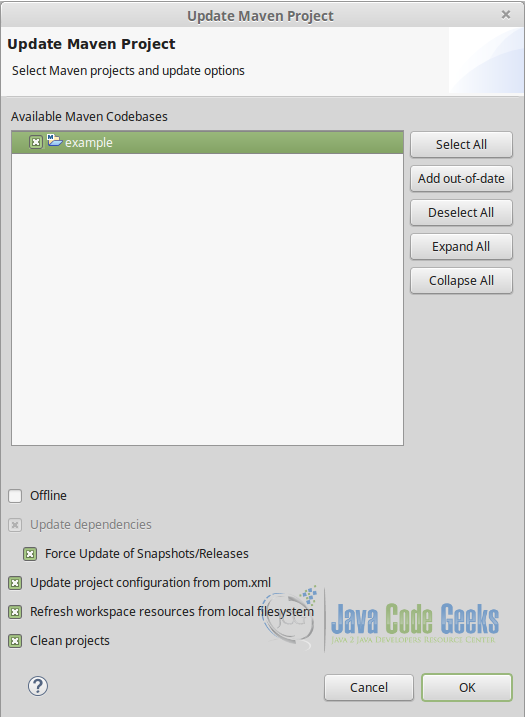
Finally perform a project update by right clicking the project and then clicking “Update Project” through Maven>Update Project…
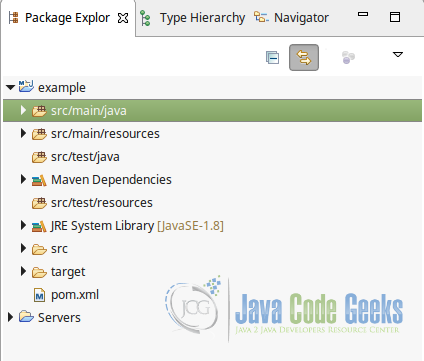
You should have seen something similar in your Package Explorer as below. JRE System Library should have been changed into JavaSE-1.8 and so on.
3. Create log4j.xml
Create log4j.xml file under src/main/resources folder with the following content. It will help us to see log messages produced by Spring during execution of test methods and trace what is going on during those executions.
log4j.xml
<?xml version="1.0" encoding="UTF-8" ?>
<!DOCTYPE log4j:configuration PUBLIC "-//LOG4J" "log4j.dtd">
<log4j:configuration xmlns:log4j="http://jakarta.apache.org/log4j/">

	<appender name="CONSOLE" class="org.apache.log4j.ConsoleAppender">
		<layout class="org.apache.log4j.EnhancedPatternLayout">
			<param name="ConversionPattern"
				value="%d{HH:mm:ss,SSS} - %p - %C{1.}.%M(%L): %m%n" />
		</layout>
	</appender>

	<logger name="org.springframework">
		<level value="DEBUG" />
	</logger>

	<root>
		<level value="INFO" />

		<appender-ref ref="CONSOLE" />

	</root>

</log4j:configuration>
4. Prepare DDL and DML scripts to initialize database
Create schema.sql and data.sql files within src/main/resources with the following contents.
4.1. schema.sql
schema.sql
CREATE SEQUENCE PUBLIC.T_PERSON_SEQUENCE START WITH 1;

CREATE CACHED TABLE PUBLIC.T_PERSON(
    ID BIGINT NOT NULL,
    FIRST_NAME VARCHAR(255),
    LAST_NAME VARCHAR(255)
);

ALTER TABLE PUBLIC.T_PERSON ADD CONSTRAINT PUBLIC.CONSTRAINT_PERSON_PK PRIMARY KEY(ID);
4.2. data.sql
data.sql
INSERT INTO T_PERSON (ID,FIRST_NAME,LAST_NAME) VALUES (T_PERSON_SEQUENCE.NEXTVAL, 'John','Doe');
INSERT INTO T_PERSON (ID,FIRST_NAME,LAST_NAME) VALUES (T_PERSON_SEQUENCE.NEXTVAL, 'Joe','Doe');
5. Write Domain Class, Service and DAO Classes
5.1. Person.java
We are going to create a simple domain class with name Person as follows. It has only three attributes, id, firstName and lastName, and accessor methods for them.
Person.java
package com.example.model;

public class Person {
	private Long id;
	private String firstName;
	private String lastName;
	public Long getId() {
		return id;
	}
	public void setId(Long id) {
		this.id = id;
	}
	public String getFirstName() {
		return firstName;
	}
	public void setFirstName(String firstName) {
		this.firstName = firstName;
	}
	public String getLastName() {
		return lastName;
	}
	public void setLastName(String lastName) {
		this.lastName = lastName;
	}
}
We also create Service and DAO classes as follows, in order to perform simple persistence operations with our domain model.
5.2. PersonDao.java
PersonDao is a simple interface which defines basic persistence operations over Person instances like findById, create a new Person, update or delete an existing one.
PersonDao.java
package com.example.dao;

import java.util.List;

import com.example.model.Person;

public interface PersonDao {
	List<Person> findAll();
	Person findById(Long id);
	void create(Person person);
	void update(Person person);
	void delete(Long id);
}
5.3. JdbcPersonDao.java
JdbcPersonDao is an implementation of PersonDao interface which employs JdbcTemplate bean of Spring in order to implement persistence operations via JDBC API. @Repository annotation causes a singleton scope bean to be created in Spring Container.
JdbcPersonDao.java
package com.example.dao;

import java.sql.Connection;
import java.sql.PreparedStatement;
import java.sql.ResultSet;
import java.sql.SQLException;
import java.util.List;

import org.springframework.beans.factory.annotation.Autowired;
import org.springframework.jdbc.core.JdbcTemplate;
import org.springframework.jdbc.core.PreparedStatementCreator;
import org.springframework.jdbc.core.RowMapper;
import org.springframework.jdbc.support.GeneratedKeyHolder;
import org.springframework.jdbc.support.KeyHolder;
import org.springframework.stereotype.Repository;

import com.example.model.Person;

@Repository
public class JdbcPersonDao implements PersonDao {
	private JdbcTemplate jdbcTemplate;

	@Autowired
	public void setJdbcTemplate(JdbcTemplate jdbcTemplate) {
		this.jdbcTemplate = jdbcTemplate;
	}

	@Override
	public List<Person> findAll() {
		return jdbcTemplate.query("select id, first_name, last_name from t_person",
				new RowMapper<Person>() {

					@Override
					public Person mapRow(ResultSet rs, int rowNum) throws SQLException {
						Person person = new Person();
						person.setId(rs.getLong("id"));
						person.setFirstName(rs.getString("first_name"));
						person.setLastName(rs.getString("last_name"));
						return person;
					}
				});
	}

	@Override
	public Person findById(Long id) {
		return jdbcTemplate.queryForObject("select first_name, last_name from t_person where id = ?",
				new RowMapper<Person>() {

					@Override
					public Person mapRow(ResultSet rs, int rowNum) throws SQLException {
						Person person = new Person();
						person.setId(id);
						person.setFirstName(rs.getString("first_name"));
						person.setLastName(rs.getString("last_name"));
						return person;
					}
				}, id);
	}

	@Override
	public void create(Person person) {
		KeyHolder keyHolder = new GeneratedKeyHolder();
		jdbcTemplate.update(new PreparedStatementCreator() {

			@Override
			public PreparedStatement createPreparedStatement(Connection con) throws SQLException {
				PreparedStatement stmt = con.prepareStatement("insert into t_person(id,first_name,last_name) values(t_person_sequence.nextval,?,?)");
				stmt.setString(1, person.getFirstName());
				stmt.setString(2, person.getLastName());
				return stmt;
			}
		}, keyHolder);
		person.setId(keyHolder.getKey().longValue());
	}

	@Override
	public void update(Person person) {
		jdbcTemplate.update("update t_person set first_name = ?, last_name = ? where id = ?", person.getFirstName(),
				person.getLastName(), person.getId());
	}

	@Override
	public void delete(Long id) {
		jdbcTemplate.update("delete from t_person where id = ?", id);
	}
}
5.4. PersonService.java
PersonService interface defines basic service methods to be consumed by the cotroller layer.
PersonService.java
package com.example.service;

import java.util.List;

import com.example.model.Person;

public interface PersonService {
	List<Person> findAll();
	Person findById(Long id);
	void create(Person person);
	void update(Person person);
	void delete(Long id);
}
5.5 PersonServiceImpl.java
PersonServiceImpl is a transactional service implementation of PersonService interface which uses PersonDao bean in order to perform persistence operations. Its role is simply delegating to its DAO bean apart from being transactional in this context.
@Service annotation causes a singleton scope bean to be created in Spring Container, and @Transactional annotation makes all of its public method transactional by default.
PersonServiceImpl.java
package com.example.service;

import java.util.List;

import org.springframework.beans.factory.annotation.Autowired;
import org.springframework.stereotype.Service;
import org.springframework.transaction.annotation.Transactional;

import com.example.dao.PersonDao;
import com.example.model.Person;

@Service
@Transactional
public class PersonServiceImpl implements PersonService {
	private PersonDao personDao;

	@Autowired
	public void setPersonDao(PersonDao personDao) {
		this.personDao = personDao;
	}


	@Override
	public List<Person> findAll() {
		return personDao.findAll();
	}


	@Override
	public Person findById(Long id) {
		return personDao.findById(id);
	}

	@Override
	public void create(Person person) {
		personDao.create(person);
	}

	@Override
	public void update(Person person) {
		personDao.update(person);
	}

	@Override
	public void delete(Long id) {
		personDao.delete(id);
	}
}
6. Write Controller Classes and JSPs to handle UI logic
We will make use of Spring MVC to handle web requests in order to perform CRUD operations related with person records. We create a separate Controller class and a corresponding JSP file for each persistence operation that will be available to our users.
6.1. PersonListController and personList.jsp
PersonListController class handles web request to display returned Persons from PersonService.findAll() method.
PersonListController.java
package com.example.controller;

import org.springframework.beans.factory.annotation.Autowired;
import org.springframework.stereotype.Controller;
import org.springframework.ui.Model;
import org.springframework.web.bind.annotation.RequestMapping;
import org.springframework.web.bind.annotation.RequestMethod;

import com.example.service.PersonService;

@Controller
public class PersonListController {
	@Autowired
	private PersonService personService;

	@RequestMapping(value = "/listPersons", method = RequestMethod.GET)
	public String findAllPersons(Model model) {
		model.addAttribute("persons", personService.findAll());
		return "personList";
	}
}
@Controller annotation causes a singleton bean to be created in Spring Container. @RequestMapping annotation over the methods maps methods with request URIs to be handled by those controller beans. For example, PersonListController.findAllPersons method is mapped with /listPersons request URI accessed with an HTTP GET via the corresponding @RequestMapping annotation. @Autowire annotation injects a service bean of type PersonService available in the container.
Before creating following JSP file, create first a folder named as jsp within src/main/webapp/WEB-INF folder in your project, and then place all those JSP files under that directory. Alhough src/main/webapp folder is accessible by users at runtime, any file or directoy within WEB-INF folder, on the other hand, is not. Placing JSP files under a directoy within WEB-INF folder limits their accessibility only through those Controller beans. Hence, users won’t be able to type names of those JSP over the browser’s URL address bar in order to access them independently from their related Controllers.
personList.jsp
<%@ page language="java" contentType="text/html; charset=UTF-8"
	pageEncoding="UTF-8"%>
<%@ taglib prefix="c" uri="http://java.sun.com/jsp/jstl/core"%>
<%@ page isELIgnored="false"%>
<!DOCTYPE html PUBLIC "-//W3C//DTD HTML 4.01 Transitional//EN" "http://www.w3.org/TR/html4/loose.dtd">
<html>
<head>
<meta http-equiv="Content-Type" content="text/html; charset=UTF-8">
<title>Person List View</title>
</head>
<body>
	<h1>Person List View</h1>
	<a href = "<%=request.getContextPath()%>/mvc/createPerson">Create</a>
	<br/>
	<br/>
	<table border="1">
		<thead>
			<tr>
				<td align="center">ID</td>
				<td align="center">First Name</td>
				<td align="center">Last Name</td>
				<td align="center" colspan="2">Action</td>
			</tr>
		</thead>
		<c:forEach items="${persons}" var="person">
			<tr>
				<td>${person.id}</td>
				<td>${person.firstName}</td>
				<td>${person.lastName}</td>
				<td>
					<form action="<%=request.getContextPath()%>/mvc/updatePerson/${person.id}" method="get">
						<input type="submit" value="Update">
					</form>
				</td>
				<td>
					<form action="<%=request.getContextPath()%>/mvc/deletePerson/${person.id}" method="get">
						<input type="submit" value="Delete">
					</form>
				</td>
			</tr>
		</c:forEach>
	</table>
	<br />
	<font color="blue"> ${message} </font>
</body>
</html>
6.2. PersonCreateController and personCreate.jsp
PersonCreateController.java
package com.example.controller;

import org.springframework.beans.factory.annotation.Autowired;
import org.springframework.stereotype.Controller;
import org.springframework.ui.Model;
import org.springframework.web.bind.annotation.ModelAttribute;
import org.springframework.web.bind.annotation.RequestMapping;
import org.springframework.web.bind.annotation.RequestMethod;
import org.springframework.web.bind.annotation.SessionAttributes;
import org.springframework.web.bind.support.SessionStatus;
import org.springframework.web.servlet.mvc.support.RedirectAttributes;

import com.example.model.Person;
import com.example.service.PersonService;

@Controller
@SessionAttributes("person")
public class PersonCreateController {
	@Autowired
	private PersonService personService;

	@RequestMapping(value = "/createPerson", method = RequestMethod.GET)
	public String startCreatingNewPerson(Model model) {
		model.addAttribute("person", new Person());
		return "personCreate";
	}

	@RequestMapping(value = "/createPersonFailed", method = RequestMethod.GET)
	public String createPersonFailed() {
		return "personCreate";
	}

	@RequestMapping(value = "/createPerson", method = RequestMethod.POST)
	public String performCreate(@ModelAttribute Person person, RedirectAttributes redirectAttributes,
			SessionStatus sessionStatus) {
		String message = null;
		String viewName = null;
		try {
			personService.create(person);
			message = "Person created. Person id :" + person.getId();
			viewName = "redirect:/mvc/listPersons";
			sessionStatus.setComplete();
		} catch (Exception ex) {
			message = "Person create failed";
			viewName = "redirect:/mvc/createPersonFailed";
		}
		redirectAttributes.addFlashAttribute("message", message);
		return viewName;
	}
}
personCreate.jsp
<%@ page language="java" contentType="text/html; charset=UTF-8"
	pageEncoding="UTF-8"%>
<%@ taglib prefix="form" uri="http://www.springframework.org/tags/form"%>
<%@ page isELIgnored="false"%>
<!DOCTYPE html PUBLIC "-//W3C//DTD HTML 4.01 Transitional//EN" "http://www.w3.org/TR/html4/loose.dtd">
<html>
<head>
<meta http-equiv="Content-Type" content="text/html; charset=UTF-8">
<title>Person Create View</title>
</head>
<body>
	<h1>Person Create View</h1>
	<form:form modelAttribute="person" method="post"
		servletRelativeAction="/mvc/createPerson">
		<table>
			<tr>
				<td>First Name</td>
				<td><form:input path="firstName" />
					</td>
			</tr>
			<tr>
				<td>Last Name</td>
				<td><form:input path="lastName" />
					</td>
			</tr>
		</table>
		<form:button name="Create">Create</form:button>
	</form:form>
	<br />
	<font color="red"> ${message} </font>
</body>
</html>
6.3. PersonUpdateController and personUpdate.jsp
PersonUpdateController.java
package com.example.controller;

import org.springframework.beans.factory.annotation.Autowired;
import org.springframework.stereotype.Controller;
import org.springframework.ui.Model;
import org.springframework.web.bind.annotation.ModelAttribute;
import org.springframework.web.bind.annotation.PathVariable;
import org.springframework.web.bind.annotation.RequestMapping;
import org.springframework.web.bind.annotation.RequestMethod;
import org.springframework.web.bind.annotation.SessionAttributes;
import org.springframework.web.bind.support.SessionStatus;
import org.springframework.web.servlet.mvc.support.RedirectAttributes;

import com.example.model.Person;
import com.example.service.PersonService;

@Controller
@SessionAttributes("person")
public class PersonUpdateController {
	@Autowired
	private PersonService personService;

	@RequestMapping(value = "/updatePerson/{id}", method = RequestMethod.GET)
	public String selectForUpdate(@PathVariable Long id, Model model) {
		model.addAttribute("person", personService.findById(id));
		return "personUpdate";
	}

	@RequestMapping(value="/updatePersonFailed", method=RequestMethod.GET)
	public String updatePersonFailed() {
		return "personUpdate";
	}

	@RequestMapping(value = "/updatePerson", method = RequestMethod.POST)
	public String performUpdate(@ModelAttribute Person person, RedirectAttributes redirectAttributes,
			SessionStatus sessionStatus) {
		String message = null;
		String viewName = null;
		try {
			personService.update(person);
			message = "Person updated. Person id :" + person.getId();
			viewName = "redirect:/mvc/listPersons";
			sessionStatus.setComplete();
		} catch (Exception ex) {
			message = "Person update failed. ";
			viewName = "redirect:/mvc/updatePersonFailed";
		}
		redirectAttributes.addFlashAttribute("message", message);
		return viewName;
	}
}
personUpdate.jsp
<%@ page language="java" contentType="text/html; charset=UTF-8"
	pageEncoding="UTF-8"%>
<%@ taglib prefix="form" uri="http://www.springframework.org/tags/form"%>
<%@ page isELIgnored="false"%>
<!DOCTYPE html PUBLIC "-//W3C//DTD HTML 4.01 Transitional//EN" "http://www.w3.org/TR/html4/loose.dtd">
<html>
<head>
<meta http-equiv="Content-Type" content="text/html; charset=UTF-8">
<title>Person Update View</title>
</head>
<body>
	<h1>Person Update View</h1>
	<form:form  modelAttribute="person" method="post"
		servletRelativeAction="/mvc/updatePerson">
		<table>
			<tr>
				<td>ID</td>
				<td><form:input path="id" readonly="true" /></td>
			</tr>
			<tr>
				<td>First Name</td>
				<td><form:input path="firstName" /> <form:errors
						path="firstName" /></td>
			</tr>
			<tr>
				<td>Last Name</td>
				<td><form:input path="lastName" /> <form:errors path="lastName" />
				</td>
			</tr>
		</table>
		<form:errors>
		</form:errors>
		<form:button name="Update">Update</form:button>
	</form:form>
	<font color="red"> ${message} </font>
</body>
</html>
6.4. PersonDeleteController and personDelete.jsp
PersonDeleteController.java
package com.example.controller;

import org.springframework.beans.factory.annotation.Autowired;
import org.springframework.stereotype.Controller;
import org.springframework.ui.Model;
import org.springframework.web.bind.annotation.ModelAttribute;
import org.springframework.web.bind.annotation.PathVariable;
import org.springframework.web.bind.annotation.RequestMapping;
import org.springframework.web.bind.annotation.RequestMethod;
import org.springframework.web.bind.annotation.SessionAttributes;
import org.springframework.web.bind.support.SessionStatus;
import org.springframework.web.servlet.mvc.support.RedirectAttributes;

import com.example.model.Person;
import com.example.service.PersonService;

@Controller
@SessionAttributes("person")
public class PersonDeleteController {
	@Autowired
	private PersonService personService;

	@RequestMapping(value = "/deletePerson/{id}", method = RequestMethod.GET)
	public String selectForDelete(@PathVariable Long id, Model model) {
		model.addAttribute("person", personService.findById(id));
		return "personDelete";
	}

	@RequestMapping(value = "/deletePersonFailed", method = RequestMethod.GET)
	public String deletePersonFailed() {
		return "personDelete";
	}

	@RequestMapping(value = "/deletePerson", method = RequestMethod.POST)
	public String delete(@ModelAttribute Person person, RedirectAttributes redirectAttributes, SessionStatus sessionStatus) {
		String message = null;
		String viewName = null;
		try {
			personService.delete(person.getId());
			message = "Person deleted. Person id :" + person.getId();
			viewName = "redirect:/mvc/listPersons";
			sessionStatus.setComplete();
		} catch (Exception ex) {
			message = "Person delete failed.";
			viewName = "redirect:/mvc/deletePersonFailed";
		}
		redirectAttributes.addFlashAttribute("message", message);
		return viewName;
	}
}
personDelete.jsp
<%@ page language="java" contentType="text/html; charset=UTF-8"
	pageEncoding="UTF-8"%>
<%@ taglib prefix="form" uri="http://www.springframework.org/tags/form"%>
<%@ page isELIgnored="false"%>
<!DOCTYPE html PUBLIC "-//W3C//DTD HTML 4.01 Transitional//EN" "http://www.w3.org/TR/html4/loose.dtd">
<html>
<head>
<meta http-equiv="Content-Type" content="text/html; charset=UTF-8">
<title>Person Delete View</title>
</head>
<body>
	<h1>Person Delete View</h1>
	<form:form modelAttribute="person" method="post"
		servletRelativeAction="/mvc/deletePerson">
		<table>
			<tr>
				<td>ID</td>
				<td><form:input path="id" readonly="true" /></td>
			</tr>
			<tr>
				<td>First Name</td>
				<td><form:input path="firstName" readonly="true" /></td>
			</tr>
			<tr>
				<td>Last Name</td>
				<td><form:input path="lastName" readonly="true" /></td>
			</tr>
		</table>
		<form:button name="Delete">Delete</form:button>
	</form:form>
	<font color="red"> ${message} </font>
</body>
</html>
7. Configure your web application to bootstrap with Spring
We will configure Spring Container with Java based configuration approach as follows.
7.1. WebAppConfig.java
WebAppConfig class contains necessary directives and bean definitions for Spring Container to provide required functionalities.
WebAppConfig.java
package com.example.config;

import javax.sql.DataSource;

import org.springframework.context.annotation.Bean;
import org.springframework.context.annotation.ComponentScan;
import org.springframework.context.annotation.Configuration;
import org.springframework.jdbc.core.JdbcTemplate;
import org.springframework.jdbc.datasource.DataSourceTransactionManager;
import org.springframework.jdbc.datasource.embedded.EmbeddedDatabaseBuilder;
import org.springframework.jdbc.datasource.embedded.EmbeddedDatabaseType;
import org.springframework.transaction.PlatformTransactionManager;
import org.springframework.transaction.annotation.EnableTransactionManagement;
import org.springframework.web.servlet.ViewResolver;
import org.springframework.web.servlet.config.annotation.EnableWebMvc;
import org.springframework.web.servlet.view.InternalResourceViewResolver;

@Configuration
@EnableTransactionManagement
@ComponentScan(basePackages = "com.example")
@EnableWebMvc
public class WebAppConfig {

	@Bean
	public DataSource dataSource() {
		return new EmbeddedDatabaseBuilder().setType(EmbeddedDatabaseType.H2)
				.addScripts("classpath:/schema.sql", "classpath:/data.sql").build();
	}

	@Bean
	public PlatformTransactionManager transactionManager(DataSource dataSource) {
		return new DataSourceTransactionManager(dataSource);
	}

	@Bean
	public JdbcTemplate jdbcTemplate(DataSource dataSource) {
		return new JdbcTemplate(dataSource);
	}

	@Bean
	public ViewResolver viewResolver() {
		InternalResourceViewResolver viewResolver = new InternalResourceViewResolver();
		viewResolver.setPrefix("/WEB-INF/jsp/");
		viewResolver.setSuffix(".jsp");
		return viewResolver;
	}
}
@Configuration annotation marks it as a Spring Configuration class so that Spring will process it as ApplicationContext metadata source.
@EnableTransactionManagement annotation enables annotation based declarative transaction support in the container.
@ComponentScan annotation causes Spring to scan base packages given as attribute value, in order to create beans out of classes under those packages which have @Controller, @Service, @Repository and @Component on top of them.
@EnableWebMvc annotation activates annotation based MVC capabilities of the container, like handling requests mapped via @RequestMapping etc.
7.2. WebAppInitializer.java
Spring provides a mechanism in order to create ApplicationContext without touching web.xml at all, purely in Java way in other words. Following WebAppInitializer class extends from AbstractDispatcherServletInitializer, executed by a special ServletContextInitializer available in the Spring distribution, configures DispatcherServlet and its WebApplicationContext using given metadata sources.
In our configuration requests coming to our web application will need to have /mvc prefix so that they will be intercepted by Spring’s DispatcherServlet which dispatches web requests to corresponding handler methods at runtime.
WebAppInitializer.java
package com.example.config;

import org.springframework.web.context.WebApplicationContext;
import org.springframework.web.context.support.AnnotationConfigWebApplicationContext;
import org.springframework.web.servlet.support.AbstractDispatcherServletInitializer;

public class WebAppInitializer extends AbstractDispatcherServletInitializer {

	@Override
	protected WebApplicationContext createServletApplicationContext() {
		AnnotationConfigWebApplicationContext wac = new AnnotationConfigWebApplicationContext();
		wac.register(WebAppConfig.class);
		return wac;
	}

	@Override
	protected String[] getServletMappings() {
		return new String[] { "/mvc/*" };
	}

	@Override
	protected WebApplicationContext createRootApplicationContext() {
		return null;
	}
}
8. Configure your IDE to run Tomcat instance
Right click on the Server tab view, and select New>Server in order to make a new server configuration within your IDE as follows.

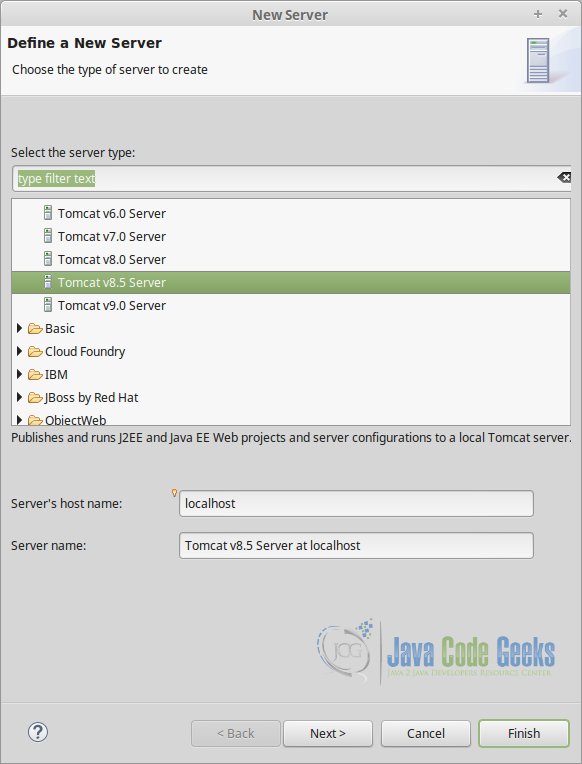
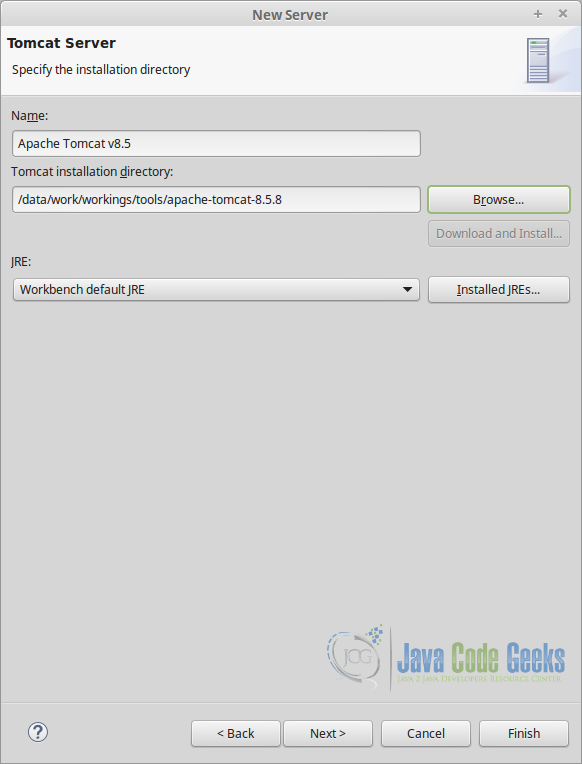
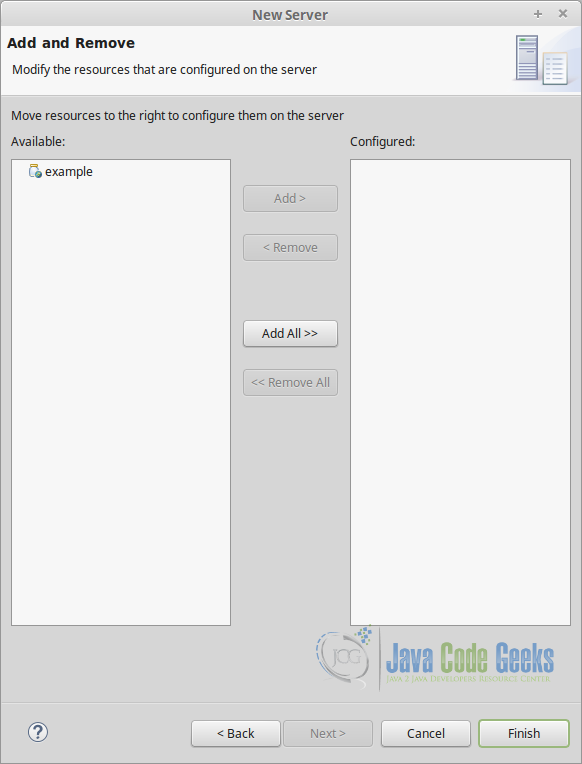
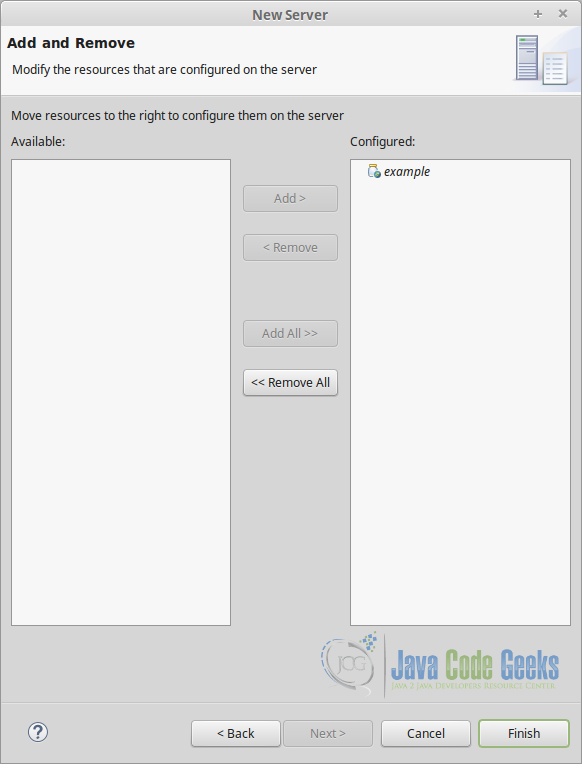
At the end of those steps, you should see something similar below in your Servers view.
9. Run Tomcat instance and access your webapp through your browser
After configuring your server instance and adding your webapp as configured project into the server instance, click start icon in the Servers view in order to bootstrap your webapp. After several hunderd lines of log output, you should see something similar to the following output in your console.
17:08:41,214 - DEBUG - o.s.w.s.FrameworkServlet.initWebApplicationContext(568): Published WebApplicationContext of servlet 'dispatcher' as ServletContext attribute with name [org.springframework.web.servlet.FrameworkServlet.CONTEXT.dispatcher]
17:08:41,214 - INFO - o.s.w.s.FrameworkServlet.initServletBean(508): FrameworkServlet 'dispatcher': initialization completed in 1055 ms
17:08:41,214 - DEBUG - o.s.w.s.HttpServletBean.init(139): Servlet 'dispatcher' configured successfully
Nov 29, 2016 5:08:41 PM org.apache.coyote.AbstractProtocol start
INFO: Starting ProtocolHandler [http-nio-8080]
Nov 29, 2016 5:08:41 PM org.apache.coyote.AbstractProtocol start
INFO: Starting ProtocolHandler [ajp-nio-8009]
Nov 29, 2016 5:08:41 PM org.apache.catalina.startup.Catalina start
INFO: Server startup in 2010 ms
This indicates that your webapp has been deployed into the server successfully and is available. Launch your favourite browser and type http://localhost:8080/example/mvc/listPersons to address bar. Following page will be displayed listing persons in the application.
You can create a new person, update or delete existing ones through those links and buttons shown on the page.
10. Summary
In this example, we created a maven web application project with webapp archetype, created domain class, classes corresponding to dao, service and controller layers, and JSP files to interact with user. After creation of necessary classes, we configured our web application to bootstrap with Spring, and deployed it into Tomcat to run.
11. Download the Source Code
You can download the full source code of this example here: HowToStartDevelopingWebappsWithSpring


