1. Introduction
As we already had an introduction to Spring Integration, it has an event-driven messaging architecture.
To take a quick recap, for every Message communication to a JMS destination involves two endpoints, which is the Producer Endpoint and Consumer Endpoint. The endpoints demarcate the ends of a particular Channel, such that the Producer Endpoint produces the Message and drops it to a designated Channel. On the other end of the Channel is the Consumer Endpoint, which is ready to consume the Message on the same channel. The Producer Endpoint is the inbound-channel-adapter, while Consumer Endpoint is the service-activator. Service Activator (Consumer Endpoint) polls for Messages on the channel, and once it finds any, it activates the service method, which further processes the Message accordingly and passes on to the Outbound Channel Adapter. The Outbound Channel Adapter uses the jmsTemplate to finally drop the Message to the destination queue.
There are two JMS-based Inbound Adapters that Spring Integration provides, which are message-driven-channel-adapter and inbound-channel-adapter. inbound-channel-adapter receives the message based on the polling parameters that we specify, so it keeps polling the configured destination queue to check for the Messages on the destination queue. The message-driven-channel-adapter relies upon Spring MessageListener container.
2. Maven dependencies
Let’s check out an example where we explicitly apply polling for Messages on the Producer and Consumer Endpoints.
We must make sure we have proper dependencies in pom.xml file.
pom.xml
<properties>
	<spring.version>4.0.0.RELEASE</spring.version>
	<jms.version>1.1-rev-1</jms.version>
	<activemq.version>5.2.0</activemq.version>
	<spring.integration.version>4.1.2.RELEASE</spring.integration.version>
</properties>

<!-- JMS -->
<dependency>
	<groupId>javax.jms</groupId>
	<artifactId>jms-api</artifactId>
	<version>${jms.version}</version>
</dependency>
<dependency>
	<groupId>org.springframework</groupId>
	<artifactId>spring-jms</artifactId>
	<version>${spring.version}</version>
</dependency>

<!-- Include ActiveMQ -->
<dependency>
	<groupId>org.apache.activemq</groupId>
	<artifactId>activemq-core</artifactId>
	<version>${activemq.version}</version>
</dependency>

<!-- Spring Integration -->
<dependency>
	<groupId>org.springframework.integration</groupId>
	<artifactId>spring-integration-core</artifactId>
	<version>${spring.integration.version}</version>
</dependency>
<dependency>
	<groupId>org.springframework.integration</groupId>
	<artifactId>spring-integration-jms</artifactId>
	<version>${spring.integration.version}</version>
</dependency>
3. Spring Integration Configuration Setup
The Spring Integration configuration can be done in one of the context files, which can be included within the root application context.
jmsContext.xml
<!-- ActiveMQ connection factory bean -->
<bean id="connectionFactory" class="org.apache.activemq.spring.ActiveMQConnectionFactory">
	<property name="brokerURL" value="tcp://localhost:61616" />
</bean>

<!-- Define a channel to communicate out to a JMS Destination -->
<int:channel id="inbound" />
<int:channel id="outbound" />

<int:service-activator input-channel="inbound"
	output-channel="outbound" ref="simpleMessageListener" method="onMessage" />

<int-jms:outbound-channel-adapter id="jmsOut"
	channel="outbound" connection-factory="connectionFactory"
	destination-name="sampleQueue" />
The component that is missing in the above configuration is the inbound-channel-adapter, which we will add one after the other for different poller scenarios, as we proceed with the example.
4. Applying Poller
Below are all the possible configuration options that we have, to define a poller:
<int:poller cron=""
	default="false"
	error-channel=""
	fixed-delay=""
	fixed-rate=""
	id=""
	max-messages-per-poll=""
	receive-timeout=""
	ref=""
	task-executor=""
	time-unit="MILLISECONDS"
	trigger="">
	<int:advice-chain />
	<int:transactional />
</int:poller>
4.1 Simple Poller Configuration
So let’s apply a very simple poller to our inbound-channel-adaptor as:
<int-jms:inbound-channel-adapter
	channel="inbound" connection-factory="connectionFactory"
	destination-name="testQueue" acknowledge="auto">
	<int:poller fixed-delay="1000" />
</int-jms:inbound-channel-adapter>
The fixed-delay of poller is specified in milliseconds to create a Periodic Trigger.
4.2 Poller fixed-rate vs fixed-delay
There is a significant difference between fixed-rate and fixed-delay. With fixed-rate, it doesn’t matter how long the previous execution took, the next execution will happen when it was scheduled. With fixed-delay, the next execution will always happen x time after the previous finished, even if it was delayed.
4.3 Poller configuration with cron-scheduler
We can also apply a cron expression instead of fixed-delay to poll for the new Message on the destination queue.
<int-jms:inbound-channel-adapter
	channel="inbound" connection-factory="connectionFactory"
	destination-name="testQueue" acknowledge="auto">
	<!-- cron expression below to poll every second -->
	<int:poller cron="* * * * * ?" />
</int-jms:inbound-channel-adapter>
4.4 Global default Poller
We can specify a global default poller as well, making sure that there is occurs only once in the application context. We can add a global default poller to our context file as:
<int:poller default="true" fixed-delay="50"/>
4.5 Asynchronous Polling
There is asynchronous polling that can be achieved in the same way as the standard poller configuration, where we need to add a TaskExecutor to the configuration. TaskExecutors can also be configured through the Spring task namespace. A simple asynchronous poller configuration would like similar to the following:

<int-jms:inbound-channel-adapter
	channel="inbound" connection-factory="connectionFactory"
	destination-name="testQueue" acknowledge="auto">
	<int:poller task-executor="taskExecutor" fixed-delay="1000" />
</int-jms:inbound-channel-adapter>

<task:executor id="taskExecutor" pool-size="20" queue-capacity="20"/>
pool-size=20 indicates that at the max 20 tasks can be executed separately on different threads concurrently. Before a new item is pushed into the task-executor pool, the pool availability is checked. If all the 20 tasks are busy, the new item is pushed to the queue until any of the ongoing tasks finish its execution on the task-executor pool. Queue limit is specified through a separate poller attribute, queue-capacity. As per our configuration, at the max 20 items can be present in the queue before claiming their place on the pool.
5. Listener Setup
There is a listener that we have in our sample application, whose method gets invoked by service-activator as soon as the Message arrives at the Consumer Endpoint.
SimpleMessageListener.java
package com.jcombat.listener;

public class SimpleMessageListener {

	public String onMessage(String message) {
		System.out.println(message);
		return message;
	}
}
6. Verify message
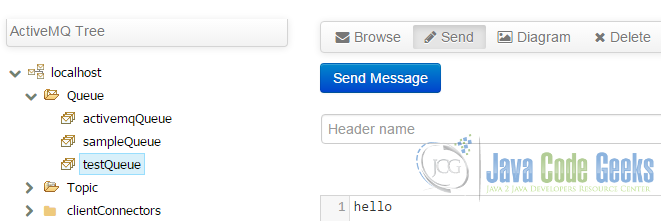
To successfully verify the working of our sample application, we just need to start our ActiveMQ server, and login to the Hawtio console and from the queues listed on the left, click on the testQueue link. We see a Send button through which we can pass any text to this queue, same as can be seen in the below snapshot.
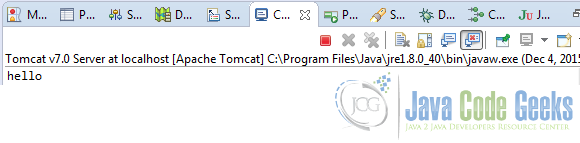
Once the message on the testQueue is sent, watch the server console for the same Message getting logged. This is because, as per our configuration, the service-activator component invokes our listener class onMessage() method, that actually processes the Message (in our case we are just displaying it), which appears on the server console as:
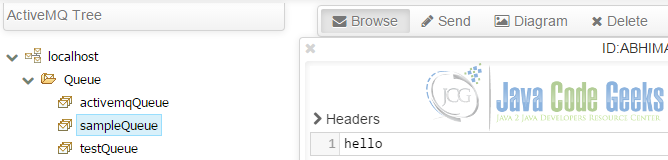
Based on the outbound-channel-adapter configuration in our context file, the above processed Message is dispatched to the outbound adapter, which finally drops the Message to the outbound destination queue, sampleQueue. We can similarly verify the message that finally arrives on the sampleQueue as can be seen below:
7. Download the Maven project
You can download the full source code of this example here: Spring Integration Poller Demo
