In this article we present an example of setting up a Spring Batch Job that reads data from a CSV file and writes them to an XML file. We will use Spring’s JobLauncherTestUtils to fire the job.
The full example code is available for download at the end of the article. But before we delve into the example code, we present a few concepts in brief that should help one to quickly grasp what Spring Batch is all about. It has been organized as shown below. Feel free to skip to any section of interest.
Table Of Contents
1.Introduction to Spring Batch
Spring Batch is an open-source framework for batch processing. Batch Processing in simple terms, refers to running bulk operations that could run for hours on end without needing human intervention. Consider Enterprise level operations that involve say, reading from or writing into or updating millions of database records. Spring Batch provides the framework to have such jobs running with minimum human involvement. It is light-weight, comprehensive, favors POJO-based development approach and comes with all the features that Spring offers. Besides, it also exposes a number of classes and APIs that could be exploited say for transaction management, for reading and writing data et al. The newer Spring Batch Version 3.x supports JSR-352, JobScope, SQLite, works with Spring 4 and Java 8 etc. It is a beautiful framework that can be used to run batch jobs smoothly.
2. Spring Batch: Core Concepts
In the following sections we will skim through a few of the core concepts of Spring Batch.
2.1 Jobs
As the document reads, it encapsulates the whole batch processing. Think of it as a task that involves, say reading from a CSV file, processing the data and updating the corresponding records in a database table. This entire operation is a Job which involves smaller bits of executions. A Job can be configured in the XML or using Java annotation. Job is technically an interface. SimpleJob is its simplest implementation provided by the framework. When a job is configured using the <job/> tags, the framework abstracts away the fact that we are actually creating an instance of SimpleJob. Below is a snippet showing a Job configuration.
Job Configuration
<job id="batchJob" job-repository="myJobRepository"  xmlns="http://www.springframework.org/schema/batch">
    <step id="step1" next="step2">
	<tasklet transaction-manager="myTransactionManager" >
	    <chunk reader="itemReader" writer="xmlWriter" commit-interval="10"></chunk>
	</tasklet>
    </step>
    <step id="step2">
        <tasklet ref="runTasklet"/>
    </step>
</job>
Following are a few points to note when setting up a Job:
- A Job must have an “id”
- It has to have a JobRepository. By default, it looks for ‘jobRepository’, though it can be explicitly set as we are doing here. What it means is, by default it looks for a bean named ‘jobRepository’ to be used but say you have created a bean named “myJobRepository” to be used as a JobRepository. To make your Job use your JobRepository it must be explicitly specified.
- It consists of one or more steps. If a
nextattribute does not link the step following the first as in the snippet above, it throws step unreachable exception. - It requires a TransactionManager. By default, it picks up ‘transactionManager’ but it can be overridden as shown here. Same as JobRepository.
- And finally, Jobs can be made ‘abstract’. This is typically done when one wants to register a listener for a set of Jobs. In such a case, a parent Job is created as abstract that does nothing but just registers a Listener. Its child jobs thus inherit the listener. Of course, each child Job can have its own listener as well. And it can decide whether it merges its listener with that of its parent or overrides it. The following shows a snippet of an abstract parent Job that registers a Listener and a child job that inherits the listener from it and defines its own listener as well.
Abstract Job<job id="parentjob" abstract="true"> <listeners> <listener ref="jobListener"/> <listeners> </job> <job id="childJob" parent="parentJob"> <step id="step1"> <tasklet> <chunk reader="itemReader" writer="itemWriter"/> </tasklet> <listeners merge="true"> <listener ref="stepListener"/> </listeners> </step> </job> -
JobInstance: single logical run of a Job. A job may have multiple JobInstances -
JobParameters: these are used to identify one JobInstance from another. -
JobExecution: it is the technical concept of a single attempt to run a Job.
Ok while we are at it, it is helpful to be familiar with the following terms:
2.2 JobRepository
This is what offers persistence mechanism in the framework. Job, Step and JobLauncher all read from it. The below snippet shows an example of configuring a JobRepository.
jobRepository
	<bean id="myJobRepository"
		class="org.springframework.batch.core.repository.support.JobRepositoryFactoryBean">
		<property name="dataSource" ref="dataSource" />
		<property name="transactionManager" ref="myTransactionManager" />
		<property name="tablePrefix" value="JCG_" />
		<property name="databaseType" value="HSQL" />
	</bean>
A quick note on the properties set in the above configuration:
dataSource: This refers to the database which has to be configured wherein the meta-data tables are created. These meta-data tables store information on the state of the job executed.dataBaseType: This should be set to the type of the database used like DB2 or MySql or HSQL.tablePrefix: The Spring meta-data tables are named as BATCH_STEP_EXECUTION, BATCH_JOB_EXECUTION etc. If one wants the table names to be prefixed with say, JCG_BATCH_STEP_EXECUTION or JCG_BATCH_JOB_EXECUTION etc. one needs to set this property.transactionManager: This is required to look after the transaction management.
2.3 JobLauncher
It is a simple interface for launching a Job with a given set of parameters. Its simplest implementation is the SimpleJobLauncher. When configuring a JobLauncher it must be provided with a reference to a JobRepository from which it picks up the JobExecution context and executes the Job. The following snippet shows a simple example of setting up a JobLauncher that uses the SimpleJobLauncher class.
JobLauncher
<bean id="jobLauncher"
      class="org.springframework.batch.core.launch.support.SimpleJobLauncher">
    <property name="jobRepository" ref="jobRepository" />
</bean>
2.4 Steps
The Spring Batch documentation aptly describes a Step. It reads: a Step is a domain object that encapsulates an independent, sequential phase of a batch job and contains all of the information necessary to define and control the actual batch processing. As stated above, each Job must have one or more steps in it. So the actual processing that goes on in a Job is contained in a Step. Steps can be processed in either of the following two ways.
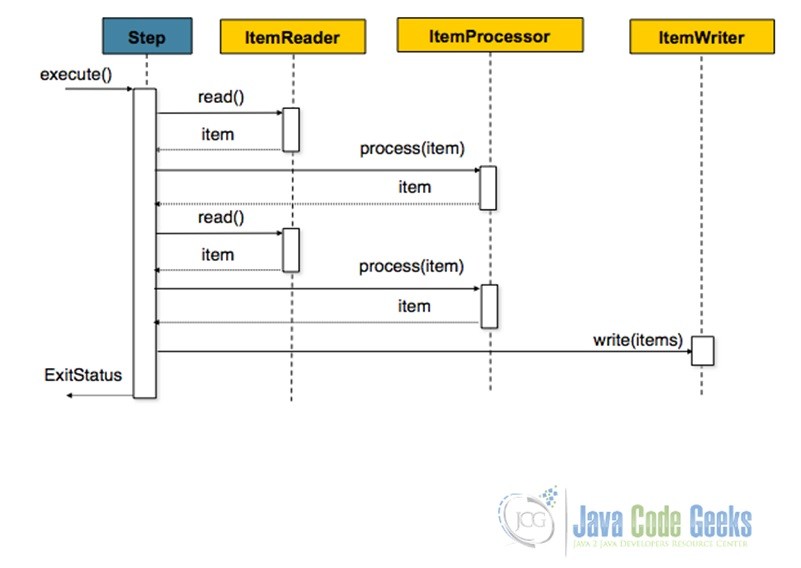
2.4.1 Chunks
Chunk-oriented processing is the most common mode of Step processing. It involves Reading an input, Processing the input through the application of some business logic and aggregating it till the commit-interval is reached and finally writing out the chunk of data output to a file or database table. A bunch of Readers and Writers are floated by the framework that could be used as well as customized. The following diagram nicely summarizes the concept.
And following snippet shows how one could configure a chunk-oriented step.
Step Configuration
<job id="sampleJob" job-repository="myJobRepository">
    <step id="step1">
        <tasklet transaction-manager="myTransactionManager">
            <chunk reader="itemReader" writer="itemWriter" commit-interval="10"/>
        </tasklet>
    </step>
</job>
Points to note on the above configuration:
itemReaderanditemWriterwould need to be supplied.- Providing an
itemProcessoris optional - Here a
commit-intervalof 10 implies, 10 records would be read, one-by-one and then the whole chunk of 10 records would be written off at one go.
2.4.2 Tasklets
TaskletStep processing comes to the fore when Step processing does not involve Reading or Processing and Writing, but say, just executing one stored procedure or making a remote call or just one task. The following shows how to configure a TaskletStep and here is another JCG article that presents an example of Tasklet.
Tasklet Configuration
<job id="taskletJob">
    <step id="callStoredProc">
       <tasklet ref="callingProc"/>
    </step>
</job>
3. Example
Now that we are familiar with the basics of Spring Batch we are good to get our hands dirty with an example. So let’s begin.
3.1 Tools Used
In this example we are using
- Maven 2.x
- Eclipse Helios
- Spring Batch 3.0.3
3.2 Create Maven Project
We will create a simple Maven project. Steps are as listed below:
- Fire up Eclipse from a suitable location/workspace
- Click on File->New->Project… ->Maven->Maven Project->Next
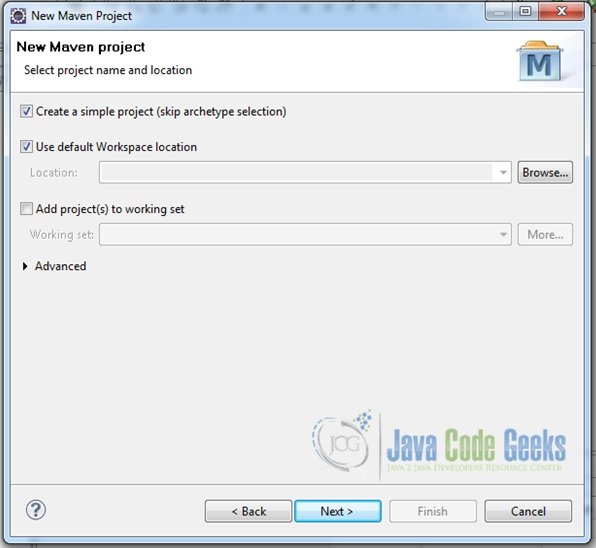
- In the pop-up window that comes up skip archetype selection and then supply the groupId and artifactId etc. in the next window and finally click on ‘Finish’.
- The following snapshots summarize the steps for project creation

Fig.2 Skip ArcheType Selection 
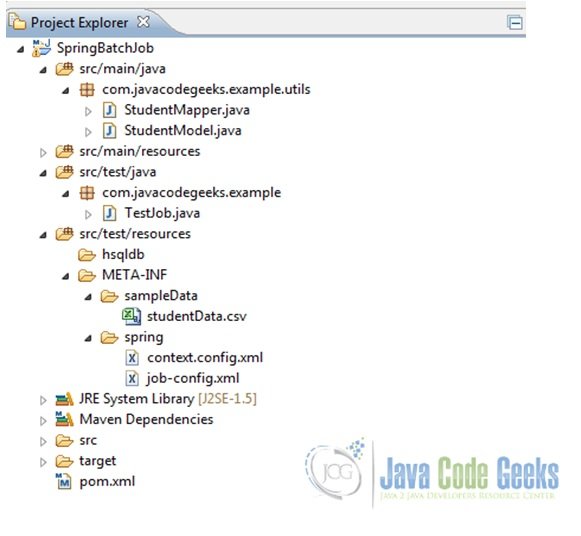
Fig.3 Create Maven Project - Once done, add some folders and files to it to have the final project structure as shown below

Fig.4 Project Structure

3.3 Add Dependencies
Add the following dependencies in the pom.xml file.
pom.xml
<project xmlns="http://maven.apache.org/POM/4.0.0" xmlns:xsi="http://www.w3.org/2001/XMLSchema-instance" xsi:schemaLocation="http://maven.apache.org/POM/4.0.0 http://maven.apache.org/xsd/maven-4.0.0.xsd">
  <modelVersion>4.0.0</modelVersion>
  <groupId>com.javacodegeeks.example</groupId>
  <artifactId>SpringBatchJob</artifactId>
  <version>0.0.1-SNAPSHOT</version>
  <properties>
  	<spring.batch.version>3.0.3.RELEASE</spring.batch.version>
  	<spring.jdbc.version>4.0.5.RELEASE</spring.jdbc.version>
  	<spring.oxm.version>4.0.5.RELEASE</spring.oxm.version>
  	<commons.version>1.4</commons.version>
  	<hsql.version>1.8.0.7</hsql.version>
  	<junit.version>4.7</junit.version>
  </properties>
   <dependencies>
  	<dependency>
		<groupId>org.springframework.batch</groupId>
		<artifactId>spring-batch-core</artifactId>
		<version>${spring.batch.version}</version>
	</dependency>
	<dependency>
		<groupId>org.springframework</groupId>
		<artifactId>spring-oxm</artifactId>
		<version>${spring.oxm.version}</version>
	</dependency>
	<dependency>
		<groupId>org.springframework</groupId>
		<artifactId>spring-jdbc</artifactId>
		<version>${spring.jdbc.version}</version>
   </dependency>
   <dependency>
		<groupId>commons-dbcp</groupId>
		<artifactId>commons-dbcp</artifactId>
		<version>${commons.version}</version>
	</dependency>
	<dependency>
		<groupId>hsqldb</groupId>
		<artifactId>hsqldb</artifactId>
		<version>${hsql.version}</version>
	</dependency>
	<dependency>
		<groupId>org.springframework.batch</groupId>
		<artifactId>spring-batch-test</artifactId>
		<version>${spring.batch.version}</version>
	</dependency>
	<dependency>
		<groupId>junit</groupId>
		<artifactId>junit</artifactId>
		<version>${junit.version}</version>
	</dependency>
  </dependencies>
</project>
3.4 Set-Up POJOs
Under the src/main folder we are going to add a StudentModel class that just holds some properties and their setters and getters. These properties would then be mapped to the data supplied; hence we will also implement a StudentMapper class as shown below.
StudentModel.java
package com.javacodegeeks.example.utils;

public class StudentModel {

	String firstName, lastName;
	String school;
	int rollNumber;
	public String getFirstName() {
		return firstName;
	}
	public void setFirstName(String firstName) {
		this.firstName = firstName;
	}
	public String getLastName() {
		return lastName;
	}
	public void setLastName(String lastName) {
		this.lastName = lastName;
	}
	public String getSchool() {
		return school;
	}
	public void setSchool(String school) {
		this.school = school;
	}
	public int getRollNumber() {
		return rollNumber;
	}
	public void setRollNumber(int rollNumber) {
		this.rollNumber = rollNumber;
	}
}
StudentMapper.java

package com.javacodegeeks.example.utils;

import java.sql.ResultSet;
import java.sql.SQLException;

import org.springframework.jdbc.core.RowMapper;

public class StudentMapper implements RowMapper {

	public StudentModel mapRow(ResultSet rs, int rowNum) throws SQLException {
		StudentModel student = new StudentModel();
		student.setFirstName(rs.getString("firstName"));
		student.setLastName(rs.getString("lastName"));
		student.setSchool(rs.getString("school"));
		student.setRollNumber(rs.getInt("rollNumber"));
		return student;
	}
}
3.5 Configure Context
Next, we will configure the context.config.xml under src/test/resources/META-INF/spring. We will place the configuration of beans like jobRepository, transactionManager etc. which would be common across different jobs that we might configure in this file. Note that we are using HSQL, an in-memory database for storing meta-data pertaining to Spring Batch processing.
context.config.xml
<beans xmlns="http://www.springframework.org/schema/beans"
	xmlns:xsi="http://www.w3.org/2001/XMLSchema-instance"
	xmlns:jdbc="http://www.springframework.org/schema/jdbc"
	xsi:schemaLocation="
	http://www.springframework.org/schema/beans
	http://www.springframework.org/schema/beans/spring-beans-4.0.xsd
	http://www.springframework.org/schema/jdbc
	http://www.springframework.org/schema/jdbc/spring-jdbc.xsd">

	<bean id="jobRepository"
	class="org.springframework.batch.core.repository.support.JobRepositoryFactoryBean">
		<property name="dataSource" ref="dataSource" />
		<property name="transactionManager" ref="transactionManager" />
		<property name="databaseType" value="hsql" />
  	</bean>

  	<bean id="jobLauncher"
	class="org.springframework.batch.core.launch.support.SimpleJobLauncher">
		<property name="jobRepository" ref="jobRepository" />
  	</bean>

  	<bean id="transactionManager"
	class="org.springframework.batch.support.transaction.ResourcelessTransactionManager" />


	<bean id="dataSource" class="org.apache.commons.dbcp.BasicDataSource"
		lazy-init="true" destroy-method="close">
		<property name="driverClassName" value="org.hsqldb.jdbcDriver" />
		<property name="url"
			value="jdbc:hsqldb:file:src/test/resources/hsqldb/batchcore.db;shutdown=true;" />
		<property name="username" value="sa" />
		<property name="password" value="" />

	</bean>

  <!-- create job-meta tables automatically
 Note: when using db2 or hsql just substitute "mysql" with "db2" or "hsql".
       For example, .../core/schema-drop-db2.sql -->
   <jdbc:initialize-database data-source="dataSource">
	   <jdbc:script location="org/springframework/batch/core/schema-drop-hsqldb.sql" />
	   <jdbc:script location="org/springframework/batch/core/schema-hsqldb.sql" />
    </jdbc:initialize-database>

</beans>
3.6 Configure Job
Now we will configure a job under src/test/resources/META-INF/spring. It is a pretty simple job with just one step that has an itemReader that reads data from a CSV file and an itemWriter that writes the output to an XML file.
job-config.xml
<?xml version="1.0" encoding="UTF-8"?>
<beans xmlns="http://www.springframework.org/schema/beans"
	xmlns:aop="http://www.springframework.org/schema/aop"
	xmlns:batch="http://www.springframework.org/schema/batch" xmlns:task="http://www.springframework.org/schema/task"
	xmlns:file="http://www.springframework.org/schema/integration/file"
	xmlns:p="http://www.springframework.org/schema/p" xmlns:xsi="http://www.w3.org/2001/XMLSchema-instance"
	xmlns:context="http://www.springframework.org/schema/context"
	xmlns:jdbc="http://www.springframework.org/schema/jdbc"
	xmlns:util="http://www.springframework.org/schema/util"
	xsi:schemaLocation="http://www.springframework.org/schema/beans
	http://www.springframework.org/schema/beans/spring-beans.xsd
	http://www.springframework.org/schema/integration/file
	http://www.springframework.org/schema/integration/file/spring-integration-file.xsd
    http://www.springframework.org/schema/beans
    http://www.springframework.org/schema/beans/spring-beans.xsd
    http://www.springframework.org/schema/batch
    http://www.springframework.org/schema/batch/spring-batch.xsd
    http://www.springframework.org/schema/context
    http://www.springframework.org/schema/context/spring-context.xsd
	http://www.springframework.org/schema/util
	http://www.springframework.org/schema/util/spring-util.xsd
	http://www.springframework.org/schema/task
    http://www.springframework.org/schema/task/spring-task.xsd
    http://www.springframework.org/schema/jdbc
	http://www.springframework.org/schema/jdbc/spring-jdbc.xsd">

	<bean id="student" class="com.javacodegeeks.example.utils.StudentModel" scope="prototype"/>

	<batch:job id="batchJob" >
		<batch:step id="batchStep">
			<batch:tasklet>
				<batch:chunk reader="itemReader" writer="itemWriter" commit-interval="2"></batch:chunk>
			</batch:tasklet>
		</batch:step>
	</batch:job>


	<!-- Read data from the csv file-->
	<bean id="itemReader" class="org.springframework.batch.item.file.FlatFileItemReader">
   		<property name="resource" value="classpath:META-INF/sampleData/studentData.csv"></property>
   		<property name="linesToSkip" value="1"></property>
   		<property name="lineMapper">
   			<bean class="org.springframework.batch.item.file.mapping.DefaultLineMapper">
   				<property name="lineTokenizer">
   					<bean class="org.springframework.batch.item.file.transform.DelimitedLineTokenizer">
   						<property name="names" value="firstName,lastName,school,rollNumber"></property>
   					</bean>
   			    </property>
   				<property name="fieldSetMapper">
   					<bean class="org.springframework.batch.item.file.mapping.BeanWrapperFieldSetMapper">
   						<property name="prototypeBeanName" value="student"></property>
   					</bean>
   				</property>
   			</bean>
   		</property>
   </bean>

  <!-- Write data into an XML file-->
    <bean id="itemWriter" class="org.springframework.batch.item.xml.StaxEventItemWriter">
   	<property name="resource" value="file:xml/student_data.xml"></property>
   	<property name="marshaller" ref="unmarshaller"></property>
   	<property name="rootTagName" value="students"></property>
   </bean>

   <bean id="unmarshaller" class="org.springframework.oxm.xstream.XStreamMarshaller">
   	<property name="aliases">
   		<util:map id="aliases">
   			<entry key="student" value="com.javacodegeeks.example.utils.StudentModel"></entry>
   		</util:map>
   	</property>
   </bean>

   <!--  This is to make use of the spring provided test launcher -->
   <bean class="org.springframework.batch.test.JobLauncherTestUtils"/>

</beans>
3.7 Sample Data
Add a csv file under src/test/resources/META-INF/sampleData and just put some data in it. The data sample we are using looks as follows:
SampleData
| FirstName | LastName | School | RollNumber |
|---|---|---|---|
| Celina | Marcus | Little Flower | 11900 |
| Rose | Anthony | St. Mary’s Convent | 22990 |
| Arthur | Samuel | St. Anthony’s | 18970 |
| Carl | Jacob | Little Flower | 12349 |
3.8 Set-up the Test Case
Now we are almost done with the set-up. So let’s move on to writing our test case from which we will fire the job. In this we are basically using Spring Batch Unit Testing. Notice how the JobLauncherTestUtils has been autowired. We have defined this bean in the job-config.xml file.
TestJob.java
package com.javacodegeeks.example;

import junit.framework.Assert;

import org.junit.Test;
import org.junit.runner.RunWith;
import org.springframework.batch.core.BatchStatus;
import org.springframework.batch.core.JobExecution;
import org.springframework.batch.test.JobLauncherTestUtils;
import org.springframework.beans.factory.annotation.Autowired;
import org.springframework.test.context.ContextConfiguration;
import org.springframework.test.context.junit4.SpringJUnit4ClassRunner;

@RunWith(SpringJUnit4ClassRunner.class)
@ContextConfiguration(locations={"classpath:META-INF/spring/context.config.xml",
		                         "classpath:META-INF/spring/job-config.xml"})
public class TestJob {

	@Autowired
	private JobLauncherTestUtils launcher;

	@Test
	public void testJob(){
		try {
			JobExecution execution = launcher.launchJob();
			Assert.assertEquals(BatchStatus.COMPLETED, execution.getStatus());
		} catch (Exception e) {
			e.printStackTrace();
		}
	}

	@Test
	public void testStep(){
		JobExecution execution = launcher.launchStep("batchStep");
		Assert.assertEquals(BatchStatus.COMPLETED, execution.getStatus());
	}
}
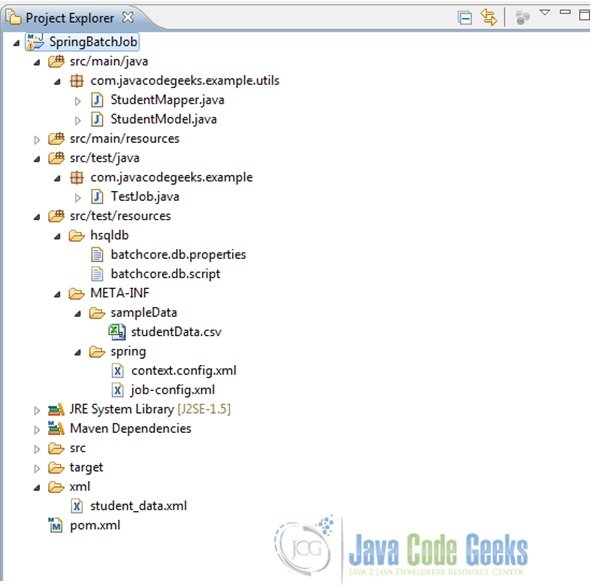
3.9 Output
Finally, just right click on the TestJob.java and run it as a JUnit test-case. If everything was set-up as detailed above, the jobs should run fine and the unit-tests results should be all green. And finally, a folder named ‘xml’ should be added to the project with a student_data.xml file in it. This is the XML file to which we have written the output from the CSV file as specified in the resource attribute of our itemWriter. So the final project structure would look as follows. Note that after running the test-cases, one might have to refresh the project to view the newly added ‘xml’ folder in it.
4. Conclusion
This brings us to the end of the example.
You can download the full source code of this example here : SpringBatchJob

Thank you very much. Your sample was very clear and helped me to implement a job and run it very fast.
@Joormana, the official Spring documentation (https://docs.spring.io/spring-batch/trunk/reference/html/readersAndWriters.html) says RowMapper is invoked by the default SQL ItemReaders when accessing a database resource, whereas “The FieldSetMapper interface defines a single method, mapFieldSet, which takes a FieldSet object and maps its contents to an object. This object may be a custom DTO, a domain object, or a simple array, depending on the needs of the job.” Which means you should have used FieldSetMapper instead of RowMapper in the StudentMapper class, and mapFieldSet(FieldSet fs) instead of mapRow(ResultSet rs, int rowNum). BTW your job-config.xml shows you already chose to inject a fieldSetMapper (and not a rowMapper)… Read more »
Hi Joormana, The official Spring documentation (https://docs.spring.io/spring-batch/trunk/reference/html/readersAndWriters.html) says RowMapper is invoked by the default SQL ItemReaders when accessing a database resource, whereas “The FieldSetMapper interface defines a single method, mapFieldSet, which takes a FieldSet object and maps its contents to an object. This object may be a custom DTO, a domain object, or a simple array, depending on the needs of the job.” Which means you should have used FieldSetMapper instead of RowMapper in the StudentMapper class, and mapFieldSet(FieldSet fs) instead of mapRow(ResultSet rs, int rowNum). BTW your job-config.xml shows you already chose to inject a fieldSetMapper (and not a… Read more »