Spring MVC RequestMapping Example
Spring MVC is one of the most important modules of the Spring framework. In this article, we are going to discuss one of the main annotation in Spring MVC i.e. @RequestMapping which is used to map a web request to Spring Controller’s handler methods.
1. Introduction
1.1 Spring Framework
- Spring is an open-source framework created to address the complexity of an enterprise application development
- One of the chief advantages of the Spring framework is its layered architecture, which allows developer to be selective about which of its components they can use while providing a cohesive framework for
J2EEapplication development - Spring framework provides support and integration to various technologies for e.g.:
- Support for Transaction Management
- Support for interaction with the different databases
- Integration with the Object Relationship frameworks for e.g. Hibernate, iBatis etc
- Support for Dependency Injection which means all the required dependencies will be resolved with the help of containers
- Support for
RESTstyle web-services
1.2 Spring MVC @RequestMapping Annotation
All incoming requests are handled by the Dispatcher Servlet and it routes them through the Spring framework. When the Dispatcher Servlet receives a web request, it determines which controllers should handle the incoming request. Dispatcher Servlet initially scans all the classes that are annotated with the @Controller annotation. The dispatching process depends on the various @RequestMapping annotations declared in a controller class and its handler methods.
The @RequestMapping annotation is used to map the web request onto a handler class (i.e. Controller) or a handler method and it can be used at the Method Level or the Class Level. If developers use the @RequestMapping annotation at a class level, it will be as a relative path for the method level path. Let’s understand this with the help of an example:
@Controller
@RequestMapping(value = "/countryController")
public class CountryController {

 @RequestMapping(value = "/countries", method = RequestMethod.GET, headers = "Accept=application/json")
 public List getCountries() {
 	// Some Business Logic
 }
The URL for this web request will be: http://localhost:8080/ProjectName/countryController/countries and will execute the getCountries() method. The below image will make it clear.

The value attribute of the @RequestMapping annotation is used to map the handler method to a path and it can be written as @GetMapping(value="/one"), which is equivalent to @GetMapping("/one"). Spring framework also provides five method-level composed variant of the @RequestMapping annotation:
@GetMapping: Equivalent to@RequestMapping(method = RequestMethod.GET)@PostMapping: Equivalent to@RequestMapping(method = RequestMethod.POST)@PutMapping: Equivalent to@RequestMapping(method = RequestMethod.PUT)@DeleteMapping: Equivalent to@RequestMapping(method = RequestMethod.DELETE)@PatchMapping: Equivalent to@RequestMapping(method = RequestMethod.PATCH)
Let’s see some of the most widely used Spring MVC Request Mapping examples.
1.2.1 @RequestMapping Annotation at Class Level
@RequestMapping can be added at the Controller Level. This way the URI provided will act as base URI for all other methods in the Controller class. For e.g.:
@Controller
@RequestMapping(value = "/employee")
public class EmployeeController {
	// Methods
}
Now any requests with /employee as URL will hit this Controller class.
1.2.2 @RequestMapping Annotation at Method Level
@RequestMapping annotation can also be added in the methods of a controller class. For e.g.:
@Controller
@RequestMapping(value = "/employee")
public class EmployeeController {
	@RequestMapping(value = "/display")
	public ModelAndView showEmployeeForm() {
		// Some Business Logic
	}
}
In the code above we have a Class level @RequestMapping annotation as /employee and a Method level @RequestMapping annotation as /display. So to call the method showEmployeeForm() we will use the URL as: /employee/display.
1.2.3 @RequestMapping Annotation Using @Pathvariable
@RequestMapping annotation can be used to construct the dynamic or the run-time URI i.e. to pass in the parameters. This can be achieved by using the @PathVariable. For e.g.:
@Controller
@RequestMapping(value = "/employee")
public class EmployeeController {
	@RequestMapping(value = "/display/{empId}/{empName}")
	public ModelAndView showEmployeeForm(@PathVariable String empId, @PathVariable String empName) {
                // Some Business Logic
	}
}
In this case developers can pass the empId and empName as parameters to the method showEmployeeForm() by using the @PathVariable annotation. For e.g.: /employee/display/101/Java Code Geek or /employee/display/105/April O’ Neil.
1.2.4 @RequestMapping Annotation Using HTTP methods
Developers have different HTTP methods like POST, GET, DELETE etc. They can call a controller method for each of these methods using the @RequestMapping and the RequestMethod annotations. For e.g.:
@Controller
@RequestMapping(value = "/employee")
public class EmployeeController {
	@RequestMapping(value = "/display", method = RequestMethod.GET)
	public String showEmployeeForm() {
		// Some Business Logic
	}

	@RequestMapping(value = "/save", method = RequestMethod.POST)
	public String saveEmployee() {
		// Some Business Logic
	}

	@RequestMapping(value = "/delete", method = RequestMethod.DELETE)
	public String deleteEmployee() {
		// Some Business Logic
	}
}
Developers also can have one controller method to use more than one RequestMethod annotation. In the below code, if the URL is /display and HTTP method is either POST or GET, the showEmployeeForm() method will be called.
@RequestMapping(value = "/display", method = {RequestMethod.GET, RequestMethod.POST})
public String showEmployeeForm() {
	return null;
}
1.2.5 @RequestMapping Annotation Using @RequestParam
In some cases developers need to pass the parameters in the URL or through a POST request. Similar to the Pathvariable annotation they can get the parameters to the method using @RequestParam. For e.g.:
@RequestMapping(value = "/display", method = RequestMethod.GET)
public String showEmployeeForm(@RequestParam("empId") String empId) {
        // Some Business Logic
}
Here the URL will be /display?empId=12345.
Now, open up the Eclipse IDE and let’s see how to implement the sample application in Spring framework!
2. Spring MVC Request Mapping Example
2.1 Tools Used
We are using Eclipse Kepler SR2, JDK 8 and Maven. Having said that, we have tested the code against JDK 1.7 and it works well.
2.2 Project Structure
Firstly, let’s review the final project structure, in case you are confused about where you should create the corresponding files or folder later!
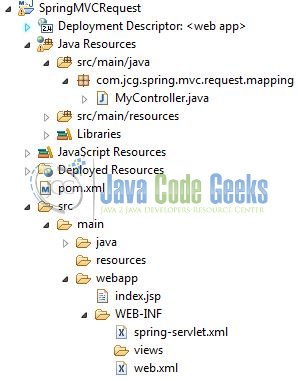
2.3 Project Creation
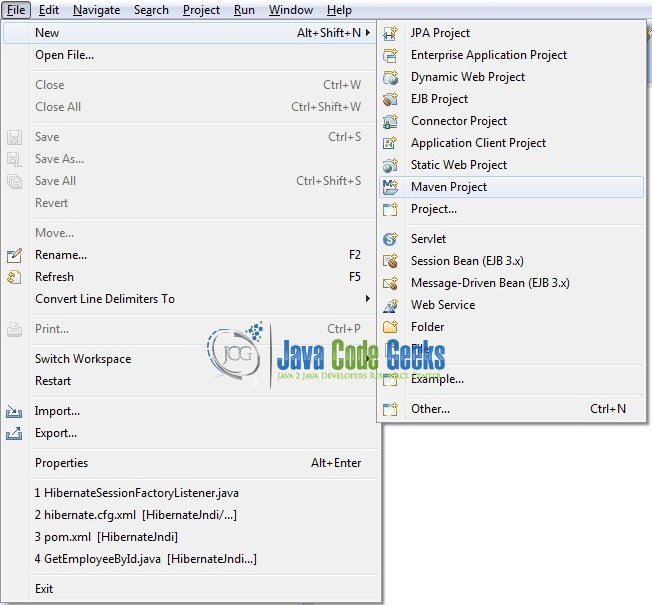
This section will demonstrate on how to create a Java based Maven project with Eclipse. In Eclipse IDE, go to File -> New -> Maven Project.
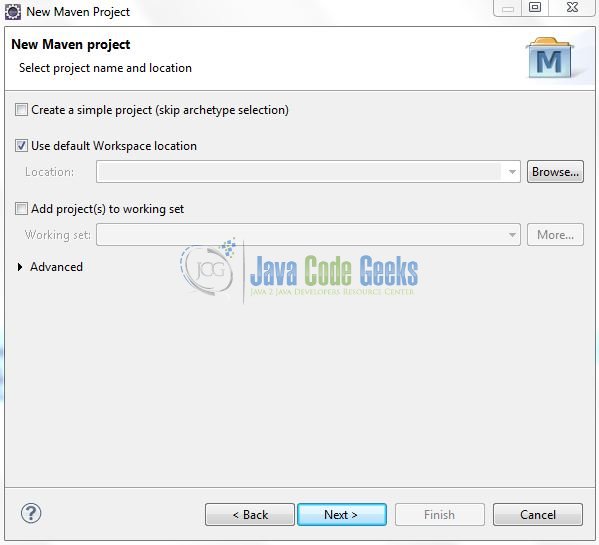
In the New Maven Project window, it will ask you to select project location. By default, ‘Use default workspace location’ will be selected. Just click on next button to proceed.
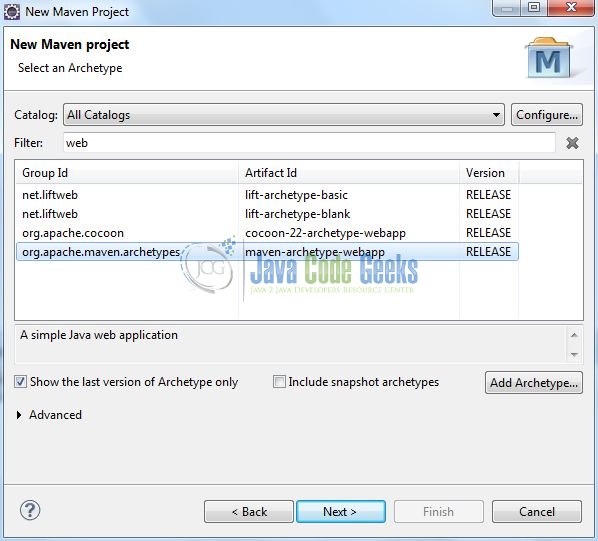
Select the ‘Maven Web App’ Archetype from the list of options and click Next.
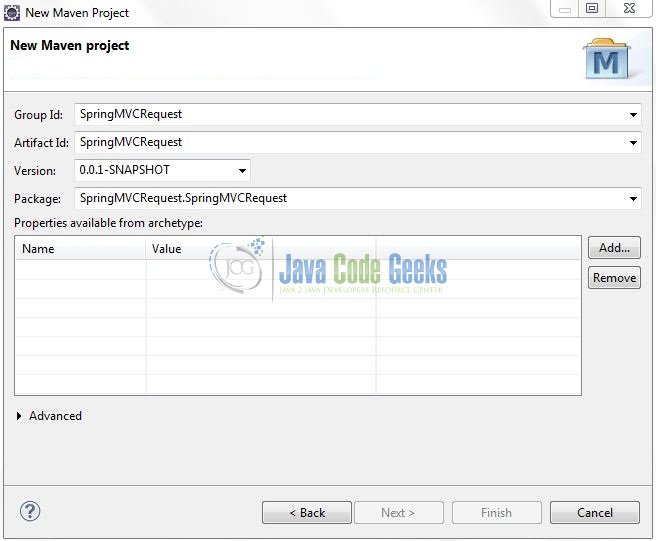
It will ask you to ‘Enter the group and the artifact id for the project’. We will input the details as shown in the below image. The version number will be by default: 0.0.1-SNAPSHOT.
Click on Finish and the creation of a maven project is completed. If you observe, it has downloaded the maven dependencies and a pom.xml file will be created. It will have the following code:
pom.xml
<project xmlns="http://maven.apache.org/POM/4.0.0" xmlns:xsi="http://www.w3.org/2001/XMLSchema-instance" xsi:schemaLocation="http://maven.apache.org/POM/4.0.0 http://maven.apache.org/xsd/maven-4.0.0.xsd">
	<modelVersion>4.0.0</modelVersion>
	<groupId>SpringMVCRequest </groupId>
	<artifactId>SpringMVCRequest </artifactId>
	<version>0.0.1-SNAPSHOT</version>
	<packaging>war</packaging>
</project>
We can start adding the dependencies that developers want like Spring MVC etc. Let’s start building the application!
3. Application Building
Below are the steps involved in developing this application.
3.1 Maven Dependencies
Here, we specify the dependency for the Spring framework. The rest dependencies will be automatically resolved by Maven, such as Spring Core, Spring Beans, and Spring MVC etc. The updated file will have the following code:
pom.xml
<project xmlns="http://maven.apache.org/POM/4.0.0" xmlns:xsi="http://www.w3.org/2001/XMLSchema-instance"
xsi:schemaLocation="http://maven.apache.org/POM/4.0.0 http://maven.apache.org/maven-v4_0_0.xsd">
	<modelVersion>4.0.0</modelVersion>
	<groupId>SpringMVCRequest</groupId>
	<artifactId>SpringMVCRequest</artifactId>
	<packaging>war</packaging>
	<version>0.0.1-SNAPSHOT</version>
	<name>SpringMVCRequest Maven Webapp</name>
	<url>http://maven.apache.org</url>
	<dependencies>
		<!-- Servlet API Dependency -->
		<dependency>
			<groupId>javax.servlet</groupId>
			<artifactId>servlet-api</artifactId>
			<version>3.0-alpha-1</version>
		</dependency>
		<!-- Spring Framework Dependencies -->
		<dependency>
			<groupId>org.springframework</groupId>
			<artifactId>spring-core</artifactId>
			<version>3.1.2.RELEASE</version>
		</dependency>
		<dependency>
			<groupId>org.springframework</groupId>
			<artifactId>spring-context</artifactId>
			<version>3.1.2.RELEASE</version>
		</dependency>
		<dependency>
			<groupId>org.springframework</groupId>
			<artifactId>spring-beans</artifactId>
			<version>3.1.2.RELEASE</version>
		</dependency>
		<dependency>
			<groupId>org.springframework</groupId>
			<artifactId>spring-webmvc</artifactId>
			<version>3.1.2.RELEASE</version>
                </dependency>
	</dependencies>
	<build>
		<finalName>${project.artifactId}</finalName>
	</build>
</project>
3.2 Java Class Creation
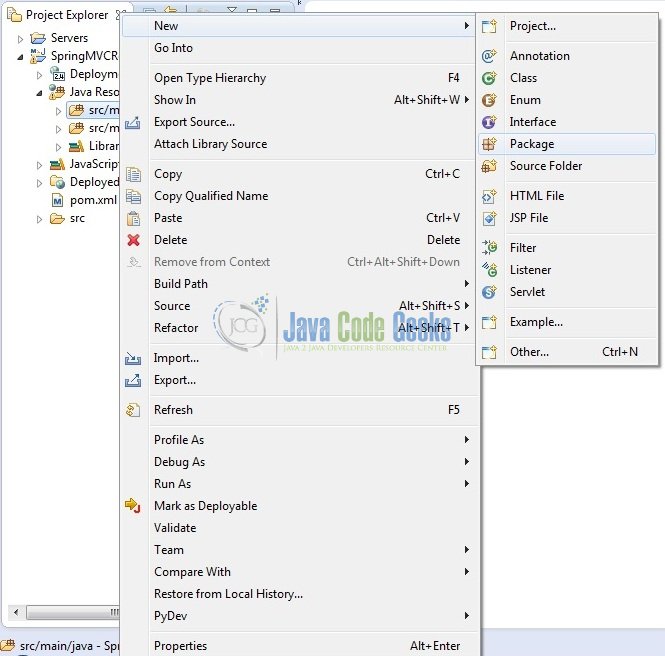
Let’s create the required Java files. Right-click on src/main/java folder, New -> Package.
A new pop window will open where we will enter the package name as: com.jcg.spring.mvc.request.mapping.
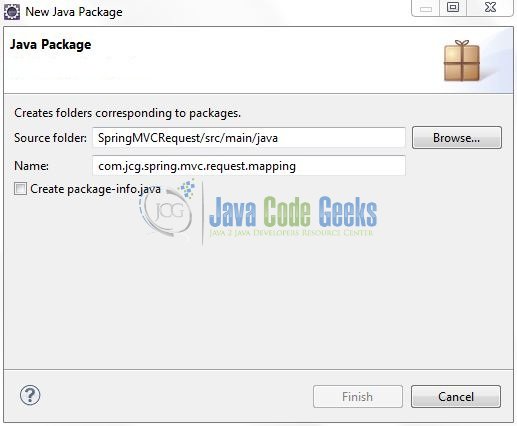
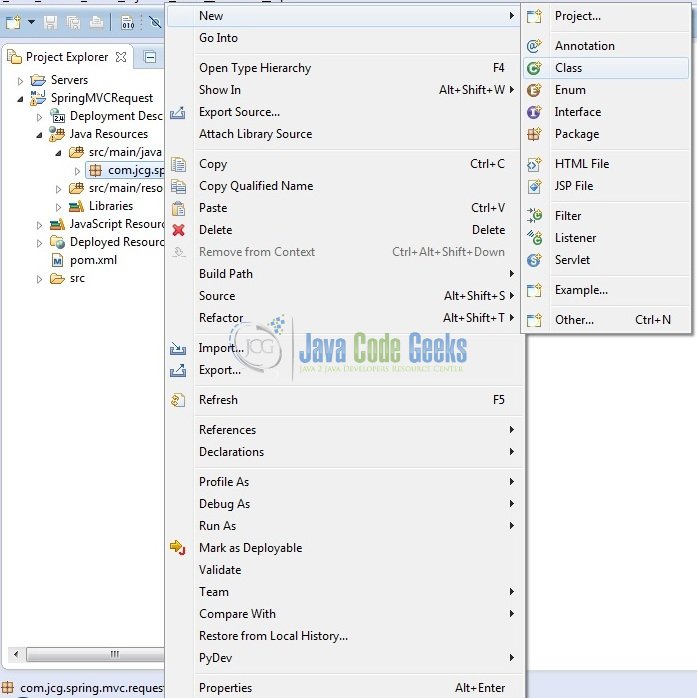
Once the package is created in the application, we will need to create the controller class. Right-click on the newly created package: New -> Class.
A new pop window will open and enter the file name as MyController. The controller class will be created inside the package: com.jcg.spring.mvc.request.mapping.
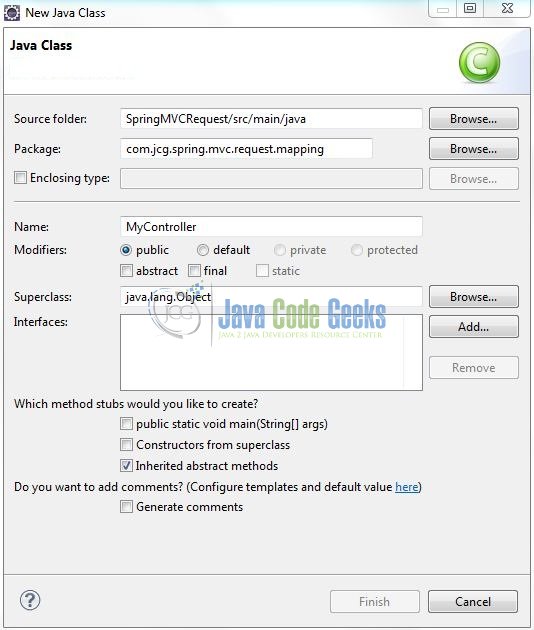
3.2.1 Implementation of Controller Class
It is a simple class where the @Controller annotation is used to specify this class as a Spring controller and the @RequestMapping annotation specifies the different method level mappings. Add the following code to it:
MyController.java
package com.jcg.spring.mvc.request.mapping;

import org.springframework.http.MediaType;
import org.springframework.stereotype.Controller;
import org.springframework.web.bind.annotation.RequestMapping;
import org.springframework.web.bind.annotation.RequestMethod;
import org.springframework.web.bind.annotation.ResponseBody;

@Controller
public class MyController {

	// Handles GET or POST Request
	@RequestMapping("/one")
	public @ResponseBody String handlerOne() {
		return "<h1>Inside handlerOne() Method Of MyController</h1>";
	}

	// Handles POST Request Only
	@RequestMapping(value = "/two", method = RequestMethod.POST)
	public @ResponseBody String handlerTwo() {
		return "<h1>Inside handlerTwo() Method Of MyController</h1>";
	}

	// Handles GET Request Only
	@RequestMapping(value = "/three", method = RequestMethod.GET)
	public @ResponseBody String handlerThree() {
		return "<h1>Inside handlerThree() Method Of MyController</h1>";
	}

	// Handles POST Request If The Request Header Contains 'content-type=application/x-www-form-urlencoded'
	@RequestMapping(value = "/four", method = RequestMethod.POST, headers = {"content-type=application/x-www-form-urlencoded"})
	public @ResponseBody String handlerFour() {
		return "<h1>Inside handlerFour() Method Of MyController</h1>";
	}

	// Handles POST Request If The Request Content Type Is 'application/x-www-form-urlencoded'
	@RequestMapping(value = "/five", method = RequestMethod.POST, consumes = {MediaType.APPLICATION_FORM_URLENCODED_VALUE})
	public @ResponseBody String handlerFive() {
		return "<h1>Inside handlerFive() Method Of MyController</h1>";
	}

	// Handles POST or GET Request And Produce Content Type Of "text/plain"
	@RequestMapping(value = "/six", produces = {MediaType.TEXT_PLAIN_VALUE})
	public @ResponseBody String handlerSix() {
		return "<h1>Inside handlerSix() Method Of MyController</h1>";
	}
}
3.3 Configuration Files
Let’s write all the configuration files involved in this application.
3.3.1 Spring Configuration File
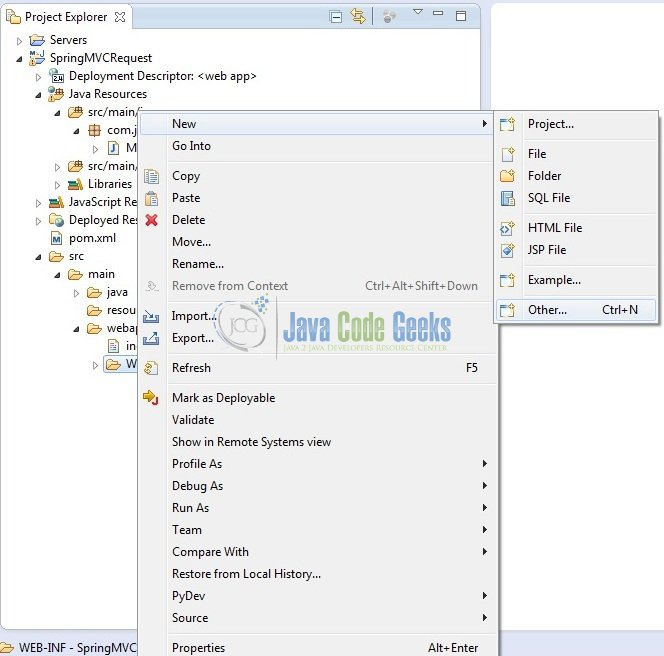
To configure the Spring framework, we need to implement a bean configuration file i.e. spring-servlet.xml which provides an interface between the basic Java class and the outside world. Right-click on SpringMVCRequest/src/main/webapp/WEB-INF folder, New -> Other.
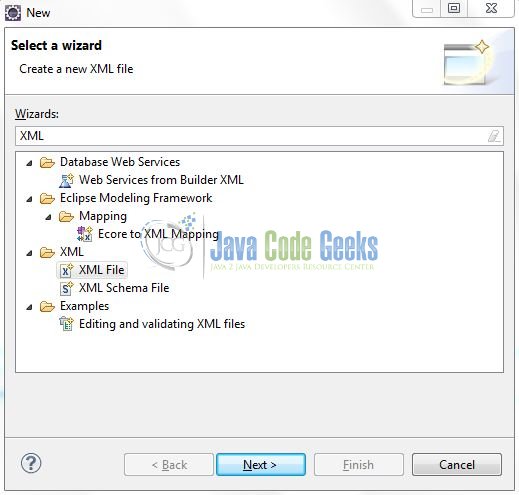
A new pop window will open and select the wizard as an XML file.
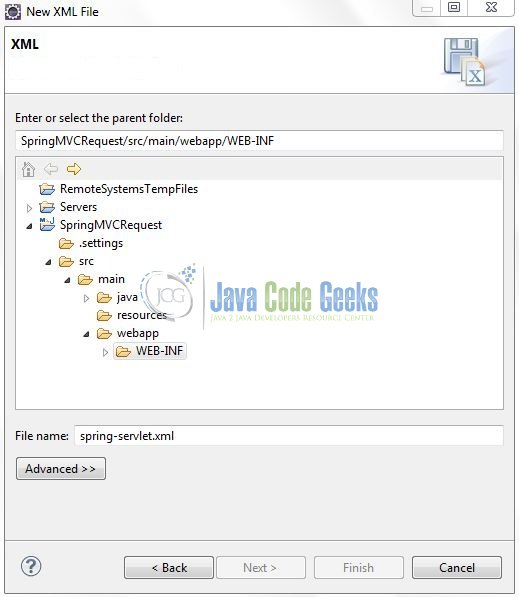
Again, a pop-up window will open. Verify the parent folder location as: SpringMVCRequest/src/main/webapp/WEB-INF and enter the file name as: spring-servlet.xml. Click Finish.
Once the XML file is created, we will add the following code to it:
spring-servlet.xml
<?xml version="1.0" encoding="UTF-8"?>
<beans xmlns="http://www.springframework.org/schema/beans"
xmlns:xsi="http://www.w3.org/2001/XMLSchema-instance" xmlns:p="http://www.springframework.org/schema/p"
xmlns:context="http://www.springframework.org/schema/context"
xsi:schemaLocation="http://www.springframework.org/schema/beans
		         http://www.springframework.org/schema/beans/spring-beans-3.0.xsd
		         http://www.springframework.org/schema/context
		         http://www.springframework.org/schema/context/spring-context-3.0.xsd">

<context:component-scan base-package="com.jcg.spring.mvc.request.mapping" />

	<!-- Resolves Views Selected For Rendering by @Controllers to *.jsp Resources in the /WEB-INF/ Folder -->
	<bean class="org.springframework.web.servlet.view.InternalResourceViewResolver">
		<property name="prefix" value="/WEB-INF/views/" />
		<property name="suffix" value=".jsp" />
	</bean>
</beans>
Notes:
This file is loaded by the Spring’s Dispatcher Servlet which receives all requests coming into the application and dispatches processing for the controllers, based on the configuration specified in this spring-servlet.xml file. Let’s look at some default configurations:
InternalResourceViewResolver: This bean declaration tells the framework how to find the physicalJSPfiles according to the logical view names returned by the controllers, by attaching the prefix and the suffix to a view name. For e.g., If a controller’s method returnshomeas the logical view name, then the framework will find a physical filehome.jspunder the/WEB-INF/viewsdirectorycontext:component-scan: This tells the framework which packages to be scanned when using the annotation-based strategy. Here the framework will scan all classes under the package:com.jcg.spring.mvc.example
3.3.2 Web Deployment Descriptor
The web.xml file declares one servlet (i.e. Dispatcher Servlet) to receive all kind of the requests. Dispatcher servlet here acts as a front controller. Add the following code to it:
web.xml
<?xml version="1.0" encoding="UTF-8"?>
<web-app version="2.5" xmlns="http://java.sun.com/xml/ns/javaee"
	xmlns:xsi="http://www.w3.org/2001/XMLSchema-instance"
	xsi:schemaLocation="http://java.sun.com/xml/ns/javaee
			         http://java.sun.com/xml/ns/javaee/web-app_2_5.xsd">

	<!-- Spring Configuration - Processes Application Requests -->
	<servlet>
		<servlet-name>spring</servlet-name>
		<servlet-class>org.springframework.web.servlet.DispatcherServlet</servlet-class>
	</servlet>
	<servlet-mapping>
		<servlet-name>spring</servlet-name>
		<url-pattern>/</url-pattern>
	</servlet-mapping>
</web-app>
3.4 Creating JSP View
Spring MVC supports many types of views for different presentation technologies. These include – JSP, HTML, XML etc. Create an index.jsp and add the following code to it:
index.jsp
<!DOCTYPE HTML>
<html>

<head>
    <meta http-equiv="Content-Type" content="text/html; charset=ISO-8859-1">
    <title>Sping MVC @RequestMapping Example</title>
    <style type="text/css">
		form {
		    display: inline-block;
		}
</style>
</head>

<body>
    <h2>Spring MVC @RequestMapping Example</h2>
    <!-- Request One -->
	<form action="one">
		<input type="submit" value="One">
	</form>

	<!-- Request Two -->
	<form action="two" method="post">
		<input type="submit" value="Two">
	</form>

	<!-- Request Three -->
	<form action="three" method="get">
		<input type="submit" value="Three">
	</form>

	<!-- Request Four -->
	<form action="four" method="post">
		<input type="submit" value="Four">
	</form>

	<!-- Request Five -->
	<form action="five" method="post" >
		<input type="submit" value="Five">
	</form>

	<!-- Request Six -->
	<form action="six" method="post" >
		<input type="submit" value="Six">
	</form>
</body>

</html>
4. Run the Application
As we are ready with all the changes, let us compile the project and deploy the application on the Tomcat7 server. To deploy the Spring MVC application on Tomat7, right-click on the project and navigate to Run as -> Run on Server.
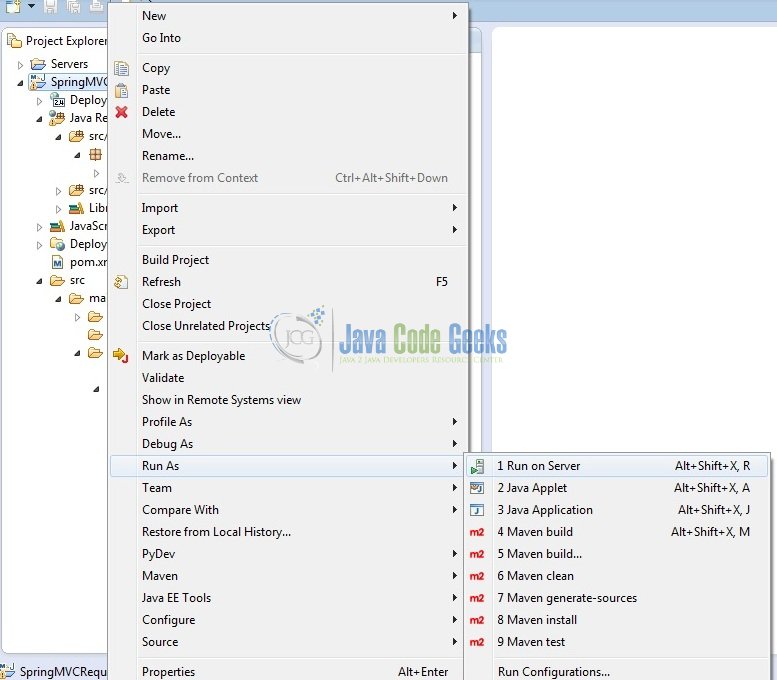
Tomcat will deploy the application in its web-apps folder and shall start its execution to deploy the project so that we can go ahead and test it on the browser.
5. Project Demo
Open your favorite browser and hit the following URL. The output page will be displayed.
http://localhost:8085/SpringMVCRequest
Server name (localhost) and port (8085) may vary as per your Tomcat configuration. Developers can debug the example and see what happens after every step. Enjoy!
Click on the button One in the main page. This will send the HTTP GET request to the handlerOne() method in the controller class.

Similarly, developers can run and test the other request URLs as specified in the controller class. That’s all for this post. Happy Learning!!
6. Conclusion
In this section, developers learned how to download, create a new project in Eclipse IDE, and add Spring 3.0 library files to write a simple Spring MVC program. That’s all for the Spring MVC tutorial and I hope this article served you whatever you were looking for.
7. Download the Eclipse Project
This was an example of Spring MVC Request Mapping for beginners.
You can download the full source code of this example here: Spring MVC Request

