Spring MVC Interceptors Example
In this post, we feature a comprehensive Example on Spring MVC Interceptors. In spring, interceptors provide a powerful mechanism to intercept an HTTP request. In this tutorial, we will show how to implement the interceptors with the Spring MVC framework.
1. Introduction
1.1 Spring Framework
- Spring is an open-source framework created to address the complexity of an enterprise application development
- One of the chief advantages of the Spring framework is its layered architecture, which allows a developer to be selective about which of its components they can use while providing a cohesive framework for
J2EEapplication development - Spring framework provides support and integration to various technologies for e.g.:
- Support for Transaction Management
- Support for interaction with the different databases
- Integration with the Object Relationship frameworks for e.g. Hibernate, iBatis etc
- Support for Dependency Injection which means all the required dependencies will be resolved with the help of containers
- Support for
RESTstyle web-services
1.2 Spring Mvc Framework
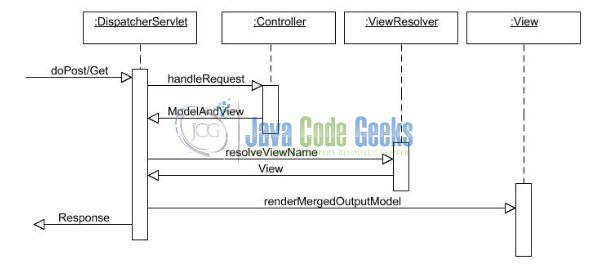
Model-View-Controller (Mvc) is a well-known design pattern for designing the GUI based applications. It mainly decouples the business logic from UI by separating the roles of Model, View, and Controller in an application. This pattern divides the application into three components to separate the internal representation of the information from the way it is being presented to the user. The three components are:
- Model (M): Model’s responsibility is to manage the application’s data, business logic, and the business rules. It is a
POJOclass which encapsulates the application data given by the controller - View (V): A view is an output representation of the information, such as displaying information or reports to the user either as a text-form or as charts. Views are usually the
JSPtemplates written with Java Standard Tag Library (JSTL) - Controller (C): Controller’s responsibility is to invoke the Models to perform the business logic and then update the view based on the model’s output. In the spring framework, the controller part is played by the Dispatcher Servlet
1.3 Spring MVC Interceptors
Similar to the filtering concepts in servlets, spring mvc provides a powerful mechanism to intercept an HTTP request. This mechanism intercepts an incoming request and is implemented in spring either by the org.springframework.web.servlet.HandlerInterceptor interface or the org.springframework.web.servlet.handler.HandlerInterceptorAdapter abstract class that provides the base implementation of the HandlerInterceptor interface.
1.3.1 HandlerInterceptor method
Spring HandlerInterceptor interface provides three callback methods to intercept an HTTP request. These methods provide flexibility to handle the pre-processing and post-processing activities. The callback methods that need to be implemented are:
preHandle(): This callback method is used to intercept the request just before the handler method is invoked. This method should returntruefor spring to understand if the request will be processed by another interceptor or the handler method. If this method returnsfalse, spring assumes that request is served by the interceptor itself and no further processing is required. This is what the code snippet looks like:public boolean preHandle(HttpServletRequest request, HttpServletResponse response, Object handler) throws Exception { …. }postHandle(): This callback method is called immediately after the handler method is invoked. This method can be used to add the additional attributes to theModelAndViewobject. This is what the code snippet looks like:public void postHandle(HttpServletRequest request, HttpServletResponse response, Object handler, ModelAndView modelAndView) throws Exception { …. }afterCompletion(): This callback method is called just before sending the response to the view page. This is what the code snippet looks like:public void afterCompletion(HttpServletRequest request, HttpServletResponse response, Object handler, Exception ex) throws Exception { …. }
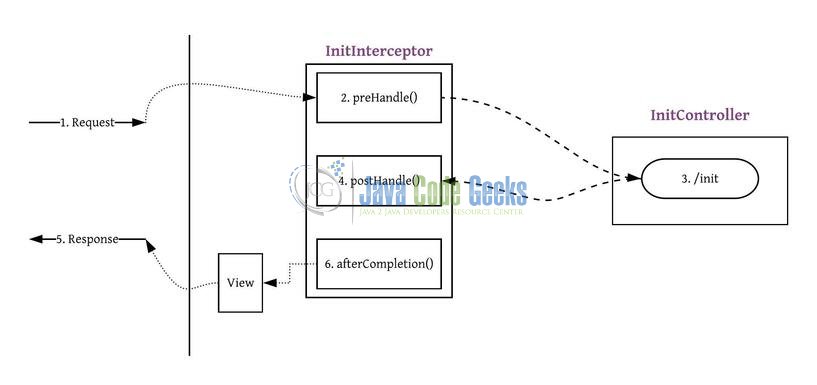
1.3.2 Few important points
HandlerInterceptorAdaptoris the implementation class of theHandlerInterceptorinterface provided by the spring framework. The implementation class provides a blank implementation- The classes implementing or extending this functionality must be declared in the spring configuration XML within the
<mvc-interceptors />tag - These interceptors can be configured in two ways i.e. execute for all requests or map to the specific url requests i.e.
<mvc:interceptors>
	<bean class="com.universal.interceptor.GlobalInterceptor" />
	<mvc:interceptor>
		<mvc:mapping path="/somepath"/>
		<bean class="com.somepath.interceptor.SomepathInterceptor" />
	</mvc:interceptor>
</mvc:interceptors>
- Do remember, all global interceptors are intercepted first and then the mapped interceptors
- If true is returned, the execution chain continues and for false, the execution stops for that request within the interceptor
Now, open up the Eclipse IDE and let’s see how to implement the interceptors in the spring mvc framework!
2. Spring MVC Interceptors Example
Here is a step-by-step guide for implementing this functionality in the spring mvc framework.
2.1 Tools Used
We are using Eclipse Kepler SR2, JDK 8 and Maven. Having said that, we have tested the code against JDK 1.7 and it works well.
2.2 Project Structure
Firstly, let’s review the final project structure, in case you are confused about where you should create the corresponding files or folder later!
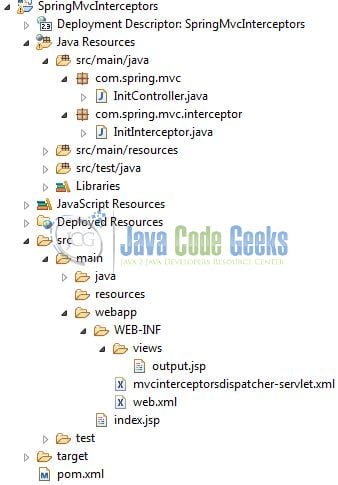
2.3 Project Creation
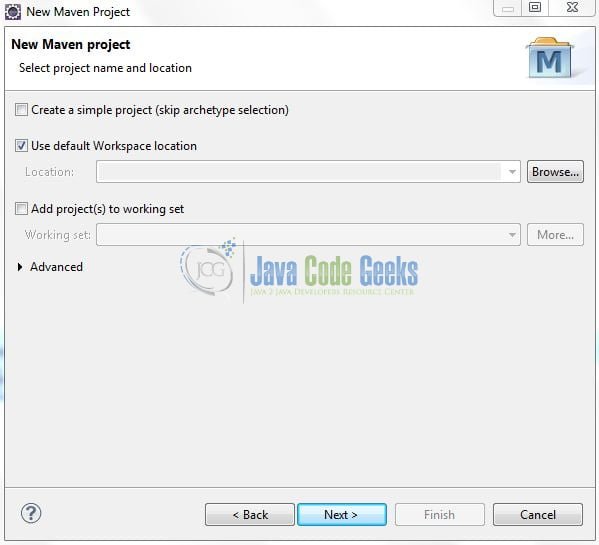
This section will demonstrate how to create a Java-based Maven project with Eclipse. In Eclipse IDE, go to File -> New -> Maven Project.
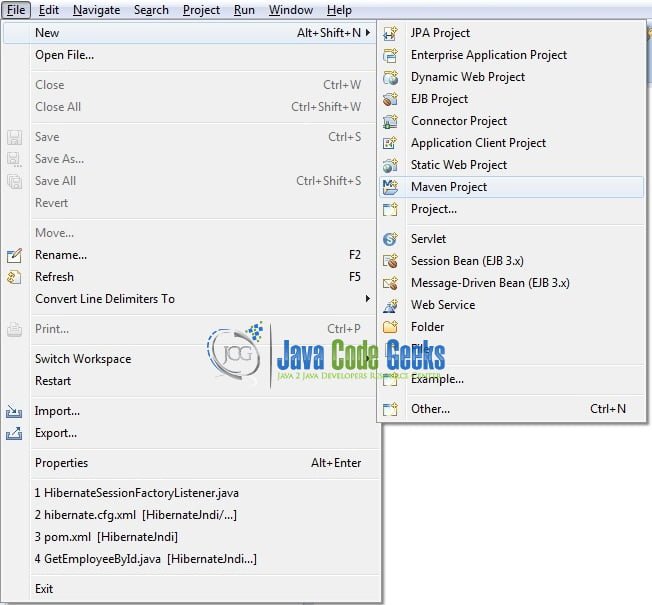
In the New Maven Project window, it will ask you to select project location. By default, ‘Use default workspace location’ will be selected. Just click on next button to proceed.
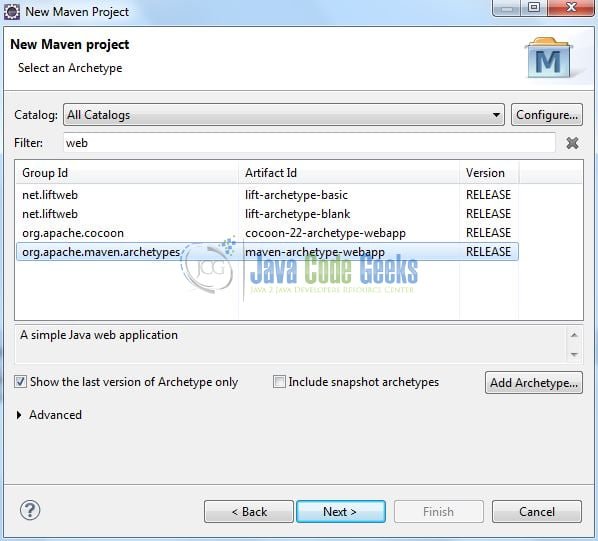
Select the Maven Web App archetype from the list of options and click next.
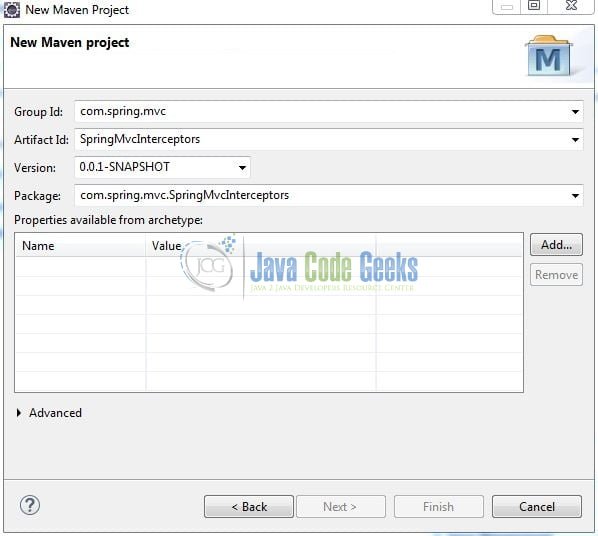
It will ask you to ‘Enter the group and the artifact id for the project’. We will input the details as shown in the below image. The version number will be by default: 0.0.1-SNAPSHOT.
Click on Finish and the creation of a maven project is completed. If you observe, it has downloaded the maven dependencies and a pom.xml file will be created. It will have the following code:
pom.xml
<project xmlns="http://maven.apache.org/POM/4.0.0" xmlns:xsi="http://www.w3.org/2001/XMLSchema-instance" xsi:schemaLocation="http://maven.apache.org/POM/4.0.0 http://maven.apache.org/xsd/maven-4.0.0.xsd">
	<modelVersion>4.0.0</modelVersion>
	<groupId>com.spring.mvc</groupId>
	<artifactId>SpringMvcInterceptors</artifactId>
	<version>0.0.1-SNAPSHOT</version>
	<packaging>war</packaging>
</project>
We can start adding the dependencies that developers want like Servlet API, Spring Mvc etc. Let’s start building the application!
3. Application Building
Below are the steps involved in developing this application.
3.1 Maven Dependencies
Here, we specify the dependencies for the spring mvc framework. The rest dependencies such as Spring Beans, Spring Core etc. will be automatically resolved by Maven. The updated file will have the following code:
pom.xml
<project xmlns="http://maven.apache.org/POM/4.0.0" xmlns:xsi="http://www.w3.org/2001/XMLSchema-instance"
	xsi:schemaLocation="http://maven.apache.org/POM/4.0.0 http://maven.apache.org/maven-v4_0_0.xsd">
	<modelVersion>4.0.0</modelVersion>
	<groupId>com.spring.mvc</groupId>
	<artifactId>SpringMvcInterceptors</artifactId>
	<packaging>war</packaging>
	<version>0.0.1-SNAPSHOT</version>
	<name>SpringMvcInterceptors Maven Webapp</name>
	<url>http://maven.apache.org</url>
	<dependencies>
		<!-- Servlet API Dependency -->
		<dependency>
			<groupId>javax.servlet</groupId>
			<artifactId>servlet-api</artifactId>
			<version>3.0-alpha-1</version>
		</dependency>
		<!-- Spring Framework Dependencies -->
		<dependency>
			<groupId>org.springframework</groupId>
			<artifactId>spring-webmvc</artifactId>
			<version>5.0.7.RELEASE</version>
		</dependency>
	</dependencies>
	<build>
		<finalName>${project.artifactId}</finalName>
	</build>
</project>
3.2 Configuration Files
Let’s write all the configuration files involved in this application.
3.2.1 Web Deployment Descriptor
The web.xml file declares one servlet (i.e. Dispatcher Servlet) to receive all kind of the requests. Dispatcher servlet here acts as a front controller. Add the following code to it:
web.xml
<!DOCTYPE web-app PUBLIC
 "-//Sun Microsystems, Inc.//DTD Web Application 2.3//EN"
 "http://java.sun.com/dtd/web-app_2_3.dtd" >

<web-app>
	<display-name>SpringMvcInterceptors</display-name>
	<servlet>
		<servlet-name>mvcinterceptorsdispatcher</servlet-name>
		<servlet-class>org.springframework.web.servlet.DispatcherServlet</servlet-class>
	</servlet>

	<servlet-mapping>
		<servlet-name>mvcinterceptorsdispatcher</servlet-name>
		<url-pattern>/</url-pattern>
	</servlet-mapping>
</web-app>
3.2.2 Spring Configuration File
To configure the spring framework, developers need to implement a bean configuration file i.e. mvcinterceptorsdispatcher-servlet.xml which provide an interface between the basic Java class and the outside world. Add the following code to it:
mvcinterceptorsdispatcher-servlet.xml
<?xml version="1.0" encoding="UTF-8"?>
<beans xmlns="http://www.springframework.org/schema/beans"
	xmlns:xsi="http://www.w3.org/2001/XMLSchema-instance" xmlns:context="http://www.springframework.org/schema/context"
	xmlns:mvc="http://www.springframework.org/schema/mvc"
	xsi:schemaLocation="
        http://www.springframework.org/schema/beans http://www.springframework.org/schema/beans/spring-beans.xsd
        http://www.springframework.org/schema/context http://www.springframework.org/schema/context/spring-context.xsd
        http://www.springframework.org/schema/mvc http://www.springframework.org/schema/mvc/spring-mvc.xsd">

	<context:annotation-config />

	<context:component-scan base-package="com.spring.mvc" />

	<!-- Configuring interceptor -->
	<mvc:interceptors>
		<bean class="com.spring.mvc.interceptor.InitInterceptor" />
	</mvc:interceptors>

	<bean
		class="org.springframework.web.servlet.view.InternalResourceViewResolver">
		<property name="prefix" value="/WEB-INF/views/" />
		<property name="suffix" value=".jsp" />
	</bean>
</beans>
Do note:
- This file is loaded by the spring’s Dispatcher Servlet which receives all the requests coming into the application and dispatches them to the controller for processing
- This file has the
InternalResourceViewResolverbean declaration that tells the framework how to find the physicalJSPfiles according to the logical view names returned by the controllers, by attaching the prefix and the suffix to a view name
3.3 Java Class Creation
3.3.1 Controller class
Let’s create a simple class where the @Controller annotation specifies this class as a spring controller and is responsible for handling the incoming request. Add the following code to it:
InitController.java
package com.spring.mvc;

import org.springframework.stereotype.Controller;
import org.springframework.web.bind.annotation.RequestMapping;
import org.springframework.web.bind.annotation.RequestMethod;
import org.springframework.web.servlet.ModelAndView;

@Controller
public class InitController {

	@RequestMapping(value= "/init", method= RequestMethod.GET)
	public ModelAndView initView() {
		System.out.println("Handler method is called.");

		ModelAndView modelview = new ModelAndView();
		modelview.addObject("message", "This is an example of mvc-interceptors in Spring framework .....!");
		modelview.setViewName("output");

		return modelview;
	}
}
3.3.2 Interceptor class
Let’s create the spring based HandlerInterceptor which will intercept the incoming request and print a message on the console. Add the following code to it:
InitInterceptor.java
package com.spring.mvc.interceptor;

import javax.servlet.http.HttpServletRequest;
import javax.servlet.http.HttpServletResponse;

import org.springframework.web.servlet.HandlerInterceptor;
import org.springframework.web.servlet.ModelAndView;

public class InitInterceptor implements HandlerInterceptor {

	public boolean preHandle(HttpServletRequest request, HttpServletResponse response, Object handler) throws Exception {
		System.out.println("Pre-handle method is called.");
		return true;
	}

	public void postHandle(HttpServletRequest request, HttpServletResponse response, Object handler, ModelAndView modelAndView) throws Exception {
		System.out.println("Post-handle method is called.");
	}

	public void afterCompletion(HttpServletRequest request, HttpServletResponse response, Object handler, Exception ex) throws Exception {
		System.out.println("After completion method is called.");
	}
}
4. Run the Application
As we are ready with all the changes, let us compile the project and deploy the application on the Tomcat7 server. To deploy the application on Tomat7, right-click on the project and navigate to Run as -> Run on Server.
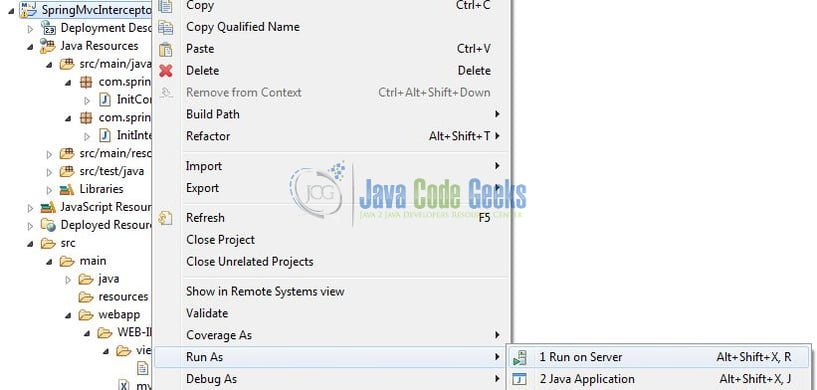
Tomcat will deploy the application in its web-apps folder and shall start its execution to deploy the project so that we can go ahead and test it on the browser.
5. Project Demo
Open your favorite browser and hit the following URL to print the messages on the console.
http://localhost:8082/SpringMvcInterceptors/
Server name (localhost) and port (8082) may vary as per your tomcat configuration.
That’s all for this tutorial and I hope the article served you whatever you were looking for. Happy Learning and don’t forget to share!
6. Conclusion
In this section, developers learned how to implement the interceptor’s functionality in the spring mvc framework. Developers can download the sample application as an Eclipse project in the Downloads section.
7. Download the Eclipse Project
This was an example of Spring MVC Interceptors.
You can download the full source code of this example here: SpringMvcInterceptors

