In one of our past examples, we learned to create a simple Spring MVC web-applciation. In this example we will demonstrate how we can implement Spring-Security to secure our web-application. We shall discuss and demonstrate both Authentication as well as the Authorization aspect of an application’s security.
1. Introduction to Spring Security
Security of a web-application revolves around three major concepts :
- Authentication
- Authorization
- Encryption
First let’s understand What is Authentication and Authorization?
- Authentication is the process of determining if the user is, who he claims to be. If the user enters his username as XYZ, then he should be able to prove that he is XYZ by providing the password known only to user XYZ.
- Authorization is usually the next step after authentication wherein the system determines if the authenticated user is privileged to access the resource requested.
We shall leave out Encryption as it is beyond the scope of this write-up.
Spring Security provides authentication and authorization in a very flexible manner and is also easy to configure and interpret. Let’s start with project setup.
2. Project Setup
We shall use Maven to setup our project. Open Eclipse and create a simple Maven project and check the skip archetype selection checkbox on the dialogue box that appears. Replace the content of the existing pom.xml with the one provided below:
pom.xml
<project xmlns="http://maven.apache.org/POM/4.0.0" xmlns:xsi="http://www.w3.org/2001/XMLSchema-instance"
	xsi:schemaLocation="http://maven.apache.org/POM/4.0.0 http://maven.apache.org/maven-v4_0_0.xsd">
	<modelVersion>4.0.0</modelVersion>
	<groupId>com.javacodegeeks.examples</groupId>
	<artifactId>SpringWebwithSpringSecurity</artifactId>
	<packaging>war</packaging>
	<version>0.0.1-SNAPSHOT</version>
	<name>SpringWebwithSpringSecurity Maven Webapp</name>
	<url>http://maven.apache.org</url>
	<dependencies>
		<dependency>
			<groupId>org.springframework</groupId>
			<artifactId>spring-core</artifactId>
			<version>4.2.3.RELEASE</version>
		</dependency>

		<dependency>
			<groupId>taglibs</groupId>
			<artifactId>standard</artifactId>
			<version>1.1.2</version>
		</dependency>


		<dependency>
			<groupId>org.springframework.security</groupId>
			<artifactId>spring-security-core</artifactId>
			<version>4.0.3.RELEASE</version>
		</dependency>

		<dependency>
			<groupId>org.springframework.security</groupId>
			<artifactId>spring-security-web</artifactId>
			<version>4.0.3.RELEASE</version>
		</dependency>

		<dependency>
			<groupId>org.springframework.security</groupId>
			<artifactId>spring-security-config</artifactId>
			<version>4.0.3.RELEASE</version>
		</dependency>

		<dependency>
			<groupId>javax.servlet.jsp.jstl</groupId>
			<artifactId>javax.servlet.jsp.jstl-api</artifactId>
			<version>1.2.1</version>
			<scope>compile</scope>
		</dependency>

		<dependency>
			<groupId>javax.servlet.jsp.jstl</groupId>
			<artifactId>jstl-api</artifactId>
			<version>1.2</version>
		</dependency>


		<dependency>
			<groupId>org.springframework</groupId>
			<artifactId>spring-webmvc</artifactId>
			<version>4.2.3.RELEASE</version>
		</dependency>

		<dependency>
			<groupId>org.springframework</groupId>
			<artifactId>spring-web</artifactId>
			<version>4.2.3.RELEASE</version>
		</dependency>

	</dependencies>
	<build>
		<finalName>SpringWebwithSpringSecurity</finalName>
		<pluginManagement>
			<plugins>
				<plugin>
					<groupId>org.apache.maven.plugins</groupId>
					<artifactId>maven-compiler-plugin</artifactId>
					<configuration>
						<source>1.8</source>
						<target>1.8</target>
					</configuration>
				</plugin>
			</plugins>
		</pluginManagement>
	</build>
	<properties>
		<project.build.sourceEncoding>UTF-8</project.build.sourceEncoding>
	</properties>

</project>
This will import the required JAR dependencies in the project. We can now start with the actual Spring-Security implementation.
3. Project Implementation
Let’s start with the gateway of the J2EE web-application, the WEB.xml. We need to declare the SpringSecurityFilterChain.
web.xml
<web-app xmlns="http://java.sun.com/xml/ns/javaee" xmlns:xsi="http://www.w3.org/2001/XMLSchema-instance"
	xsi:schemaLocation="http://java.sun.com/xml/ns/javaee
          http://java.sun.com/xml/ns/javaee/web-app_3_0.xsd"
	version="3.0">

	<display-name>Servlet 3.0 Web Application</display-name>
	<display-name>Spring Security Example</display-name>

	<context-param>
		<param-name>contextConfigLocation</param-name>
		<param-value>
			classpath:/security-config.xml
		</param-value>
	</context-param>

	<filter>
		<filter-name>springSecurityFilterChain</filter-name>
		<filter-class>org.springframework.web.filter.DelegatingFilterProxy</filter-class>
	</filter>

	<filter-mapping>
		<filter-name>springSecurityFilterChain</filter-name>
		<url-pattern>/*</url-pattern>
	</filter-mapping>

	<listener>
		<listener-class>org.springframework.web.context.ContextLoaderListener</listener-class>
	</listener>

	<servlet>
		<servlet-name>Spring-Controller</servlet-name>
		<servlet-class>org.springframework.web.servlet.DispatcherServlet</servlet-class>
		<init-param>
			<param-name>contextConfigLocation</param-name>
			<param-value>classpath:/springWeb.xml</param-value>
		</init-param>
		<load-on-startup>1</load-on-startup>
	</servlet>
	<servlet-mapping>
		<servlet-name>Spring-Controller</servlet-name>
		<url-pattern>/</url-pattern>
	</servlet-mapping>

	<welcome-file-list>
		<welcome-file>jsp/login.jsp</welcome-file>
	</welcome-file-list>

</web-app>
Spring Security intercepts the incoming request via a Servlet filter – springSecurityFilterChain. The DelegatingFilterProxy is a proxy for actual spring bean object which implements the javax.servlet.Filter interface. This filter guards the web-application from a host of malicious attacks like CSRF , Session Fixation, XSS etc.
We pass the location of spring security config file – security-config.xml to the filter via the contextConfigLocation web context parameter. Let’s have a look at security-config.xml:
security-config.xml
<?xml version="1.0" encoding="UTF-8"?>
<beans:beans xmlns="http://www.springframework.org/schema/security"
	xmlns:xsi="http://www.w3.org/2001/XMLSchema-instance" xmlns:beans="http://www.springframework.org/schema/beans"
	xmlns:sec="http://www.springframework.org/schema/security"
	xmlns:context="http://www.springframework.org/schema/context"
	xsi:schemaLocation="
      http://www.springframework.org/schema/security
      http://www.springframework.org/schema/security/spring-security-4.0.xsd
      http://www.springframework.org/schema/beans
      http://www.springframework.org/schema/beans/spring-beans-4.0.xsd
      http://www.springframework.org/schema/context
	  http://www.springframework.org/schema/context/spring-context-4.0.xsd">

	<sec:http auto-config="true" use-expressions="true">
		<sec:form-login login-page="/login"
			login-processing-url="/authenticateUser" default-target-url="/welcome"
			authentication-failure-url="/login" username-parameter="username"
			password-parameter="password" />

		<sec:access-denied-handler error-page="/403.jsp" />

		<sec:intercept-url pattern="/login" access="permitAll" />

		<sec:intercept-url pattern="/**" access="hasAuthority('AUTH_USER')" />
		<sec:session-management invalid-session-url="/login" />
		<sec:logout delete-cookies="JSESSIONID" logout-url="/logout" />
	</sec:http>

	<context:component-scan base-package="com.jcg.examples" />

	<sec:authentication-manager>
		<authentication-provider ref="customAuthenticationProvider" />
	</sec:authentication-manager>

</beans:beans>
This is the file where we configure the actual security parameters for our application. The acts as a container for all HTTP-related security settings.
sec:form-login is the login form shown to the user when he tries to access any resource in the web-application. If we do not provide a login form, the spring provides its default login page with a username, password fields and submit button. The username-parameter and password-parameter are the names of the username and the password fields that the login page has. When these attributes are not explicitly provided they default to j_username and j_password. It is wise to rename to hide underlying technology. Spring extracts the username and password from the request using the names provided and provides them in the org.springframework.security.core.Authentication object.
The login-processing-url is the actual url which holds the resource to authenticate the user. We have defined a custom authenticator class and mapped it to /authenticateUser URL. We will look in to this class in detail in the next section.
The developer may define multiple sec:intercept-url. This specifies the roles authorized to access the resource mapped by this filter-pattern. The user may also use hasRole expression to authenticate based in the user-roles, but in that case the role-name must start with ROLE_ or else the user is denied the access. The user may also choose to waive authentication process for certain resources from all security check like the login page, Javascript and CSS files. Not doing so may lead to infinite redirects to the same login page.
sec:logout tag is used to customize the logging-out process from the web-application.
The sec:authentication-manager is the actual bean that authenticates the user based on the username and password he enters in the login page. Here’s how the custom authenticator class looks like:
CustomAuthenticationProvider.java
package com.jcg.examples.authentication;


import java.util.ArrayList;
import java.util.List;

import org.springframework.security.authentication.AuthenticationCredentialsNotFoundException;
import org.springframework.security.authentication.AuthenticationProvider;
import org.springframework.security.authentication.UsernamePasswordAuthenticationToken;
import org.springframework.security.core.Authentication;
import org.springframework.security.core.AuthenticationException;
import org.springframework.security.core.GrantedAuthority;
import org.springframework.stereotype.Component;


@Component
public class CustomAuthenticationProvider implements AuthenticationProvider
{
		@Override
		public Authentication authenticate(Authentication authentication) throws AuthenticationException
		{
				String userName = authentication.getName();
				String password = authentication.getCredentials().toString();

				if (authorizedUser(userName, password))
				{
						List<GrantedAuthority> grantedAuths = new ArrayList<>();
						grantedAuths.add(()-> {return "AUTH_USER";});
						Authentication auth = new UsernamePasswordAuthenticationToken(userName, password, grantedAuths);
						System.out.println(auth.getAuthorities());
						return auth;
				}
				else
				{
						throw new AuthenticationCredentialsNotFoundException("Invalid Credentials!");
				}
		}

		private boolean authorizedUser(String userName, String password)
		{
				System.out.println("username is :" + userName+" and password is "+password );
				if("Chandan".equals(userName) && "Chandan".equals(password))
						return true;
				return false;
		}

		@Override
		public boolean supports(Class<?> authentication)
		{
				return UsernamePasswordAuthenticationToken.class.isAssignableFrom(authentication);
		}
}
Our custom authenticator class implements the org.springframework.security.authentication.AuthenticationProvider interface. The interface provides us with simple method which will help simplify the process of user-authentication for us.

authenticate(Authentication authentication) : This method takes the authentication request object as a parameter. This object contains the username and password the user entered in the login page. Upon successful authentication the users roles are populated in a new org.springframework.security.authentication.UsernamePasswordAuthenticationToken authentication object. The resource requested by the user is then checked against the role in this authentication object. If the role matches the access rights for the user is allowed to access the resource. If not, the user is redirected to the error-page defined in the sec:access-denied-handler tag.
In this example we have implemented the org.springframework.security.core.GrantedAuthority interface using the lambda expression and provided the user with the AUTH_USER role.
Once the user is successfully authenticated and authorized, the url is directed to DispatcherServlet configured in the web.xml. The DispatcherServlet in turn invokes the Controller method mapped to the resource’s url.
Here’s a simple configuration xml for the initialization of the controllers. Remember to pass this xml file-name in the init-param of the DispatcherServlet in web.xml.
springWeb.xml
<beans xmlns="http://www.springframework.org/schema/beans"
	xmlns:context="http://www.springframework.org/schema/context"
	xmlns:xsi="http://www.w3.org/2001/XMLSchema-instance"
	xsi:schemaLocation="
   http://www.springframework.org/schema/beans
   http://www.springframework.org/schema/beans/spring-beans-3.0.xsd
   http://www.springframework.org/schema/context
   http://www.springframework.org/schema/context/spring-context-3.0.xsd">

	<context:component-scan base-package="com.jcg.examples" />

	<bean class="org.springframework.web.servlet.view.InternalResourceViewResolver">
      <property name="prefix" value="/jsp/" />
      <property name="suffix" value=".jsp" />
   </bean>

</beans>
We have also configured the JSP view-resolver for the view resolution. Let’s see have a look at the JSP files:
login.jsp
<%@ page language="java" contentType="text/html; charset=ISO-8859-1"
	pageEncoding="ISO-8859-1"%>
<%@taglib uri="http://java.sun.com/jsp/jstl/core" prefix="c"%>
<%@taglib uri="http://www.springframework.org/tags/form" prefix="form"%>
<%@taglib uri="http://www.springframework.org/tags" prefix="spring"%>
<html>
<head>
<meta http-equiv="Content-Type" content="text/html; charset=ISO-8859-1">
<title>Login</title>
</head>
<body>
<c:if test="${not empty SPRING_SECURITY_LAST_EXCEPTION}">
      <font color="red">
        Your login attempt was not successful due to <c:out value="${SPRING_SECURITY_LAST_EXCEPTION.message}"/>.
      </font>
</c:if>
	<form name="loginForm" action="authenticateUser" method="post">
		User-name<input type="text" name="username" /><br /> Password <input
			type="password" name="password" /> <input type="hidden"
			name="${_csrf.parameterName}" value="${_csrf.token}" /> <input
			type="submit" value="Submit">
	</form>
</body>
</html>
As I have already explained, the names of the username and the password have been configured in the sec:form-login tag of the security-config.xml as is the authentication URL. There is also a hidden field which stores a random token to be submitted with the request. This helps to guard against the CSRF attack.
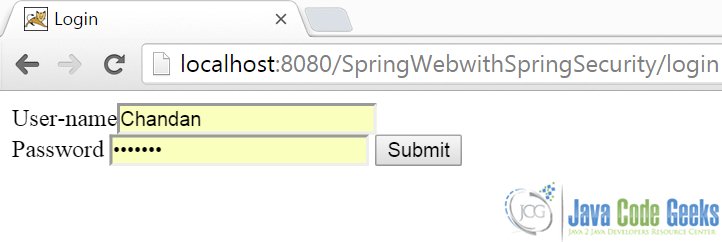
Here’s the login.jsp in browser:
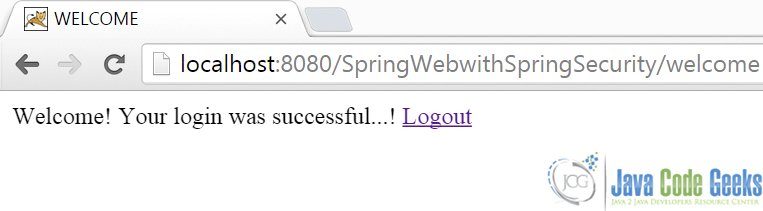
Upon successful authentication, the user is rendered the welcome.jsp
<%@ page language="java" contentType="text/html; charset=ISO-8859-1"
    pageEncoding="ISO-8859-1"%>
    <%@taglib uri="http://java.sun.com/jsp/jstl/core" prefix="c"%>
<!DOCTYPE html PUBLIC "-//W3C//DTD HTML 4.01 Transitional//EN" "http://www.w3.org/TR/html4/loose.dtd">
<html>
<head>
<meta http-equiv="Content-Type" content="text/html; charset=ISO-8859-1">
<title>WELCOME</title>
</head>
<body>
Welcome! Your login was successful...!

<a href="<c:url value="/logout" />">Logout</a>
</body>
</html>
Here’s how it looks:
In case the user enters wrong password he is redirected back to the login page with the message that is thrown from the CustomAuthenticationProvider#authenticate method. We can access the message using the SPRING_SECURITY_LAST_EXCEPTION variable in the login.jsp.
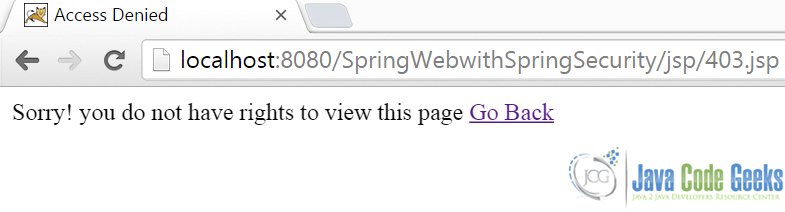
If the user is authenticated but his role does not allow him to access the resource, he is re-directed to the Access Denied page as shown here:
4. Download the Source Code
Here, we studied how we can user spring-security to enable access control in our web-application.
You can download the source code of this example here: SpringWebwithSpringSecurity.zip
