Spring Bean Lifecycle Example
With this tutorial we shall show you how to use Spring’s initialization and destruction methods to control a Spring Bean’s lifecycle. Sometimes, specific actions need to be performed upon a bean creation or when a bean is destroyed. Spring provides simple ways to perform actions in a bean’s lifecycle start and end.
The first way provided by Spring to perform any actions in a bean’s lifecycle start and end is the implementation of two interfaces, InitializingBean and DisposableBean. The second way is via the XML configuration, using the init-method and destroy-method attributes inside the bean element in the bean definition. The third and most recommended way is via annotations, and specifically with @PostConstruct and @PreDestroy annotations. We are going to use all three ways in a simple Spring bean and perform simple actions inside the methods provided.
Our preferred development environment is Eclipse. We are using Eclipse Juno (4.2) version, along with Maven Integration plugin version 3.1.0. You can download Eclipse from here and Maven Plugin for Eclipse from here. The installation of Maven plugin for Eclipse is out of the scope of this tutorial and will not be discussed. We are also using Spring version 3.2.3 and the JDK 7_u_21.
Let’s begin.
1. Create a new Maven project
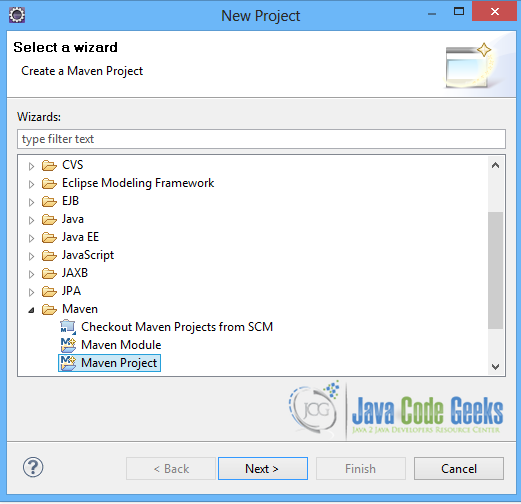
Go to File -> Project ->Maven -> Maven Project.
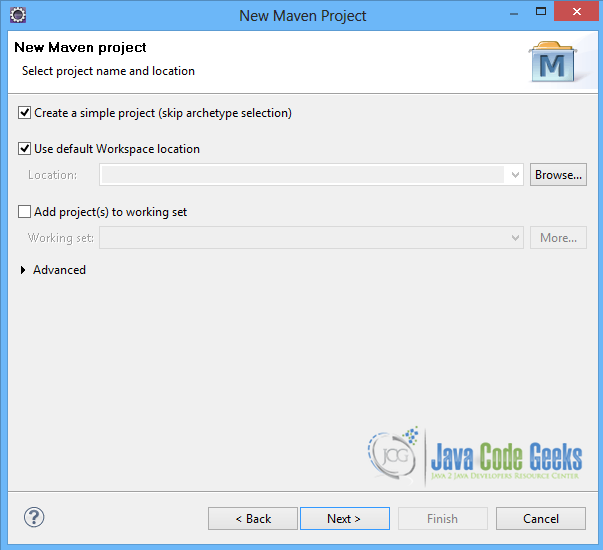
In the “Select project name and location” page of the wizard, make sure that “Create a simple project (skip archetype selection)” option is checked, hit “Next” to continue with default values.
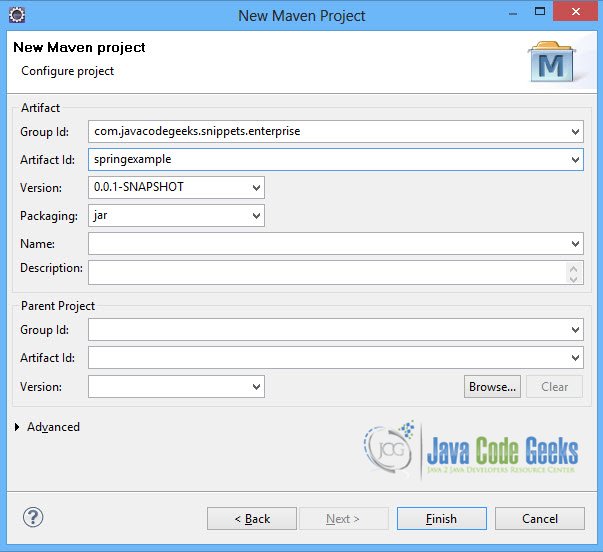
In the “Enter an artifact id” page of the wizard, you can define the name and main package of your project. We will set the “Group Id” variable to "com.javacodegeeks.snippets.enterprise" and the “Artifact Id” variable to "springexample". The aforementioned selections compose the main project package as "com.javacodegeeks.snippets.enterprise.springexample" and the project name as "springexample". Hit “Finish” to exit the wizard and to create your project.
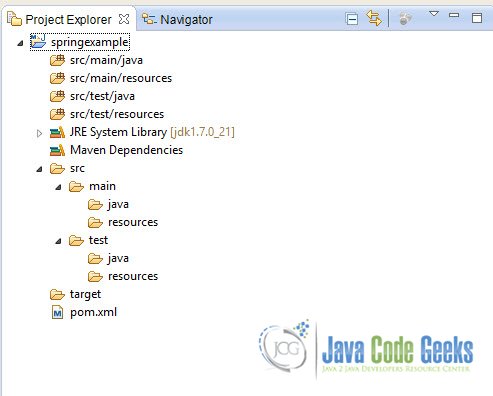
The Maven project structure is shown below:
- It consists of the following folders:
- /src/main/java folder, that contains source files for the dynamic content of the application,
- /src/test/java folder contains all source files for unit tests,
- /src/main/resources folder contains configurations files,
- /target folder contains the compiled and packaged deliverables,
- the pom.xml is the project object model (POM) file. The single file that contains all project related configuration.
2. Add Spring 3.2.3 dependency
- Locate the “Properties” section at the “Overview” page of the POM editor and perform the following changes:
Create a new property with name org.springframework.version and value 3.2.3.RELEASE. - Navigate to the “Dependencies” page of the POM editor and create the following dependencies (you should fill the “GroupId”, “Artifact Id” and “Version” fields of the “Dependency Details” section at that page):
Group Id : org.springframework Artifact Id : spring-web Version : ${org.springframework.version}
Alternatively, you can add the Spring dependencies in Maven’s pom.xml file, by directly editing it at the “Pom.xml” page of the POM editor, as shown below:
pom.xml:
<project xmlns="http://maven.apache.org/POM/4.0.0"; xmlns:xsi="http://www.w3.org/2001/XMLSchema-instance"
	xsi:schemaLocation="http://maven.apache.org/POM/4.0.0 http://maven.apache.org/xsd/maven-4.0.0.xsd">
	<modelVersion>4.0.0</modelVersion>
	<groupId>com.javacodegeeks.snippets.enterprise</groupId>
	<artifactId>springexample</artifactId>
	<version>0.0.1-SNAPSHOT</version>

	<dependencies>
		<dependency>
			<groupId>org.springframework</groupId>
			<artifactId>spring-core</artifactId>
			<version>${spring.version}</version>
		</dependency>
		<dependency>
			<groupId>org.springframework</groupId>
			<artifactId>spring-context</artifactId>
			<version>${spring.version}</version>
		</dependency>
	</dependencies>

	<properties>
		<spring.version>3.2.3.RELEASE</spring.version>
	</properties>
</project>
As you can see Maven manages library dependencies declaratively. A local repository is created (by default under {user_home}/.m2 folder) and all required libraries are downloaded and placed there from public repositories. Furthermore intra – library dependencies are automatically resolved and manipulated.
3. InitializingBean and DisposableBean interfaces
When a bean implements the InitializingBean interface it is allowed to perform initialization work after all necessary properties on the bean have been set by the container. Respectively, when a bean implements the DisposableBean interface it can get a callback when the container containing it is destroyed. The InitializingBean interface specifies a single method, afterPropertiesSet(), whereas the DisposableBean interface specifies a single method, destroy().
The Employee bean that is created below implements both interfaces and uses their methods to print a message each time the bean is created and destroyed.
Employee.java
package com.javacodegeeks.snippets.enterprise.services;

import org.springframework.beans.factory.DisposableBean;
import org.springframework.beans.factory.InitializingBean;

public class Employee implements InitializingBean, DisposableBean{

	private Long id;

	private String position;

	public Long getId() {
		return id;
	}

	public void setId(Long id) {
		this.id = id;
	}

	public String getPosition() {
		return position;
	}

	public void setPosition(String position) {
		this.position = position;
	}

	@Override
	public String toString(){
		return "id "+ id + " and position " + position;
	}

	public void destroy() throws Exception {
		System.out.println("I am in destroy... ");

	}

	public void afterPropertiesSet() throws Exception {
		System.out.println("I am in afterPropertiesSet... ");

	}
}
The bean is defined without any special configuration in applicationContext.xml.
applicationContext.xml
<beans xmlns="http://www.springframework.org/schema/beans"
	xmlns:xsi="http://www.w3.org/2001/XMLSchema-instance" xmlns:p="http://www.springframework.org/schema/p"
	xmlns:aop="http://www.springframework.org/schema/aop" xmlns:context="http://www.springframework.org/schema/context"
	xmlns:jee="http://www.springframework.org/schema/jee" xmlns:tx="http://www.springframework.org/schema/tx"
	xmlns:task="http://www.springframework.org/schema/task"
	xsi:schemaLocation="http://www.springframework.org/schema/aop http://www.springframework.org/schema/aop/spring-aop-3.2.xsd http://www.springframework.org/schema/beans http://www.springframework.org/schema/beans/spring-beans-3.2.xsd http://www.springframework.org/schema/context http://www.springframework.org/schema/context/spring-context-3.2.xsd http://www.springframework.org/schema/jee http://www.springframework.org/schema/jee/spring-jee-3.2.xsd http://www.springframework.org/schema/tx http://www.springframework.org/schema/tx/spring-tx-3.2.xsd http://www.springframework.org/schema/task http://www.springframework.org/schema/task/spring-task-3.2.xsd">

		<bean id="employeeBean" class="com.javacodegeeks.snippets.enterprise.services.Employee">
		<property name="id" value="123"/>
		<property name="position" value="marketing"/>
	</bean>

</beans>
We load the bean in App.class and call its properties.
App.java
package com.javacodegeeks.snippets.enterprise;

import org.springframework.context.ConfigurableApplicationContext;
import org.springframework.context.support.ClassPathXmlApplicationContext;

import com.javacodegeeks.snippets.enterprise.services.Employee;

public class App {

	public static void main(String[] args) {

			ConfigurableApplicationContext context = new ClassPathXmlApplicationContext("applicationContext.xml");

			Employee em = (Employee) context.getBean("employeeBean");

			System.out.println(em.toString());

			context.close();
	}
}
When the application is executed the result is the one shown below:
Output
I am in afterPropertiesSet...
id 123 and position marketing
Jul 30, 2013 12:56:10 AM org.springframework.context.support.AbstractApplicationContext doClose
INFO: Closing org.springframework.context.support.ClassPathXmlApplicationContext@4d82eca8: startup date [Tue Jul 30 00:56:09 EEST 2013]; root of context hierarchy
Jul 30, 2013 12:56:10 AM org.springframework.beans.factory.support.DefaultSingletonBeanRegistry destroySingletons
INFO: Destroying singletons in org.springframework.beans.factory.support.DefaultListableBeanFactory@14ebf5ae: defining beans [employeeBean]; root of factory hierarchy
I am in destroy...
It is though recommended that you do not use the two interfaces because they unnecessarily couple the code to Spring.
4. Use of init-method and destroy-method attributes in bean definition
Another easy way for initialization and destroy method callbacks without the use of Spring-specific InitializingBean and DisposableBean callback interfaces, is to write methods with names such as init(), initialize(), dispose(), and so on inside the bean. Then the Spring container can be configured to look for these initialization and destroy callback method names on the bean. In order to do so, it needs to find the init-method and destroy-method elements inside the bean definition. Thus, the named callback methods will be invoked.
The Employee bean now has two methods, initIt() and cleanUp() that print a message.
Employee.java
package com.javacodegeeks.snippets.enterprise.services;


public class Employee {

	private Long id;

	private String position;

	public Long getId() {
		return id;
	}

	public void setId(Long id) {
		this.id = id;
	}

	public String getPosition() {
		return position;
	}

	public void setPosition(String position) {
		this.position = position;
	}

	@Override
	public String toString(){
		return "id "+ id + " and position " + position;
	}

	public void initIt() throws Exception {
		  System.out.println("Init method after properties are set : " + id + " " + position);
		}

		public void cleanUp() throws Exception {
		  System.out.println("Spring Clean Up! Employee is cleaned up now.");
		}
}
In the employeeBean definition the init-method and destroy-method attributes are set, using as values the names of the specified methods.
applicationContext.xml
<beans xmlns="http://www.springframework.org/schema/beans"
	xmlns:xsi="http://www.w3.org/2001/XMLSchema-instance" xmlns:p="http://www.springframework.org/schema/p"
	xmlns:aop="http://www.springframework.org/schema/aop" xmlns:context="http://www.springframework.org/schema/context"
	xmlns:jee="http://www.springframework.org/schema/jee" xmlns:tx="http://www.springframework.org/schema/tx"
	xmlns:task="http://www.springframework.org/schema/task"
	xsi:schemaLocation="http://www.springframework.org/schema/aop http://www.springframework.org/schema/aop/spring-aop-3.2.xsd http://www.springframework.org/schema/beans http://www.springframework.org/schema/beans/spring-beans-3.2.xsd http://www.springframework.org/schema/context http://www.springframework.org/schema/context/spring-context-3.2.xsd http://www.springframework.org/schema/jee http://www.springframework.org/schema/jee/spring-jee-3.2.xsd http://www.springframework.org/schema/tx http://www.springframework.org/schema/tx/spring-tx-3.2.xsd http://www.springframework.org/schema/task http://www.springframework.org/schema/task/spring-task-3.2.xsd">

		<bean id="employeeBean" class="com.javacodegeeks.snippets.enterprise.services.Employee" init-method="initIt" destroy-method="cleanUp">
		<property name="id" value="123"/>
		<property name="position" value="marketing"/>
	</bean>

</beans>
After running the application again, using the App.class we can see that Spring has invoked both callback methods when the bean was created and destroyed.
Output
Init method after properties are set : 123 marketing
id 123 and position marketing
Jul 30, 2013 1:06:56 AM org.springframework.context.support.AbstractApplicationContext doClose
INFO: Closing org.springframework.context.support.ClassPathXmlApplicationContext@509c6c30: startup date [Tue Jul 30 01:06:55 EEST 2013]; root of context hierarchy
Jul 30, 2013 1:06:56 AM org.springframework.beans.factory.support.DefaultSingletonBeanRegistry destroySingletons
INFO: Destroying singletons in org.springframework.beans.factory.support.DefaultListableBeanFactory@1d7d6ac2: defining beans [employeeBean]; root of factory hierarchy
Spring Clean Up! Employee is cleaned up now.
5. @PostConstruct and @PreDestroy annotations
The easiest way to control a bean’s lifecycle is by using the two lifecycle annotations above custom methods that will be invoked upon bean initialization and destruction.
The Employee bean has the same two methods that we created above, but now the @PostConstruct and @PreDestroy annotations are applied to the methods.
Employee.java
package com.javacodegeeks.snippets.enterprise.services;

import javax.annotation.PostConstruct;
import javax.annotation.PreDestroy;


public class Employee {

	private Long id;

	private String position;

	public Long getId() {
		return id;
	}

	public void setId(Long id) {
		this.id = id;
	}

	public String getPosition() {
		return position;
	}

	public void setPosition(String position) {
		this.position = position;
	}

	@Override
	public String toString(){
		return "id "+ id + " and position " + position;
	}

	@PostConstruct
	public void initIt() throws Exception {
		  System.out.println("Init method after properties are set : " + id + " " + position);
		}

	@PreDestroy
	public void cleanUp() throws Exception {
		  System.out.println("Spring Clean Up! Employee is cleaned up now.");
		}
}
In this case the CommonAnnotationBeanPostProcessor must be enabled, or the <context:annotation-config/> element must be set in applicationContext.xml.
CommonAnnotationBeanPostProcessor in applicationContext.xml
<beans xmlns="http://www.springframework.org/schema/beans"
	xmlns:xsi="http://www.w3.org/2001/XMLSchema-instance" xmlns:p="http://www.springframework.org/schema/p"
	xmlns:aop="http://www.springframework.org/schema/aop" xmlns:context="http://www.springframework.org/schema/context"
	xmlns:jee="http://www.springframework.org/schema/jee" xmlns:tx="http://www.springframework.org/schema/tx"
	xmlns:task="http://www.springframework.org/schema/task"
	xsi:schemaLocation="http://www.springframework.org/schema/aop http://www.springframework.org/schema/aop/spring-aop-3.2.xsd http://www.springframework.org/schema/beans http://www.springframework.org/schema/beans/spring-beans-3.2.xsd http://www.springframework.org/schema/context http://www.springframework.org/schema/context/spring-context-3.2.xsd http://www.springframework.org/schema/jee http://www.springframework.org/schema/jee/spring-jee-3.2.xsd http://www.springframework.org/schema/tx http://www.springframework.org/schema/tx/spring-tx-3.2.xsd http://www.springframework.org/schema/task http://www.springframework.org/schema/task/spring-task-3.2.xsd">

	<bean class="org.springframework.context.annotation.CommonAnnotationBeanPostProcessor" />
		<bean id="employeeBean" class="com.javacodegeeks.snippets.enterprise.services.Employee">
		<property name="id" value="123"/>
		<property name="position" value="marketing"/>
	</bean>

</beans>
annotation-config element in applicationContext.xml
<beans xmlns="http://www.springframework.org/schema/beans"
	xmlns:xsi="http://www.w3.org/2001/XMLSchema-instance" xmlns:p="http://www.springframework.org/schema/p"
	xmlns:aop="http://www.springframework.org/schema/aop" xmlns:context="http://www.springframework.org/schema/context"
	xmlns:jee="http://www.springframework.org/schema/jee" xmlns:tx="http://www.springframework.org/schema/tx"
	xmlns:task="http://www.springframework.org/schema/task"
	xsi:schemaLocation="http://www.springframework.org/schema/aop http://www.springframework.org/schema/aop/spring-aop-3.2.xsd http://www.springframework.org/schema/beans http://www.springframework.org/schema/beans/spring-beans-3.2.xsd http://www.springframework.org/schema/context http://www.springframework.org/schema/context/spring-context-3.2.xsd http://www.springframework.org/schema/jee http://www.springframework.org/schema/jee/spring-jee-3.2.xsd http://www.springframework.org/schema/tx http://www.springframework.org/schema/tx/spring-tx-3.2.xsd http://www.springframework.org/schema/task http://www.springframework.org/schema/task/spring-task-3.2.xsd">

	<context:annotation-config />
		<bean id="employeeBean" class="com.javacodegeeks.snippets.enterprise.services.Employee">
		<property name="id" value="123"/>
		<property name="position" value="marketing"/>
	</bean>

</beans>
Running the example with the use of App.class again leads to the results below:
Output
INFO: Pre-instantiating singletons in org.springframework.beans.factory.support.DefaultListableBeanFactory@3d36472f: defining beans [org.springframework.context.annotation.internalConfigurationAnnotationProcessor,org.springframework.context.annotation.internalAutowiredAnnotationProcessor,org.springframework.context.annotation.internalRequiredAnnotationProcessor,org.springframework.context.annotation.internalCommonAnnotationProcessor,employeeBean,org.springframework.context.annotation.ConfigurationClassPostProcessor.importAwareProcessor]; root of factory hierarchy
Init method after properties are set : 123 marketing
id 123 and position marketing
Jul 30, 2013 1:14:55 AM org.springframework.context.support.AbstractApplicationContext doClose
INFO: Closing org.springframework.context.support.ClassPathXmlApplicationContext@509c6c30: startup date [Tue Jul 30 01:14:54 EEST 2013]; root of context hierarchy
Jul 30, 2013 1:14:55 AM org.springframework.beans.factory.support.DefaultSingletonBeanRegistry destroySingletons
INFO: Destroying singletons in org.springframework.beans.factory.support.DefaultListableBeanFactory@3d36472f: defining beans [org.springframework.context.annotation.internalConfigurationAnnotationProcessor,org.springframework.context.annotation.internalAutowiredAnnotationProcessor,org.springframework.context.annotation.internalRequiredAnnotationProcessor,org.springframework.context.annotation.internalCommonAnnotationProcessor,employeeBean,org.springframework.context.annotation.ConfigurationClassPostProcessor.importAwareProcessor]; root of factory hierarchy
Spring Clean Up! Employee is cleaned up now.
This was an example of Spring Bean Lifecycle.
Download the Eclipse project of this tutorial : SpringLifecycleExample.zip


