Creating JAX-RS web service using Apache CXF Example
Ever since JAX-RS was introduced (JSR-311), it had a profound effect on the architecture and design of web services. It’s simplified scheme of creating an exposable service had really made an impact to how developers create web services as well as how it’s being used on the micro-service architecture. With this, a lot of service frameworks was introduced to create a more standardise and conventional way of following this scheme with more functional aspects to it. The list includes Jersey, RestEasy and for our topic of tutorial for this post: Apache CXF.
What is Apache CXF
Apache CXF is a service framework, that can be used by developers to create exposable and reusable web services. It supports almost every web service specification available and has a wide range of wrappers that can be used in binding, parsing and manipulating data. It’s extremely light weight and easy to plugin to any Java based applications.
Visit the project site here
For this scenario, we’re going to create a micro-service, deploy and consume it through the front-end app.
How do we build?
Let’s start with a scenario. Let’s try to expose a service (contract first) that will display an account detail given an account id. The service specs:
- Service will accept account id as an input
- Return the JSON format account id and name
Step by Step Guide
1. Create the Web App using Maven and download the Apache CXF dependencies
Download the Apache CXF distribution first, use the following Maven dependency on your project. Configure your project to enable all request to go through Apache CXF framework.
- Go to New > Maven Project
- Group Id: com.jcg.areyes.main
- Artifact Id: apache-cxf-sample
- Archetype Template: J2EE Simple WebApp
pom.xml
<properties>
		<cxf.version>3.0.3</cxf.version>
		<httpclient.version>3.1</httpclient.version>
		<jax.ws.rs>2.0.1</jax.ws.rs>
		<springmvc>4.1.4.RELEASE</springmvc>
		<jackson.version>1.1.1</jackson.version>
	</properties>
	<dependencies>
		<dependency>
			<groupId>org.springframework</groupId>
			<artifactId>spring-context</artifactId>
			<version>${springmvc}</version>
		</dependency>
		<dependency>
			<groupId>org.springframework</groupId>
			<artifactId>spring-web</artifactId>
			<version>${springmvc}</version>
		</dependency>

		<dependency>
			<groupId>org.springframework</groupId>
			<artifactId>spring-webmvc</artifactId>
			<version>${springmvc}</version>
		</dependency>

		<dependency>
			<groupId>org.apache.cxf</groupId>
			<artifactId>cxf-rt-frontend-jaxrs</artifactId>
			<version>${cxf.version}</version>
		</dependency>
		<dependency>
			<groupId>org.apache.cxf</groupId>
			<artifactId>cxf-rt-transports-http</artifactId>
			<version>${cxf.version}</version>
		</dependency>
		<dependency>
			<groupId>commons-httpclient</groupId>
			<artifactId>commons-httpclient</artifactId>
			<version>${httpclient.version}</version>
		</dependency>
		<dependency>
			<groupId>javax.ws.rs</groupId>
			<artifactId>javax.ws.rs-api</artifactId>
			<version>${jax.ws.rs}</version>
		</dependency>
		<dependency>
			<groupId>org.codehaus.jackson</groupId>
			<artifactId>jackson-jaxrs</artifactId>
			<version>${jackson.version}</version>
		</dependency>
		<dependency>
			<groupId>junit</groupId>
			<artifactId>junit</artifactId>
			<version>3.8.1</version>
			<scope>test</scope>
		</dependency>
	</dependencies>
As it can be seen in the screenshot above, we imported the JAX-RS library from Apache CXF and http transport api that handles the transportation from process from start to end points.
2. Configure Apache CXF in the Web App.
The web app should be configured to use the Apache CXF Servlet for a specific URL path. This will allow the Apache CXF library to get the request and run all necessary process to create and call the service at runtime.
web.xml
<?xml version="1.0" encoding="UTF-8"?>

<web-app version="2.5" xmlns="http://java.sun.com/xml/ns/javee"
xmlns:xsi="http://www.w3.org/2001/XMLSchema-instance"
xsi:schemaLocation="http://java.sun.com/xml/ns/javaee http://java.sun.com/xml/ns/javaee/web-app_2_5.xsd">

  <display-name>Archetype Created Web Application</display-name>

  <listener>
  	<listener-class>org.springframework.web.context.ContextLoaderListener</listener-class>
  </listener>

  <context-param>
  	<param-name>contextConfigLocation</param-name>
  	<param-value>WEB-INF/rest-servlet.xml</param-value>
  </context-param>

  <servlet>
  	<servlet-name>CXFServlet</servlet-name>
  	<servlet-class>org.apache.cxf.transport.servlet.CXFServlet</servlet-class>
  </servlet>

  <servlet-mapping>
  	<servlet-name>CXFServlet</servlet-name>
  	<url-pattern>/*</url-pattern>
  </servlet-mapping>

</web-app>

We configure our web.xml so that it will detect any URL to pass through the CXF service.
rest-servlet.xml
<?xml version="1.0" encoding="UTF-8"?>
<beans xmlns="http://www.springframework.org/schema/beans"
		xmlns:xsi="http://www.w3.org/2001/XMLSchema-instance"
     	xmlns:cxf="http://cxf.apache.org/core"
		xmlns:jaxws="http://cxf.apache.org/jaxws"
		xmlns:jaxrs="http://cxf.apache.org/jaxrs"
		xsi:schemaLocation="
			http://cxf.apache.org/core http://cxf.apache.org/schemas/core.xsd
			http://www.springframework.org/schema/beans
			http://www.springframework.org/schema/beans/spring-beans.xsd
			http://cxf.apache.org/jaxrs http://cxf.apache.org/schemas/jaxrs.xsd
			http://cxf.apache.org/jaxws http://cxf.apache.org/schemas/jaxws.xsd">

	<import resource="classpath:META-INF/cxf/cxf.xml"/>
	<import resource="classpath:META-INF/cxf/cxf-servlet.xml"/>

    <cxf:bus>
        <cxf:features>
            <cxf:logging/>
        </cxf:features>
    </cxf:bus>

	<bean id="accountService" class="server.service.AccountService" init-method="init"></bean>
	<bean id="jsonProvider"
		class="org.codehaus.jackson.jaxrs.JacksonJsonProvider"/>

  	<jaxrs:server id="accountrs" address="/rservice">
  		<jaxrs:serviceBeans>
  			<ref bean="accountService"/>
  		</jaxrs:serviceBeans>
  		<jaxrs:providers>
			<ref bean='jsonProvider' />
		</jaxrs:providers>
  	</jaxrs:server>

</beans>
This file is imported from web.xml. This holds the actual services and the jaxrs service declaration.
3. Create the Service Implementation on the App
Create the Account Object first. This is the object that we will return from our service.
Account.java:
package server.obj;

import javax.xml.bind.annotation.XmlRootElement;

@XmlRootElement(name = "Account")
public class Account {
    private long id;
    private String name;

    public long getId() {
        return id;
    }

    public void setId(long id) {
        this.id = id;
    }

    public String getName() {
        return name;
    }

    public void setName(String name) {
        this.name = name;
    }
}
Create the Service Implementation class. This will house our actual implementation.
AccountService.java
package server.service;

import java.util.ArrayList;
import java.util.HashMap;
import java.util.List;
import java.util.Map;
import javax.ws.rs.Consumes;
import javax.ws.rs.POST;
import javax.ws.rs.Path;
import javax.ws.rs.PathParam;
import javax.ws.rs.Produces;
import javax.ws.rs.core.MediaType;

import server.obj.Account;

@Path("/accountservice/")
@Consumes(MediaType.APPLICATION_JSON)
@Produces(MediaType.APPLICATION_JSON)
public class AccountService {

	Map<String, Account> accounts = new HashMap<String, Account>();

	public void init() {

		Account newAccount1 = new Account();
		newAccount1.setId(1);
		newAccount1.setName("Alvin Reyes");

		Account newAccount2 = new Account();
		newAccount2.setId(2);
		newAccount2.setName("Rachelle Ann de Guzman Reyes");

		accounts.put("1", newAccount1);
		accounts.put("2", newAccount2);

	}

	public AccountService() {
		init();
	}

	@POST
	@Path("/accounts/{id}/")
	public Account getAccount(@PathParam("id") String id) {
		Account c = accounts.get(id);
		return c;
	}

	@POST
	@Path("/accounts/getall")
	public List getAllAccounts(Account account) {
		List accountList = new ArrayList();
		for (int i = 0; i <= accounts.size(); i++) {
			accountList.add((Account) accounts.get(i));
		}
		return accountList;
	}

}
As it can be seen above, there’s a bunch of Annotations that we used. These annotations are crucial as it allows the JVM to categorize this source code to have a configuration injected to it and Apache CXF to notice that we are using its libraries. The following annotations are described below:
@Path– The endpoint url path.@Get– This means that the method is called using the GET http method.@Produce– the response output format.@QueryParam– Query parameters passed via the URL.
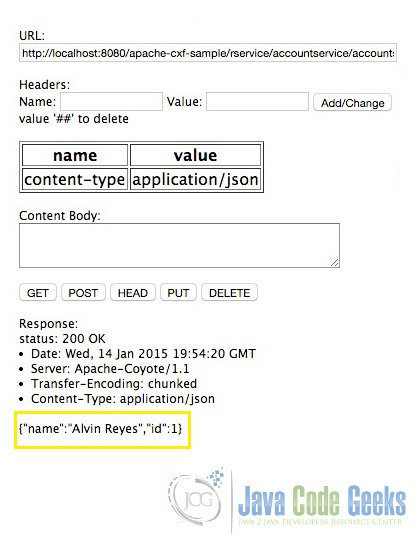
4. Test out the service
Once everything is in place, we can now test the service. Test it via your browser or a chrome extension (Poser).

Download the Eclipse project of this tutorial:
This was an example of creating a JAX-RS compliant web service using Apache CXF
You can download the full source code of this example here: apache-cxf-sample.zip


On which Web server we need to run this application??
any webserver like tomcat, weblogic, websphere
why do you use: ?