This is a continuation of the two part series featuring the significance and use of Ninja Web Framework. In Part 1, we understood the motivations behind the making of Ninja framework and the different features it offers. In part 2, we will look at developing a sample application using Ninja API and framework semantics.
We will develop a simple login application that will have an input form which will accept and authenticate user credentials (user id and password). Upon successful authentication, we will display the name of the user in the next page. The application on paper looks very simple but we will cover important Ninja semantics that will help you understand the framework better and use it to build a more professional real world web project. A brief flow will be something like this: A user will navigate to the login page and enter its user id and password and proceed to click on the Login button. The system will perform basic validation and then authenticate the user id by checking the database to see if the id exists or not. If user exists, then the authentication is successful otherwise a decent error message is displayed. Once logged in, the user information in the session will be valid for 60 seconds during which time if you try to access the login page, it will indicate you that the user is already logged in.
Before, we deep dive into the development, let’s setup the application environment
1. Setting up application environment
Application environment setup is a very important step. We will use Maven to build and deploy the application. For database, we will use MySQL and setup ORM using JPA Hibernate implementation. Application related global settings will be defined in the application.conf file.
1.1 Maven setup
We will create a Maven project. If you are not used to creating Maven based projects from scratch then you can get the sample project shell using the Maven archetype ‘ninja-servlet-archetype-simple’. This will create the basic Ninja application for you. The folder hierarchy will look like the following:
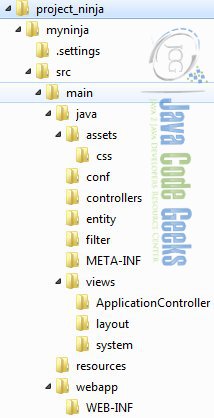
As discussed in Part 1 of this article, Ninja is modeled on convention than configuration and therefore you need to make sure the folder hierarchy and its components are named according to the framework norms. The routes (Routes.java) and module (Module.java) will be part of conf/ folder. The application global settings will be defined in the application.conf file again as part of conf/ folder. The controllers folder will host the controller class, we will name it as ApplicationController.java. The views folder will contain views categorized as controller defined views, layouts and system error messages. We will manually add two new folders viz. filter and entity that will contain filter and entity class respectively. The below code shows the important portions of Maven POM file:
pom.xml
<project ...>
	<modelVersion>4.0.0</modelVersion>
	<artifactId>myninja</artifactId>
	<packaging>war</packaging>
	<groupId>demo.ninja</groupId>
	<version>1.0</version>
	...
	<build>
		<plugins>
			...
			<plugin>
				<groupId>org.ninjaframework</groupId>
				<artifactId>ninja-maven-plugin</artifactId>
				<version>${ninja.version}</version>
			</plugin>
		</plugins>
		...
	</build>
	<dependencies>
		...
		<dependency>
			<groupId>org.ninjaframework</groupId>
			<artifactId>ninja-servlet</artifactId>
			<version>${ninja.version}</version>
		</dependency>
		<dependency>
			<groupId>mysql</groupId>
			<artifactId>mysql-connector-java</artifactId>
			<version>5.1.37</version>
		</dependency>

	</dependencies>
</project>
The ninja-maven plugin allows you to make use of SuperDev feature of Ninja. The feature is briefly described in Part 1 of this article. We will deploy the application as a WAR file and therefore you need to configure the dependency named ninja-servlet.
1.2 DB setup
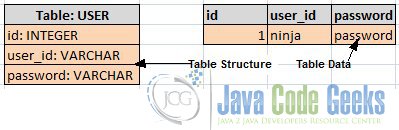
We will setup our database as MySQL. We will create the DB or schema and name it as ‘ninja’. Then we will create a table named ‘user’ that will have the relevant columns and add a sample record that will contain a user id as ‘ninja’ and password as ‘password’. We will authenticate the user against this sample record. The below figure shows the table columns and the sample data.
1.3 Setting up ORM
We will use JPA-Hibernate to implement ORM for our sample login application. JPA makes use of persistence.xml file to define and configure the database as one unit of persistence. Our persistence.xml file will look like the following:
persistence.xml
<persistence ...>
	<persistence-unit name="mysql" transaction-type="RESOURCE_LOCAL">
	  <provider>org.hibernate.jpa.HibernatePersistenceProvider</provider>

	  <properties>
		<property name="hibernate.connection.driver_class" value="com.mysql.jdbc.Driver"/>
		<property name="hibernate.dialect" value="org.hibernate.dialect.MySQLDialect" />

		<property name="hibernate.show_sql" value="false" />
		<property name="hibernate.format_sql" value="false" />

	  </properties>
	</persistence-unit>
</persistence>
As you can see, this file will have configuration details about MySQL like the driver class, dialect and other relevant properties. The file will be part of the META-INF/ folder. Next, we will configure the DB user credentials in the application.conf file:
application.conf
ninja.jpa.persistence_unit_name = mysql
db.connection.url=jdbc:mysql://localhost:3306/ninja
db.connection.username=sa
db.connection.password=
The above code snippet shows the ORM configuration defined in the application.conf file. The said file is placed under the conf/ folder. It makes a reference to the persistence unit that we defined in the persistence.xml file. The persistence unit here is named ‘mysql’.
As our table name is ‘user’, we will create an entity class named ‘User’ that will map this table. The following code shows the entity class:
User.java
@Entity
public class User {

	@Id
	@GeneratedValue(strategy = GenerationType.AUTO)
	Long id;

	@NotNull
	@Column(name = "USER_ID")
	String userId;

	@NotNull
	@Column(name = "PASSWORD")
	String password;
	...
	// Getter and setters
The entity class uses JPA based annotations to map it with the user table. The code is pretty self explanatory. Also note the use of @NotNull annotation, this is a Java validation feature employed on this entity class. It indicates that user id and password cannot be null and must have some value.
1.4 Setting up web.xml
Let’s take a brief look at the web.xml:
web.xml
<web-app ...>

    <display-name>ninja</display-name>

	<listener>
		<listener-class>ninja.servlet.NinjaServletListener</listener-class>
	</listener>

	<filter>
		<filter-name>guiceFilter</filter-name>
		<filter-class>com.google.inject.servlet.GuiceFilter</filter-class>
	</filter>
	<filter-mapping>
		<filter-name>guiceFilter</filter-name>
		<url-pattern>/*</url-pattern>
	</filter-mapping>

</web-app>
The class NinjaServletListener is used to bootstrap the Ninja application that tracks and bind dependencies in the application. The class GuiceFilter is used to perform Guice based dependency injection.
2. Creating View
Ninja uses Apache Freemarker to define template views. The code snippet below depicts a view template that renders our login page (login.ftl.html).
login.ftl.html
<#import "../layout/defaultLayout.ftl.html" as layout> <@layout.myLayout
"Login page">

<form action="/doLogin" method="post">
	<div>
		${i18n("label.user.id")}: <span><input type="text"
			name="userId" /></span>
	</div>
	<div> </div>
	<div>
		${i18n("label.password")}: <span><input type="text"
			name="password" /></span>
	</div>
	<div> </div>
	<div>
		<button type="submit">Login</button>
	</div>
</form>

</@layout.myLayout>
It defines a directive called @layout that contains the login form. This form will be replaced in the main layout file that is constructed using Freemarker tags like macro, nested etc. At this point, it is just enough for you to understand that we have designed a login page using some view template. There is also another view (result.ftl.html) that will show the appropriate message once the user logs in. Also observe the i18n object that is used to localize the view in the language of your choice. The locale specific labels are stored in the messages.properties file under conf/ folder. For simplicity, we will not deep dive into the semantics of Apache Freemarker as it is a seperate topic in itself. More information on Freemarker can be found at: http://freemarker.incubator.apache.org/docs/index.html
3. Defining Routes and Controller
With most of the traditional MVC frameworks, request routing and delegation happens within a controller itself. With Ninja, URL routing is defined in a seperate file called Routes.java and the action methods, to which the requests are delegated, are defined in the controller class. Routing is the process of making a HTTP request using a well defined URL with one of the four HTTP methods viz. GET, POST, PUT and DELETE. This request is then mapped with the action method defined in the controller. We will configure our routes as following:
Routes.java
public class Routes implements ApplicationRoutes {

    @Override
    public void init(Router router) {
        router.GET().route("/").with(ApplicationController.class, "login");
        router.POST().route("/doLogin").with(ApplicationController.class, "performLogin");
		...
The root /URL will invoke the login() method that will render the login page. The /doLogin URL will invoke the performLogin() method that will display the welcome message. The methods login() and performLogin() are defined as part of ApplicationController class. Both the said methods returns the Result object which contains the destination view to be rendered.
ApplicationController.java
@Singleton
public class ApplicationController {

	@Inject
	Provider entitiyManagerProvider;

	@FilterWith(LoginFilter.class)
    public Result login() {
        return Results.html();

    }

    public Result performLogin(User user, Session session) {
		String userId = user.getUserId();
		if (userExists(userId)) {
			session.put("userId", userId);
			return Results.html().template("/views/ApplicationController/result.ftl.html").render("msg", "Welcome " + user.getUserId());
		} else {
			session.clear();
		}
		return Results.html().template("/views/ApplicationController/result.ftl.html").render("msg", "Invalid user, please login again ");
    }

	private boolean userExists(String userId, String password) {
		EntityManager entityManager = entitiyManagerProvider.get();
		List users = entityManager.createQuery("from User where userId = ?1 and password = ?2").setParameter(1, userId).setParameter(2, password).getResultList();
		return (users.size() > 0) ? true : false;
	}
}
The controller is injected with the EntityManager component that represents our database. The userExists() method will check against the database whether user id and password exists or not. It makes use of JPA based EntityManager class to perform the query against User entity. If the credentials are found then the user id is put in the session.
4. Defining Filter
We will define a nice little filter that will check the session if it contains the user id. If the sesssion is empty it means we have to show the user a login page. The filter class is LoginFilter and it looks like the following:
LoginFilter.java
public class LoginFilter implements Filter {
	public Result filter(FilterChain chain, Context context) {
		String userId = context.getSession().get("userId");
		if (userId != null) {
			return Results.html().template("/views/ApplicationController/result.ftl.html").render("msg", "You are logged in!");
		}

		return chain.next(context);
	}
}
It gets the user id from the session using context object and checks if it is null. If it is not found then take the user to the login page or display a message saying the user is already loggged in.
5. Build and Deploy
You can use Eclipse to import the codebase as a Maven project. Alternatively, you can use command shell to manually build the code. To manually build the code, you can give the following command:
Perform Build
mvn clean install
Please note that this command is to be given inside the folder where your Maven POM file resides. To run the application, give the following command:
Run the server in SuperDev mode
mvn ninja:run
The above command will run the Ninja in the SuperDev mode thereby provding the hot deploy feature.
6. Conclusion
As you saw it is so simple to build a web application with Ninja. Though we took a very simple use case, it covered important concepts of Ninja. We saw how the MVC pattern is implemented through the use of routes and conroller. For the view, Ninja uses Apache Freemarker. The view here is a template organized as layouts. You could make use of locale specific labels using the i18n object. We covered the session handling by persisting the user information in the session. Remember, Ninja handles session in the cookies and not on the server side. We looked at defining the filter that intercepts the request to check the login state. For persistence, we used JPA Hibernate as a ORM framework to query user data. There was also a use of Dependency Injection (DI) by way of @Inject annotation provided by Google Guice. There are still plently of features one can explore and this article has given you the base foundation for developing a more real world Ninja web application.
7. Download the Source Code
This was a tutorial showing the web application development using Ninja web framework.
You can download the full source code of this tutorial here: Ninja Web Framework Tutorial
