In this post, we will demonstrate how to build a JAX-WS web service using Gradle.
1. Introduction
Java API for XML Web Services (JAX-WS) uses XML files for configuring services and for exchanging data. JAX-WS is commonly used for SOAP-based messaging. It uses Java API for XML Binding (JAXB) to marshal and unmarshal Java objects to XML and the reverse.
Gradle is a popular build tool used for compiling, testing, and packaging applications. Like Apache Maven, it is also a dependency management tool. In fact, Gradle evolved from Maven. However, it uses DSL (Domain Specific Language) files for build configurations as opposed to XML-based POM files used by Maven.
When creating a Gradle project in Eclipse the New Project Wizard automatically configures a Gradle wrapper for Gradle integration. The Gradle wrapper embeds Gradle within your project so that you can run Gradle tasks without requiring a Gradle installation on your system. This makes it easy to share your project. It also ensures that the Gradle version used is consistent if you need to share your project.
Eclipse Buildship is a collection
of Eclipse plug-ins that provide support for Gradle integration. Buildship includes a user interface for
running Gradle tasks. The Buildship plug-ins are included in most Eclipse
distributions.
In
this example, we will show how to configure Gradle for building a JAX-WS web
service.
1.1 Tools Used in this Example
- Eclipse Java EE IDE for Web Developers Version: Photon
- Gradle 5.1
- Tomcat 9.0
2. JAX-WS Gradle Example
In this example, we’ll develop a “Get Quote” web service that returns random quotes. Let’s begin by creating a Gradle project.
2.1 Create a Gradle Project
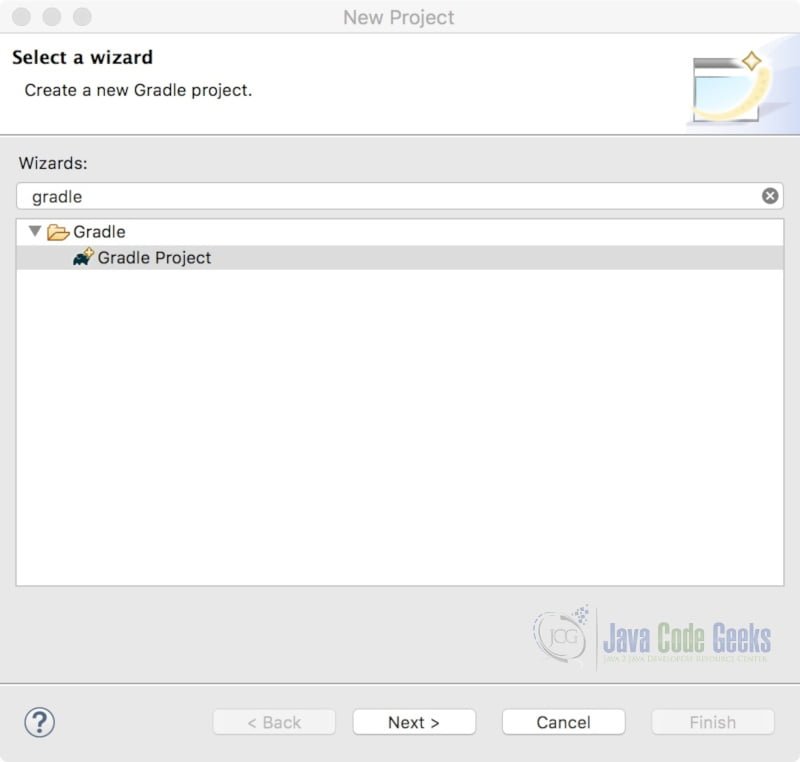
- Select File –> New –> Project…
- In the Select a Wizard dialog window type gradle and select Gradle Project. Click Next.
At this point, you may see the Gradle integration welcome page. Click Next.

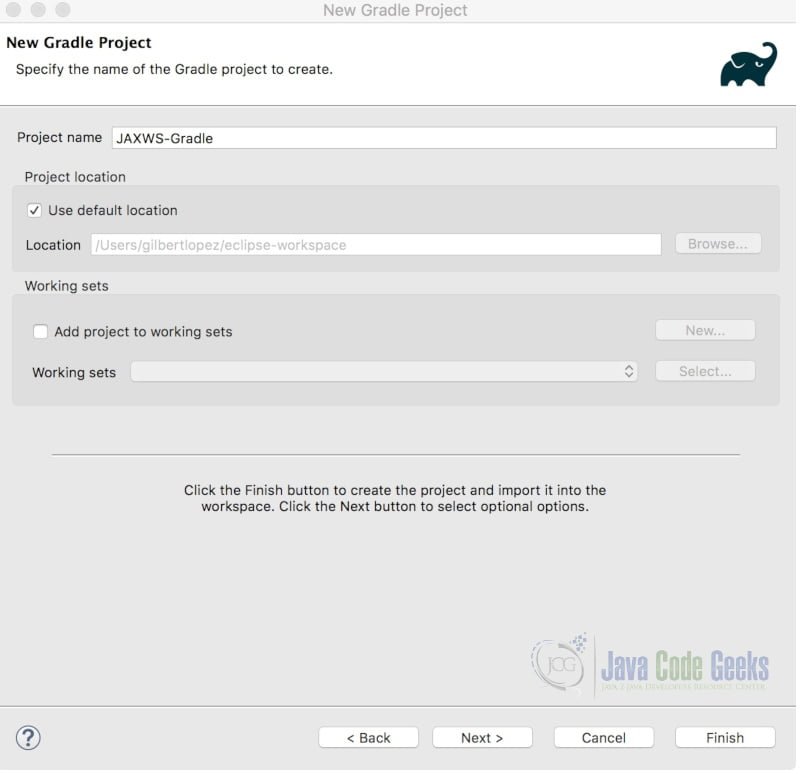
Enter a name for your project and leave the other default values. Click Finish.
The project wizard will create a new Gradle project using the java-library template (described below). If you look at the console, you will notice that two build setup tasks were executed.
Console output for Gradle build setup tasks
:wrapper
:init

BUILD SUCCESSFUL in 20s
2 actionable tasks: 2 executed
Here is a description of the build setup tasks:
- init – Initializes a new Gradle build.
- wrapper – Generates Gradle wrapper files.
The init task created a project structure that is akin to that of a typical Maven project.
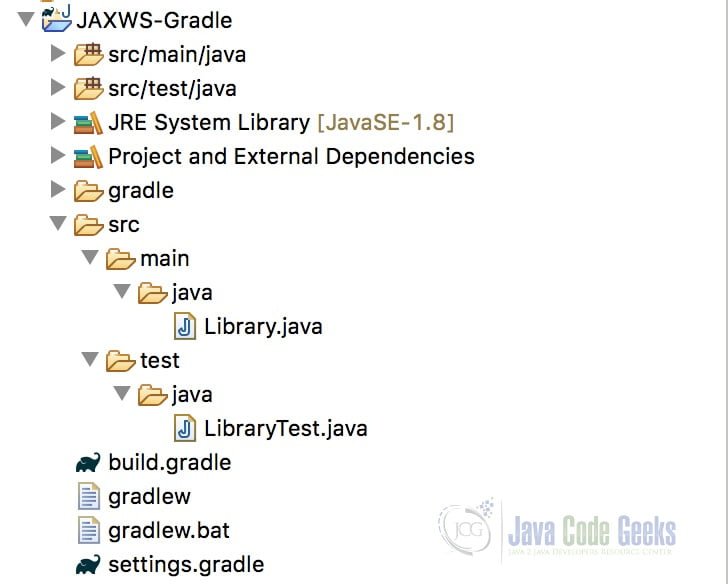
Additionally, the init task created four files in the project’s root directory:
- build.gradle – The build script. (More on this in the next section.)
- gradlew – A script for running tasks inside the Gradle wrapper on Unix environments.
- gradlew.bat – A script for running tasks inside the Gradle wrapper on Windows environments.
- settings.gradle – A properties file used to include other projects in your build if required.
2.2 Examine the build.gradle Script File
Open the build.gradle file.
build.gradle
/*
 * This build file was generated by the Gradle 'init' task.
 *
 * This generated file contains a sample Java Library project to get you started.
 * For more details take a look at the Java Libraries chapter in the Gradle
 * user guide available at https://docs.gradle.org/4.3/userguide/java_library_plugin.html
 */

// Apply the java-library plugin to add support for Java Library
apply plugin: 'java-library'

// In this section you declare where to find the dependencies of your project
repositories {
    // Use jcenter for resolving your dependencies.
    // You can declare any Maven/Ivy/file repository here.
    jcenter()
}

dependencies {
    // This dependency is exported to consumers, that is to say found on their compile classpath.
    api 'org.apache.commons:commons-math3:3.6.1'

    // This dependency is used internally, and not exposed to consumers on their own compile classpath.
    implementation 'com.google.guava:guava:23.0'

    // Use JUnit test framework
    testImplementation 'junit:junit:4.12'
}
A basic Gradle build script contains the following declarations and code blocks.
2.2.1 Apply Plugin
A plugin is an extension to Gradle that provides added capabilities (through pre-configured tasks) to the existing Gradle tasks.
The java-library plugin is a superset of the java plugin. (The java plugin adds tasks for compiling and unit testing your Java source code and for packaging it into a JAR file). The java-library plugin is typically used for projects that are to be used by other components. It adds the ‘api’ and ‘implementation’ configurations to your project. (Gradle configurations are comparable to scopes in Maven.)
2.2.2 Repositories
Repositories listed in this code block are used to look up and download dependencies for use in your project. JCenter and Maven Central are popular repositories used in Gradle projects.
2.2.3 Dependencies
The dependencies code block is where you list the dependencies of your project. Dependencies are expressed in the form ‘groupId:artifactId:version‘ e.g. ‘org.springframework:spring-web:5.0.7.RELEASE‘. For each dependency, you must specify a configuration. Let’s look at some Gradle configurations.
- api – An ‘api’ dependency will be exported to consumers of this project. This has the consequence that the dependency will appear on the consumer’s classpath.
- implementation – An ‘implementation’ dependency will not be exported to consumers of this project. Dependencies declared as ‘implementation’ will remain internal to the project.
- testImplementation – The ‘testImplementation’ configuration will ensure that the dependency, used for testing, will remain internal to the project.
2.3 Gradle Tasks
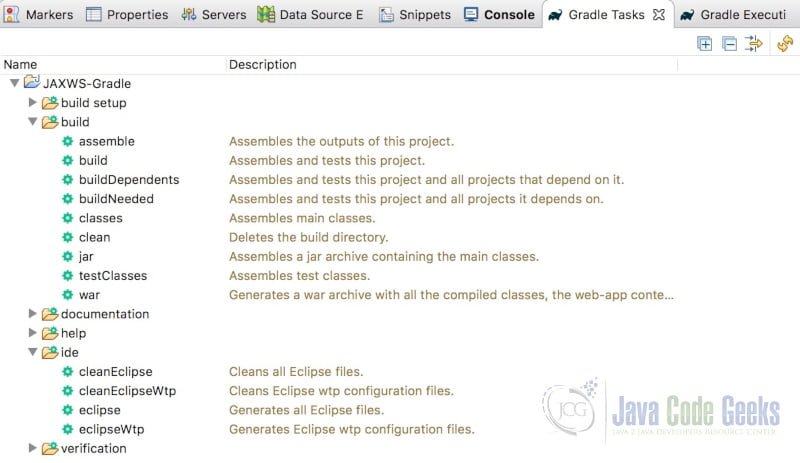
In the Gradle Tasks view, click on the + Expand All icon in the upper-right corner. (Note: If you do not see the Gradle Tasks view, click on the Windows menu – Show View -> Other… and type gradle in the text box.)
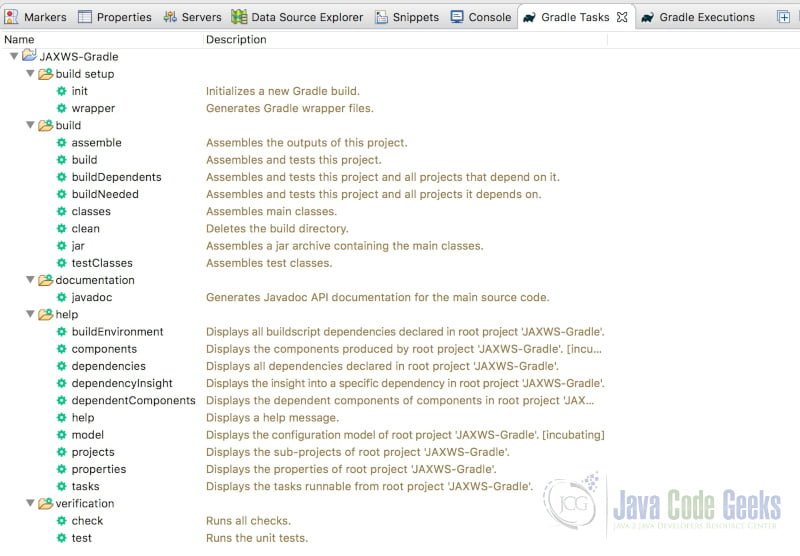
You can see and execute all available Gradle tasks for your project in this view. You can double-click on a task to execute it. For example, double-click the ‘build’ task under the ‘build’ task group. The status will be shown in the Gradle Executions view.
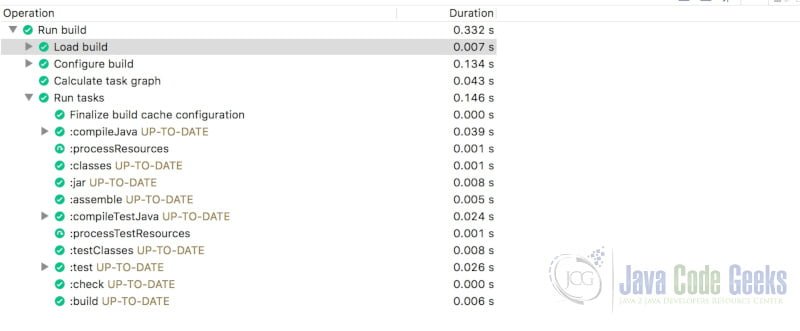
Notice that the ‘:compileJava’, ‘:test’, and ‘:jar’ tasks were executed along with several other tasks as part of the build process.
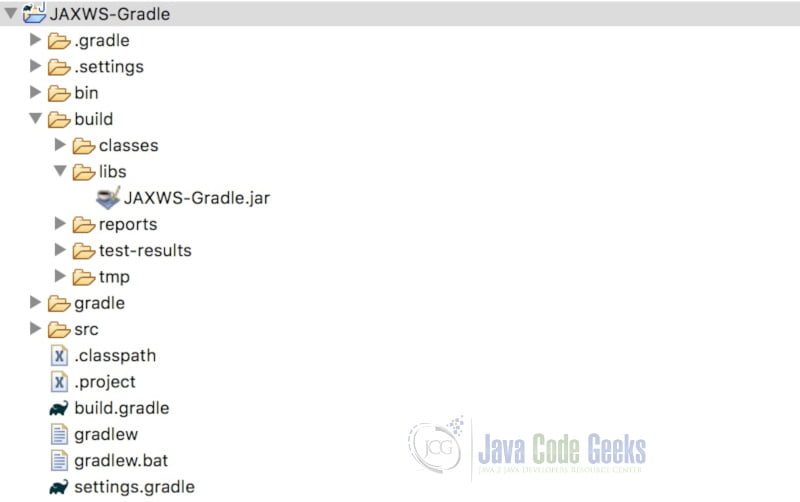
If you open the project in the Navigator view, you will see that a build directory was created along with several new artifacts, such as the project’s JAR file. (You may need to refresh the project to see the build directory.)
2.4 Create the Web Service
First we’ll create a Java interface for our web service.
RandomQuoteService.java
package com.javacodegeeks.examples.jaxws;

import javax.jws.WebMethod;
import javax.jws.WebService;
import javax.jws.soap.SOAPBinding;
import javax.jws.soap.SOAPBinding.Style;

@WebService
@SOAPBinding(style=Style.DOCUMENT)
public interface RandomQuoteService {

	@WebMethod
	public String getQuote();
}
Next, we’ll create the implementation for the interface.
RandomQuoteServiceImpl.java
package com.javacodegeeks.examples.jaxws;

import java.util.ArrayList;
import java.util.List;
import java.util.Random;

import javax.annotation.PostConstruct;
import javax.jws.WebService;

@WebService(endpointInterface = "com.javacodegeeks.examples.jaxws.RandomQuoteService")
public class RandomQuoteServiceImpl implements RandomQuoteService {

	private static List<String> quoteList;

	@PostConstruct
	private void createList() {
		quoteList = new ArrayList<String>();
		quoteList.add("You cannot escape the responsibility of tomorrow by evading it today");
		quoteList.add("I think therefore I am");
		quoteList.add("It was the best of times, it was the worst of times...");
		quoteList.add("Don't cry because it's over, smile because it happened");
		quoteList.add("Be yourself; everyone else is already taken");
		quoteList.add("So many books, so little time");
	}

	@Override
	public String getQuote() {
		Random random = new Random();
		int index = random.nextInt(quoteList.size());
		return (String) quoteList.get(index);
	}
}
2.5 Create the Deployment Descriptor and CXF Configuration File
Create the webapp folder under the src/main/ folder and create the WEB-INF folder under the webapp folder. (The result will be /src/main/webapp/WEB-INF.) Next, create the web.xml file in the WEB-INF folder.
web.xml
<?xml version="1.0" encoding="UTF-8"?>
<web-app xmlns:xsi="http://www.w3.org/2001/XMLSchema-instance"
	xmlns="http://java.sun.com/xml/ns/javaee"
	xsi:schemaLocation="http://java.sun.com/xml/ns/javaee http://java.sun.com/xml/ns/javaee/web-app_2_5.xsd"
	version="2.5">
	<display-name>JAXWS-Gradle</display-name>
	<servlet>
		<servlet-name>cxfservlet</servlet-name>
		<servlet-class>org.apache.cxf.transport.servlet.CXFServlet</servlet-class>
		<load-on-startup>1</load-on-startup>
	</servlet>
	<servlet-mapping>
		<servlet-name>cxfservlet</servlet-name>
		<url-pattern>/*</url-pattern>
	</servlet-mapping>

	<session-config>
		<session-timeout>30</session-timeout>
	</session-config>
</web-app>
We map CXFServlet to handle all requests coming through “/*”.
Next, create the cxf-servlet.xml file in the WEB-INF folder with the following content.
cxf-servlet.xml
<?xml version="1.0" encoding="UTF-8"?>
<beans xmlns="http://www.springframework.org/schema/beans"
	xmlns:xsi="http://www.w3.org/2001/XMLSchema-instance" xmlns:jaxws="http://cxf.apache.org/jaxws"
	xmlns:cxf="http://cxf.apache.org/core"
	xmlns:soap="http://cxf.apache.org/bindings/soap"
	xsi:schemaLocation="http://cxf.apache.org/core http://cxf.apache.org/schemas/core.xsd http://www.springframework.org/schema/beans http://www.springframework.org/schema/beans/spring-beans.xsd http://cxf.apache.org/bindings/soap http://cxf.apache.org/schemas/configuration/soap.xsd http://cxf.apache.org/jaxws http://cxf.apache.org/schemas/jaxws.xsd">

	<jaxws:server id="quoteService" serviceClass="com.javacodegeeks.examples.jaxws.RandomQuoteService" address="/getQuote">
		<jaxws:serviceBean>
			<bean class="com.javacodegeeks.examples.jaxws.RandomQuoteServiceImpl" />
		</jaxws:serviceBean>
	</jaxws:server>

</beans>
Apache CXF with Spring configuration uses the ‘cxf-servlet.xml‘ file to configure the endpoint, implementation, and URL of the web service.
2.6 Modify the build.gradle Script
Let’s modify the build script to enable JAX-WS web services. Edit the build.gradle file as follows:
build.gradle
apply plugin: 'war'
apply plugin: 'eclipse-wtp'

repositories {
	mavenCentral()
}

dependencies {

    compile 'org.apache.cxf:cxf-rt-frontend-jaxws:3.2.7'
 	compile 'org.apache.cxf:cxf-rt-transports-http:3.2.7'
 	compile 'org.springframework:spring-core:5.0.7.RELEASE'
	compile 'org.springframework:spring-context:5.0.7.RELEASE'
 	compile 'org.springframework:spring-web:5.0.7.RELEASE'

    // Use JUnit test framework
    testImplementation 'junit:junit:4.12'
}
2.6.1 Plugins
- The war plugin extends the java plugin and adds support for packaging a web application in a WAR file.
- The eclipse-wtp plugin adds tasks to clean and generate Eclipse files. It is useful when importing and exporting Eclipse-based projects.
2.6.2 Repositories
We changed the repository from JCenter to Maven Central.
2.6.3 Dependencies
We included the required dependencies for developing Apache CXF web services using Spring configuration. Notice that these dependencies use the ‘compile’ configuration, indicating that they are to be available during compile-time and their JAR files included in the /WEB-INF/libs folder, as is required for web applications.
2.7 Rebuild the Project
Right-click the project in the Project Explorer and select Gradle -> Refresh Gradle Project.

Click the Refresh Tasks for All Projects icon in the upper-right corner of the Gradle Task view. (It looks like two arrows circling each other.) You will notice that new tasks have been added. The war task was added to the build task group. Also, a new task group IDE was added with the Eclipse-related tasks.
Double click the build task under the build task group. This will assemble a WAR file as part of the build process, as can be verified by examining the project’s build/libs folder.
2.8 Project and External Dependencies
Expand Java Resources -> Libraries -> Project and External Dependencies in the Project Explorer.
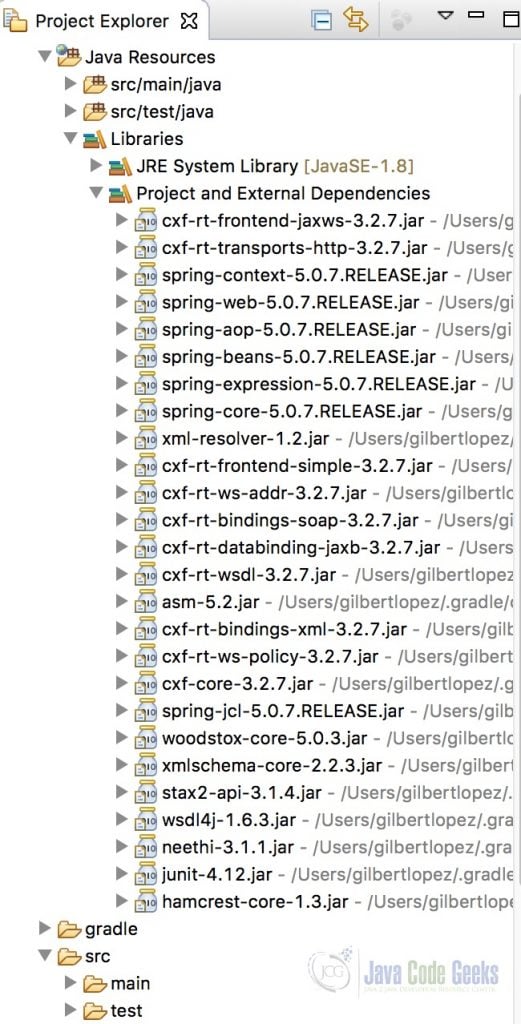
Notice that the JAR files for the specified dependencies have been downloaded and included in the project.
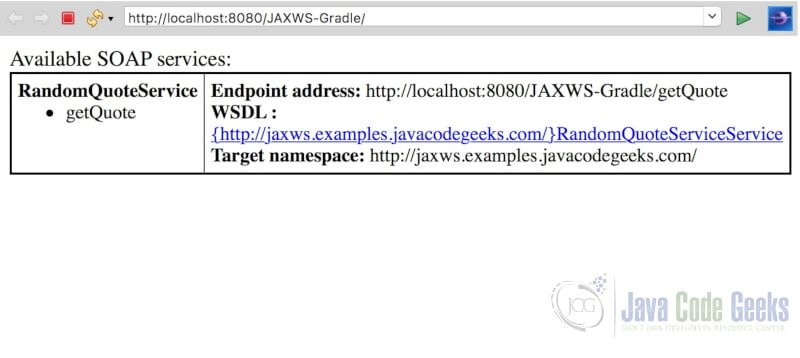
2.9 Run the JAX-WS Service
Right-click the project and select Run As -> Run on Server. Select the Tomcat server and click “Finish”. When the application starts, you will see the “Available SOAP services” page. For instructions on testing the web service, see the following post. JAX-WS Dependencies Example
3. Summary
In this post we demonstrated how how to build a JAX-WS web service using Gradle.
4. Download the Source Code
This was a JAX-WS Gradle Example.
You can download the full source code of this example here: JAX-WS Gradle Example

Thanks for a clear and concise example.
Thanks for your comment R. S. I’m glad you liked the article.