1. Introduction
Hibernate is an Object-Relational Mapping (ORM) framework which acts as the transformational layer between the object-oriented programming model of Java and the table-oriented model of relational databases. In the application code, programmers deal with classes and variables, inheritance, composition, aggregates, identity, and getters/setters. On the database side, there are tables and columns, primary keys, foreign keys, join tables, and SQL queries. Thus, we have two different sub-systems to represent and manipulate the same data. Hibernate ORM reduces this dual dependency into one so that programmers can use only the object-oriented approach to model and manipulate their data and leave the tasks of database creation and data persistence to Hibernate.
Since its initial appearance, Hibernate has grown; it now has other libraries like Search, Validator, OGM (for NoSQL databases) etc.
Gradle is a build tool for building, packaging and running applications written in Java (it supports other languages too). With a large number of plugins, it has a rich feature-set that includes incremental builds, parallel download of dependencies, parallel execution of tasks, task output caching, comparing builds, dry runs, and so on. Some of these features help in very high performance of Gradle. On its website, the documentation lists the top three features that make Gradle faster than Maven:
- Incrementality – Gradle avoids work by tracing input and output of tasks and only running what is necessary, and only processing files that changed when possible.
- Build Cache — Reuses the build outputs of any other Gradle build with the same inputs, including between machines.
- Gradle Daemon — A long-lived process that keeps build information “hot” in memory.
2. Application
In this article, we will discuss a Gradle-based Spring Boot application that uses Hibernate as its persistence framework to interact with a MySQL database. In the domain layer, it has one base class which is inherited by two classes. For each of these sub-classes, we will persist two entities to the database, delete one of them and modify the other.
3. Environment
The environment I used consists of:
- Java 1.8
- Gradle 4.9
- Spring Boot 2.0
- MySQL 8
- Windows 10
4. Source Code
Let’s look at the files and code. Our application is a Gradle-based project, so we start with build.gradle
build.gradle
buildscript {
	ext {
		springBootVersion = '2.0.4.RELEASE'
	}
	repositories {
		mavenCentral()
	}
	dependencies {
		classpath("org.springframework.boot:spring-boot-gradle-plugin:${springBootVersion}")
	}
}

apply plugin: 'java'
apply plugin: 'eclipse'
apply plugin: 'org.springframework.boot'
apply plugin: 'io.spring.dependency-management'

group = 'org.javacodegeeks'
version = '0.0.1-SNAPSHOT'
sourceCompatibility = 1.8

repositories {
	mavenCentral()
}

dependencies {
	compile('org.springframework.boot:spring-boot-starter-data-jpa')
    compile 'mysql:mysql-connector-java'
	compileOnly('org.projectlombok:lombok')
	testCompile('org.springframework.boot:spring-boot-starter-test')
}
This file, the equivalent of Maven’s pom.xml file lists all libraries required for compiling and packaging our application. The spring-boot-started-data-jpa provides Spring JPA library and all libraries that it requires. JPA is not a library that you can use in your application, rather it is specification for an API for ORM and persistence management with Java. Hibernate is an ORM library that started with its own session management mechanism along with an XML-based approach for configuration; it then implemented the JPA specification. Spring Data JPA is another layer of abstraction over JPA that reduces the boiler plate code for data access through repositories in the Spring context, leveraging its annotations and context scanning features and referencing the JPA provider under the hood.
mysql-connector-java is used to connect to the MySQL database and lombok is used to provide annotations for various functions like getters, setters and constructors.
The base domain class of the application is AccountTransaction.
AccountTransaction.java
package org.javacodegeeks.gradlehibernatejpa.domain;

import java.util.Date;

import javax.persistence.DiscriminatorColumn;
import javax.persistence.Entity;
import javax.persistence.GeneratedValue;
import javax.persistence.GenerationType;
import javax.persistence.Id;
import javax.persistence.Inheritance;
import javax.persistence.InheritanceType;

import lombok.Getter;
import lombok.NoArgsConstructor;
import lombok.Setter;

@Getter
@Setter
@NoArgsConstructor
@Entity
@Inheritance(strategy = InheritanceType.SINGLE_TABLE)
@DiscriminatorColumn(name = "account_type")
public abstract class AccountTransaction {
	@Id
	@GeneratedValue(strategy = GenerationType.AUTO)
	private Long id;

	protected Date date;
	protected String description;
	protected Double amount;
}
This is the starting point class of the application. It’s an abstract class, so we can not instantiate objects of its type. Any class whose objects are to be persisted to the database has to be annotated with @Entity. Since we have not used the @Table annotation, the table name will be the same as the class name but with the words separated by underscore. So, in this case, the table name created will be account_transaction. @Entity classes must define a primary key by way of a field annotated by @Id. Typically, we use the AUTO generation strategy for the values of the primary key. Further, the class should also have a default constructor, which we have not defined here, but simply supplied it using the lombok library’s @NoArgsConstructor annotation.
The key annotation here is @Inheritance which is required to be specified on the entity class that is at the root of a class hierarchy. This annotation defines the inheritance strategy to be used for the entity hierarchy. We have chosen the SINGLE_TABLE strategy which uses a single table to map all entities of the class hierarchy. From a performance point of view, this is the most efficient strategy and it allows polymorphic queries. The other inheritance strategies that can be used with JPA and Hibernate are:
- Mapped superclass
- Table per class
- Joined table
Since all sub-class entities in a hierarchy get persisted to the same table, we need a way to identify which class a particular row has come from. This is done by using the @DiscriminatorColumn annotation. In our example, we have specified that the column name is account_type.
In the real world, there are many types of accounting transactions. Here, we deal with only two, the first one being Income.
Income.java
package org.javacodegeeks.gradlehibernatejpa.domain;

import java.util.Date;

import javax.persistence.DiscriminatorValue;
import javax.persistence.Entity;

import lombok.Getter;
import lombok.NoArgsConstructor;
import lombok.Setter;

@Entity
@DiscriminatorValue("income")
@Getter
@Setter
@NoArgsConstructor
public class Income extends AccountTransaction {

	public Income(Date date, String description, Double amount) {
		this.date = date;
		this.description = description;
		this.amount = amount;
	}
}
This class is a sub-class of AccountTransaction. It has a public constructor to let clients instantiate objects with values passed through arguments. It has no fields of its own. Using the @DiscriminatorValue annotation, we indicate that in the database, each Income record will have the value "income" in the account_type column.
Given below is the second type of accounting transaction, namely, Expense.
Expense.java
package org.javacodegeeks.gradlehibernatejpa.domain;

import java.util.Date;

import javax.persistence.DiscriminatorValue;
import javax.persistence.Entity;

import lombok.Getter;
import lombok.NoArgsConstructor;
import lombok.Setter;

@Entity
@DiscriminatorValue("expense")
@Getter
@Setter
@NoArgsConstructor
public class Expense extends AccountTransaction {

	public Expense(Date date, String description, Double amount) {
		this.date = date;
		this.description = description;
		this.amount = amount;
	}
}
Similar to Income class, this class is also a sub-class of AccountTransaction, has a public constructor and does not have its own properties. Using the @DiscriminatorValue annotation. we indicate that in the database, each Expense record will have the value "expense" in the account_type column.
We now come to the Repository interfaces which reduce boilerplate code for database operations. The first one is AccountTransactionRepository.
AccountTransactionRepository.java
package org.javacodegeeks.gradlehibernatejpa.domain;

import org.springframework.data.jpa.repository.Query;
import org.springframework.data.repository.CrudRepository;
import org.springframework.data.repository.query.Param;

public interface AccountTransactionRepository extends CrudRepository {
	@Query(value = "SELECT sum(amount) from account_transaction atn where atn.account_type = :account_type", nativeQuery = true)
	Double findTotalByAccountType(@Param("account_type") String account_type);
}
This interface extends CrudRepository so that we can use the standard methods like save and delete, that are available by default. We also declare a method findTotalByAccountType that takes a String argument account_type and executes a native SQL query that selects the sum of amount column values of the rows whose account_type is the same as the passed in argument.
Next, we take a look at the IncomeRepository interface.
IncomeRepository.java
package org.javacodegeeks.gradlehibernatejpa.domain;

import java.util.Date;
import java.util.List;

import javax.transaction.Transactional;

import org.springframework.data.repository.CrudRepository;

public interface IncomeRepository extends CrudRepository {
	@Transactional
	void deleteByDate(Date date);

	List<Income> findAllByDate(Date date);
}
Here we have specified two methods and Spring JPA will automatically generate the required queries just by parsing the properties from the method names. For the deleteByDate method, a query to delete all rows that have the date column value same as the passed-in date argument will be generated. The @Transactional annotation ensures that the database transaction happens in a persistence context. For the findAllByDate method, a query to find all rows that have the date column value same as the passed-in date argument will be returned.
Given below is ExpenseRepository.
ExpenseRepository.java
package org.javacodegeeks.gradlehibernatejpa.domain;

import java.util.Date;
import java.util.List;

import javax.transaction.Transactional;

import org.springframework.data.repository.CrudRepository;

public interface ExpenseRepository extends CrudRepository {
	@Transactional
	void deleteByDate(Date date);

	List<Expense> findAllByDate(Date date);
}
Similar to the IncomeRepository, here too we have specified two methods: deleteByDate and findAllByDate. The only difference is that in this case, the findAllByDate method returns Expense objects.
Next, we take a look at the application.properties file.
application.properties

spring.jpa.hibernate.ddl-auto=update
spring.datasource.url=jdbc:mysql://localhost:3306/mh1
spring.datasource.username=root
spring.datasource.password=root
In SpringBoot, we can specify various run-time fields and their values in the application.properties file which can reside anywhere on the classpath. Typically this file is placed in src/main/resources directory.
The first application property we have specified here is spring.jpa.hibernate.ddl-auto, with value set to update indicating that Hibernate will add new tables, columns or constraints if they do not exist, but will not remove tables, columns or constraints that were already created in the previous run of the application. The next three properties indicate the URL, username and password that are required to connect to the database. In my MySQL database, the schema I have used is mh1 and the user name and password are both ‘root’.
Finally we come to the main class of the application, GradleHibernateJpaApplication.
GradleHibernateJpaApplication.java
package org.javacodegeeks.gradlehibernatejpa;
package org.javacodegeeks.gradlehibernatejpa;

import java.text.SimpleDateFormat;

import org.javacodegeeks.gradlehibernatejpa.domain.AccountTransactionRepository;
import org.javacodegeeks.gradlehibernatejpa.domain.Expense;
import org.javacodegeeks.gradlehibernatejpa.domain.ExpenseRepository;
import org.javacodegeeks.gradlehibernatejpa.domain.Income;
import org.javacodegeeks.gradlehibernatejpa.domain.IncomeRepository;
import org.springframework.beans.factory.annotation.Autowired;
import org.springframework.boot.CommandLineRunner;
import org.springframework.boot.SpringApplication;
import org.springframework.boot.autoconfigure.SpringBootApplication;

@SpringBootApplication
public class GradleHibernateJpaApplication implements CommandLineRunner {

	@Autowired
	AccountTransactionRepository atr;

	@Autowired
	IncomeRepository ir;

	@Autowired
	ExpenseRepository er;

	SimpleDateFormat formatter = new SimpleDateFormat("dd/MM/yyyy");

	public static void main(String[] args) {
		SpringApplication.run(GradleHibernateJpaApplication.class, args);
	}

	@Override
	public void run(String... args) throws Exception {

		ir.save(new Income(formatter.parse("01/01/2018"), "first income", 1000.0));
		ir.save(new Income(formatter.parse("02/01/2018"), "second income", 2000.0));
		ir.save(new Income(formatter.parse("03/01/2018"), "third income", 2000.0));

		er.save(new Expense(formatter.parse("01/01/2018"), "first expense", 500.0));
		er.save(new Expense(formatter.parse("02/01/2018"), "second expense", 750.0));
		er.save(new Expense(formatter.parse("03/01/2018"), "third expense", 750.0));

		// Delete incomes and expenses of 2nd January
		ir.deleteByDate(formatter.parse("02/01/2018"));
		er.deleteByDate(formatter.parse("02/01/2018"));

		// update 3rd January income(s) amount to 500
		Iterable<Income> incomes = ir.findAllByDate(formatter.parse("03/01/2018"));
		incomes.forEach(income -> {
			income.setAmount(500.0);
			ir.save(income);
		});

		// update 3rd January expense(s) amount to 250
		Iterable<Expense> expenses = er.findAllByDate(formatter.parse("03/01/2018"));
		expenses.forEach(expense -> {
			expense.setAmount(250.0);
			er.save(expense);
		});

		// calculate & print overall balance: incomes total minus expenses total
		Double balance = atr.findTotalByAccountType("income") - atr.findTotalByAccountType("expense");
		System.out.println(balance);
	}
}
The @SpringBootApplication annotation is a convenience annotation that combines three other annotations, @EnableConfiguration, @ComponentScan, and @Configuration. In other words, the class is marked for auto-configuration, component scan and having the ability to register additional beans and import extra configuration classes. The main method invokes SpringApplication.run to start the application.
The task of configuring a JavaBean and its dependency injection is called wiring. Spring provides the facility of automatically doing the wiring without programmers having to do it explicitly. This is called autowiring specified by the @Autowired annotation, which we have used on all the three repository interfaces – AccountTransactionRepository, IncomeRepository, and ExpenseRepository.
The class implements the CommandLineRunner interface that declares a run method which has to be overridden in all implementing classes. After Spring Boot loads the application context, it executes the run method.
In the run method we first create three instances of the Income class and persist them to the database, by calling the save method of IncomeRepository. Next, we create three instances of the Expense class and persist them to the database by calling the save method of ExpenseRepository. We then delete rows that have date of 2nd January by calling the deleteByDate method of both the IncomeRepository and ExpenseRepository. We then query the database to retrieve the Income rows with the date "03/01/2018", set their amount value to 500.0 and save them. Similarly we retrieve all rows with the date "03/01/2018", set their amount value to 250.0 and save them.
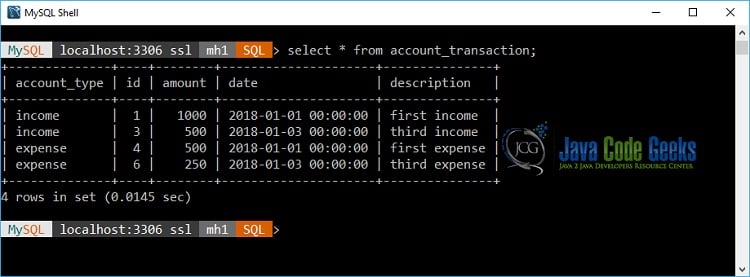
At this point the database will have two Income rows with amounts 1000.0 and 500.0, and two Expense rows with amounts 500.0 and 250.0.
The last step is to calculate the overall balance. For this, we call the AccountTransactionRepository method findTotalByAccountType method twice, once with the argument "income" and second with the argument "expense". This will give the sum of incomes and sum of expenses; balance is just the subtraction of the two, which we print in the last statement.
5. How To Run
Ensure that MySQL is up an running on port 3306. Create a schema called mh1 in your database. If you want to use an existing schema, please change the string mh1 in application.properties file to your schema.
In a terminal window, go to the root folder of the application and issue the command
gradlew bootRun
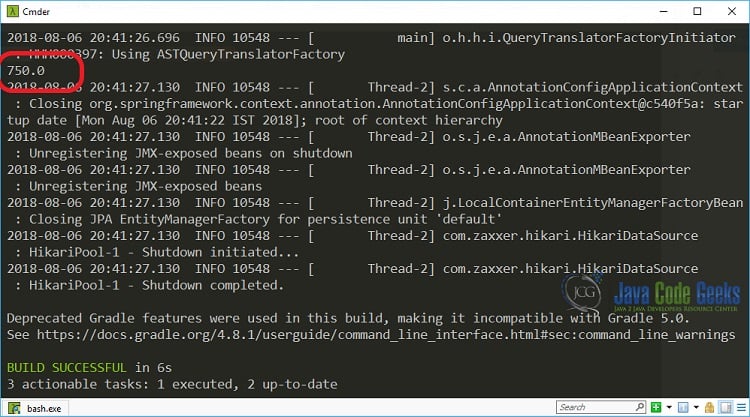
In the output, you will see the number 750 printed. This is the balance which is calculated as the total amounts of the expenses subtracted from the total amounts of the incomes. Screenshot is given below:
If we query the database, we will see that there are two income rows and two expense rows, as appearing in the following screenshot:
6. Summary
In this article, we have discussed the overview of Hibernate and Gradle and the implementation of a Spring Boot application that performs CRUD operations on entities in an hierarchy.
7. Download the Source Code
You can download the full source code of this example here: gradle-hibernate-jpa.zip

That was a nice guide – it provides the right amount of information without going too much into detail or adding unnecessary information. Well done and thank you