Hibernate Configuration File Tutorial
In this example, we will show how to configure hibernate. Hibernate requires to know in advance where to find all the mapping information related to java classes and database tables. There are some other database related settings that hibernate needs which are provided through configuration file. These configuration settings can be provided programmatically OR through a configuration file called hibernate.cfg.xml .
1. Environment
- Windows 7
- Java version 7
- Eclipse Kepler 4.3
- Maven 3.0.4
- MySQL 5.0.86
- JBoss-Hibernate Plugin 4.1.2 for Eclipse
2. Introduction
Hibernate is an object-relational mapping(ORM) framework for java language. In short, it provides a framework to map Java objects to relational database tables. Hibernate solves the problem of mismatch between object-relational by replacing direct, persistent database accesses with high-level object handling functions. By mapping Java classes to database tables and java data types to SQL data types, hibernate reduces 95% of common persistence related programming tasks. Hibernate sits between Java objects and database server to persist those objects based on O/R mechanism. In this example, we will show a configuration file for using Hibernate. In this file, we will show how to connect to database and how a hibernate configuration file can be used to generate java objects which will represent relational database tables.
3. Example Outline
In this example, we will create a Maven project with hibernate plugin in eclipse. We will add all the required configurations in hibernate.cfg.xml file to show how hibernate connects to database and use object relational mechanism. We will create Java source code to map our Java classes to database tables through hibernate XML mapping. At the end, we will create a test program to test our Java objects for updating and retrieving information from database.
4. Hibernate Configuration File Tutorial
Following are the steps, we will perform to show the tutorial for Hibernate Configuration File. We will show from downloading the plugin to create a java object and map it to configuration xml file.
4.1 Download Hibernate plugin
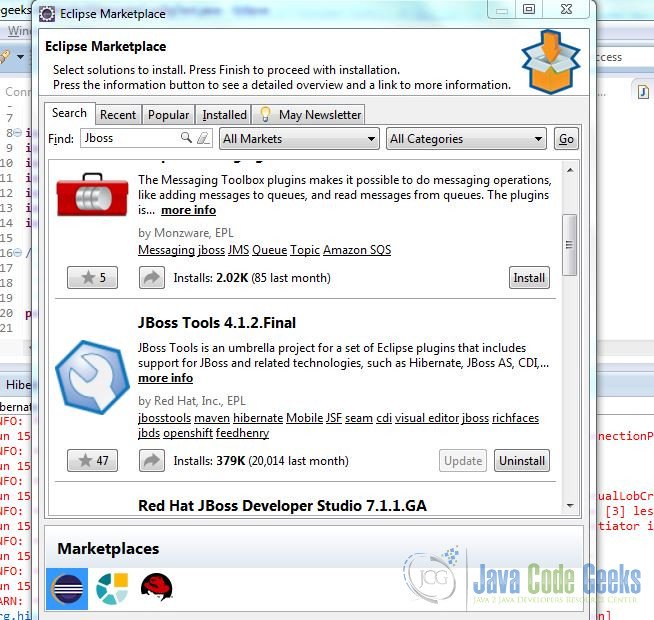
If you don’t have hibernate plugin in your eclipse, you can download based on what version of eclipse are you using. Since we are using Eclipse Kepler (4.3) version, we can download JBoss plugin for hibernate. Go to Help -> Eclipse Marketplace and search JBoss. Install JBoss Tools 4.1.2 Final as shown below
4.2 Create a Maven project
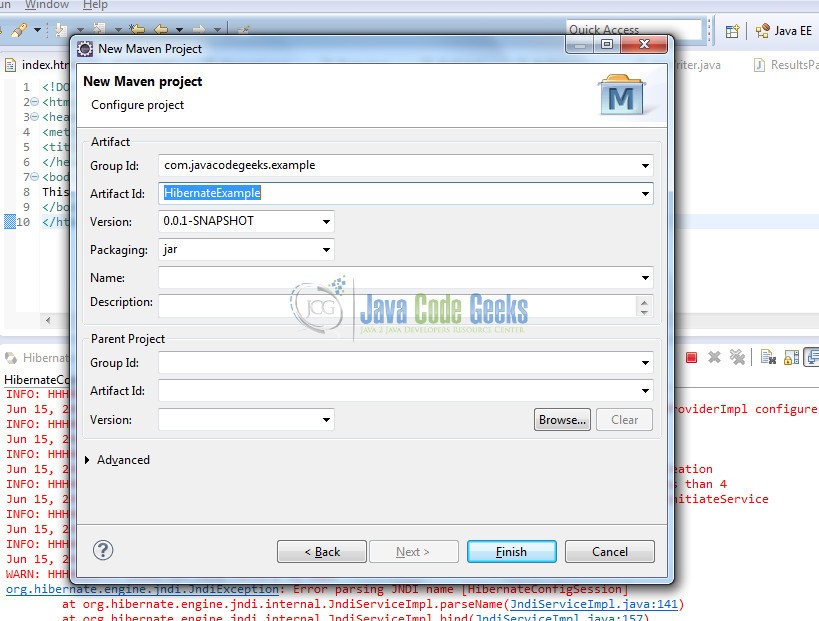
Create a new maven project in eclipse. Fill in the details for GroupId as com.javacodegeeks.example and ArtifactId as HibernateExample as shown below
4.3 Add Hibernate dependencies
Now we will add the required dependencies for Hibernate. Here we will use Maven’s awesome feature of dependency management in pom.xml file.
pom.xml
<project xmlns="http://maven.apache.org/POM/4.0.0" xmlns:xsi="http://www.w3.org/2001/XMLSchema-instance" xsi:schemaLocation="http://maven.apache.org/POM/4.0.0 http://maven.apache.org/xsd/maven-4.0.0.xsd">
  <modelVersion>4.0.0</modelVersion>
  <groupId>com.javacodegeeks.example</groupId>
  <artifactId>HibernateExample</artifactId>
  <version>0.0.1-SNAPSHOT</version>
  <dependencies>
	<dependency>
		<groupId>org.hibernate</groupId>
		<artifactId>hibernate-core</artifactId>
		<version>4.3.11.Final</version>
	</dependency>
  </dependencies>
</project>
4.4 Create Hibernate Configuration File
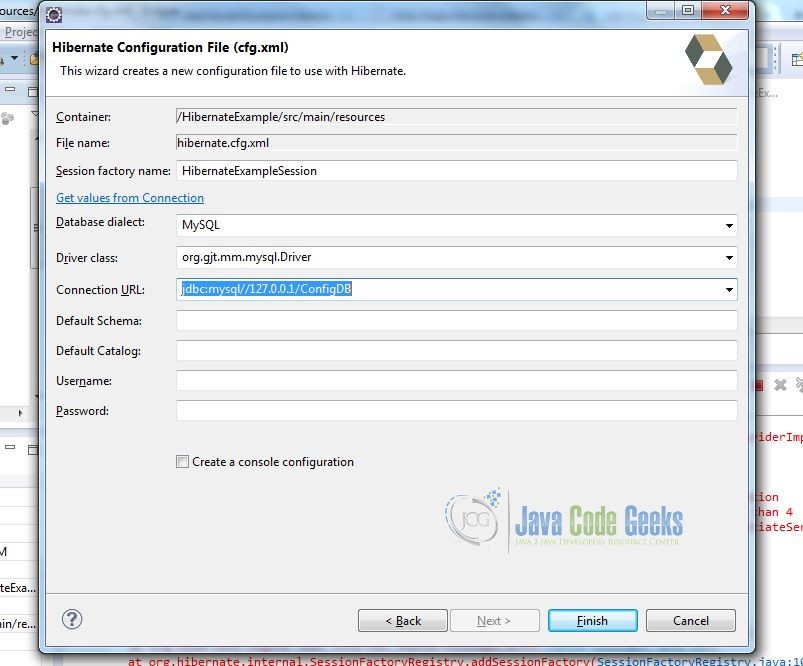
Now we will create hibernate.cfg.xml file. Under your maven project in eclipse, there will be resources directory. Right click and select New -> Hibernate Configuration XML File
Make sure the value you choose for Connection URL will contain the URL for database, so you should create database in MySQL to make this working. Also do not forget to select “Create a console configuration” checkbox on this screen. That will be our next step to configure Hibernate Console. For my database, I am connecting to it without username and password, if you are using this for production, it is highly recommended to use username and password to connect to database. The hibernate.cfg.xml file will look like below:
<?xml version="1.0" encoding="UTF-8"?>
<!DOCTYPE hibernate-configuration PUBLIC
		"-//Hibernate/Hibernate Configuration DTD 3.0//EN"
		"http://hibernate.sourceforge.net/hibernate-configuration-3.0.dtd">
<hibernate-configuration>
    <session-factory>
        <property name="hibernate.connection.driver_class">org.gjt.mm.mysql.Driver</property>
        <property name="hibernate.connection.url">jdbc:mysql://127.0.0.1/ConfigDB</property>
        <property name="hibernate.dialect">org.hibernate.dialect.MySQLDialect</property>
    </session-factory>
</hibernate-configuration>
4.5 Hibernate Console Configuration
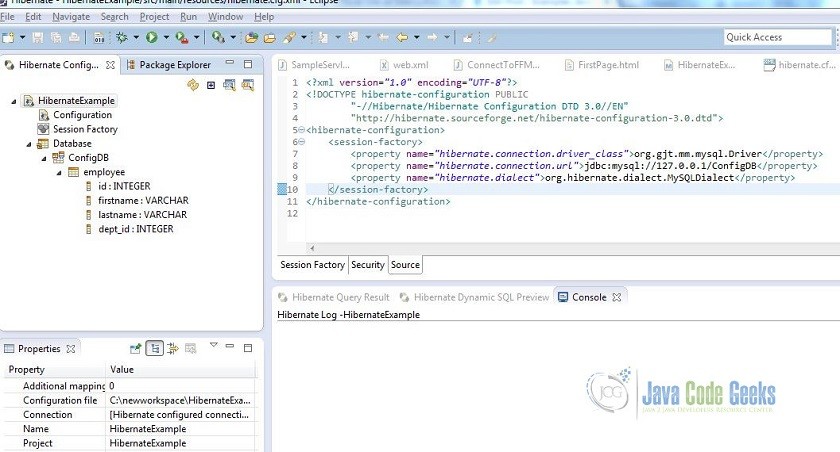
Once you have selected the checkbox for “Create a console Configuration” , click Next to go on the screen shown below for Hibernate Console and click Finish.
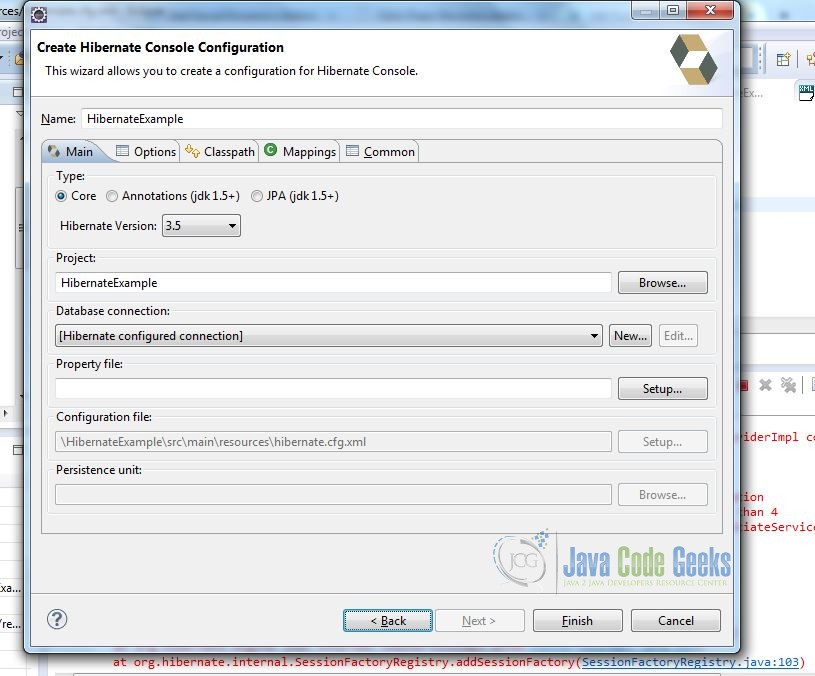
Once you go to Hibernate Console Configuration view in eclipse, it will show database and all the tables it fetched for configuring hibernate.
4.6 Create Java Object
Before we can map our database table to Java object, we will have to create a Java object for Employee . Now under src -> main -> java, create a Java object Employee.
Employee.java
package com.javacodegeeks.example;

public class Employee {
	private int id;
	private String first_name;
	private String last_name;
	private int dept_id;

	public Employee(){

	}

	public Employee(int empId, String firstname, String lastname, int deptId) {
		// TODO Auto-generated constructor stub
		this.id = empId;
		this.first_name = firstname;
		this.last_name = lastname;
		this.dept_id = deptId;
	}

	public int getId() {
		return id;
	}

	public void setId(int id) {
		this.id = id;
	}

	public String getFirst_name() {
		return first_name;
	}

	public void setFirst_name(String first_name) {
		this.first_name = first_name;
	}

	public String getLast_name() {
		return last_name;
	}

	public void setLast_name(String last_name) {
		this.last_name = last_name;
	}

	public int getDept_id() {
		return dept_id;
	}

	public void setDept_id(int dept_id) {
		this.dept_id = dept_id;
	}
}
Here as shown in the code, we have fields for first name, last name and department id. Those are our columns in database in Employee table other than primary key id.
4.7 Map Java Object to database
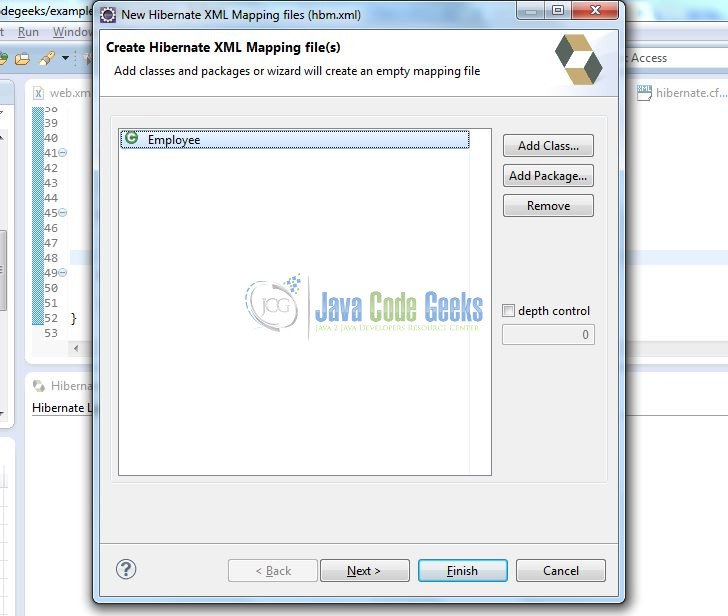
Let’s create a mapping file for java object to database. In eclipse, under src -> main -> resources, create a file with option Hibernate XML Mapping file (hbm.xml).
Click Next and you will see a wizard mapping fields from java objects to database columns in an XML as shown below
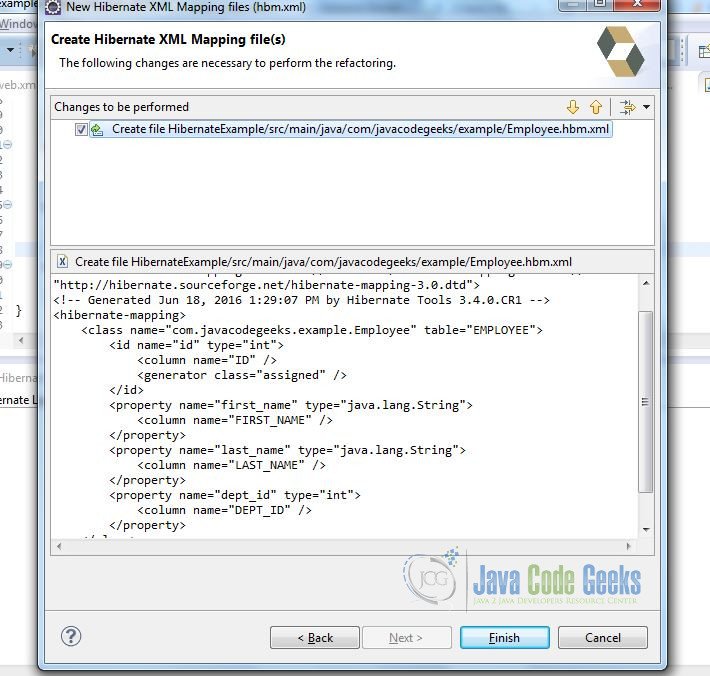
Make sure column name mentioned in this file match with the column names for the table in database. Otherwise you can run into SQLGrammarException
4.8 Create Hibernate Test Program
Let’s create a test program to insert some employee data in database table and retrieve all the data from the database table. The source code looks like below
HibernateConfigTest.java
package com.javacodegeeks.example;

import java.util.ArrayList;
import java.util.List;

import org.hibernate.HibernateException;
import org.hibernate.Session;
import org.hibernate.SessionFactory;
import org.hibernate.Transaction;
import org.hibernate.boot.registry.StandardServiceRegistryBuilder;
import org.hibernate.cfg.Configuration;
import org.hibernate.service.ServiceRegistry;

public class HibernateConfigTest {
	private static SessionFactory factory;
	private static ServiceRegistry serviceRegistry;

	public static void main(String[] args) {
		// TODO Auto-generated method stub

		Configuration config = new Configuration();
		config.configure();
		config.addAnnotatedClass(Employee.class);
		config.addResource("Employee.hbm.xml");
		serviceRegistry = new StandardServiceRegistryBuilder().applySettings(config.getProperties()).build();
		factory = config.buildSessionFactory(serviceRegistry);

		HibernateConfigTest hbConfigTest = new HibernateConfigTest();
		hbConfigTest.addEmployee(5,"Mack","Doe",5000);

		List emps = hbConfigTest.getAllEmployees();
		for(Employee emp : emps){
			System.out.print(emp.getId() + " ");
			System.out.print(emp.getFirst_name() + " ");
			System.out.print(emp.getLast_name() + " ");
                        System.out.println();
		}
	}

	private int addEmployee(int empId,String firstname, String lastname, int deptId)
	{
		Session session = factory.openSession();
		Transaction tx = null;
		Integer empIdSaved = null;
		try {
			tx = session.beginTransaction();
			Employee emp = new Employee(empId,firstname,lastname,deptId);
			empIdSaved = (Integer) session.save(emp);
			tx.commit();
		} catch(HibernateException ex) {
			if(tx != null)
				tx.rollback();
			ex.printStackTrace();
		} finally {
			session.close();
		}

		return empIdSaved;
	}

	private List getAllEmployees()
	{
		Session sesn = factory.openSession();
		Transaction tx = null;
		List employees = new ArrayList();
		try{
			tx = sesn.beginTransaction();
			employees = (List)sesn.createQuery("From Employee").list();
			tx.commit();
		} catch(HibernateException e) {
			e.printStackTrace();
		} finally {
			sesn.close();
		}

		return employees;
	}
}
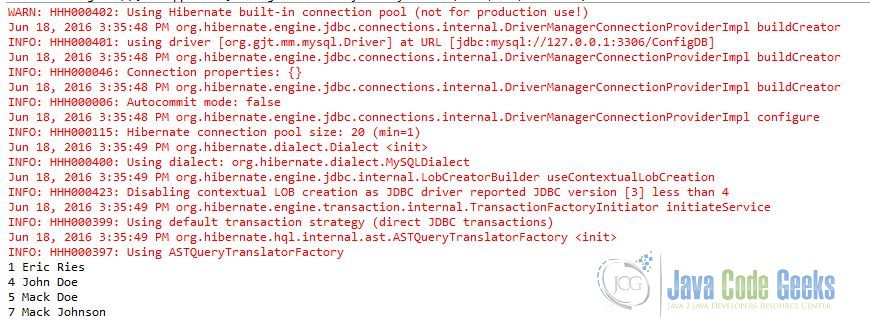
Running this program in eclipse, gave me following output
5. Conclusion
In this example, we showed how to use Hibernate Configuration file to persist java objects to relational database. The advantages hibernate provide
- Hibernate takes care of mapping java objects to relational database tables with a configuration XML file without writing a single line of code.
- It provides simple API to store and retrieve java objects.
- Hibernate does not require application server to operate.
- Hibernate manipulates complex associations of objects of database.
- It minimizes database access with smart fetching strategies.
6. Download
Here we showed how to use Hibernate Configuration for a simple Java object to database table mapping.
You can download the full source code of this example here: HibernateConfigurationTutorial

