Hibernate 3 with Maven 3 and MySQL 5 Example (XML Mapping and Annotation)
In this example we are going to see how to create a Java program that uses Hibernate Framework to store a Student tuple in a MySQL database. We are going to use Maven to create and build our project. We are going to see how to work both with XML mapping and Annotations to map the Class to the database table.
So these are the tools we are going to use on a Windows 7 platform:
- JDK 1.7
- Maven 3.0.5
- Hibernate 3.6.3.Final
- MySQL JDBC driver 5.1.9
- Eclipse 4.2 Juno
Mapping the Class using XML Mapping
1. Create a project with Maven
As we know, Maven is a very cool build tool and dependency checker as well. We are going to use Maven to create our Project. Then, we are going to transform it to Eclipse format, open it with Eclipse and edit it in the IDE (which is what most of us would really want to do).
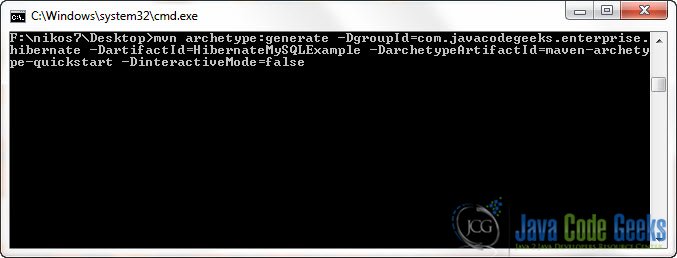
Now, go the folder you want to create your project to and paste the following command in the console:
mvn archetype:generate -DgroupId=com.javacodegeeks.enterprise.hibernate -DartifactId=HibernateMySQLExample -DarchetypeArtifactId=maven-archetype-quickstart -DinteractiveMode=false
Like so:
This will create a sort of local repository that you can use to change your projects classpath and dependencies when necessary.
-DgroupIdoption is used to specifcy the main package of the project.-DartifactIdspecifies the name of the project.- We also use
-DarchetypeArticactIdto quicly create a basic project structure.
2. Open the project with Eclipse
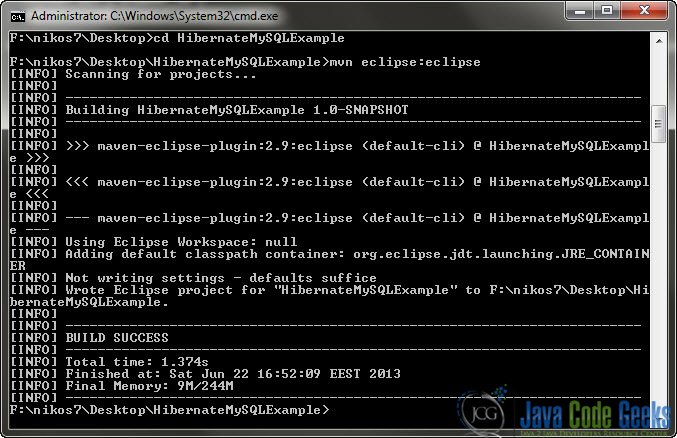
Now that your project is build, we are going to transform it to Eclipse format. This process will just create the necessary files needed in order to open and Edit the project using Eclipse IDE. To do that, you have to navigate to the project’s folder using the console and paste the following command:
mvn eclipse:eclipse
Like so:
An now the project is ready to be opened with Eclipse.
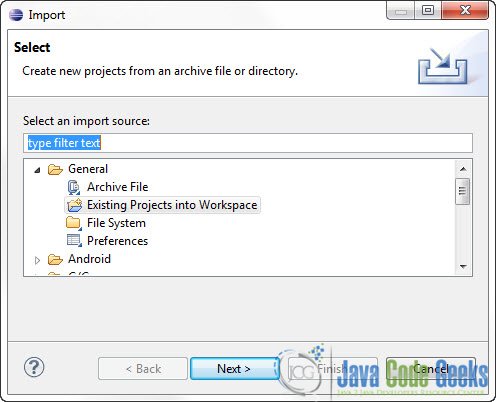
Open Eclipse IDE and go to File -> Import:
General -> Existing Projects into Workspace:
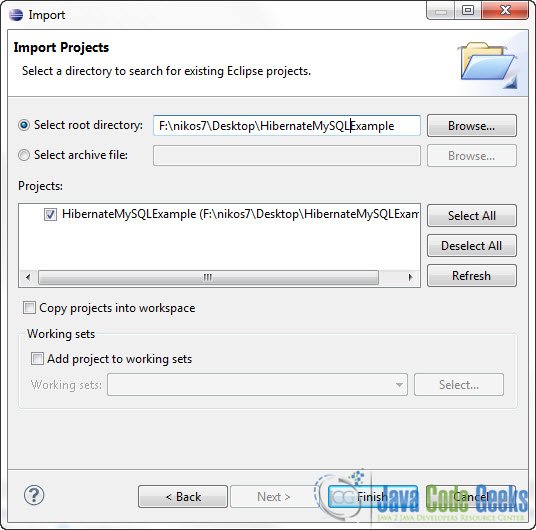
Browse to the Project you’ve created in the previous steps:
And that’s it.
3. Create a MySQL table
We have to create a MySQL table to store the tuples we want. This is the script to create it:
DROP TABLE IF EXISTS `student`;
CREATE TABLE `student` (
  `STUDENT_ID` INT(10) UNSIGNED NOT NULL AUTO_INCREMENT,
  `STUDENT_NAME` VARCHAR(10) NOT NULL,
  `STUDENT_AGE` VARCHAR(20) NOT NULL,
  PRIMARY KEY (`STUDENT_ID`)
) ENGINE=InnoDB DEFAULT CHARSET=utf8;
I’ve already created that table in a Database called tutorials.
4. Edit the pom.xml to get Hibernate library and MySQL JDBC driver
These are the basic things you need to know about the structure of a project created with Maven:
/src/main/javafolder, that contains source files for the dynamic content of the application,/src/test/javafolder contains all source files for unit testing,- the
pom.xmlis the project object model (POM) file. The single file that contains all project related configuration.
From that point you can customize the structure of the project as you wish. I would strongly advice creating a /src/main/resources folder to hold configurations files.
As you might imagine, our code will be using Hibernate framework and jdbc connector to connect to a MySQL database. In order to do that we have to include the external libraries (jars mostly …) of the aforementioned frameworks. But Maven just does that for you. All you have to do is to state which libraries you want to use in the pom.xml file.
Use the package explorer to navigate to pom.xml file and paste the following code:
pom.xml:
<project xmlns="http://maven.apache.org/POM/4.0.0" xmlns:xsi="http://www.w3.org/2001/XMLSchema-instance"
	xsi:schemaLocation="http://maven.apache.org/POM/4.0.0 http://maven.apache.org/maven-v4_0_0.xsd">
	<modelVersion>4.0.0</modelVersion>
	<groupId>com.javacodegeeks</groupId>
	<artifactId>HibernateMySQLExample</artifactId>
	<packaging>jar</packaging>
	<version>1.0-SNAPSHOT</version>
	<name>HibernateMySQLExample</name>
	<url>http://maven.apache.org</url>

	<!-- JBoss repository for Hibernate -->
	<repositories>
		<repository>
			<id>JBoss repository</id>
			<url>http://repository.jboss.org/nexus/content/groups/public/</url>
		</repository>
	</repositories>

	<dependencies>

		<dependency>
			<groupId>junit</groupId>
			<artifactId>junit</artifactId>
			<version>4.8.2</version>
			<scope>test</scope>
		</dependency>

		<dependency>
			<groupId>org.slf4j</groupId>
			<artifactId>jcl-over-slf4j</artifactId>
			<version>1.7.0</version>
			<scope>runtime</scope>
		</dependency>

		<dependency>
			<groupId>org.slf4j</groupId>
			<artifactId>slf4j-api</artifactId>
			<version>1.7.0</version>
			<scope>runtime</scope>
		</dependency>

		<dependency>
			<groupId>org.slf4j</groupId>
			<artifactId>slf4j-log4j12</artifactId>
			<version>1.7.0</version>
			<scope>runtime</scope>
		</dependency>

		<dependency>
			<groupId>log4j</groupId>
			<artifactId>log4j</artifactId>
			<version>1.2.14</version>
		</dependency>

		<!-- MySQL database driver -->

		<dependency>
			<groupId>mysql</groupId>
			<artifactId>mysql-connector-java</artifactId>
			<version>5.1.9</version>
		</dependency>

		<!-- Hibernate framework -->

		<dependency>
			<groupId>org.hibernate</groupId>
			<artifactId>hibernate-core</artifactId>
			<version>3.6.3.Final</version>
		</dependency>

		<dependency>
			<groupId>javassist</groupId>
			<artifactId>javassist</artifactId>
			<version>3.12.1.GA</version>
		</dependency>

	</dependencies>

</project>
Now you have to run:
mvn eclipse:eclipse
from within your project directory. This will download the necessary files and change the classpath of your Project in order to include the newly downloaded libraries.
5. Create a resources directory
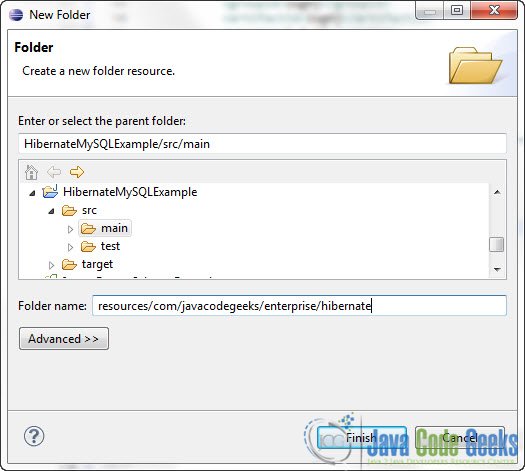
Go to the package explorer and find the src/main folder:
Right click -> New -> Folder. Create the new path : resources/com/javacodegeeks:
6. Create an XML mapping file and the corresponding class
In this step we are going to create a Java class that represents the database table the we want to populate, as well as the XML files that describes the mapping of the classe’s attributes to the table’s columns.
Go ahead and create a new Java file called Student.java. Create the file in /src/main/java/com/javacodegeeks path and paste the following code:
/src/main/java/com/javacodegeeks/enterprise/hibernate/Student.java:
package com.javacodegeeks.enterprise.hibernate;

public class Student implements java.io.Serializable {

	private static final long serialVersionUID = 1L;

	private Integer studentId;
	private String  studentName;
	private String  studentAge;

	public Student() {
	}

	public Student(String studentName, String studentAge) {
		this.studentName = studentName;
		this.studentAge = studentAge;
	}

	public Integer getStudentId() {
		return this.studentId;
	}

	public void setStudentId(Integer studentId) {
		this.studentId = studentId;
	}

	public String getStudentName() {
		return this.studentName;
	}

	public void setStudentName(String studentName) {
		this.studentName = studentName;
	}

	public String getStudentAge() {
		return this.studentAge;
	}

	public void setStudentAge(String studentAge) {
		this.studentAge = studentAge;
	}
}
Now go to to /src/main/resources/com/javacodegeeks and create the Student.hbm.xml file :
/src/main/resources/com/javacodegeeks/enterprise/hibernate/Student.hbm.xml:
<?xml version="1.0"?>
<!DOCTYPE hibernate-mapping PUBLIC "-//Hibernate/Hibernate Mapping DTD 3.0//EN"
"http://hibernate.sourceforge.net/hibernate-mapping-3.0.dtd">

<hibernate-mapping>
    <class name="com.javacodegeeks.enterprise.hibernate.Student" table="student" catalog="tutorials">
        <id name="studentId" type="java.lang.Integer">
            <column name="STUDENT_ID" />
            <generator class="identity" />
        </id>
        <property name="studentName" type="string">
            <column name="STUDENT_NAME" length="10" not-null="true" unique="true" />
        </property>
        <property name="studentAge" type="string">
            <column name="STUDENT_Age" length="20" not-null="true" unique="true" />
        </property>
    </class>
</hibernate-mapping>
.hbm files (Hibernate Mapping Files) are used to decribe the mapping of a class to a database table. As you can see every attribute and property of the class is mapped to a column in the database table.
You have to be extra careful for spelling mistakes in this step. You have to map each class attributes with a correct setter and getter and the corresponding columns in the database table. Now, you can issue mvn eclipse:eclipse again and Refresh the Project in Eclipse’s Package Explorer (although this is not absolutely necessary).
7. Create the Hibernate Configuration File
Go to /src/main/resources and create the hibernate.cfg.xml file :
/src/main/resources/hibernate.cfg.xml:
<?xml version="1.0" encoding="utf-8"?>
<!DOCTYPE hibernate-configuration PUBLIC
"-//Hibernate/Hibernate Configuration DTD 3.0//EN"
"http://hibernate.sourceforge.net/hibernate-configuration-3.0.dtd">
<hibernate-configuration>
	<session-factory>
		<property name="hibernate.bytecode.use_reflection_optimizer">false</property>
		<property name="hibernate.connection.driver_class">com.mysql.jdbc.Driver</property>
		<property name="hibernate.connection.username">root</property>
		<property name="hibernate.connection.password"></property>
		<property name="hibernate.connection.url">jdbc:mysql://localhost:3306/tutorials</property>
		<property name="hibernate.dialect">org.hibernate.dialect.MySQLDialect</property>
		<property name="show_sql">true</property>
		<mapping resource="com/javacodegeeks/enterprise/hibernate/Student.hbm.xml"></mapping>
	</session-factory>
</hibernate-configuration>
This configuration file decribes everything about the database connection. Make sure to specify the correct hibernate.dialect.
8. Create a Hibernate utility class
Create that class in order to wrap Hibernate connections and sessions. You can use this class as it is in most project that use Hibernate. Go to /src/main/java/com/javacodegeeks/utils and create an new class HibernateUtil.java :
/src/main/java/com/javacodegeeks/enterprise/hibernate/utils/HibernateUtil.java:
package com.javacodegeeks.enterprise.hibernate.utils;

import org.hibernate.SessionFactory;
import org.hibernate.cfg.Configuration;

public class HibernateUtil {

	private static final SessionFactory sessionFactory = buildSessionFactory();

	private static SessionFactory buildSessionFactory() {
		try {
			// Use hibernate.cfg.xml to get a SessionFactory
			return new Configuration().configure().buildSessionFactory();
		} catch (Throwable ex) {
			System.err.println("SessionFactory creation failed." + ex);
			throw new ExceptionInInitializerError(ex);
		}
	}

	public static SessionFactory getSessionFactory() {
		return sessionFactory;
	}

	public static void shutdown() {
		getSessionFactory().close();
	}
}
The above class simply holds a SessionFactory instance. The main purpose of SessionFactory is to create Session instances. Most of the times, every application uses a single SessionFactory instance and just obtain Session instances from this factory every time you need one. The notion of Session is straightforword. It is the main runtime interface between a Java application and Hibernate. As we can read from the documentantion, the lifecycle of a Session is bounded by the beginning and end of a logical transaction. The main function of the Session is to offer create, read and delete operations for instances of mapped entity classes. Instances may exist in one of three states:
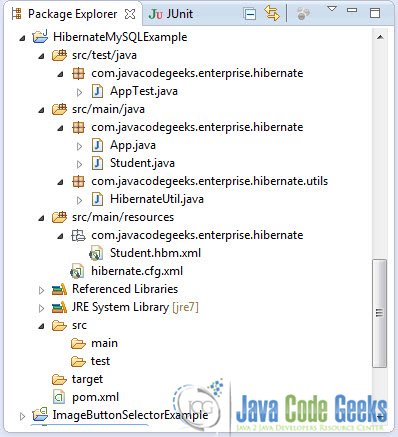
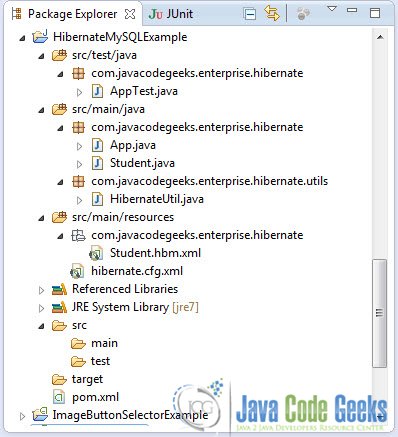
Now, check that your Project’s structure is correct:
9. Code the Application
Go to /src/main/java/com/javacodegeeks/enterprise/hibernate/App.java file and paste the following code:
App.java:
package com.javacodegeeks.enterprise.hibernate;

import org.hibernate.Session;
import com.javacodegeeks.enterprise.hibernate.utils.HibernateUtil;

public class App
{
    public static void main( String[] args )
    {
        Session session = HibernateUtil.getSessionFactory().openSession();

        session.beginTransaction();
        Student student = new Student();

        student.setStudentName("JavaFun");
        student.setStudentAge("19");

        session.save(student);
        session.getTransaction().commit();
        System.out.println("Great! Student was saved");
    }
}
The above code has some notable parts. First of all we obtain a Session from the SessionFactory instance of our HibernateUtil class. Then we start a transaction with the database. We simply create one instance of Student. Then, we save to the Session the student instance and finally commit the transaction.Upon transaction commit the Hibernate session is flushed/synchronized with the database. So the newly created Student intance residing in the Session is persisted to the database.
10. Run the Application
Run the Application. This is the output:
.
.
.
Hibernate: insert into tutorials.student (STUDENT_NAME, STUDENT_Age) values (?, ?)
Great! Student was saved
So far so good.
This was an example on Hibernate 3 with Maven 2 and MySQL 5 using XML Mapping. Download the Eclipse project of this part : HibernateMySQLExample.zip
Mapping the Class using Annotations
For this part we just have to do some updates to the previous project. The main diference is that we are not going to use Student.hbm.xml to map the Student class to the student table in the database. We will use special annotations in the Student.java that will dictate the mapping.
1. Delete Student.hbm.xml
We don’t need that any more.
2. Update the pom.xml file to include Hibernate Annotiation library
Since Hibernate version 3.6, the annotation framework is included into the hibernate-core.jar module, so no update for us.
But if you face any problems updated the pom.xml file to include these libraries as well:
<dependency>
	<groupId>hibernate-annotations</groupId>
	<artifactId>hibernate-annotations</artifactId>
	<version>3.6.3.Final</version>
</dependency>

<dependency>
	<groupId>hibernate-commons-annotations</groupId>
	<artifactId>hibernate-commons-annotations</artifactId>
	<version>3.6.3.Final</version>
</dependency>
And then run mvn eclipse:eclipse to downlaoad the necessary jars and update the classpath of your project.
3. Update Student.java file to include Hibernate Annotiations
This is how the annotated Student.java file should look like:
Studen.java:
package com.javacodegeeks.enterprise.hibernate;

import static javax.persistence.GenerationType.IDENTITY;

import javax.persistence.Column;
import javax.persistence.Entity;
import javax.persistence.GeneratedValue;
import javax.persistence.Id;
import javax.persistence.Table;

@Entity
@Table(name = "student", catalog = "tutorials")
public class Student implements java.io.Serializable {

	private static final long serialVersionUID = 1L;

	private Integer studentId;
	private String  studentName;
	private String  studentAge;

	public Student() {
	}

	public Student(String studentName, String studentAge) {
		this.studentName = studentName;
		this.studentAge = studentAge;
	}

	@Id
	@GeneratedValue(strategy = IDENTITY)
	@Column(name = "STUDENT_ID", unique = true, nullable = false)
	public Integer getStudentId() {
		return this.studentId;
	}

	public void setStudentId(Integer studentId) {
		this.studentId = studentId;
	}

	@Column(name = "STUDENT_NAME", nullable = false, length = 10)
	public String getStudentName() {
		return this.studentName;
	}

	public void setStudentName(String studentName) {
		this.studentName = studentName;
	}

	@Column(name = "STUDENT_AGE", nullable = false, length = 20)
	public String getStudentAge() {
		return this.studentAge;
	}

	public void setStudentAge(String studentAge) {
		this.studentAge = studentAge;
	}

}
These are the basic things you need to know about Hibernate annotations :
@Entity: used to mark the specific class as a Hibenrate entity class that will be mapped to a database table.@Table: used to specify the database table that this class is mapped to. If @Table annotation is not specified, the class name will be considered as the table name.@Id: used to specify the attribute that corresponds to the primary key of the databse table.@GeneratedValue: used to specify the primary key generation strategy and used for auto genarated ids (e.g auto increment in this example).@Column: used to specify the the column to which a field will be mapped. If it is not specified the attribute name and type will be considered as the column name and type respectively
4. Update hibernate.cfg.xml file to change the mapping
As we said in the previous part we user the XML mapping. Now. we have to change the following line in hibernate.cfg.xml:
<mapping resource="com/javacodegeeks/enterprise/hibernate/Student.hbm.xml"></mapping>
to
<mapping class="com.javacodegeeks.enterprise.hibernate.Student"></mapping>
So here is the complete hibernate.cfg.xml file:
<?xml version="1.0" encoding="utf-8"?>
<!DOCTYPE hibernate-configuration PUBLIC
"-//Hibernate/Hibernate Configuration DTD 3.0//EN"
"http://hibernate.sourceforge.net/hibernate-configuration-3.0.dtd">
<hibernate-configuration>
	<session-factory>
		<property name="hibernate.bytecode.use_reflection_optimizer">false</property>
		<property name="hibernate.connection.driver_class">com.mysql.jdbc.Driver</property>
		<property name="hibernate.connection.username">root</property>
		<property name="hibernate.connection.password"></property>
		<property name="hibernate.connection.url">jdbc:mysql://localhost:3306/tutorials</property>
		<property name="hibernate.dialect">org.hibernate.dialect.MySQLDialect</property>
		<property name="show_sql">true</property>
		<mapping class="com.javacodegeeks.enteprise.hibernate.Student"></mapping>
	</session-factory>
</hibernate-configuration>
5. Update HibernateUtil.java
There is no need to update HibernateUtil.java , since Hibernate 3.6, both XML mapping and annotation are integrated to org.hibernate.cfg.Configuration class.
However, if you’re using an older versions make sure to change :
return new Configuration().configure().buildSessionFactory();
to
return new AnnotationConfiguration().configure().buildSessionFactory();
6. Run the Application
Run the Application. This is the output:
.
.
.
Hibernate: insert into tutorials.student (STUDENT_NAME, STUDENT_Age) values (?, ?)
Great! Student was saved
This was an example on Hibernate 3 with Maven 2 and MySQL 5 using Annotations. Download the Eclipse project of this part : HibernateMySQLAnnot.zip

