Java Swing Slider example
1. Introduction
In this article, we’ll discuss Java swing slider. In Java Swing, slider is normally constructed by a JSlider component. JSlider is a component that lets the users select a value by sliding a knob within a specified interval. For the knob, it always points to the point which matches the integer values within the interval.
For JSlider, six different constructors can be used:
- JSlider(): creates a horizontal slider ranging from 0 to 100 with the initial value to be 50.
- JSlider(BoundedRangeModel brm): creates a horizontal slider using the specified BounedRangeModel.
- JSlider(int orientation): creates a slider using the specified orientation ranging from 0 to 100, with the initial value to be 50.
- JSlider(int min, int max): creates a slider using the specified min and max value, with a initial value equals to the average of the min plus the max.
- JSlider(int min, int max, int value): creates a horizontal slider using the specified min, max and the initial value.
- JSlider(int orientation, int min, int max, int value): very similar to the above one, with the orientation specified.
For detailed constructors and methods within the JSlider class, you can refer to the Oracle official document.
2. Examples on Java swing slider
For the following example parts on JSlider, Java 8 and Eclipse IDE (version Mars 4.5.0) are used.
2.1 Simple examples on Java swing slider
In this part, different settings on JSlider will be discussed.
JSlider() construct a horizontal slider, ranging from 0 to 100, with the initial value points to 50. It can be constructed by:
JSlider slider = new JSlider();
The figure below shows the result for run the above code:
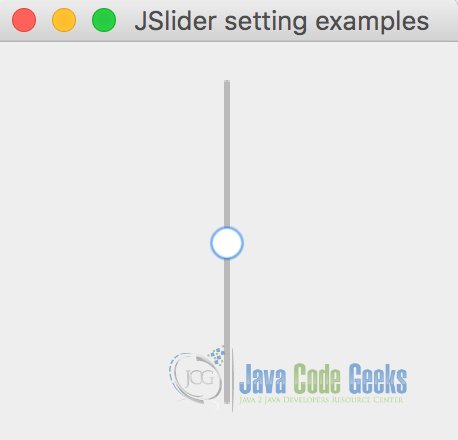
Also, we can set the orientation of the slider to be either vertical or horizontal, with JSlider.VERTICAL or JSlider.HORIZONTAL being specified respectively.
For example, a vertical or horizontal slider can be constructed by:
JSlider slider = new JSlider(JSlider.VERTICAL);
JSlider slider = new JSlider(JSlider.HORIZONTAL);
The result is shown in figure below:
In addition, the min, max and initial value can be specified by having different parameters when constructing slider. For example, we can set the min, max and initial value to be -100, 100 and 50 with following setting:
JSlider slider = new JSlider(-100, 100, 50);
The figure below shows that the range is from -100 to 100, and the initial tick is pointing to 50:
Also, we can use the BoundedRangeModel to specify the min, max, extent and initial value of the slider. For instance, the code below makes a slider ranging from 1 to 100, specifying the initial value to be 20 and the extent to be 0:
DefaultBoundedRangeModel model = new DefaultBoundedRangeModel(20, 0, 1, 100);
JSlider slider = new JSlider(model);
The figure below shows the slider after running code above:
2.2 Adding ticks into Java swing slider
In most situation, it’s convenient to add ticks into the slider, making it clearer. In Java swing, the method setMajorTickSpacing is used for this purpose. With a int value parameter n being the input, it specifies the major tick spacing between the interval. For example, with n set by 25 and the default setting for the slider, you will get major ticks with following values: 0, 25, 50, 75, 100. The code below shows how to add the major ticks:
slider.setMajorTickSpacing(25);
slider.setPaintTicks(true);
The result can be obtained and shown below:
Note that we need to add the method setPaintTicks to be true determine that tick marks are painted on the slider, as the default value is false.
In contrast, the minor ticks can be obtained by using the method setMinorTickSpacing. With a int value parameter n being the input, the minor tick spacing can be obtained. For example, if we set the parameter to be 10 with the default setting for the slider, minor ticks will be obtained with following values: 0, 10, 20, 30, 40, 50, 60, 70, 80, 90, 100, with the code below:
slider.setMinorTickSpacing(10);
slider.setPaintTicks(true);
However, in most situation, we need to specify the major and minor ticks together, which is very easy. What you only need to do is to combine the code above and set the major and minor ticks together, such as:
slider.setMajorTickSpacing(50);
slider.setMinorTickSpacing(10);
slider.setPaintTicks(true);
For this situation, we can run the code and get the following slider:

2.3 Labeling positions in slider
In some situations, we need to know the positions of some values. In this condition, we can add the positions and label them in the slider. Here we use a hash table to map the value with a label with following code:
// Set the labels to be painted on the slider
slider.setPaintLabels(true);

// Add positions label in the slider
Hashtable position = new Hashtable();
position.put(0, new JLabel("0"));
position.put(25, new JLabel("25"));
position.put(50, new JLabel("50"));
position.put(75, new JLabel("75"));
position.put(100, new JLabel("100"));

// Set the label to be drawn
slider.setLabelTable(position);
The slider after running the code above is shown below. Here, we label the value of 0, 25, 50, 75 and 100 to make the slider clearer to read.
The code above could be summarized in the code simpleSliderExample.java below:
simpleSliderExample.java
package javaCodeGeeks;

import javax.swing.DefaultBoundedRangeModel;
import javax.swing.JFrame;
import javax.swing.JLabel;
import javax.swing.JPanel;
import javax.swing.JSlider;

import java.util.Hashtable;

/*
 * A simple swing slider example with different constructors
 */

public class simpleSliderExample {

	public static void main(String[] args) {
		// Create and set up a frame window
		JFrame.setDefaultLookAndFeelDecorated(true);
		JFrame frame = new JFrame("JSlider setting examples");
		frame.setDefaultCloseOperation(JFrame.EXIT_ON_CLOSE);

		// Set the panel to add buttons
		JPanel panel = new JPanel();

		// Different settings on the sliders
		JSlider slider = new JSlider();
		// JSlider slider = new JSlider(JSlider.VERTICAL);
		// JSlider slider = new JSlider(-100, 100, 50);
		// JSlider slider = new JSlider(JSlider.VERTICAL, -100, 100, 50);

		// Set the slider with the DefaultBoundedRangeModel
		//DefaultBoundedRangeModel model = new DefaultBoundedRangeModel(20, 0, 1, 100);
		//JSlider slider = new JSlider(model);

		// Set major or minor ticks for the slider
		slider.setMajorTickSpacing(25);
		slider.setMinorTickSpacing(10);
		slider.setPaintTicks(true);

		// Set the labels to be painted on the slider
		slider.setPaintLabels(true);

		// Add positions label in the slider
		Hashtable position = new Hashtable();
		position.put(0, new JLabel("0"));
		position.put(25, new JLabel("25"));
		position.put(50, new JLabel("50"));
		position.put(75, new JLabel("75"));
		position.put(100, new JLabel("100"));

		// Set the label to be drawn
		slider.setLabelTable(position);

		// Add the slider to the panel
		panel.add(slider);

		// Set the window to be visible as the default to be false
		frame.add(panel);
		frame.pack();
		frame.setVisible(true);

	}

}
After running the code above, we can get the following figure:
2.4 Adding change listener to slider
To make the slider more functional, we can add the change listener to the slider and perform different functions.
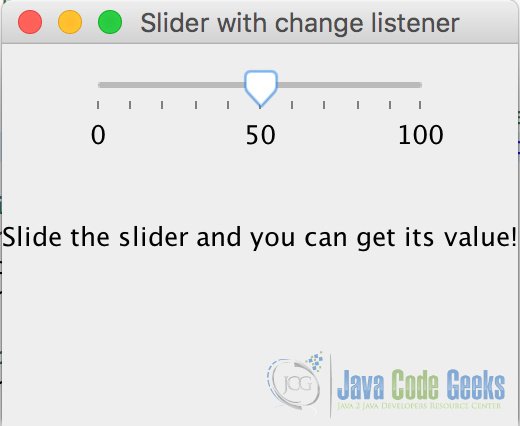
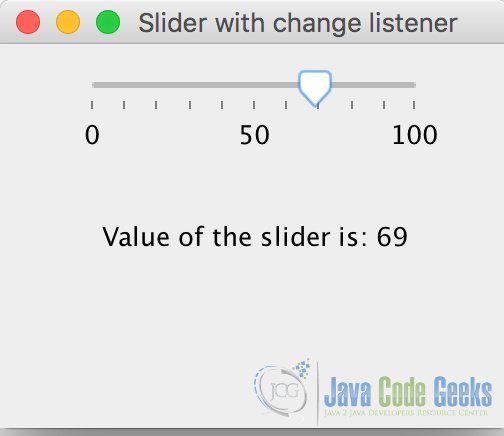
For example, we can add another panel to show the value of the slider in real-time. Then we know where is the slider now. In the example below, we add an change listener to the slider and show the value of the slider in a panel below the slider.
sliderWithEvent.java
package javaCodeGeeks;

import java.awt.GridLayout;
import java.util.Hashtable;

import javax.swing.JFrame;
import javax.swing.JLabel;
import javax.swing.JPanel;
import javax.swing.JSlider;
import javax.swing.event.ChangeEvent;
import javax.swing.event.ChangeListener;

public class sliderWithEvent {

	public static void main(String[] args) {
		// Create and set up a frame window
		JFrame.setDefaultLookAndFeelDecorated(true);
		JFrame frame = new JFrame("Slider with change listener");
		frame.setSize(500, 500);
		frame.setLayout(new GridLayout(3, 1));
		frame.setDefaultCloseOperation(JFrame.EXIT_ON_CLOSE);

		// Set the panel to add buttons
		JPanel panel1 = new JPanel();
		JPanel panel2 = new JPanel();

		// Add status label to show the status of the slider
		JLabel status = new JLabel("Slide the slider and you can get its value", JLabel.CENTER);

		// Set the slider
		JSlider slider = new JSlider();
		slider.setMinorTickSpacing(10);
		slider.setPaintTicks(true);

		// Set the labels to be painted on the slider
		slider.setPaintLabels(true);

		// Add positions label in the slider
		Hashtable<Integer, JLabel> position = new Hashtable<Integer, JLabel>();
		position.put(0, new JLabel("0"));
		position.put(50, new JLabel("50"));
		position.put(100, new JLabel("100"));

		// Set the label to be drawn
		slider.setLabelTable(position);

		// Add change listener to the slider
		slider.addChangeListener(new ChangeListener() {
			public void stateChanged(ChangeEvent e) {
				status.setText("Value of the slider is: " + ((JSlider)e.getSource()).getValue());
			}
		});

		// Add the slider to the panel
		panel1.add(slider);

		// Set the window to be visible as the default to be false
		frame.add(panel1);
		frame.add(status);
		frame.add(panel2);
		frame.pack();
		frame.setVisible(true);

	}

}
After we run the code, we can see the initial status showing that “Slide the slider and you can get its value!”.
Then you can change the slider and get different values.
3. Download the Source Code
This was an example about Java Swing Slider.
You can download the source code of this example here: sliderExample.zip


