This is an article about the JavaFX Scene Builder. You will get a short introduction about the installation and usage of the software. The article contains also a short introduction to FXML.
The following table shows an overview of the whole article:
Table Of Contents
1. Introduction
The JavaFX Scene Builder is a tool that lets you design JavaFX application user interfaces without coding. Users can drag and drop UI components to a work area, modify their properties, apply style sheets, and the FXML code for the layout that they are creating is automatically generated in the background. The result is an FXML file that can then be combined with a Java project by binding the UI to the application.
JavaFX Scene Builder includes the following key features:
- A drag-and-drop interface allows you to quickly create a UI layout without the need to write source code.
- You can add, combine, and edit JavaFX UI controls to your layout by using the library of UI controls and the content panel.
- Integration with any Java IDE is easy since it is a standalone development tool.
- Automatic FXML code generation occurs as you build and modify your UI layout.
- The generated FXML code is stored in a separate file from the application logic source and style sheet files.
- Live editing and preview features let you quickly visualize the UI layout changes that you make without the need to compile.
- Access to the complete JavaFX 2.2 UI controls library is provided.
- CSS support enables flexible management of the look and feel of your application’s UI.
2. Installation
The installation of the Scene Builder 1.1 consists of the following Steps:
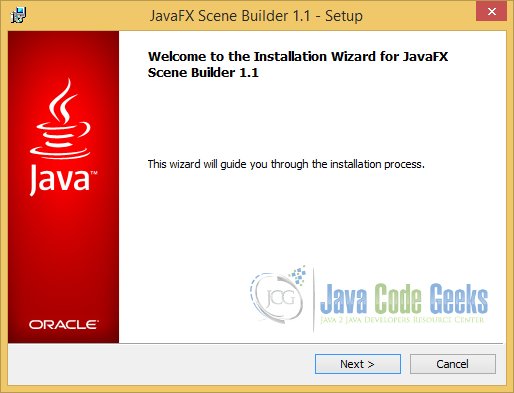
Go to the JavaFX Scene Builder Archive and download your package, which depends on the used Operating System.
If you are using windows, double click the setup file. Thereafter the following Dialog appears:
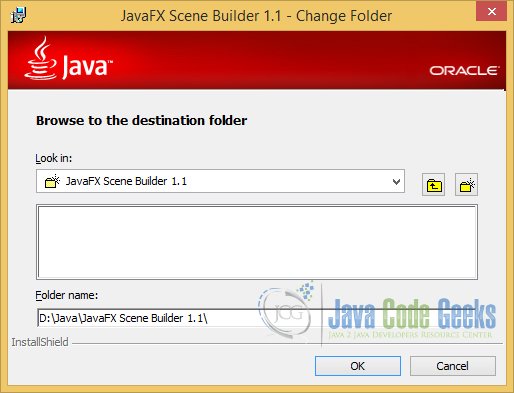
After a click on the Next Button, you can change your Destination Folder, if you want:
Thereafter, the selected Destination Folder will be shown:
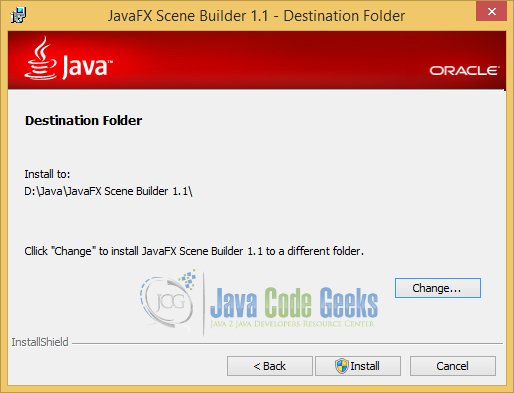
After a click on the Finish Button, your Setup is complete.

Now you can use the Scene Builder.
3. The GUI of the Scene Builder
After starting the Application (Double-Click to the Icon on the Desktop), you get the following GUI:
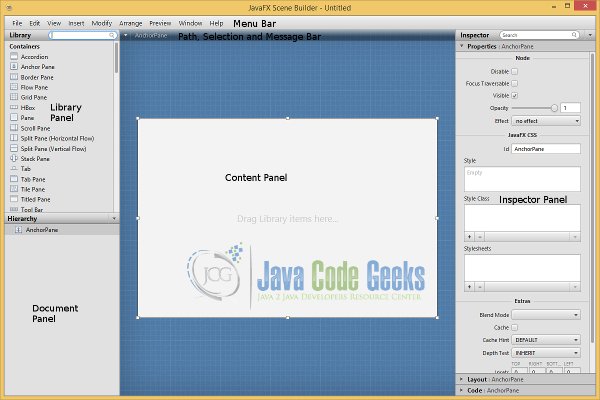
By default, the main window of JavaFX Scene Builder includes the following sections:
- Menu Bar
- Path, Selection and Message Bar
- Content Panel
- Library Panel
- Document Panel
- Inspector Panel
The Menu Bar provides access to the menu of commands available in JavaFX Scene Builder.
The Path, Selection and Message Bar displays the path to a selected element and allows you to select an element to put into focus. It also displays any error or status messages.
The Content Panel represents the scene container for the GUI elements that make up your FXML layout. By default, a new empty FXML file is opened in JavaFX Scene Builder.
The Library Panel lists the available JavaFX GUI elements or controls, including custom controls, that you can use to build your FXML layout. You select the GUI elements from this panel and add them to the Content panel or the Hierarchy panel.
The Document Panel contains the Hierarchy and Controller sections. The Hierarchy section displays a tree view representation of the FXML layout that you are building in the Content panel. Elements that are not visible in the Content panel can be placed into focus by selecting it in the Hierarchy panel. The Controller section enables you to manage the controller source information and gives information about assigned fx:id values.
The Inspector Panel contains the Properties, Layout, and Code sections. The Properties and Layout sections help you manage the properties of the currently selected GUI element in the Content panel or in the Hierarchy panel. The Code section enables you to manage the event handling actions to use for the selected GUI element. The Inspector panel also contains a Search text field that enables you to isolate specific properties that you want to modify.
4. FXML
FXML is an XML-based language designed to build the user interface for JavaFX applications. You can use FXML to build an entire scene or part of a scene. FXML allows application developers to separate the logic for building the UI from the business logic. You still use JavaFX to write business logic using the Java language. An FXML document is an XML document.
A JavaFX scene graph is a hierarchical structure of Java objects. XML format is well suited for storing information representing some kind of hierarchy. It is common to use FXML to build a scene graph in a JavaFX application. However, the use of FXML is not limited to building only scene graphs. It can build a hierarchical object-graph of Java objects.
An FXML document is simply a text file. Typically, the file name has a .fxml extension (e.g., TextAreaExample.fxml).
In the following chapters you will generate a scene using the Scene Builder. Additionally, the corresponding parts of FXML will be discussed.
5. Your first Example
Now, let´s create a simple example using the JavaFX Scene Builder. We will create a VBox which contains a Label for the In- and Output, a Button, a TextField and a TextArea.
5.1 Adding UI Elements
The root element of the FXML document is the top-level object in the object-graph. Our top-level object is an AnchorPane.
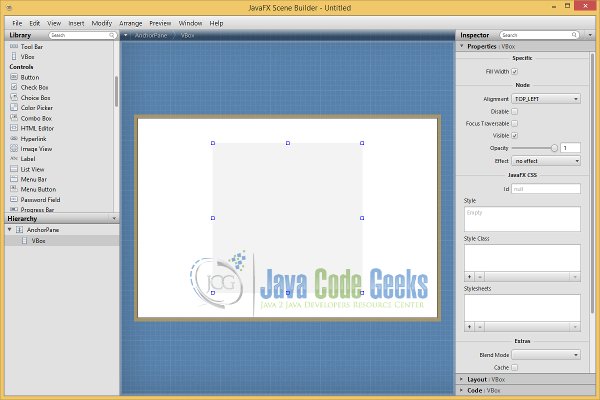
At first we add the VBox to the AnchorPane. This can be done via Drag and Drop of the Object from the Containers.
5.2 Setting Properties to an Object
You can set properties for Java objects in FXML. There are two ways to set properties:
- Using attributes of an FXML element
- Using property elements
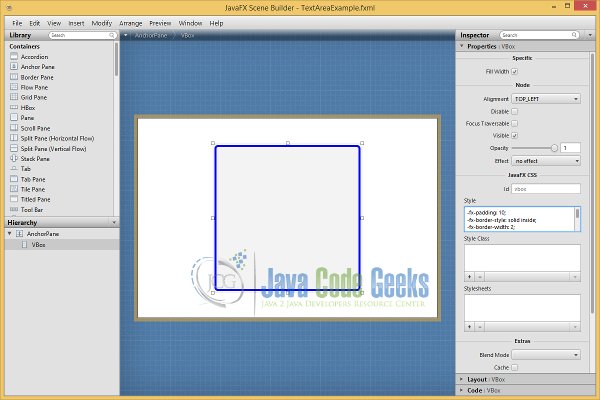
5.2.1 Setting the Style Properties to an Object
In the Hierarchy panel, select the VBox element and click the Properties section of the Inspector panel.
In our example. the following properties were inserted into the Style Text Field.
-fx-padding: 10;
-fx-border-style: solid inside;
-fx-border-width: 2;
-fx-border-insets: 5;
-fx-border-radius: 5;
-fx-border-color: blue;
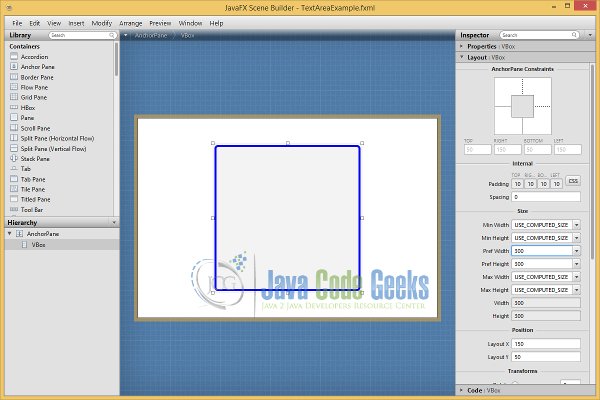
5.2.2 Setting the Width and Height Properties to an Object
In the Hierarchy panel, select the VBox element and click the Layout section of the Inspector panel. In this example, the Preferred Width and the Preferred Height was set to 300px.
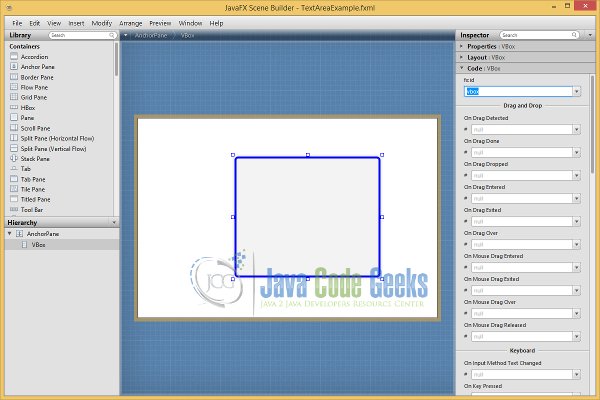
5.2.3 Assigning an Identifier to an Object
An object created in FXML can be referred to somewhere else in the same document. It is common to get the reference of UI objects created in FXML inside the JavaFX code. You can achieve this by first identifying the objects in FXML with an fx:id attribute. The value of the fx:id attribute is the identifier for the object. If the object type has an id property, the value will be also set for the property. Note that each Node in JavaFX has an id property that can be used to refer to them in CSS.
In the Hierarchy panel, select the VBox element and click the Code section of the Inspector panel. In this example, the Identifier was set to vbox.
5.3 Adding the other UI Elements
Now we have to add the other necessary elements to the VBox to finish our example. This step includes also the setting of the Properties, which were already discussed. At first we add a Label.

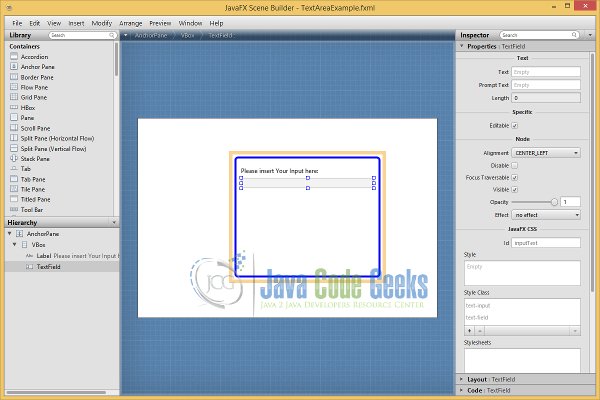
Thereafter we add a TextField for the Input:
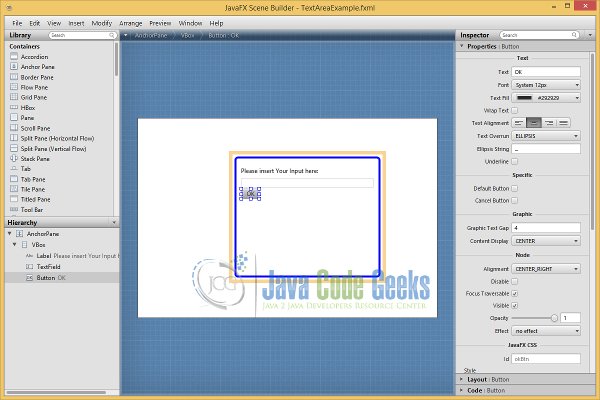
Now, let´s add a Button which handles the necessary ActionEvent.
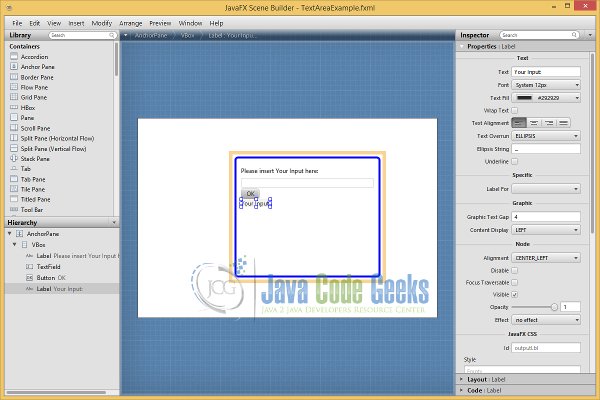
So we add a second Label as Head for the Output:
And finally, we have to add a TextArea, which contains and display our input.

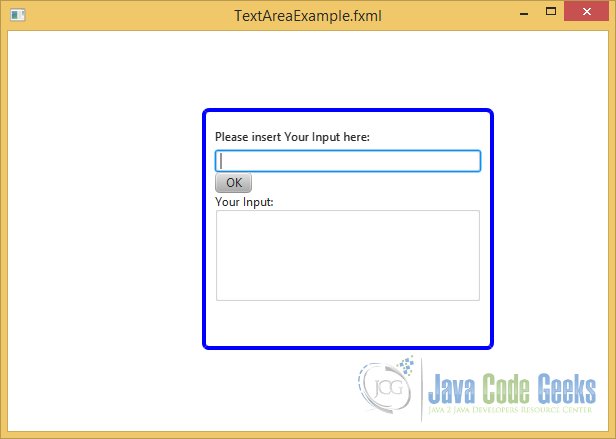
Let´s save the example by using the “Save As” Menu Entry in the File Menu. Choose a directory and save the scene as TextAreaExample.fxml.
5.4 Preview of your Design
You can always make a Preview in the Scene Builder about your current design under usage of the “Show Preview in Window” Menu Entry in the “Preview” Menu.
5.5 The Generated FXML Source Code
If you open the created FXML File with an editor, you will see the following FXML Code:
TextAreaExample.fxml
<?xml version="1.0" encoding="UTF-8"?>

<?import java.lang.*?>
<?import java.util.*?>
<?import javafx.scene.control.*?>
<?import javafx.scene.layout.*?>
<?import javafx.scene.paint.*?>

<AnchorPane id="AnchorPane" fx:id="pane" disable="false" maxHeight="-Infinity" maxWidth="-Infinity" minHeight="-Infinity" minWidth="-Infinity" prefHeight="400.0" prefWidth="600.0" xmlns:fx="http://javafx.com/fxml/1" xmlns="http://javafx.com/javafx/2.2">
  <children>
    <VBox fx:id="vbox" layoutX="190.0" layoutY="73.0" prefHeight="250.0" prefWidth="300.0" style="-fx-padding: 10;
-fx-border-style: solid inside;
-fx-border-width: 2;
-fx-border-insets: 5;
-fx-border-radius: 5;
-fx-border-color: blue;">
      <children>
        <Label fx:id="inputLbl" alignment="CENTER_LEFT" cache="true" cacheHint="SCALE" prefHeight="29.0" prefWidth="206.0" text="Please insert Your Input here:" textAlignment="LEFT" />
        <TextField fx:id="inputText" prefWidth="167.0" />
        <Button fx:id="okBtn" alignment="CENTER_RIGHT" contentDisplay="CENTER" mnemonicParsing="false" text="OK" textAlignment="CENTER" />
        <Label fx:id="outputLbl" text="Your Input:" />
        <TextArea fx:id="outputText" prefHeight="93.0" prefWidth="221.0" wrapText="true" />
      </children>
    </VBox>
  </children>
</AnchorPane>
6. Loading FXML Documents
An FXML document defines the view (the GUI) part of a JavaFX application. You need to load the FXML document to get the object-graph it represents. Loading an FXML is performed by an instance of the FXMLLoader class, which is in the javafx.fxml package. The FXMLLoader class provides several constructors that let you specify the location, charset, resource bundle, and other elements to be used for loading the document. You need to specify at least the location of the FXML document, which is a URL. The class contains load() methods to perform the actual loading of the document.
6.1 The Code
The following snippet of code loads an FXML document from a local file system in Windows:
TextAreaExample.java
import java.io.FileInputStream;
import java.io.IOException;

import javafx.application.Application;
import javafx.fxml.FXMLLoader;
import javafx.scene.Scene;
import javafx.scene.layout.AnchorPane;
import javafx.stage.Stage;

public class TextAreaExample extends Application
{
	public static void main(String[] args)
	{
		Application.launch(args);
	}

	@Override
	public void start(Stage stage) throws IOException
	{
		// Create the FXMLLoader
		FXMLLoader loader = new FXMLLoader();
		// Path to the FXML File
		String fxmlDocPath = "Path-To-Your-FXML-Files/TextAreaExample.fxml";
		FileInputStream fxmlStream = new FileInputStream(fxmlDocPath);

		// Create the Pane and all Details
		AnchorPane root = (AnchorPane) loader.load(fxmlStream);

		// Create the Scene
		Scene scene = new Scene(root);
		// Set the Scene to the Stage
		stage.setScene(scene);
		// Set the Title to the Stage
		stage.setTitle("A SceneBuilder Example");
		// Display the Stage
		stage.show();
	}
}
FXMLLoader supports loading a FXML document using an InputStream. The following snippet of code loads the same FXML document using an InputStream.
// Create the FXMLLoader
FXMLLoader loader = new FXMLLoader();
// Path to the FXML File
String fxmlDocPath = "Path-To-Your-FXML-Files/TextAreaExampleController.fxml";
FileInputStream fxmlStream = new FileInputStream(fxmlDocPath);

// Create the Pane and all Details
AnchorPane root = (AnchorPane) loader.load(fxmlStream);
6.2 The GUI
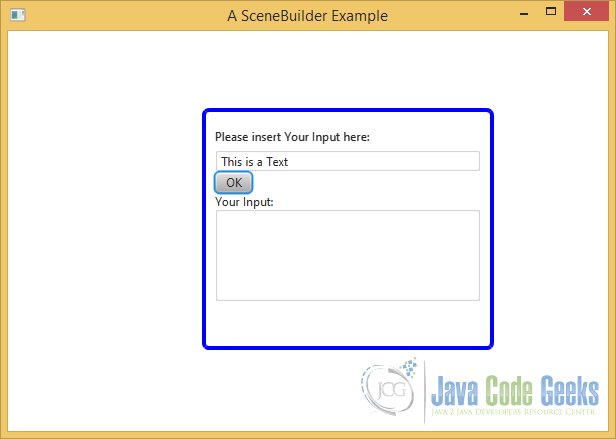
After starting the Application, you can insert Text in the Input Field and press the OK Button. But at this time, it does not have any effect. The reason is the fact, that we don´t have added an Event Handler to the Button. This will be discussed in the next part of this article.
7. Adding Event Handlers
You can set event handlers for nodes in FXML. Setting an event handler is similar to setting any other properties. For example, the Button class contains an onAction property to set an ActionEvent handler. In FXML, you can specify two types of event handlers:
- Script Event Handlers
- Controller Event Handlers
7.1 Using Script Event Handlers
The script event handler is used when the event handler is defined in a scripting language. The value of the attribute is the script itself, such as a function call or one or more statements.
7.1.1 The FXML Code
At first, the JavaScript Method must be defined in the corresponding FXML File:
TextAreaExampleScript.fxml
<?xml version="1.0" encoding="UTF-8"?>
<?language JavaScript?>

<?import java.lang.*?>
<?import java.util.*?>
<?import javafx.scene.control.*?>
<?import javafx.scene.layout.*?>
<?import javafx.scene.paint.*?>

<AnchorPane id="AnchorPane" fx:id="pane" disable="false" maxHeight="-Infinity" maxWidth="-Infinity" minHeight="-Infinity" minWidth="-Infinity" prefHeight="400.0" prefWidth="600.0" xmlns:fx="http://javafx.com/fxml/1" xmlns="http://javafx.com/javafx/2.2">
  <children>
    <VBox fx:id="vbox" layoutX="190.0" layoutY="73.0" prefHeight="250.0" prefWidth="300.0" style="-fx-padding: 10;
-fx-border-style: solid inside;
-fx-border-width: 2;
-fx-border-insets: 5;
-fx-border-radius: 5;
-fx-border-color: blue;">
      <children>
        <Label fx:id="inputLbl" alignment="CENTER_LEFT" cache="true" cacheHint="SCALE" prefHeight="29.0" prefWidth="206.0" text="Please insert Your Input here:" textAlignment="LEFT" />
        <TextField fx:id="inputText" prefWidth="167.0" />
        <Button fx:id="okBtn" alignment="CENTER_RIGHT" contentDisplay="CENTER" mnemonicParsing="false" onAction="printOutput();" text="OK" textAlignment="CENTER" />
        <Label fx:id="outputLbl" text="Your Input:" />
        <TextArea fx:id="outputText" prefHeight="93.0" prefWidth="221.0" wrapText="true" />
        <fx:script>
			function printOutput()
			{
				outputText.setText(inputText.getText());
			}
		</fx:script>
      </children>
    </VBox>
  </children>
</AnchorPane>
The following code snippet shows an example of the definition of a Script Event Handler using JavaScript.
<?language JavaScript?>

<fx:script>
	function printOutput()
	{
		outputText.setText(inputText.getText());
	}
</fx:script>
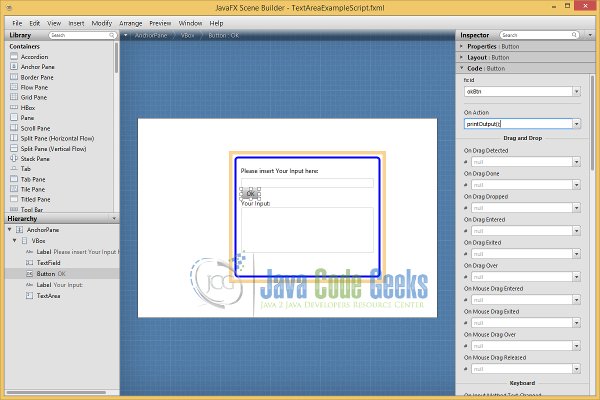
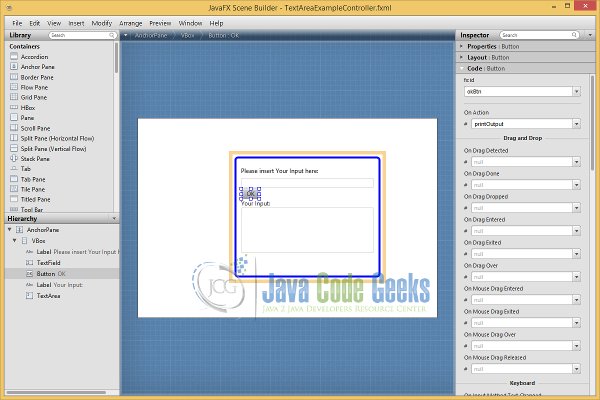
The following image shows an example of the definition of an ActionEvent handler for a Button that calls the printOutput(); function defined using JavaScript.
7.1.2 The Java Code
Given the fact, that we have added the Event Handler in the FXML Code, there are no changes in the corresponding Java Class necessary.
TextAreaExampleScript.java
import java.io.FileInputStream;
import java.io.IOException;

import javafx.application.Application;
import javafx.fxml.FXMLLoader;
import javafx.scene.Scene;
import javafx.scene.layout.AnchorPane;
import javafx.stage.Stage;

public class TextAreaExampleScript extends Application
{
	public static void main(String[] args)
	{
		Application.launch(args);
	}

	@Override
	public void start(Stage stage) throws IOException
	{
		// Create the FXMLLoader
		FXMLLoader loader = new FXMLLoader();
		// Path to the FXML File
		String fxmlDocPath = "Path-To-Your-FXML-Files/TextAreaExampleScript.fxml";
		FileInputStream fxmlStream = new FileInputStream(fxmlDocPath);

		// Create the Pane and all Details
		AnchorPane root = (AnchorPane) loader.load(fxmlStream);

		// Create the Scene
		Scene scene = new Scene(root);
		// Set the Scene to the Stage
		stage.setScene(scene);
		// Set the Title to the Stage
		stage.setTitle("A SceneBuilder Example with JavaScript");
		// Display the Stage
		stage.show();
	}
}
7.1.3 The GUI
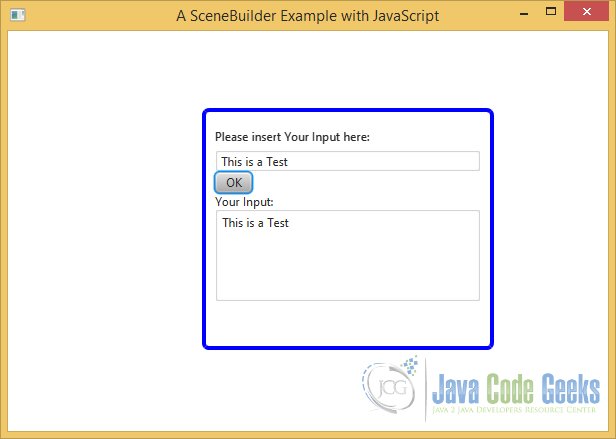
After starting the Application, we can insert a Text in the TextField, press the OK Button, and the Message appears in the TextArea.
7.2 Controller Event Handlers
A controller is simply a class name whose object is created by FXML and used to initialize the UI elements. FXML lets you specify a controller on the root element using the fx:controller attribute. Note that only one controller is allowed per FXML document, and if specified, it must be specified on the root element.
7.2.1 The Controller Class
At first, you have to write a Controller for your root element. In our case the root element is the AnchorPane
TextAreaController.java
import java.net.URL;
import java.util.ResourceBundle;

import javafx.fxml.FXML;
import javafx.scene.control.TextArea;
import javafx.scene.control.TextField;

public class TextAreaController
{
	@FXML
	// The reference of inputText will be injected by the FXML loader
	private TextField inputText;

	// The reference of outputText will be injected by the FXML loader
	@FXML
	private TextArea outputText;

	// location and resources will be automatically injected by the FXML loader
	@FXML
	private URL location;

	@FXML
	private ResourceBundle resources;

	// Add a public no-args constructor
	public TextAreaController()
	{
	}

	@FXML
	private void initialize()
	{
	}

	@FXML
	private void printOutput()
	{
		outputText.setText(inputText.getText());
	}
}
The controller class uses a @FXML annotation on some members. The @FXML annotation can be used on fields and methods. It cannot be used on classes and constructors. By using a @FXML annotation on a member, you are declaring that the FXML loader can access the member even if it is private. A public member used by the FXML loader does not need to be annotated with @FXML. However, annotating a public member with @FXML is not an error. It is better to annotate all members, public and private, used by the FXML loader with @FXML annotation. This tells the reader of your code how the members are being used.
A controller needs to conform to some rules:
The controller must have a public no-args constructor. If it does not exist, the FXML loader will not be able to instantiate it, which will throw an exception at the load time.
// Add a public no-args constructor
public TextAreaController()
{
}
The controller can have accessible methods, which can be specified as event handlers in FXML.
@FXML
private void printOutput()
{
	outputText.setText(inputText.getText());
}
The FXML loader will automatically look for accessible instance variables of the controller. If the name of an accessible instance variable matches the fx:id attribute of an element, the object reference from FXML is automatically copied into the controller instance variable. This feature makes the references of UI elements in FXML available to the controller. The controller can use them later, such as binding them to model.
<AnchorPane id="AnchorPane" fx:id="pane" disable="false" maxHeight="-Infinity" maxWidth="-Infinity" minHeight="-Infinity" minWidth="-Infinity" prefHeight="400.0" prefWidth="600.0" xmlns:fx="http://javafx.com/fxml/1" xmlns="http://javafx.com/javafx/2.2">
The controller can have an accessible initialize() method, which should take no arguments and have a return type of void. The FXML loader will call the initialize() method after the loading of the FXML document is complete.
@FXML
private void initialize()
{
}
The following image shows an example of the definition of an Controller for the AnchorPane.
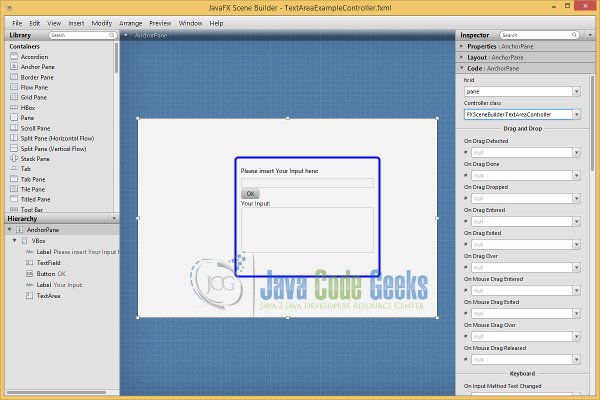
Additionally you have to define the Java Method printOutput to the Button.
7.2.2 The FXML Code
Thereafter you get the following FXML Code:
TextAreaExampleController.fxml
<?xml version="1.0" encoding="UTF-8"?>

<?import java.lang.*?>
<?import java.util.*?>
<?import javafx.scene.control.*?>
<?import javafx.scene.layout.*?>
<?import javafx.scene.paint.*?>

<AnchorPane id="AnchorPane" fx:id="pane" disable="false" maxHeight="-Infinity" maxWidth="-Infinity" minHeight="-Infinity" minWidth="-Infinity" prefHeight="400.0" prefWidth="600.0" xmlns:fx="http://javafx.com/fxml/1" xmlns="http://javafx.com/javafx/2.2" fx:controller="FXSceneBuilder.TextAreaController">
  <children>
    <VBox fx:id="vbox" layoutX="190.0" layoutY="73.0" prefHeight="250.0" prefWidth="300.0" style="-fx-padding: 10;
-fx-border-style: solid inside;
-fx-border-width: 2;
-fx-border-insets: 5;
-fx-border-radius: 5;
-fx-border-color: blue;">
      <children>
        <Label fx:id="inputLbl" alignment="CENTER_LEFT" cache="true" cacheHint="SCALE" prefHeight="29.0" prefWidth="206.0" text="Please insert Your Input here:" textAlignment="LEFT" />
        <TextField fx:id="inputText" prefWidth="167.0" />
        <Button fx:id="okBtn" alignment="CENTER_RIGHT" contentDisplay="CENTER" mnemonicParsing="false" onAction="#printOutput" text="OK" textAlignment="CENTER" />
        <Label fx:id="outputLbl" text="Your Input:" />
        <TextArea fx:id="outputText" prefHeight="93.0" prefWidth="221.0" wrapText="true" />
      </children>
    </VBox>
  </children>
</AnchorPane>
7.2.3 The Java Code
TextAreaExampleController.java
import java.io.FileInputStream;
import java.io.IOException;

import javafx.application.Application;
import javafx.fxml.FXMLLoader;
import javafx.scene.Scene;
import javafx.scene.layout.AnchorPane;
import javafx.stage.Stage;

public class TextAreaExampleController extends Application
{
	public static void main(String[] args)
	{
		Application.launch(args);
	}

	@Override
	public void start(Stage stage) throws IOException
	{
		// Create the FXMLLoader
		FXMLLoader loader = new FXMLLoader();
		// Path to the FXML File
		String fxmlDocPath = "Path-To-Your-FXML-Files/TextAreaExampleController.fxml";
		FileInputStream fxmlStream = new FileInputStream(fxmlDocPath);

		// Create the Pane and all Details
		AnchorPane root = (AnchorPane) loader.load(fxmlStream);

		// Create the Scene
		Scene scene = new Scene(root);
		// Set the Scene to the Stage
		stage.setScene(scene);
		// Set the Title to the Stage
		stage.setTitle("A SceneBuilder Example with a Controller");
		// Display the Stage
		stage.show();
	}

}
7.2.4 The GUI
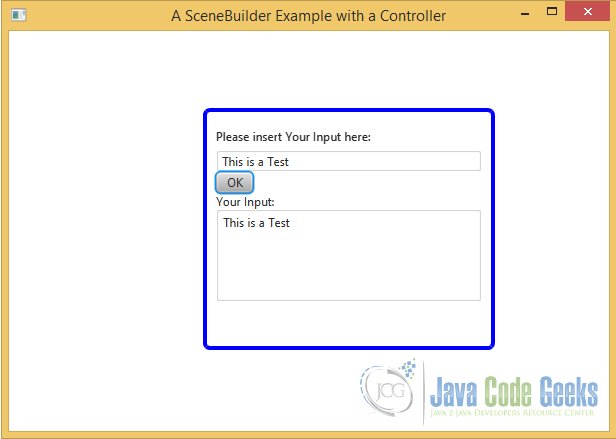
After starting the Application, we can insert a Text in the TextField, press the OK Button, and the Message appears in the TextArea. The Controller has the same effect, like the JavaScript Method.
8. Download Java Source Code
This was an example of the JavaFX Scene Builder
You can download the full source code of this example here: FxSceneBuilderExample.zip
