Java Database Connectivity (JDBC) is a Java-based data access technology that defines how a client may access a database. It provides methods for querying and updating the data in a database. The JDBC classes are contained in the Java package i.e. java.sql and javax.sql.
1. Introduction
In this JDBC Oracle connectivity example, we will see how to setup a JDBC environment and create a simple Java database application to connect to Oracle Database Express Edition using JDBC API.
1.1 What is JDBC?
The JDBC API is a Java API that can access any kind of tabular data, especially the data stored in a relational database. The JDBC API defines interfaces and classes for writing the database applications in Java by making the database connections. Using JDBC one can send statements to almost any relational database. Thus, JDBC is a Java API for executing SQL statements and supports basic SQL functionality.
In short, JDBC is an API which provides communication between a Java application and the database in a database independent and platform independent manner.
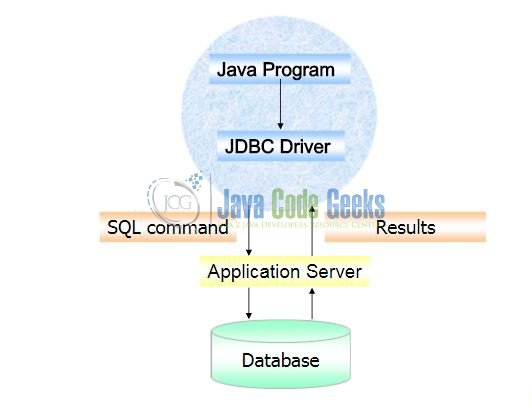
JDBC lets a developer manage the below three important programming activities, i.e.:
- Connection to a database.
- Sending queries and update statements to the database.
- Retrieving and processing the results received from the database in answer to the
SQLquery.
The following simple code fragment gives an example of these three steps,
Example.java
Connection connObj = DriverManager.getConnection("jdbc:myDriver:testDb", "myLoginId", "myPassword");

Statement stmtObj = connObj.createStatement();
ResultSet resObj = stmtObj.executeQuery("SELECT test_id, test_name, test_salary FROM testTable");
while (resObj.next()) {
	int id = resObj.getInt("test_id ");
	String name = resObj.getString("test_name ");
	float salary = resObj.getFloat("test_salary ");
}
1.2 What Is ODBC?
Before JDBC, ODBC API was used to communicate with the databases. ODBC API uses ODBC Drivers to interact with the databases. Since ODBC drivers are entirely written in C language, therefore, they are platform dependent and cause the portability issues.
That is why Java has defined its own JDBC API and uses the JDBC drivers (written entirely in the Java language) to interact with the databases.
1.3 What are JDBC Drivers?
A JDBC Driver is a software component that enables the Java application to interact with the database. The four different types of JDBC drivers are:
- Type 1: JDBC-ODBC Bridge Driver
- Type 2: JDBC-Native API Driver
- Type 3: Network Protocol Driver
- Type 4: Thin Driver
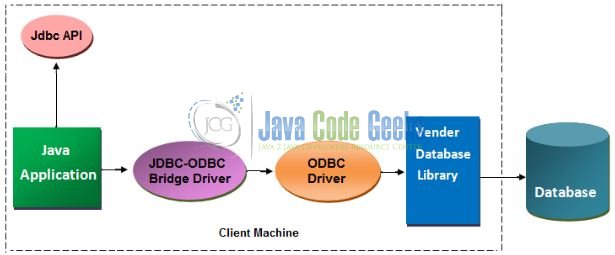
1.3.1 JDBC-ODBC Bridge Driver
The Type 1 driver translates all the JDBC calls into ODBC calls and sends them to the ODBC driver. Since ODBC is a generic API this driver is now discouraged because of Type 4 Thin Driver.
Advantages
- The JDBC-ODBC bridge allows access to almost any database since the database’s ODBC drivers are already available.
Disadvantages
- A performance issue is observed as the JDBC call goes through the bridge to the ODBC driver and then to the database. This applies even in the reverse process and thus making it as a slowest of all driver types.
- The ODBC driver needs to be installed on the client machine.
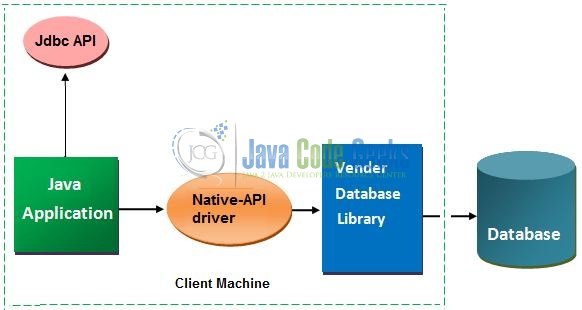
1.3.2 JDBC-Native API Driver
The Native API driver uses the client-side libraries of the database. The driver converts JDBC method calls into native calls of the database API i.e. database-specific calls. For e.g., Oracle will have Oracle Native API.
Advantages
- The distinctive characteristic of Type 2 JDBC drivers are that they typically offer better performance than the JDBC-ODBC Bridge as the layers of communication are less than that of Type 1.
- Type 2 uses the Native API which is database specific.
Disadvantages
- Native API must be installed on the client system and hence Type 2 drivers cannot be used for the internet.
- The Vendor client library also needs to be installed on the client machine.
- Usually, Type 3 drivers are not thread-safe.
- In the case of Type 3 drivers, if we change the database we have to change the Native API as it is specific to a particular database.
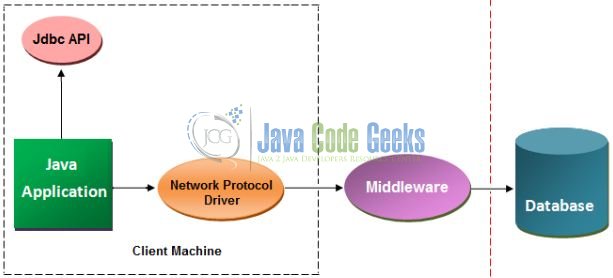
1.3.3 Network Protocol Driver
The Network Protocol driver uses the middleware (i.e. application or web server) that converts the JDBC calls directly or indirectly into a vendor-specific database protocol.
Advantages
- This driver is server-based, so there is no need for any vendor database library to be present on the client machines.
- This driver is fully written in Java and hence offers portability.
- The Type 3 driver typically provides support for features such as caching (connections, query results etc.), load balancing etc.
- This driver is very flexible and allows access to multiple databases using a single driver.
Disadvantages
- Network support is required on the client machines.
- Requires database-specific coding to be done in the middle tier.
- Maintenance of network protocol driver becomes costly as it requires database-specific coding to be done in the middle tier.
1.3.4 Thin Driver
The Thin Driver converts the JDBC calls directly into a vendor-specific database protocol.
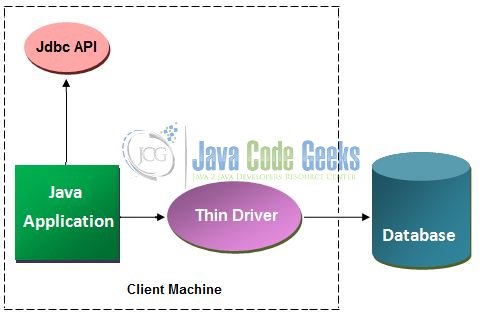
Advantages
- The major benefit of using a Type 4 JDBC driver is that they are completely written in Java to achieve platform independence and eliminate deployment administration issues.
- No special software is required either on the client or the server side. Further, these drivers can be downloaded dynamically.
- The number of translation layers is very less i.e. Type 4 JDBC drivers don’t have to translate database requests to ODBC or a native connectivity interface or to pass the request on to the another server.
Disadvantages
- With Type 4 drivers, the user needs a different driver for each database.
1.4 Download Oracle Database
This Oracle JDBC example requires Oracle Database XE (Express edition) which can be downloaded from the following link.
Accept the license agreement and download the version for the required platform.
1.5 Install Oracle Database
Once the download is complete, just unzip the file and run the setup.exe file. Follow the step-by-step installation guide from this link.
Now, open up the Eclipse IDE and let’s start building the application!
2. JDBC with Oracle Thin Driver Example
2.1 Tools Used
We are using Eclipse Kepler SR2, JDK 8, Oracle Database and Maven. Having said that, we have tested the code against JDK 1.7 and it works well.
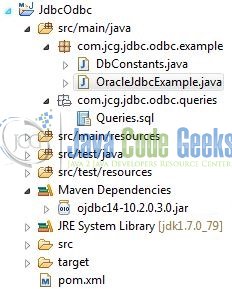
2.2 Project Structure
Firstly, let’s review the final project structure, in case you are confused about where you should create the corresponding files or folder later!
2.3 Project Creation
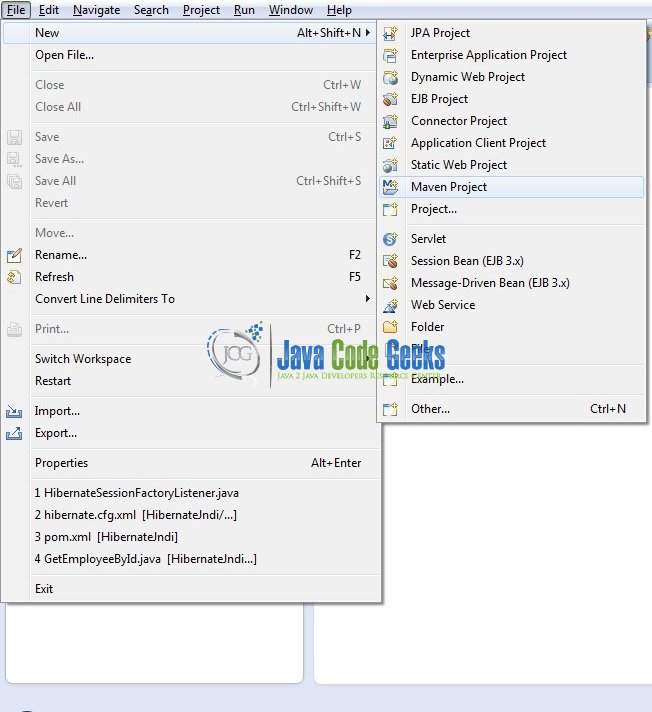
This section will demonstrate on how to create a Java Maven project with Eclipse. In Eclipse IDE, go to File -> New -> Maven Project.
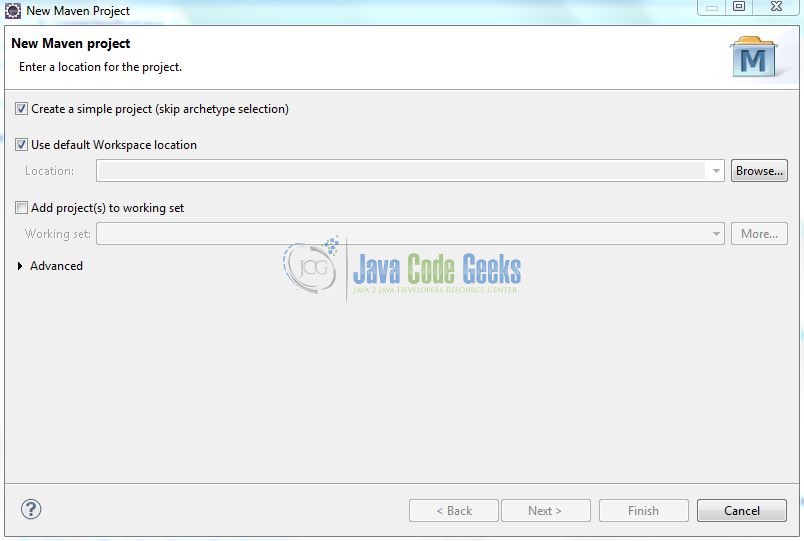
In the New Maven Project window, it will ask you to select a project location. By default, ‘Use default workspace location‘ will be selected. Select the ‘Create a simple project (skip archetype selection)‘ checkbox and just click on next button to proceed.
It will ask you to ‘Enter a group id for the artifact.’ We will input the details as shown in the below image. The version number will be by default 0.0.1-SNAPSHOT.
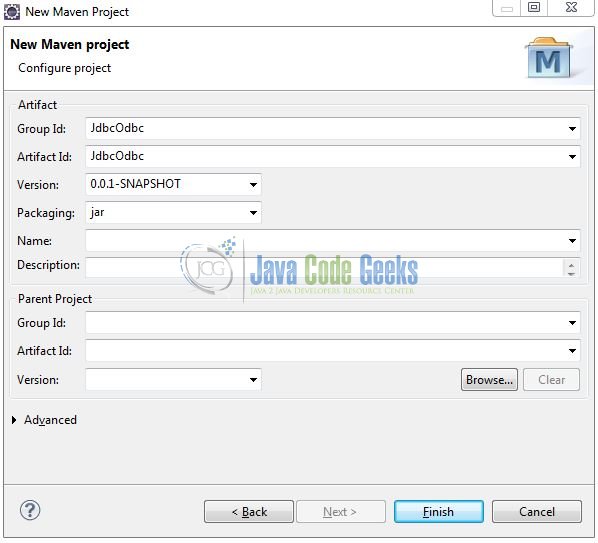
Click on Finish and the creation of a maven project will be completed. If you observe, it has downloaded the maven dependencies and a pom.xml file will be created. It will have the following code:
pom.xml
<project xmlns="http://maven.apache.org/POM/4.0.0" xmlns:xsi="http://www.w3.org/2001/XMLSchema-instance" xsi:schemaLocation="http://maven.apache.org/POM/4.0.0 http://maven.apache.org/xsd/maven-4.0.0.xsd">
	<modelVersion>4.0.0</modelVersion>
	<groupId>JdbcOdbc</groupId>
	<artifactId>JdbcOdbc</artifactId>
	<version>0.0.1-SNAPSHOT</version>
</project>
We can start adding the dependencies that developers want like Oracle etc. Let’s start building the application!
3. Application Building
Below are the steps involved in developing this application.
3.1 SQL Table Creation
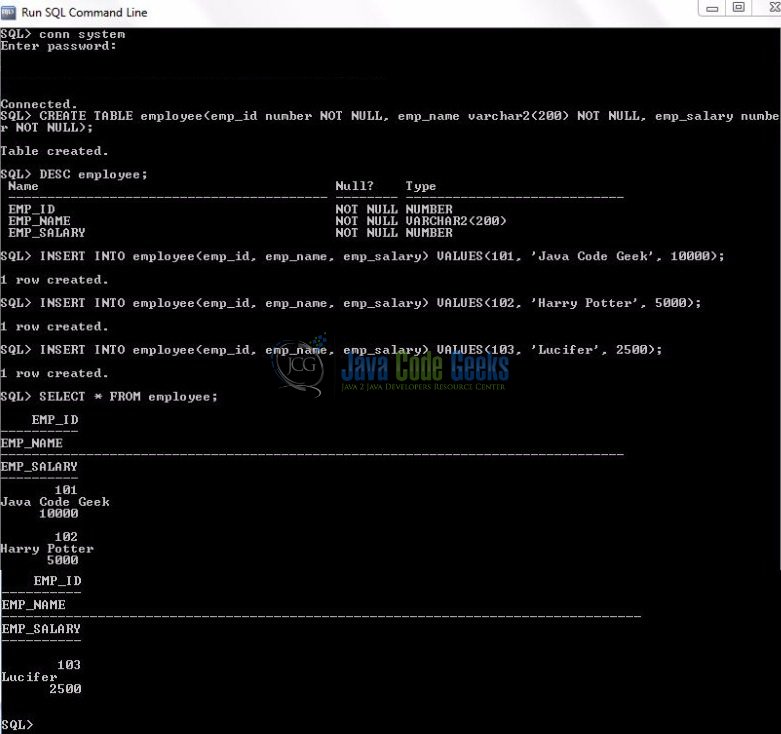
This tutorial uses a table called employee. The table is not included when you create the project in eclipse so you need to first create the table to follow this tutorial:
- Create the table
employeeas shown below:
CREATE TABLE employee(emp_id number NOT NULL, emp_name varchar2(200) NOT NULL, emp_salary number NOT NULL);
- Now we shall insert some values into the
employeetable as:
INSERT INTO employee(emp_id, emp_name, emp_salary) VALUES(101, 'Java Code Geek', 10000);

INSERT INTO employee(emp_id, emp_name, emp_salary) VALUES(102, 'Harry Potter', 5000);

INSERT INTO employee(emp_id, emp_name, emp_salary) VALUES(103, 'Lucifer', 2500);
If everything goes well, the table will be shown as below in the Oracle workbench:
3.2 Maven Dependencies
In this example, we are using latest ODBC version (i.e. ojdbc14-10.2.0.3.0) in order to make the database connectivity. The updated file will have the following code:
pom.xml
<project xmlns="http://maven.apache.org/POM/4.0.0" xmlns:xsi="http://www.w3.org/2001/XMLSchema-instance"
	xsi:schemaLocation="http://maven.apache.org/POM/4.0.0 http://maven.apache.org/xsd/maven-4.0.0.xsd">
	<modelVersion>4.0.0</modelVersion>
	<groupId>JdbcOdbc</groupId>
	<artifactId>JdbcOdbc</artifactId>
	<version>0.0.1-SNAPSHOT</version>
	<packaging>jar</packaging>
	<dependencies>
		<dependency>
			<groupId>com.oracle</groupId>
			<artifactId>ojdbc14</artifactId>
			<version>10.2.0.3.0</version>
		</dependency>
	</dependencies>
	<build>
		<finalName>${project.artifactId}</finalName>
	</build>
</project>
</project>
3.3 Java Class Creation
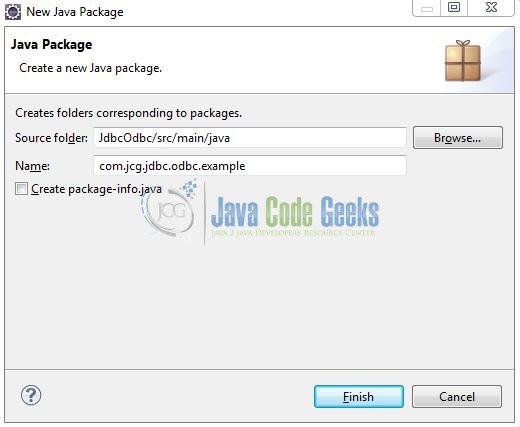
Let’s create the required Java files. Right click on src/main/java folder, New -> Package.
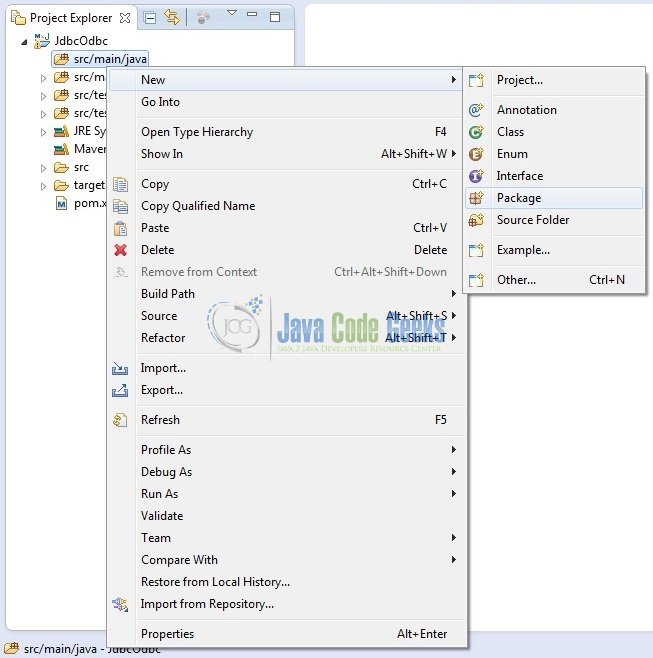
A new pop window will open where we will enter the package name as: com.jcg.jdbc.odbc.example.
Once the package is created, we will need to create the implementation class. Right click on the newly created package, New -> Class.
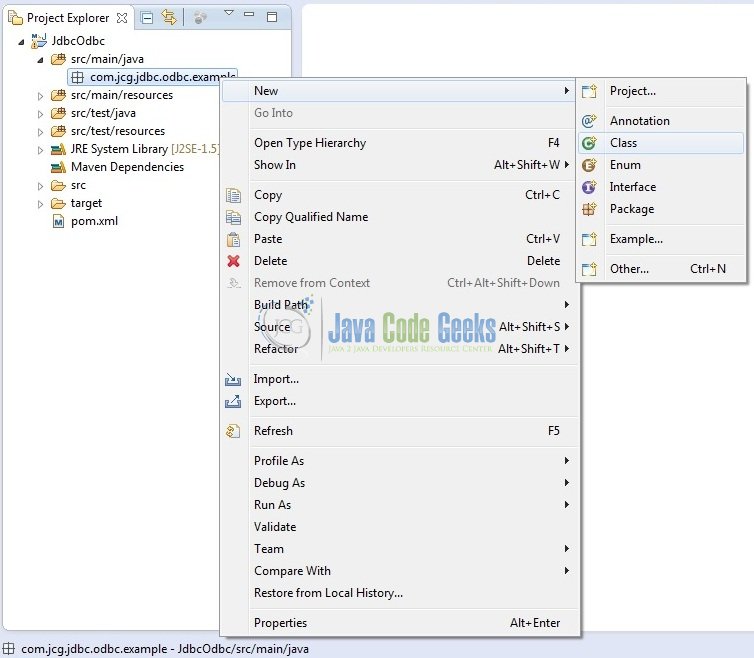
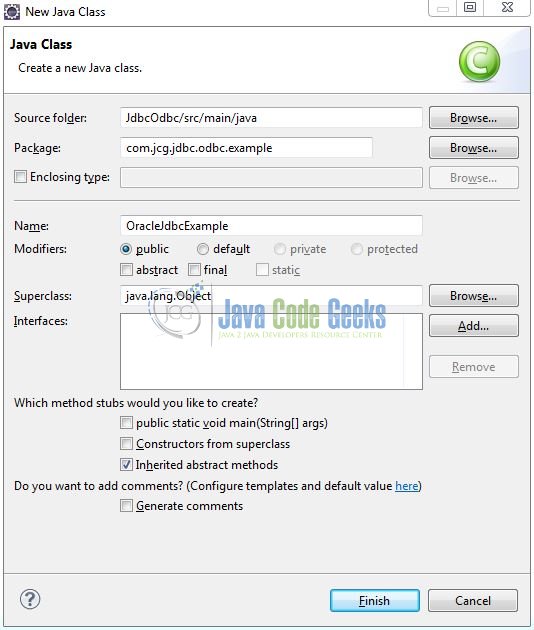
A new pop window will open and enter the file name as: OracleJdbcExample. The implementation class will be created inside the package: com.jcg.jdbc.odbc.example.
3.2.1 Implementation of Main Class
In this class, we will be establishing a connection to the database using JDBC API. We need to perform the following steps,
- Import the required interfaces or classes from the
java.sqlpackage. - Load the JDBC Oracle Driver class.
- Establish the connection by providing the JDBC Oracle Connection String URL.
Add the following code to it:
OracleJdbcExample.java
package com.jcg.jdbc.odbc.example;

import java.sql.Connection;
import java.sql.DriverManager;
import java.sql.ResultSet;
import java.sql.Statement;

public class OracleJdbcExample implements DbConstants {

	static Statement stmtObj;
	static Connection connObj;
	static ResultSet resultSetObj;

	public static void main(String[] args) {
		try {
			// Step 1 - Register Oracle JDBC Driver (Though This Is No Longer Required Since JDBC 4.0, But Added Here For Backward Compatibility!
			Class.forName("oracle.jdbc.driver.OracleDriver");

			// Step 2 - Creating Oracle Connection Object
			connObj = DriverManager.getConnection(DB_URL, DB_USERNAME, DB_PASSWORD);
			if(connObj != null) {
				System.out.println("!! Connected With Oracle Database !!\n");
			}

			// Step 3 - Creating Oracle Statement Object
			stmtObj = connObj.createStatement();

			// Step 4 - Execute SQL Query
			resultSetObj = stmtObj.executeQuery("SELECT * FROM employee");
			while(resultSetObj.next()) {
				System.out.println(resultSetObj.getInt(1) + ", " + resultSetObj.getString(2) + ", " + resultSetObj.getFloat(3) + "$");
			}
		} catch(Exception sqlException) {
			sqlException.printStackTrace();
		} finally {
			try {
				if(resultSetObj != null) {
					resultSetObj.close();
				}
				if(stmtObj != null) {
					stmtObj.close();
				}
				if(connObj != null) {
					connObj.close();
				}
			} catch(Exception sqlException) {
				sqlException.printStackTrace();
			}
		}
	}
}
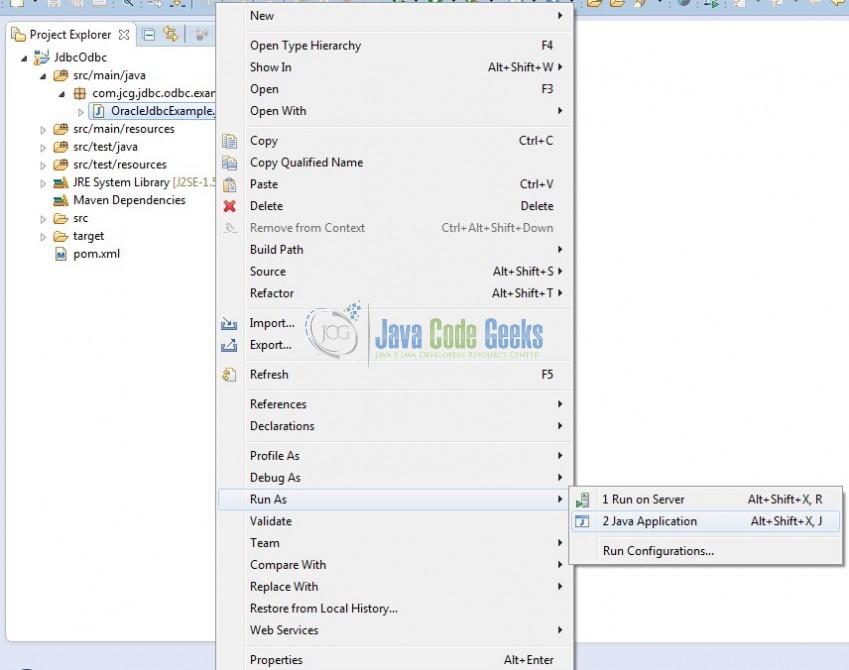
4. Run the Application
To run the application, Right click on the OracleJdbcExample class, Run As -> Java Application.
5. Project Demo
The code shows the following status as output:

That’s all for this post. Happy Learning!!
6. Conclusion
Here, in this example, we have seen how to connect to the Oracle database using JDBC Thin Driver. With Thin Driver, it is much easier to connect to the database as developers don’t need to create the data-sources like they used to do while using a JDBC ODBC Driver.
7. Download the Eclipse Project
This was an example of Java Application with Oracle database.
You can download the full source code of this example here: Jdbc Odbc

where is the DbConstants interface?
Murali, please download the project and it is present in the source folder.
The ojdbc driver doesnt load in maven anymore due to licensing issue. Please update your code, your code is outdated now.
The “2017” article intended to tell users about the communication between java and oracle driver. Regarding your point, please download the jar in your local repo and do the same process. It will work! ;-)