Most often, batch processing using Spring Batch is carried out in a single-threaded, single process operation. But sometimes, one may need to have other complex implementations to facilitate parallel processing. In this article, we will discuss one such approach that is by Partitioning a Step. It will be driven by an XML based example code. Tools used in the example are as follows:
- Eclipse Helios
- Maven 2.2.1
- Spring 4.0.5.RELEASE
- Spring Batch 3.0.4.RELEASE
- JDBC 4.0.5.RELEASE
- HSQL 1.8.0.7
- Apache Commons 1.4
The article has been organized into the following sections. Feel free to skip to any section of choice. The example code is available for download at the end of the article.
Table Of Contents
1. Introduction
Spring Batch is an open-source framework for batch processing. Most of the batch processing can be handled with single-threaded, single process jobs but sometimes, having the processing run in parallel becomes necessary; say when the processing takes a really long time. At a high level, Spring Batch supports two modes of parallel processing: single process, multi-threaded and multi-process. Following are the types into which it can be further categorized:
- Multi-threaded Step (Single Process)
- Parallel Steps (Single Process)
- Remote-Chunking of Step (multi-process)
- Partitioning a Step (single or multi-process)
As stated above, this article focuses on Single process Step Partitioning through an XML based example.
2. Spring Batch Core Concepts
Before we delve into the example code it is worthwhile to have a quick glance at the basic concepts involved.This will facilitate an easier understanding of the concepts at play in the example code.
2.1 Job
As the documentation reads, a Job is an entity that encapsulates the entire concept of batch processing. Think of it as a task like reading a bulk of database records, applying some business logic to them and writing the processed records to another database table or to a CSV file etc. A Job consists of one or more Steps. A Job can be wired-up using XML based configuration or Java based configuration. Technically, a Job is a simple interface. One of its simplest implementations floated by the framework is SimpleJob. When using the <job/> tags in the XML based configuration, the framework abstracts away the fact that using these tags implies creating an instance of SimpleJob. Following is an example snippet of wiring-up a Job. Note that it is mandatory to supply an ‘id’ and configure at least one Step in a Job. However, there are a few other optional attributes that maybe supplied like ‘restartable’ indicating whether the Job can be restarted, the attribute ‘next’ to order the Steps in the Job etc.
XML Job Configuration
<job id="myJob">
    <step id="step1" next="step2"/>
    <step id="step2" />
</job>
2.2 Step
As specified in the documentation, a Step is a domain object that represents an independent, sequential phase of a Job. One or more Steps constitute a Job. A Step is where the actual batch processing happens. It can be configured to do some complex processing like reading from a source, applying business logic to the read data and then writing out the data to some output say a file or a database table etc. Or one can simply invoke a remote procedure call or a stored procedure in a database in a Step. In this article, we will be focused on Partitioning a Step so that the batch processing happens in parallel. The following is an example snippet of configuring a Step. Notice that we have two Steps configured in this Job, one does a chunk-processing that uses a reader and a writer with a commit-interval of 10 implying that it would read and write data in chunks of 10 records. The second Step invokes a Tasklet that could be doing a simpler action of say, invoking a stored procedure etc.
XML Step Configuration
<job id="myJob" xmlns="http://www.springframework.org/schema/batch">
	<step id="processingStep" next="taskletStep">
	    <tasklet>
		<chunk reader="cvsFileItemReader" writer="myItemWriter" commit-interval="10">
		</chunk>
	     </tasklet>
        </step>
	<step id="taskletStep">
		<tasklet ref="myTasklet" />
	</step>
</job>
2.3 Parallel Processing
Most often single-threaded, single batch processing is good enough to serve one’s task at hand as reading and writing files of a few hundred megabytes generally takes just a couple of minutes even with standard hardware. But if one is looking for more, the following approaches for parallel processing in batch operations can be explored.
2.3.1 Multi-Threaded Step
It is a part of a single process but the execution happens in multiple threads. One of the easiest ways of achieving it is by supplying a multi-threaded task-executor as shown in the code snippet below.
Multi-Threaded Step
<step id="loadingData">
    <tasklet task-executor="taskExecutor" throttle-limit="20">...
    </tasklet>
</step>

<bean id="taskExecutor" class="org.springframework.core.task.SimpleAsyncTaskExecutor" />
SimpleAsyncTaskExecutor is the simplest multi-threaded implementation of the TaskExecutor interface. Using it implies that processing defined under the <tasklet/> tags of the Step for each chunk of data—reading, processing and writing, happens in different threads. Hence, the processed records may not be in the same sequential order as fed into it. There are following three things to take note of.
- There could be a throttle limit imposed on the task executor say, when it is backed by some thread pool. This limit defaults to 4 but can be configured differently.
- There might be concurrency limits on the resource used in the Step, say the DataSource used.
- And most of the readers and writers exposed by the framework are stateful; implying they need to keep some sort of a state info to keep track of which records have been read, processed etc. Hence they might need to be suitably modified to be workable under a multi-threaded environment
2.3.2 Parallel Steps
This is pretty easy to configure and use. It can be employed only when the processing logic can be split into distinct responsibilities and assigned to individual flows to be run in parallel in a single step. It is done using the ‘split’ element that contains one or more ‘flows’. The following shows an example snippet of configuring it.
Parallel Step
<job id="job1">
    <split id="split1" task-executor="taskExecutor" next="step4">
        <flow>
            <step id="step1" next="step2"/>
            <step id="step2" />
        </flow>
        <flow>
            <step id="step3"/>
        </flow>
    </split>
    <step id="step4"/>
</job>

<bean id="taskExecutor" class="org.spr...SimpleAsyncTaskExecutor"/>
Points to note are as follows:
- ‘split’ element holds ‘flows’ which execute in parallel
- Each ‘flow’ can hold one or more steps
- An asynchronous task executor is required to execute the flows in parallel
- The job ensures that every flow in the split completes before the exit statuses and transitioning are aggregated
2.3.3 Remote-Chunking a Step
This follows a master-slave model in which Step processing is split across multiple processes that communicate with each other through some middleware as illustrated in the diagram below.
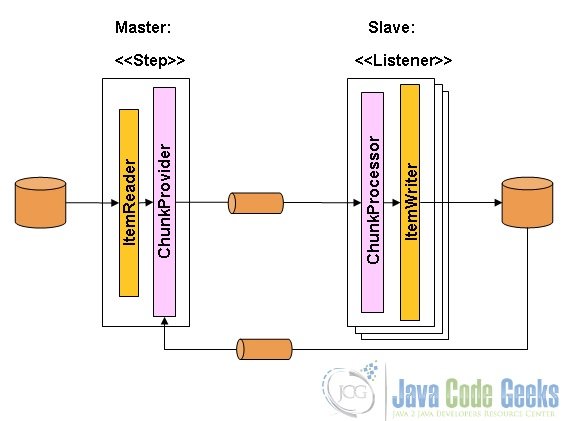
Points to note on this approach are as follows:
- The Master is just an implementation of a generic Step and its itemWriter is a generic version that sends chunks of messages to the middleware as messages
- The Slaves are standard listeners of the middleware that process the chunks of received messages using the standard ItemWriter or ItemProcessor and ItemWriter
- The middleware has to be durable, with guaranteed delivery of messages and support single consumer for each message; hence JMS is the common choice but other options also exist
2.3.4 Partitioning a Step
The beauty of Step Partitioning is that it allows a Step to be partitioned or split into a number of child steps which can then participate in the processing either as remote instances or as local execution threads. The child steps are all instances of the same Step and could replace the Master step without any difference in output. The following diagram nicely conveys the concept.
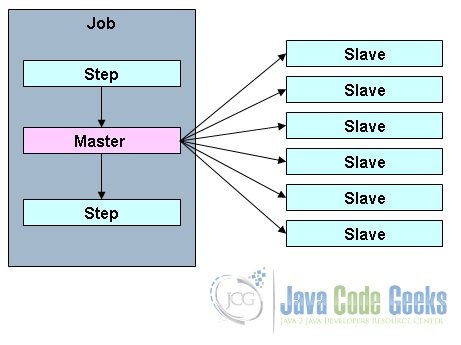
Following are a few points to note on Step partitioning.
- A Job can be constituted of any number of Steps and any of these Steps may be made a Master Step
- The Slave Steps are all identical instances of a Step
- The Slave Steps could be invoked as remote services or local threads
- Messages sent from the Master to the Slaves do not need to be durable or have guaranteed delivery as in the case of Remote Chunking as the Spring Batch meta-data in the JobRepository ensures that each Slave Step executes only once for each Job execution
- There are two interfaces for imposing the strategy for partitioning namely,
PartitionHandlerandStepExecutionSplitter. -
Another important concept to note is of the
Partitioner. It is an interface with a simple responsibility of generating execution contexts that are provided as input parameters to the new step executions. It has just one as method shown below. The parameter “gridSize” specifies the number of threads or the number of Slave Steps to be created. More on this in the following example code.Partitioner Interface
public interface Partitioner {
    Map partition(int gridSize);
}
3. Step Partitioning Example
Now that we are good with the basics, we can embark on the adventure of understanding Spring Batch Step Partitioning with the following XML based example code. Since the target is to grasp the concept, we will stress more on getting the concepts clarified rather than accomplishing something too challenging through Step Partitioning. In fact, in this example we intend to read some data in an in-memory database table, namely HSQL database and write the data to CSV files through Partitioned Steps. The roadmap is as follows.
- We will create a standard Maven project
- Use an HSQL database for persisting the batch meta-data
- Create a table in the HSQL database with a bunch of records fed into it
- Create some POJOs for mapping data etc
- Configure a Job with one Master Step and a couple of Slave Steps such that each Slave Step processes a chunk of the database table records and writes them to CSV files
- Which records would be handled by which of the Slave Steps will be based on the index or the values of an identifier column in the table.
So let’s begin. Have deliberately kept the example simple and added comments where it was thought would be necessary.
3.1 Project Set-Up
- Fire up Eclipse from a suitable location and choose the creation of a standard Maven project as shown in the screenshots below.
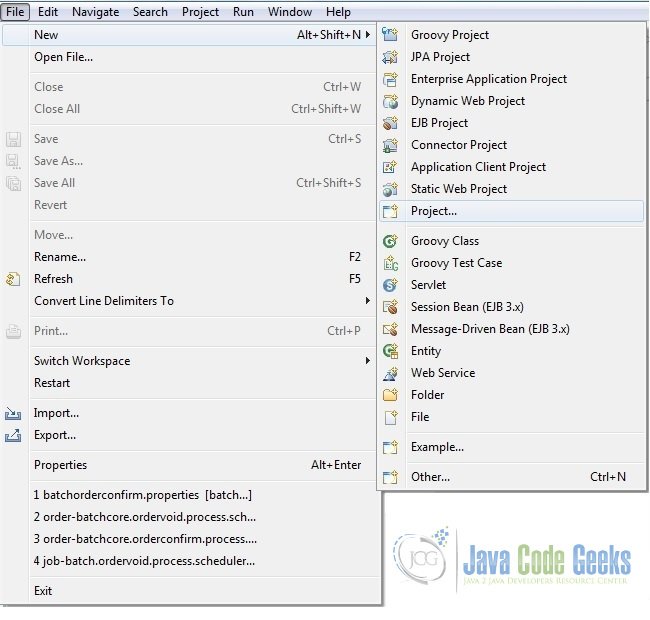
Fig.3 Create Project
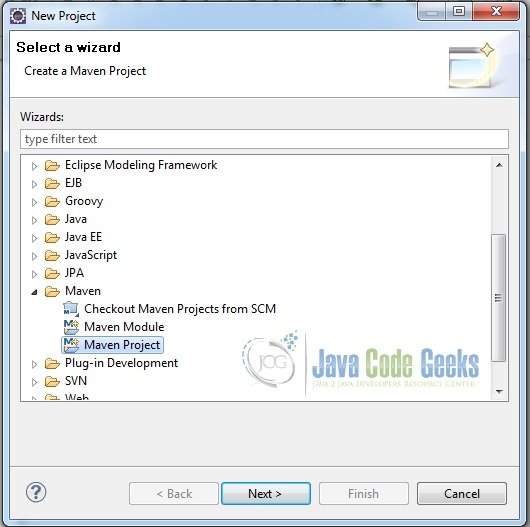
Fig.4 Choose the Creation of a Maven Project
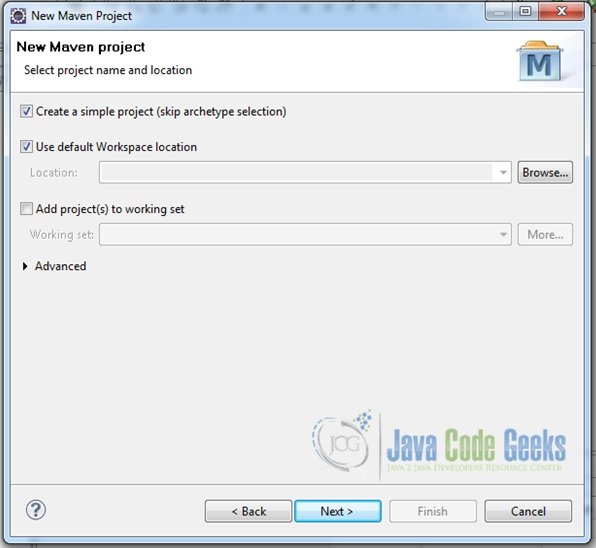
Fig.5 Choose Standard Maven Project (ignore archetype selection) - Provide an appropriate name to the project
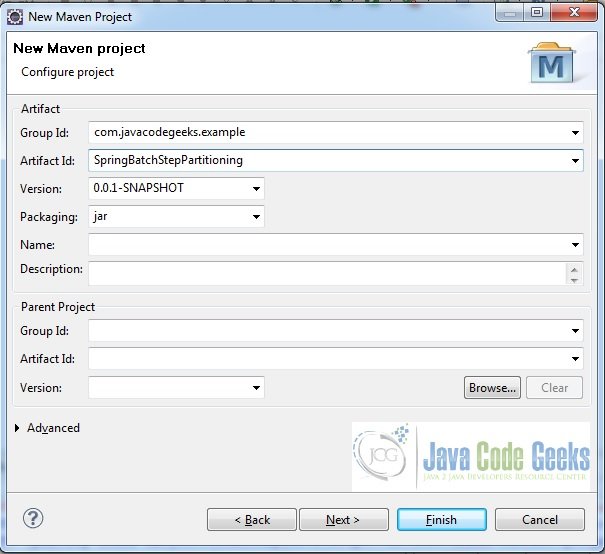
Fig.6 Provide Project name - Add some files and folders to the project to have the final project structure as shown here:
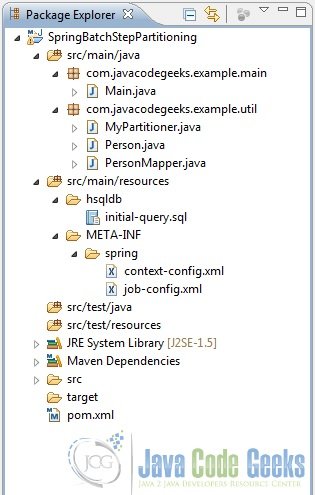
Fig.7 Final Project Structure


3.2 Maven Dependencies
In the pom.xml file add the following Maven dependencies.
pom.xml
<project xmlns="http://maven.apache.org/POM/4.0.0" xmlns:xsi="http://www.w3.org/2001/XMLSchema-instance" xsi:schemaLocation="http://maven.apache.org/POM/4.0.0 http://maven.apache.org/xsd/maven-4.0.0.xsd">
  <modelVersion>4.0.0</modelVersion>
  <groupId>com.javacodegeeks.example</groupId>
  <artifactId>SpringBatchStepPartitioning</artifactId>
  <version>0.0.1-SNAPSHOT</version>
  <properties>
  	<spring.version>4.0.5.RELEASE</spring.version>
  	<spring.batch.version>3.0.4.RELEASE</spring.batch.version>
  	<spring.jdbc.version>4.0.5.RELEASE</spring.jdbc.version>
  	<hsql.version>1.8.0.7</hsql.version>
  	<commons.version>1.4</commons.version>
  </properties>
  <dependencies>
  	 <dependency>
		<groupId>org.springframework</groupId>
		<artifactId>spring-context-support</artifactId>
		<version>${spring.version}</version>
    </dependency>
  	<dependency>
		<groupId>org.springframework.batch</groupId>
		<artifactId>spring-batch-core</artifactId>
		<version>${spring.batch.version}</version>
    </dependency>
    <dependency>
		<groupId>hsqldb</groupId>
		<artifactId>hsqldb</artifactId>
		<version>${hsql.version}</version>
	</dependency>
	<dependency>
		<groupId>org.springframework</groupId>
		<artifactId>spring-jdbc</artifactId>
		<version>${spring.jdbc.version}</version>
   </dependency>
     <dependency>
		<groupId>commons-dbcp</groupId>
		<artifactId>commons-dbcp</artifactId>
		<version>${commons.version}</version>
	</dependency>
  </dependencies>
</project>
3.3 HSQL Table Creation
In the initial-query.sql add the following code. This script will be invoked on the dataSource that is, HSQL database in our case while we configure the context. It simply drops and creates a table PERSON and inserts a chunk of records into it. These records would then be read in the Partitioned Steps. We are inserting about 20 records which we intend to be handled in say, 4 or 5 Slave Steps. Note how we are using an auto-incremented column “id” to be used for indexing. This would be used to decide which of the records would be handled by which Slave Step. Of course, one could have employed any other approach for splitting up the data say, using separate CSV files etc.
initial-query.sql
DROP TABLE IF EXISTS PERSON;

CREATE TABLE PERSON(
id INTEGER GENERATED BY DEFAULT AS IDENTITY (START WITH 1, INCREMENT BY 1) PRIMARY KEY,
firstName varchar(20),
lastName varchar(20),
city varchar(30)
);

INSERT INTO PERSON(firstName, lastName, city) VALUES('Allan','Mohammed','Bangalore');
INSERT INTO PERSON(firstName, lastName, city) VALUES('Ashok','Lee','Bangalore');
INSERT INTO PERSON(firstName, lastName, city) VALUES('Raju','Diesel','Delhi');
INSERT INTO PERSON(firstName, lastName, city) VALUES('Ramesh','Chan','NYC');
INSERT INTO PERSON(firstName, lastName, city) VALUES('Howard','Das','California');
INSERT INTO PERSON(firstName, lastName, city) VALUES('Daniel','Gupta','Delhi');
INSERT INTO PERSON(firstName, lastName, city) VALUES('Alexander','Speilberg','New Jersey');
INSERT INTO PERSON(firstName, lastName, city) VALUES('Danny','Rowling','California');
INSERT INTO PERSON(firstName, lastName, city) VALUES('Elizabeth','Lee','Kolkatta');
INSERT INTO PERSON(firstName, lastName, city) VALUES('Thomas','Ali','Delhi');
INSERT INTO PERSON(firstName, lastName, city) VALUES('Billy','Owens','Los Angeles');
INSERT INTO PERSON(firstName, lastName, city) VALUES('Joe','Bush','Atlanta');
INSERT INTO PERSON(firstName, lastName, city) VALUES('John','Chand','San Francisco');
INSERT INTO PERSON(firstName, lastName, city) VALUES('Sultan','Mohammed','NYC');
INSERT INTO PERSON(firstName, lastName, city) VALUES('Harper','Khan','Hyderabad');
INSERT INTO PERSON(firstName, lastName, city) VALUES('Charlie','Chan','Bangalore');
INSERT INTO PERSON(firstName, lastName, city) VALUES('Jake','Beans','Delhi');
INSERT INTO PERSON(firstName, lastName, city) VALUES('Artemis','Harper','Nabraska');
INSERT INTO PERSON(firstName, lastName, city) VALUES('Judith','Reddy','New Jersey');
INSERT INTO PERSON(firstName, lastName, city) VALUES('Elvin','Saring','NYC');
3.4 POJOs
Add the following POJO classes (refer project structure above). These are just meant to map the data to the database table.
Person.java
package com.javacodegeeks.example.util;

public class Person {
   String firstName, lastName, city;
   int id;

public String getFirstName() {
	return firstName;
}

public void setFirstName(String firstName) {
	this.firstName = firstName;
}

public String getLastName() {
	return lastName;
}

public void setLastName(String lastName) {
	this.lastName = lastName;
}

public String getCity() {
	return city;
}

public void setCity(String city) {
	this.city = city;
}

public int getId() {
	return id;
}

public void setId(int id) {
	this.id = id;
 }
}
PersonMapper.java
package com.javacodegeeks.example.util;

import java.sql.ResultSet;
import java.sql.SQLException;

import org.springframework.jdbc.core.RowMapper;

public class PersonMapper implements RowMapper{

	public Person mapRow(ResultSet rs, int rowNum) throws SQLException {
		Person person = new Person();
		person.setFirstName(rs.getString("firstName"));
		person.setLastName(rs.getString("lastName"));
		person.setCity(rs.getString("city"));
		person.setId(rs.getInt("id"));
		return person;
	}
}
3.5 Partitioner Implementation
Now we will write a simple implementation of the Partitioner interface. We want to generate ExecutionContexts for the Slave Steps. There are following things of note here.
- The number of Slave Steps created is determined by the value of the parameter ‘gridSize’ which will be supplied from the XML configuration.
- In our implementation, each Slave Step intends to read/write the database table records with ‘ids’ in groups of 5 (specified by the value of range). That is, Slave Step 1 would read/write records with ‘ids’ 1 to 5, Slave Step 2 would read/write records with ids 6 to 10 etc.
- ExecutionContext is a Map. Whatever entities- be it integers or strings etc that are to be made available in the context must be put in it. We are putting the two integer values denoted by the variables– startingIndex and endingIndex
MyPartitioner.java
package com.javacodegeeks.example.util;

import java.util.HashMap;
import java.util.Map;

import org.apache.commons.logging.Log;
import org.apache.commons.logging.LogFactory;
import org.springframework.batch.core.partition.support.Partitioner;
import org.springframework.batch.item.ExecutionContext;

public class MyPartitioner implements Partitioner{

	static private Log log = LogFactory.getLog(MyPartitioner.class);

	public Map partition(int gridSize) {
		log.debug("START: Partition");
		Map partitionMap = new HashMap();
		int startingIndex = 0;
		int endingIndex = 5;

		for(int i=0; i< gridSize; i++){
			ExecutionContext ctxMap = new ExecutionContext();
			ctxMap.putInt("startingIndex",startingIndex);
			ctxMap.putInt("endingIndex", endingIndex);

			startingIndex = endingIndex+1;
			endingIndex += 5;

			partitionMap.put("Thread:-"+i, ctxMap);
		}
		log.debug("END: Created Partitions of size: "+ partitionMap.size());
		return partitionMap;
	}
}
3.6 Context Configuration
Okay, we are closing in now. In the context-config.xml file add the following code. Here we are setting up the jobRepository,jobLauncher ,transactionManager, dataSource and invoking some scripts that create the batch meta-data tables and also our initial-query.sql written above.
context-config.xml
<beans xmlns="http://www.springframework.org/schema/beans"
	xmlns:xsi="http://www.w3.org/2001/XMLSchema-instance"
	xmlns:jdbc="http://www.springframework.org/schema/jdbc"
	xsi:schemaLocation="
		http://www.springframework.org/schema/beans
		http://www.springframework.org/schema/beans/spring-beans-3.2.xsd
		http://www.springframework.org/schema/jdbc
	    http://www.springframework.org/schema/jdbc/spring-jdbc.xsd">

	<!-- using in-memory store for batch meta-data -->
	<bean id="jobRepository"
		class="org.springframework.batch.core.repository.support.MapJobRepositoryFactoryBean">
		<property name="transactionManager" ref="transactionManager" />
	</bean>

	<bean id="transactionManager"
		class="org.springframework.batch.support.transaction.ResourcelessTransactionManager" />

	<bean id="jobLauncher"
		class="org.springframework.batch.core.launch.support.SimpleJobLauncher">
		<property name="jobRepository" ref="jobRepository" />
	</bean>

	<bean id="dataSource" class="org.apache.commons.dbcp.BasicDataSource"
		lazy-init="true" destroy-method="close">
		<property name="driverClassName" value="org.hsqldb.jdbcDriver" />
		<property name="url"
			value="jdbc:hsqldb:file:src/main/resources/hsqldb/batchcore.db;shutdown=true;" />
		<property name="username" value="sa" />
		<property name="password" value="" />

	</bean>

	<!-- Create meta-tables. Here we are also invoking the initial-query.sql script -->
	<jdbc:initialize-database data-source="dataSource">
	    <jdbc:script location="classpath:hsqldb/initial-query.sql" />
		<jdbc:script location="org/springframework/batch/core/schema-drop-hsqldb.sql" />
		<jdbc:script location="org/springframework/batch/core/schema-hsqldb.sql" />
    </jdbc:initialize-database>

</beans>
3.7 Job Configuration
Next we are going to configure our Job. As outlined above it is a Job with one Master Step and 4 Slave Steps as denoted by the ‘gridSize’ attribute. We will be using the MyPartitioner.java that we wrote and the framework provided SimpleAsyncTaskExecutor. For reading the data from the table JDBCPagingItemReader and for writing the output to CSV files FlatFileItemWriter will be used. It is pretty self-explanatory. But still would like to highlight the following.
- The ‘gridSize’ specifies the number of Slave Steps to be created
- Since each Slave Step would individually invoke the reader and the writer their scopes must be set to ‘step’. That is, say,
<bean id="pagingItemReader" class="...JdbcPagingItemReader" scope="step">
- The values for the variable startingIndex and endingIndex that are read here is possible because these variables were put in the ExecutionContext in our
MyPartitioner.javaclass.
job-config.xml
<?xml version="1.0" encoding="UTF-8"?>
<beans xmlns="http://www.springframework.org/schema/beans"
	xmlns:batch="http://www.springframework.org/schema/batch" xmlns:util="http://www.springframework.org/schema/util"
	xmlns:xsi="http://www.w3.org/2001/XMLSchema-instance"
	xsi:schemaLocation="http://www.springframework.org/schema/batch
		http://www.springframework.org/schema/batch/spring-batch-2.2.xsd
		http://www.springframework.org/schema/beans
		http://www.springframework.org/schema/beans/spring-beans-3.2.xsd
		http://www.springframework.org/schema/util
		http://www.springframework.org/schema/util/spring-util-3.2.xsd
		">

    <!-- Configuring a Job with one master step and 4 (denoted by grid-size) slave threads -->
	<job id="myJob" xmlns="http://www.springframework.org/schema/batch">
		<step id="master.Step">
			<partition step="slave.Step" partitioner="myPartitioner">
				<handler grid-size="4" task-executor="myTaskExecutor"/>
			</partition>
		</step>
	</job>

	<step id="slave.Step" xmlns="http://www.springframework.org/schema/batch">
		<tasklet>
			<chunk reader="pagingItemReader" writer="flatFileItemWriter" commit-interval="1" />
		</tasklet>
	</step>

	<bean id="myTaskExecutor" class="org.springframework.core.task.SimpleAsyncTaskExecutor"/>

	<bean id="myPartitioner" class="com.javacodegeeks.example.util.MyPartitioner" />

	<bean id="pagingItemReader" class="org.springframework.batch.item.database.JdbcPagingItemReader" scope="step">
		<property name="dataSource" ref="dataSource" />
		<property name="queryProvider">
			<bean class="org.springframework.batch.item.database.support.SqlPagingQueryProviderFactoryBean">
				<property name="dataSource" ref="dataSource"/>
				<property name="selectClause" value="select firstName, lastName, city, id "/>
				<property name="fromClause" value="from PERSON" />
				<property name="whereClause" value="where id >= :startingIndex and id <= :endingIndex" />
				<property name="sortKey" value="id"/>
			</bean>
		</property>
		<property name="parameterValues">
			<map>
				<entry key="startingIndex" value="#{stepExecutionContext[startingIndex]}"/>
				<entry key="endingIndex" value="#{stepExecutionContext[endingIndex]}" />
			</map>
		</property>
		<property name="pageSize" value="5"/>
		<property name="rowMapper">
			<bean class="com.javacodegeeks.example.util.PersonMapper"/>
		</property>
	</bean>

	<bean id="flatFileItemWriter" class="org.springframework.batch.item.file.FlatFileItemWriter" scope="step">
		<property name="resource" value="file:csv/output/person.data#{stepExecutionContext[startingIndex]}-#{stepExecutionContext[endingIndex]}.csv"/>
		<property name="appendAllowed" value="false"/>
		<property name="lineAggregator">
			<bean class="org.springframework.batch.item.file.transform.DelimitedLineAggregator">
				<property name="delimiter" value=","/>
				<property name="fieldExtractor">
					<bean class="org.springframework.batch.item.file.transform.BeanWrapperFieldExtractor">
						<property name="names" value="firstName, lastName, city" />
					</bean>
				</property>
			</bean>
		</property>
	</bean>

</beans>
3.8 Application Set-Up
Now that we are done with the set-up, let’s write our Main method that simply picks up the Job and launches it.
Main.java
package com.javacodegeeks.example.main;

import org.springframework.batch.core.Job;
import org.springframework.batch.core.JobExecution;
import org.springframework.batch.core.JobParameters;
import org.springframework.batch.core.launch.JobLauncher;
import org.springframework.context.ApplicationContext;
import org.springframework.context.support.ClassPathXmlApplicationContext;

public class Main {

	public static void main(String[] args) {
		String[] str = {"META-INF/spring/context-config.xml","META-INF/spring/job-config.xml"};
		ApplicationContext ctx = new ClassPathXmlApplicationContext(str);
		Job job = (Job) ctx.getBean("myJob");
		JobLauncher jobLauncher = (JobLauncher) ctx.getBean("jobLauncher");
		try{
			JobExecution execution = jobLauncher.run(job, new JobParameters());
			System.out.println("Execution Status: "+ execution.getStatus());
		}catch(Exception e){
			e.printStackTrace();
		}
	}
}
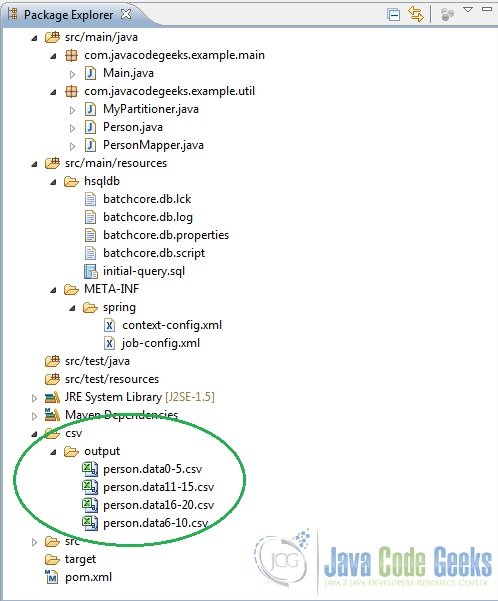
3.9 Output
Okay, so if everything has been followed along fine so far one should be able to run it as a Java Application upon which it should display the following output. Also, upon refreshing the project in the Eclipse workspace one should see the CSV files written into it.
Console Output
Aug 5, 2015 12:23:19 PM org.springframework.jdbc.datasource.init.ScriptUtils executeSqlScript
INFO: Executing SQL script from class path resource [hsqldb/initial-query.sql]
Aug 5, 2015 12:23:19 PM org.springframework.jdbc.datasource.init.ScriptUtils executeSqlScript
INFO: Executed SQL script from class path resource [hsqldb/initial-query.sql] in 23 ms.
Aug 5, 2015 12:23:19 PM org.springframework.jdbc.datasource.init.ScriptUtils executeSqlScript
INFO: Executing SQL script from class path resource [org/springframework/batch/core/schema-drop-hsqldb.sql]
Aug 5, 2015 12:23:19 PM org.springframework.jdbc.datasource.init.ScriptUtils executeSqlScript
INFO: Executed SQL script from class path resource [org/springframework/batch/core/schema-drop-hsqldb.sql] in 3 ms.
Aug 5, 2015 12:23:19 PM org.springframework.jdbc.datasource.init.ScriptUtils executeSqlScript
INFO: Executing SQL script from class path resource [org/springframework/batch/core/schema-hsqldb.sql]
Aug 5, 2015 12:23:19 PM org.springframework.jdbc.datasource.init.ScriptUtils executeSqlScript
INFO: Executed SQL script from class path resource [org/springframework/batch/core/schema-hsqldb.sql] in 6 ms.
Aug 5, 2015 12:23:19 PM org.springframework.batch.core.launch.support.SimpleJobLauncher run
INFO: Job: [FlowJob: [name=myJob]] launched with the following parameters: [{}]
Aug 5, 2015 12:23:19 PM org.springframework.batch.core.job.SimpleStepHandler handleStep
INFO: Executing step: [master.Step]
Execution Status: COMPLETED
Aug 5, 2015 12:23:20 PM org.springframework.batch.core.launch.support.SimpleJobLauncher run
INFO: Job: [FlowJob: [name=myJob]] completed with the following parameters: [{}] and the following status: [COMPLETED]
CSV Files AS Output
4. Conclusion
This brings us to the end of the example. Hope it was an interesting read. As promised, the full example code is available for download below.
You can download the full source code of this example here: SpringBatchStepPartitioning
