M2_REPO classpath variable to Eclipse IDE configuration example
In this tutorial, we will show you a couple ways, in order to add the M2_REPO classpath variable in the Eclipse IDE. This variable is not defined by default and it must point to Maven’s Local Repository.
In this example, we use the following tools on a Windows 7 platform:
- Apache Maven 3.1.1
- Eclipse Kepler Service Release 1
- JDK 1.7
Apache Maven is able to transform a Java project in such a way to be supported by the Eclipse IDE, by executing the command:
mvn eclipse:eclipse
While executing the aforementioned command, Maven creates the entire dependency classpath of the project, using the M2_REPO variable.
1. Add the M2_REPO classpath variable through Eclipse IDE
We will add the M2_REPO variable to Eclipse‘s classpath variables, by undergoing the following steps:
- Inside the Eclipse IDE, we click on Windows > Preferences.
- In the left panel, we click on Java > Build path > Classpath Variables.
- In the right panel, we click on
New:button and we fill these values:
Name:M2_REPO
Path:C:\Users\Username\.m2\repository\ - We click on the
OKbutton.
2. Add the M2_REPO classpath variable through Terminal or Command Line
We can define the M2_REPO variable using the terminal (Linux or Mac) or the command prompt (Windows), by executing the command:
mvn -Declipse.workspace="Eclipse workspace" eclipse:configure-workspace
A sample output of the command’s execution is shown below:
3. Verify the installation
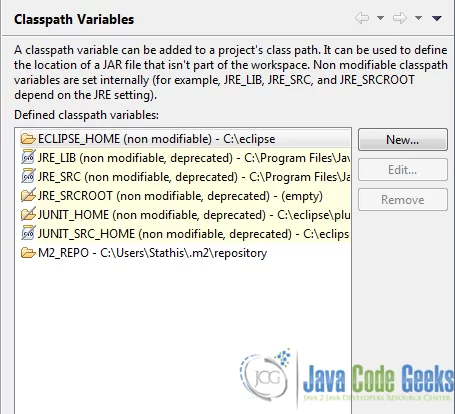
If either of the proposed methods has been completed successfully, our newly created variable will be placed among the other variables, as shown below:

The M2_REPO classpath variable shall be defined once and then, will be shared among all Eclipse workspaces.
This was a tutorial on how to define the M2_REPO environment variable in Windows 7.


