Lwjgl Tutorial
LWJGL, which stands for Lightweight Java Game Library, it’s a library wrapper that allows us the use of OpenGL and OpenAL from Java. In this tutorial we are going to download the library, configure it on eclipse and create a window and setup a bare bones game loop to draw a basic shape with some animation.
LWJGL is the library used in very popular Java games like Minecraft, Spiral Knights, Project Zomboid, Starsector and go on, because LWJGL is a low level library used in other popular high level libraries like LibGDX and Slick2D. At the moment LWJGL is on version 3 with lots of cool improvements and now using GLFW, a low level OpenGl window and input library.
1. The tools
- Java JDK 8
- Latest Eclipse Mars
- LWJGL 3
2. Introduction
The minimum LWJGL application is an application that checks if your system have OpenGL available and opens a window with some drawing, most modern computers have support for OpenGL on the integrated cards, but for backwards compatibility I am going to stick this example to the OpenGL 1.1 implementation because some cards only have support for that version of the library, as a wrapper LWJGL relies on native libraries and allow us to use Java to make graphics applications with great performance.
LWJGL is open source under BSD license that allows you make commercial games without strings attached, low level bindings with uncompromised performance in the excellent Java ecosystem make it a great library to make the next top game of the year, also with a great community and extensive documentation.
3. Prerequisites
- JDK installed
- Eclipse Mars installed and working
4. Download LWJGL
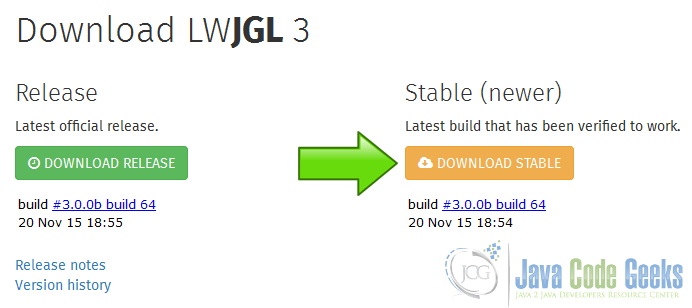
Go to Download LWJGL and get the stable version of the library:
You got a zip file with the jar, the documentation, the sources and the native libraries, uncompress it on a place where you can find it easy and start eclipse for the next step.
5. Configure eclipse
5.1 Create project
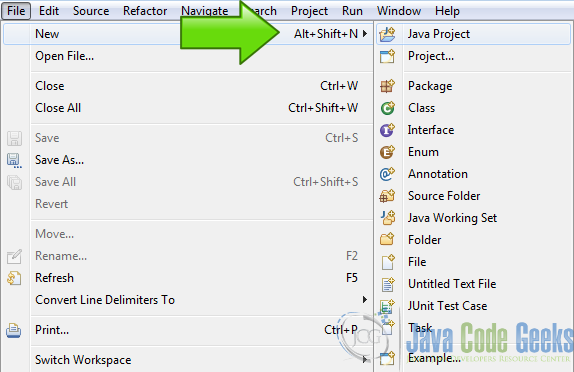
Create a new standard Java project.
5.2 Name
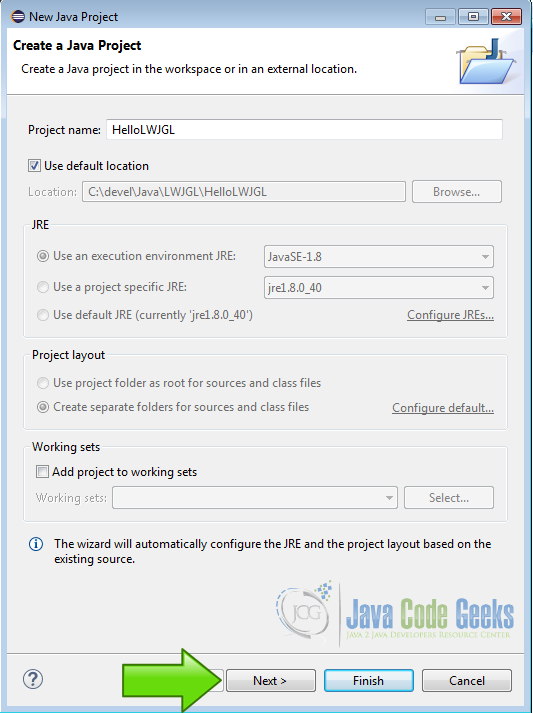
Write the name of the project and hit next.
5.3 External JARs
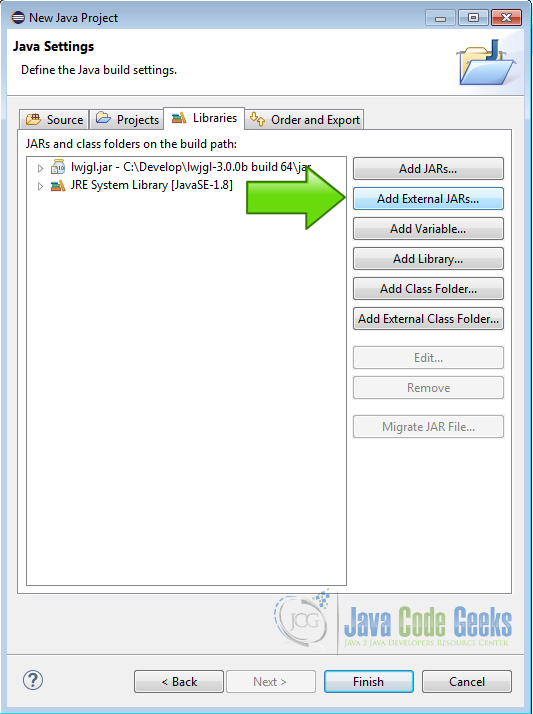
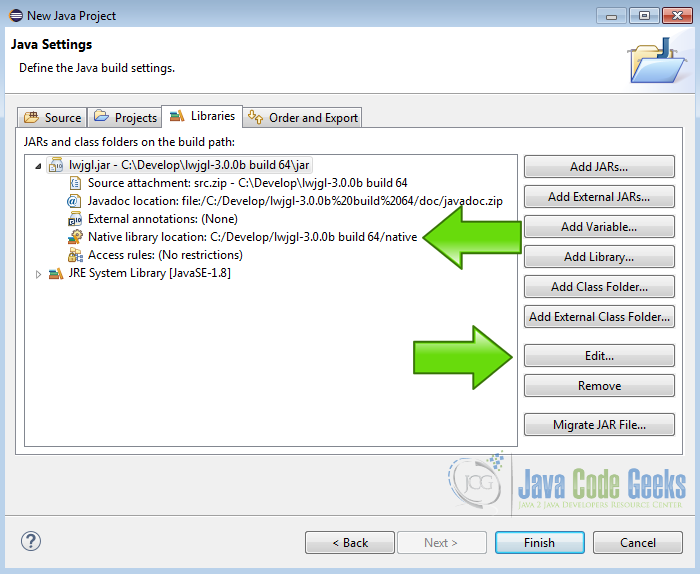
Now in the Libraries tab push [Add External JARs…].
Locate the lwjgl.jar inside the jar directory into the folder you create earlier and open it.
5.4 Configure the library
Add the documentation, the source and most important add the native library location to your eclipse library because whitout the native library the project won’t run, just open lwjgl.jar tree and select each item and hit edit then locate te proper path in each case.
5.5 Finish configuration
Now hit finish and we are ready to begin coding.
6. Create a package and a java class
By convention we create a Java package named example and a class HelloLWJGL. Now we have:
HelloLWJGL.java
package example;

public class HelloLWJGL
{

}
7. Coding the example
7.1 the variables
Variables
    private GLFWErrorCallback errorCallback;
    private GLFWKeyCallback   keyCallback;

    private long window;

    private float sp = 0.0f;
    private boolean swapcolor = false;
GLFWErrorCallback and GLFWKeyCallback are used by GLFWE that is our window manager. window is a handler of the window of our application used by GLFWE to manage the lifetime of the window. private float sp = 0.0f; and private boolean swapcolor = false; are variables used to control our animation.
7.2 Init method
in our Init method we try to create the application window, set the properties of the window and show the window.
Init method
    private void init() {
        glfwSetErrorCallback(errorCallback = GLFWErrorCallback.createPrint(System.err));

        if ( glfwInit() != GLFW_TRUE )
            throw new IllegalStateException("Unable to initialize GLFW");

        glfwDefaultWindowHints();
        glfwWindowHint(GLFW_VISIBLE, GLFW_FALSE);
        glfwWindowHint(GLFW_RESIZABLE, GLFW_FALSE);

        int WIDTH = 300;
        int HEIGHT = 300;

        window = glfwCreateWindow(WIDTH, HEIGHT, "Hello LWJGL3", NULL, NULL);
        if ( window == NULL )
            throw new RuntimeException("Failed to create the GLFW window");

        glfwSetKeyCallback(window, keyCallback = new GLFWKeyCallback() {
            @Override
            public void invoke(long window, int key, int scancode, int action, int mods) {
                if ( key == GLFW_KEY_ESCAPE && action == GLFW_RELEASE )
                    glfwSetWindowShouldClose(window, GLFW_TRUE);
            }
        });

        GLFWVidMode vidmode = glfwGetVideoMode(glfwGetPrimaryMonitor());
        glfwSetWindowPos(
            window,
            (vidmode.width() - WIDTH) / 2,
            (vidmode.height() - HEIGHT) / 2
        );

        glfwMakeContextCurrent(window);
        glfwSwapInterval(1);
        glfwShowWindow(window);
    }
Set GLFW error callback
glfwSetErrorCallback(errorCallback = GLFWErrorCallback.createPrint(System.err));
Set a callback function as a handler used by GLFW to handle errors.
Init GLFW
        if ( glfwInit() != GLFW_TRUE )
            throw new IllegalStateException("Unable to initialize GLFW");
Try to initialize the window system and throw an error otherwise.
Window hints
        glfwDefaultWindowHints();
        glfwWindowHint(GLFW_VISIBLE, GLFW_FALSE);
        glfwWindowHint(GLFW_RESIZABLE, GLFW_FALSE);
setup the main window behavior, make it non resizable and hidden at the moment.
Create window
        int WIDTH = 300;
        int HEIGHT = 300;

        window = glfwCreateWindow(WIDTH, HEIGHT, "Hello LWJGL3", NULL, NULL);
        if ( window == NULL )
            throw new RuntimeException("Failed to create the GLFW window");
declare two variables to define the window dimensions next we try to create te window and throw an error if GLFW cannot create it.
Init input
        glfwSetKeyCallback(window, keyCallback = new GLFWKeyCallback() {
            @Override
            public void invoke(long window, int key, int scancode, int action, int mods) {
                if ( key == GLFW_KEY_ESCAPE && action == GLFW_RELEASE )
                    glfwSetWindowShouldClose(window, GLFW_TRUE);
            }
        });
GLFW handles the input of our application so we instruct it to handle all inputs and manage if our application can be closeable.
Detect video mode
        GLFWVidMode vidmode = glfwGetVideoMode(glfwGetPrimaryMonitor());
        glfwSetWindowPos(
            window,
            (vidmode.width() - WIDTH) / 2,
            (vidmode.height() - HEIGHT) / 2
        );
GLFW detects the video mode of our graphics system next knowing that we center the window on the screen.
GLFW aditional configuration
        glfwMakeContextCurrent(window);
        glfwSwapInterval(1);
        glfwShowWindow(window);
at last we set the drawing context to the window we created, ths swap interval and show the window that was hidden, the context is where the application is going to draw and the interval is how many back buffers are created before the application refresh the front buffer.
7.3 Update and Render
The Update method is used to calculate the next steep of the animation.
Update
    private void update()
    {
    	sp = sp+0.001f;
    	if(sp > 1.0f)
    	{
    		sp = 0.0f;
    		swapcolor = !swapcolor;
    	}
    }
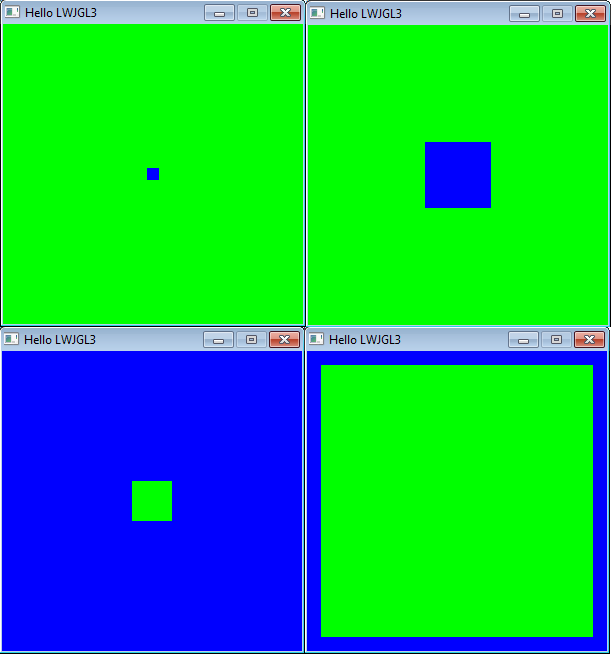
The application draws a square and make it bigger until it fills the screen, in sp we store the size of that square, and swapcolor tells the application what color is used to draw the square.
Render
    private void render()
    {
    	drawQuad();
    }
Render calls the drawQuad() function, maybe you can put the code here but to make things clear I made a separate function, the render code is where you draw all your stuff and can be very complicated when the application grows.
drawQuad
    private void drawQuad()
    {
		if(!swapcolor)
		{
	    	glColor3f(0.0f, 1.0f, 0.0f);
		}
		else
		{
	    	glColor3f(0.0f, 0.0f, 1.0f);
		}
		glBegin(GL_QUADS);
		{
			glVertex3f(-sp, -sp, 0.0f);
			glVertex3f(sp, -sp, 0.0f);
			glVertex3f(sp, sp, 0.0f);
			glVertex3f(-sp, sp, 0.0f);
		}
		glBegin(GL_QUADS);
    }
We use the variables updated before to draw our shapes, here we only draw a simple shape but you can draw a lot of stuff, points, triangles, lines, textures and whatever OpenGL allows you to draw and the limit of this is the videocard memory. We set the color to draw and the drawing procedure use that color in this case we set the color with glColor3f(R, G, B); with floats and RGB, RGB is a computer standard red, green, blue in other worlds the amount of each color that we use to get the color we want.
Inside the glBegin(GL_QUADS);/glBegin(GL_QUADS); block we are instructing OpenGL that the drawing operation is a quad and OpenGL expects you define the four vertexes that conforms that quad and thats we do with the glVertex3f(x, y, z);, it defines a vertex in the 3D space, in our case we only use x,y because the example only draw a square but with OpenGL you can draw in 3D, load models and do lot of nice things to make your game.
7.4 Main loop
The main loop is the classic way of make animations and games:
Loop Method
	private void loop() {
		GL.createCapabilities();
		System.out.println("----------------------------");
		System.out.println("OpenGL Version : " + glGetString(GL_VERSION));
		System.out.println("OpenGL Max Texture Size : " + glGetInteger(GL_MAX_TEXTURE_SIZE));
		System.out.println("OpenGL Vendor : " + glGetString(GL_VENDOR));
		System.out.println("OpenGL Renderer : " + glGetString(GL_RENDERER));
		System.out.println("OpenGL Extensions supported by your card : ");
		String extensions = glGetString(GL_EXTENSIONS);
		String[] extArr = extensions.split("\\ ");
		for (int i = 0; i < extArr.length; i++) {
			System.out.println(extArr[i]);
		}
		System.out.println("----------------------------");

		while (glfwWindowShouldClose(window) == GLFW_FALSE) {
			if (!swapcolor) {
				glClearColor(0.0f, 0.0f, 1.0f, 0.0f);
			} else {
				glClearColor(0.0f, 1.0f, 0.0f, 0.0f);
			}

			glClear(GL_COLOR_BUFFER_BIT | GL_DEPTH_BUFFER_BIT);
			update();
			render();
			glfwSwapBuffers(window);

			glfwPollEvents();
		}
	}
The loop method initialize our main loop and keep it running until we close our application. GL.createCapabilities(); is very important because is a function thats allow the interoperability between the GLFW and the LWJGL system. glGetString is used to get information that OpenGL get from the system when is initialized and here we get some usefull information for our purpose and send it to the console.
while (glfwWindowShouldClose(window) == GLFW_FALSE) when the application is not closed we keep doing our stuff. Then we define our clear color that is the color that we use to erase the window and we proceed to clear the window with glClear(GL_COLOR_BUFFER_BIT | GL_DEPTH_BUFFER_BIT); and the performs the update and the render. At last get the back buffer and send it to the screen with glfwSwapBuffers(window); to finally do glfwPollEvents(); to capture the input events of our application.
The use of two buffers to make a computer animation is a common technique to avoid the flick of the screen and is wide used in games, you can use more buffers but is more common to have two buffers, is the most used technique.
7.5 The Run method
The method called from the Main java method
Run Method
    public void run() {
        System.out.println("Hello LWJGL3 " + Version.getVersion() + "!");

        try {
            init();
            loop();
            glfwDestroyWindow(window);
            keyCallback.release();
        } finally {
            glfwTerminate();
            errorCallback.release();
        }
    }
Here we handle the main stages of our application, first init then loop and at last the exit conditions by normal exit or by an error.
7.6 The Main Method
The init method of a classic Java application:
Main Method
    public static void main(String[] args) {
        new HelloLWJGL3().run();
    }
8. The complete source code
HelloLWJGL.java
package example;

import static org.lwjgl.glfw.GLFW.GLFW_FALSE;
import static org.lwjgl.glfw.GLFW.GLFW_KEY_ESCAPE;
import static org.lwjgl.glfw.GLFW.GLFW_RELEASE;
import static org.lwjgl.glfw.GLFW.GLFW_RESIZABLE;
import static org.lwjgl.glfw.GLFW.GLFW_TRUE;
import static org.lwjgl.glfw.GLFW.GLFW_VISIBLE;
import static org.lwjgl.glfw.GLFW.glfwCreateWindow;
import static org.lwjgl.glfw.GLFW.glfwDefaultWindowHints;
import static org.lwjgl.glfw.GLFW.glfwDestroyWindow;
import static org.lwjgl.glfw.GLFW.glfwGetPrimaryMonitor;
import static org.lwjgl.glfw.GLFW.glfwGetVideoMode;
import static org.lwjgl.glfw.GLFW.glfwInit;
import static org.lwjgl.glfw.GLFW.glfwMakeContextCurrent;
import static org.lwjgl.glfw.GLFW.glfwPollEvents;
import static org.lwjgl.glfw.GLFW.glfwSetErrorCallback;
import static org.lwjgl.glfw.GLFW.glfwSetKeyCallback;
import static org.lwjgl.glfw.GLFW.glfwSetWindowPos;
import static org.lwjgl.glfw.GLFW.glfwSetWindowShouldClose;
import static org.lwjgl.glfw.GLFW.glfwShowWindow;
import static org.lwjgl.glfw.GLFW.glfwSwapBuffers;
import static org.lwjgl.glfw.GLFW.glfwSwapInterval;
import static org.lwjgl.glfw.GLFW.glfwTerminate;
import static org.lwjgl.glfw.GLFW.glfwWindowHint;
import static org.lwjgl.glfw.GLFW.glfwWindowShouldClose;
import static org.lwjgl.opengl.GL11.GL_COLOR_BUFFER_BIT;
import static org.lwjgl.opengl.GL11.GL_DEPTH_BUFFER_BIT;
import static org.lwjgl.opengl.GL11.GL_EXTENSIONS;
import static org.lwjgl.opengl.GL11.GL_MAX_TEXTURE_SIZE;
import static org.lwjgl.opengl.GL11.GL_QUADS;
import static org.lwjgl.opengl.GL11.GL_RENDERER;
import static org.lwjgl.opengl.GL11.GL_VENDOR;
import static org.lwjgl.opengl.GL11.GL_VERSION;
import static org.lwjgl.opengl.GL11.glBegin;
import static org.lwjgl.opengl.GL11.glClear;
import static org.lwjgl.opengl.GL11.glClearColor;
import static org.lwjgl.opengl.GL11.glColor3f;
import static org.lwjgl.opengl.GL11.glEnd;
import static org.lwjgl.opengl.GL11.glGetInteger;
import static org.lwjgl.opengl.GL11.glGetString;
import static org.lwjgl.opengl.GL11.glVertex3f;
import static org.lwjgl.system.MemoryUtil.NULL;

import org.lwjgl.Version;
import org.lwjgl.glfw.GLFWErrorCallback;
import org.lwjgl.glfw.GLFWKeyCallback;
import org.lwjgl.glfw.GLFWVidMode;
import org.lwjgl.opengl.GL;

public class HelloLWJGL {

	private GLFWErrorCallback errorCallback;
	private GLFWKeyCallback keyCallback;

	private long window;

	private float sp = 0.0f;
	private boolean swapcolor = false;

	private void init() {
		glfwSetErrorCallback(errorCallback = GLFWErrorCallback.createPrint(System.err));

		if (glfwInit() != GLFW_TRUE)
			throw new IllegalStateException("Unable to initialize GLFW");

		glfwDefaultWindowHints();
		glfwWindowHint(GLFW_VISIBLE, GLFW_FALSE);
		glfwWindowHint(GLFW_RESIZABLE, GLFW_FALSE);

		int WIDTH = 300;
		int HEIGHT = 300;

		window = glfwCreateWindow(WIDTH, HEIGHT, "Hello LWJGL3", NULL, NULL);
		if (window == NULL)
			throw new RuntimeException("Failed to create the GLFW window");

		glfwSetKeyCallback(window, keyCallback = new GLFWKeyCallback() {
			@Override
			public void invoke(long window, int key, int scancode, int action, int mods) {
				if (key == GLFW_KEY_ESCAPE && action == GLFW_RELEASE)
					glfwSetWindowShouldClose(window, GLFW_TRUE);
				}
		});

		GLFWVidMode vidmode = glfwGetVideoMode(glfwGetPrimaryMonitor());
		glfwSetWindowPos(window, (vidmode.width() - WIDTH) / 2, (vidmode.height() - HEIGHT) / 2);

		glfwMakeContextCurrent(window);
		glfwSwapInterval(1);

		glfwShowWindow(window);
	}

	private void update() {
		sp = sp + 0.001f;
		if (sp > 1.0f) {
			sp = 0.0f;
			swapcolor = !swapcolor;
		}
	}

	private void render() {
		drawQuad();
	}

	private void drawQuad() {
		if (!swapcolor) {
			glColor3f(0.0f, 1.0f, 0.0f);
		} else {
			glColor3f(0.0f, 0.0f, 1.0f);
		}

		glBegin(GL_QUADS);
		{

			glVertex3f(-sp, -sp, 0.0f);
			glVertex3f(sp, -sp, 0.0f);
			glVertex3f(sp, sp, 0.0f);
			glVertex3f(-sp, sp, 0.0f);
		}
		glEnd();

	}

	private void loop() {
		GL.createCapabilities();
		System.out.println("----------------------------");
		System.out.println("OpenGL Version : " + glGetString(GL_VERSION));
		System.out.println("OpenGL Max Texture Size : " + glGetInteger(GL_MAX_TEXTURE_SIZE));
		System.out.println("OpenGL Vendor : " + glGetString(GL_VENDOR));
		System.out.println("OpenGL Renderer : " + glGetString(GL_RENDERER));
		System.out.println("OpenGL Extensions supported by your card : ");
		String extensions = glGetString(GL_EXTENSIONS);
		String[] extArr = extensions.split("\\ ");
		for (int i = 0; i < extArr.length; i++) {
			System.out.println(extArr[i]);
		}
		System.out.println("----------------------------");

		while (glfwWindowShouldClose(window) == GLFW_FALSE) {
			if (!swapcolor) {
				glClearColor(0.0f, 0.0f, 1.0f, 0.0f);
			} else {
				glClearColor(0.0f, 1.0f, 0.0f, 0.0f);
			}

			glClear(GL_COLOR_BUFFER_BIT | GL_DEPTH_BUFFER_BIT);
			update();
			render();
			glfwSwapBuffers(window);

			glfwPollEvents();
		}
	}
    public void run() {
        System.out.println("Hello LWJGL3 " + Version.getVersion() + "!");

        try {
            init();
            loop();
            glfwDestroyWindow(window);
            keyCallback.release();
        } finally {
            glfwTerminate();
            errorCallback.release();
        }
    }

    public static void main(String[] args) {
        new HelloLWJGL().run();
    }

}
9. Running the example
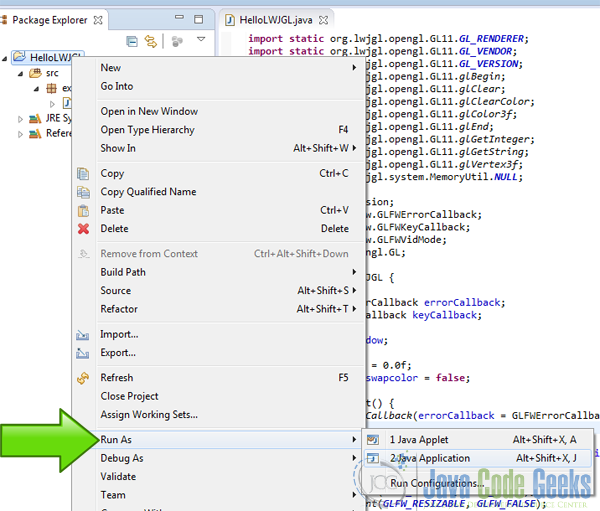
Right click in the project folder and “Run as” -> “Java Application”
10. Results
Example screens
these screens are at varios stages of the animation.
Console Output
Hello LWJGL3 3.0.0b SNAPSHOT!
----------------------------
OpenGL Version : 1.4.0 - Build 8.14.10.1930
OpenGL Max Texture Size : 2048
OpenGL Vendor : Intel
OpenGL Renderer : Intel Bear Lake B
OpenGL Extensions supported by your card :
GL_EXT_blend_minmax
GL_EXT_blend_subtract
GL_EXT_blend_color
GL_EXT_abgr
GL_EXT_texture3D
GL_EXT_clip_volume_hint
GL_EXT_compiled_vertex_array
GL_EXT_cull_vertex
GL_SGIS_texture_edge_clamp
GL_SGIS_generate_mipmap
GL_EXT_draw_range_elements
GL_SGIS_texture_lod
GL_EXT_rescale_normal
GL_EXT_packed_pixels
GL_EXT_separate_specular_color
GL_ARB_multitexture
GL_EXT_texture_env_combine
GL_EXT_bgra
GL_EXT_blend_func_separate
GL_EXT_secondary_color
GL_EXT_fog_coord
GL_EXT_texture_env_add
GL_ARB_texture_cube_map
GL_ARB_transpose_matrix
GL_ARB_texture_env_add
GL_IBM_texture_mirrored_repeat
GL_EXT_multi_draw_arrays
GL_NV_blend_square
GL_ARB_texture_compression
GL_3DFX_texture_compression_FXT1
GL_EXT_texture_filter_anisotropic
GL_ARB_texture_border_clamp
GL_ARB_point_parameters
GL_ARB_texture_env_combine
GL_ARB_texture_env_dot3
GL_ARB_texture_env_crossbar
GL_EXT_texture_compression_s3tc
GL_ARB_shadow
GL_ARB_window_pos
GL_EXT_shadow_funcs
GL_EXT_stencil_wrap
GL_ARB_vertex_program
GL_ARB_fragment_program
GL_EXT_stencil_two_side
GL_ARB_vertex_buffer_object
GL_EXT_texture_lod_bias
GL_NV_texgen_reflection
GL_ARB_depth_texture
GL_WIN_swap_hint
----------------------------
as you can see my computer only supports OpenGL 1.4 also you have the list of all extensions supported in my machine.
11. Download the source code
This was a Tutorial about Lightweight Java Game Library.
You can download the Eclipse project here: LWJGL Tutorial




Your example works. Used Netbeans 8.2. Thank you. I
Awesome!!!! Thanks……..