JUnit Test Void Method Example
In this example, we shall show you to test void methods. In JUnit Test Void Method example we will learn how we can test the void methods using the JUnit. In our previous tutorials, we have learned a lot about the JUnit and its various techniques about testing. But in our previous tutorials we haven’t seen how we can test void methods.
You can read about JUnit in Testing with JUnit book.
In this example, we will see how we can cover examples of some of the scenarios where we need to test the void methods. We will be using Maven as our build and dependency tool for this example.
1. Introduction
JUnit testing framework will help you test all your methods. It is a major tool in the arsenal of Java developers. We can test all type of methods irrespective of the method returning any value or not.
In our previous tutorials, we have seen many ways to test the methods those returning the value. In this example we will test those methods that don’t return any value.
If your method has no side effects, and doesn’t return anything, then it’s not doing anything.
Above line is from JUnit docs and tells everything about the methods.
2. Technologies Used
We will be using the following technologies in our example.
- Java 1.8: Language to write our example. We will be using the latest Java version i.e. 1.8
- JUnit 4.12: testing framework for unit testing.
- Maven: build and dependency tool. It will be used to fetch the JUnit jar from maven repository.
- Eclipse: IDE for writing code. You can use any IDE of your choice as it supports Maven integration
3. Project Setup
Let’s begin with creating our example.
You may skip project creation and jump directly to the beginning of the example below.
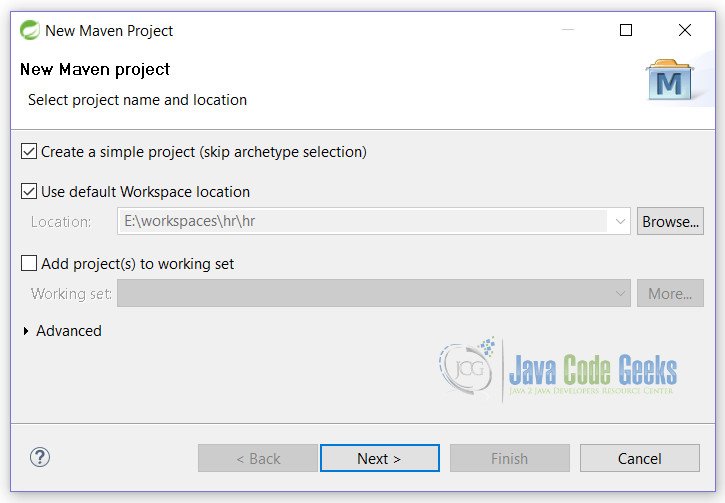
Open eclipse. Click File -> New -> Maven Project.See below screen for modifications and click on Next button.

On next screen fill in all the details as shown below and click on the Finish button.

With this, we are ready with the blank Maven project. At this point, our example is an empty Maven project with a blank skeleton. Let’s start with our example from here. We need to write some initial steps before start coding.
4. JUnit Test Void Method Example
First of all we need to create the following lines in pom.xml file. These lines will fetch the JUnit dependency.
It also tells Maven to use Java 1.8 for compiling our code.
pom.xml
    <dependencies>
        <dependency>
            <groupId>junit</groupId>
            <artifactId>junit</artifactId>
            <version>4.12</version>
        </dependency>
    </dependencies>

    <properties>
        <maven.compiler.source>1.8</maven.compiler.source>
        <maven.compiler.target>1.8</maven.compiler.target>
    </properties>
4.1 Java Classes
Now start by writing a java class that will prepare the core for our example. We will create a simple class which will be used later in this example for testing.
MyList.java
package junittestvoidmethod;

import java.util.ArrayList;
import java.util.List;
import java.util.NoSuchElementException;

public class MyList {

    private List lstFruits = new ArrayList<>();

    public void add(String fruit) {
        lstFruits.add(fruit);
    }

    public void remove(String fruit) {
        if (!lstFruits.contains(fruit)) {
            throw new NoSuchElementException();
        }
        lstFruits.remove(fruit);
    }

    public int size() {
        return lstFruits.size();
    }

    public void removeAll() {
        lstFruits.clear();
    }
}
As you see in this class we have some void methods that need to be tested. This is a simple example explaining the behavior of the void methods. In this example, we are imitating the behavior of List interface for adding and removing of an element.
We will simply create a List and then add and remove from that, but with help of our class.
At line no 17, we are also throwing the NoSuchElementException(). We will also see how we can test this exception in our example. We have covered it here as it is thrown by the void method.
4.2 JUnit Test Class
Now, we will create a test class that will help and test our MyList class above. We will cover each test case in details. First of all lets see how our class will look like.
MyListTest.java
package junittestvoidmethod;

import static org.junit.Assert.assertEquals;

import java.util.NoSuchElementException;

import org.junit.After;
import org.junit.Before;
import org.junit.Test;

public class MyListTest {

    private MyList lstTest = new MyList();

    @Before
    public void init() {
        lstTest.add("Apple");
        lstTest.add("Orange");
        lstTest.add("Grapes");
    }

    @Test
    public void testSize() {
        assertEquals("Checking size of List", 3, lstTest.size());
    }

    @Test
    public void testAdd() {
        lstTest.add("Banana");
        assertEquals("Adding 1 more fruit to list", 4, lstTest.size());
    }

    @Test
    public void testRemove() {
        lstTest.remove("Orange");
        assertEquals("Removing 1 fruit from list", 2, lstTest.size());
    }

    @Test(expected = NoSuchElementException.class)
    public void testRemoveException() {
        lstTest.remove("Kiwi");
        assertEquals("Removing 1 fruit from list", 2, lstTest.size());
    }

    @After
    public void destroy() {
        lstTest.removeAll();
    }
}
4.3 Code Explained
Let’s examine each method in details and how we are testing it.
- init() is used to initialize the
Listof our class. We are adding some default elements, in our case fruits. - testSize() is used to check size of the list.
- testAdd() is a
voidmethod. We are simply adding the new element to the existing list. This method is not returning any value. So the point is how we can test it? And the answer to this question is simple as that.
We simply check the size of the list. If it is increased by one (as we added one element) then we can easily check the size.
We have used theassertEqualshere(see line no 30) - testRemove() is used to check the removal of an element from list. in this case, the size of the list should be decreased. Same way as in
testAdd(), here also we are usingassertEqualsfor testing. - testRemoveException() is used to test the exception thrown by the method. See how we have captured the exception. In this method we are removing an element which is not present in the list. In such case this method will thrown an exception. If we do not catch that exception, the test case will fail eventually.
So to make our test case pass we have to catch it using the@Test(expected = NoSuchElementException.class). It is a very clean way of catching exception and testing it. - destroy() is used to remove all elements that we have added to our collection. It is to be noted that
@Beforeand@Afterwill run before and after every test case.
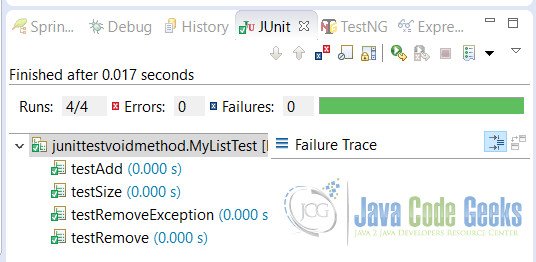
Output
We can analyze the output of our example in the JUnit tab of eclipse.

5. Conclusion
In this example, we have learned that how we can JUnit Test Void Method. We have also learned that how to catch the exception if it is thrown by a void method. Actually testing mechanism is same for all methods, but void methods are special as we don’t have any returning value to be matched for testing.
But as we have previously said that the method may not be returning anything but it may be altering the behaviour of our program somewhere. So we simply test that case and then it is easy to implement it.
6. Download the Eclipse Project
This is a JUnit Test Void Method example.
You can download the full source code of this example here: JUnitTestVoidMethod.zip


This solution is not generic for all void methods.
Exactly this is not at all generic void testing. Rather than checking void test this post is checking list size that is irrelevant in current topic context
I think that the content in this article is useful for explaining how JUnit handles state change between tests, but it would be better if it addressed the significance of testing void. I know there really isn’t any, but it is what the article says it will address.
This is not at all a generic example and please make another example which will be more useful.