JUnit Keyboard Input Example
In this post we shall show users the usage of JUnit keyboard input working. This example is very useful in case users want to enter data from keyboard for testing of their methods. Do not worry, we will the same in the post.
Users are advised to see the JUnit Hello World example where they can see the basic usage of JUnit. In addition, if users want to run their test cases in the order of their choice, they are recommended to visit JUnit FixMethodOrder example.
First of all, let’s start with the small introduction of JUnit.
1. JUnit Introduction
JUnit is a testing framework for Java programmers. This is the testing framework where users can unit test their methods for working. Almost all Java programmers used this framework for basic testing. Basic example of the JUnit can be seen in JUnit Hello World example.
2. Tools Required
Users have to have a basic understanding of the Java. These are the tools that are used in this example.
- Eclipse (users can use any tool of their choice. We are using STS, which is built on the top of the Eclipse)
- Java
- Maven (optional, users can also use this example without Maven, but we recommend to use it)
- JUnit 4.12 (this is the latest version we are using for this example)
3. Project Setup
You may skip project creation and jump directly to the beginning of the example below.
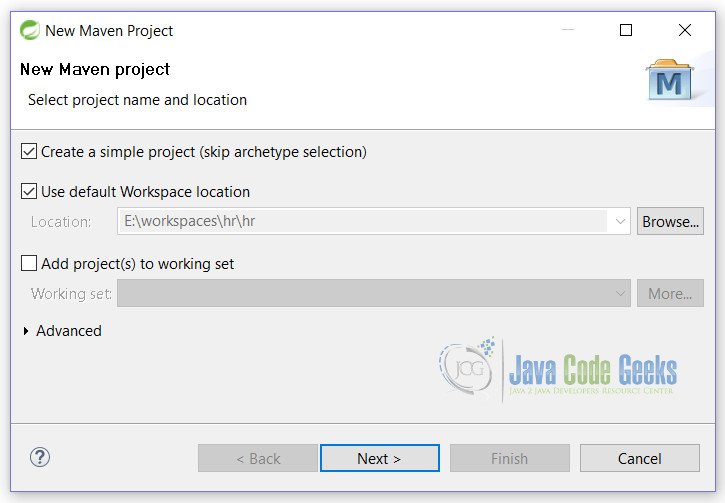
In this post we are using the Maven for initial setup of our application. Let’s start with the creating of the Maven project. Open eclipse, File -> New -> Maven Project
On the following screen, fill in the details as shown and click on Next button.

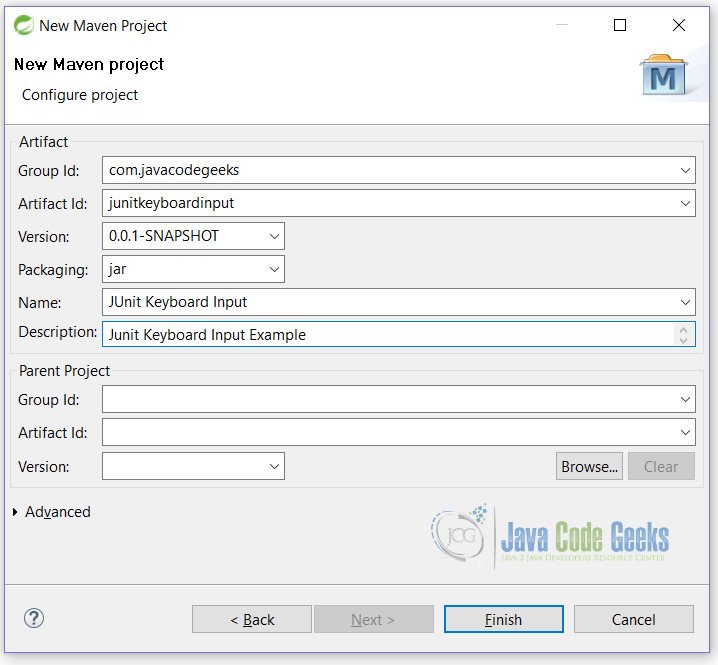
Clicking on Next button users will be taken to the below screen. Fill in the details as shown and click on finish.

Now we are ready to start writing code for our application.
4. JUnit Keyboard Input
Open pom.xml and add the following lines to it. This is the main file which is used by the Maven to download dependencies on users local machine.
pom.xml
<dependencies>
     <dependency>
          <groupId>junit</groupId>
          <artifactId>junit</artifactId>
          <version>4.12</version>
     </dependency>
</dependencies>
Create a class with the following code. This class will test the parameter passed for leap year. If the passed parameter is Leap year, it will return true otherwise it will return false.
LeapYear.java
package junitkeyboardinput;

public class LeapYear {

	public boolean isLeapYear(int year) {
		return ((year % 400 == 0) || ((year % 4 == 0) && (year % 100 != 0)));
	}
}
Finally, we create a LeapYearTest class which is a JUnit keyboard input test class, that test our isLeapYear() method. We are using, Scanner class of Java.
LeapYearTest.java
package junitkeyboardinput;

import static org.junit.Assert.assertTrue;

import java.io.IOException;
import java.util.Scanner;

import org.junit.Test;

public class LeapYearTest {

	@Test
	public void isLeapYearTest() throws IOException {
		LeapYear check = new LeapYear();
		assertTrue("Leap Year", check.isLeapYear(2015));
	}

	@Test
	public void isLeapYearKeboardTest() throws IOException {
		LeapYear leapYear = new LeapYear();

		Scanner sc = new Scanner(System.in);
		System.out.print("Enter year(yyyy):");
		int year = sc.nextInt();
		assertTrue("Leap Year", leapYear.isLeapYear(year));
		sc.close();
	}
}
Let’s see what is happening in this class.
Line no 22: We are creating object of Scanner class.
Line no 24: We are taking the input as Integer
Line no 26: closing the Scanner.
In the console window, users will be prompted for entering year. Enter year and depend upon the input, test case will fail or pass.
Enter year(yyyy):
If user passes, 2016 as the year, result will be shown in JUnit window.
Enter year(yyyy): 2016
5. Examine the output
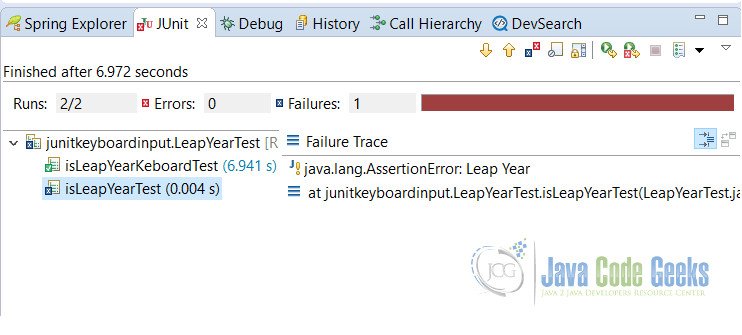
Users can see that there are 2 test cases, out of which one is passed and other is failed. Let’s examine the output.
1. One of the test case is failed i.e. isLeapYearTest() , as the result of the parameter passed which is not a leap year.(See LeapYearTest.java, line no 15)
2. Other test is passed i.e. isLeapYearKeboardTest(), as we have passed the leap year.
We advised users to experiment with the example to see the real output.
6. Conclusion
In conclusion, this is an example of JUnit Keyboard input, where we have learnt how they can use the keyboard to test their methods in JUnit.
7. Download the Eclipse Project
This was an example of JUnit Keyboard Input.
You can download the full source code of this example here: JUnitKeyboardInput.zip


