JUnit Example for Spring Controller
In this example, we shall show users the usage of JUnit Spring Controller Example. There are many ways where we can test Spring controller. There is also a specific test framework, especially for Spring.
Spring-Test is especially built for the Spring testing and we will be using it for the testing of the spring controller in our example below.
1. Introduction
Since we are dealing only with the JUnit part we will only write here the testing part of it. We are using the Spring MVC Hello World Example as our base for this example.
We will change some of the logic of the controller for testing purpose.
2. Technologies Used
We will be using the following technologies in our example.
- Java 8 – We will be using the latest version of Java. There is no specific feature of Java 1.8 that has been used.
- JUnit 4.12 – This is the main testing framework that we will be using.
- Maven – This is the build and dependency tool for this example.
- Eclipse – IDE for writing the code.
- Spring – Spring Framework to test.
- Mockito – Test framework for the mocking of the objects.
For the links to the latest versions and their websites visit the references section of this tutorial. Now, we have defined the technologies to be used. Let’s start the setup of our example.
3. Project Setup
First of all, we need to download the example for Spring MVC Hello World.
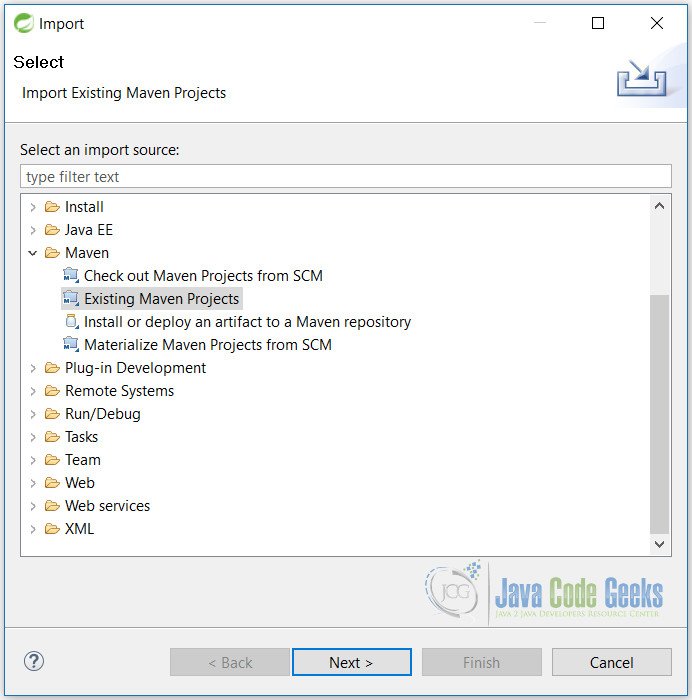
Next, we will import this project into our eclipse workspace. Follow the below steps to setup. Open Eclipse. Click File -> Import. You will be able to see the following screen. Select the Existing Maven Projects under the Maven. Click on the Next button.

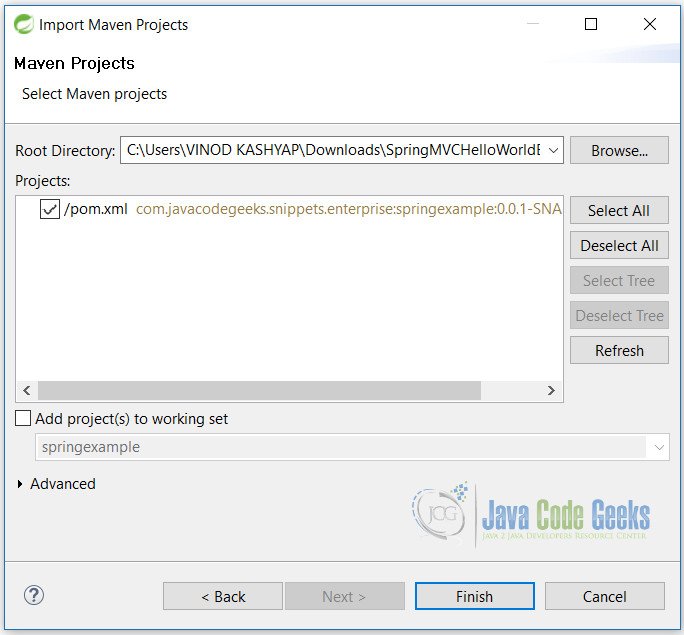
On this screen, you need to browse the downloadable project and click on the Finish button. It will take some time as it will download all dependencies defined in the pom.xml file.

Now the basic structure is there. But to continue with our example we need to do some initial changes to the project. First we need to update the pom.xml for the JUnit 4.12, Spring Test MVC, Mockito and Servlet API jar file. Copy below lines and paste them in pom.xml file
pom.xml
...
<dependency>
<groupId>junit</groupId>
<artifactId>junit</artifactId>
<version>4.12</version>
</dependency>

<dependency>
<groupId>org.springframework</groupId>
<artifactId>spring-test</artifactId>
<version>3.2.3.RELEASE</version>
<scope>test</scope>
</dependency>

<dependency>
<groupId>org.mockito</groupId>
<artifactId>mockito-core</artifactId>
<version>1.9.5</version>
<scope>test</scope>
</dependency>

<dependency>
<groupId>javax.servlet</groupId>
<artifactId>javax.servlet-api</artifactId>
<version>3.1.0</version>
<scope>provided</scope>
</dependency>

<build>
<finalName>junitspringcontroller</finalName>
<plugins>
<plugin>
<groupId>org.apache.maven.plugins</groupId>
<artifactId>maven-compiler-plugin</artifactId>
<version>2.5.1</version>
<inherited>true</inherited>
<configuration>
<source>1.8</source>
<target>1.8</target>
</configuration>
</plugin>
</plugins>
</build>
...
Line 3: It will fetch the JUnit dependency
Line 9: It will fetch Spring Test dependency
Line 16: It will fetch Mockito framework dependency
Line 23: It will fetch Servlet API
Line 38,39: This will tell Maven to compile and build using Java 8
Secondly, change the Request Mapping url in HelloWorldController.java to “/”. See below changes.
...
@RequestMapping("/helloWorld")
...
to
...
@RequestMapping("/")
...
Now we are ready to start coding our test example.
4. JUnit Spring Controller Example
Let’s create the class.
TestController.java
package com.javacodegeeks.snppets.enterprise;

import static org.springframework.test.web.servlet.request.MockMvcRequestBuilders.get;
import static org.springframework.test.web.servlet.result.MockMvcResultMatchers.status;

import org.junit.Before;
import org.junit.Test;
import org.mockito.InjectMocks;
import org.mockito.MockitoAnnotations;
import org.springframework.test.web.servlet.MockMvc;
import org.springframework.test.web.servlet.setup.MockMvcBuilders;

import com.javacodegeeks.snippets.enterprise.HelloWorldController;

public class TestController {

    @InjectMocks
    private HelloWorldController helloWorldController;

    private MockMvc mockMvc;

    @Before
    public void setup() {
        MockitoAnnotations.initMocks(this);
        this.mockMvc = MockMvcBuilders.standaloneSetup(helloWorldController).build();
    }

    @Test
    public void testCreateSignupFormInvalidUser() throws Exception {
        this.mockMvc.perform(get("/")).andExpect(status().isOk());
    }
}
Line 17,18: Here we are injecting the mock objects of our controller. For injecting we are using the @InjectMocks annotation of the Mockito framework.
Line 24: Here we are using initializing the Mockito to create mocks.
Line 25: This will build the MockMVC object. Here we are using our controller as parameter.
Line 30: We are testing the controller method with the help of Mockito.
The below image shows the output:

5. Conclusion
We have seen how a Spring Controller can be tested with the help of JUnit and its helping framework Mockito. We simply need to inject our controller using the @InjectMocks annotation of the Mockito framework.
6. Download the Eclipse Project
This is a JUnit Spring Controller Example.
You can download the full source code of this example here: junitspringcontroller.zip


Not working. NullPointerException
I’ve got the same NPE.