In this tutorial we shall show users the JUnit BlockJUnit4ClassRunner Example. We will analyze and see when and why should we use the JUnit Blockjunit4classrunner. Also we will learn about the different runners that we sued in the JUnit. But in this tutorial we will have our main focus on JUnit Blockjunit4classrunner class.
1. Introduction
JUnit provides different type of runners that help us to test out cases. JUnit Blockjunit4classrunner is the default class that will run if we do not provide any other type of runner to the test class. For example:
TestClass.java
package com.javacodegeeks;

import static org.junit.Assert.assertTrue;
import org.junit.Test;

public class TestClass {

    @Test
    public void testA(){
        assertTrue(true);
    }
}
Here we have not defined any runner class. So, by default Blockjunit4classrunner will be used to run the test cases.
Class BlockJUnit4ClassRunner is the default Runner that is used if no other Runner is provided
As you are surprised where we will be using the runner, then do not panic as we will also show it here. We have to use the runner with the @RunWith annotation as a parameter to it. One of the common runner that we use is the Suite.class.
Let’s see the Suite example.
TestClass.java
@RunWith(Suite.class)
@Suite.SuiteClasses({
    TestClassA.class,
    TestClassB.class
    })
public class TestClass {}
Here we are using the Suite.class to run out test cases. More detailed example of the Suite class can be found at JUnit Group Tests Example
2. JUnit BlockJUnit4ClassRunner
So, what is the use of BlockJUnit4ClassRunner class? It is the default class that is called whenever we run any test case. Before BlockJUnit4ClassRunner class we have a JUnit4ClassRunner class that is by default called. But now as of latest JUnit this class has been depreciated and instead we use BlockJUnit4ClassRunner class.
See below details about the class dependencies hierarchy.
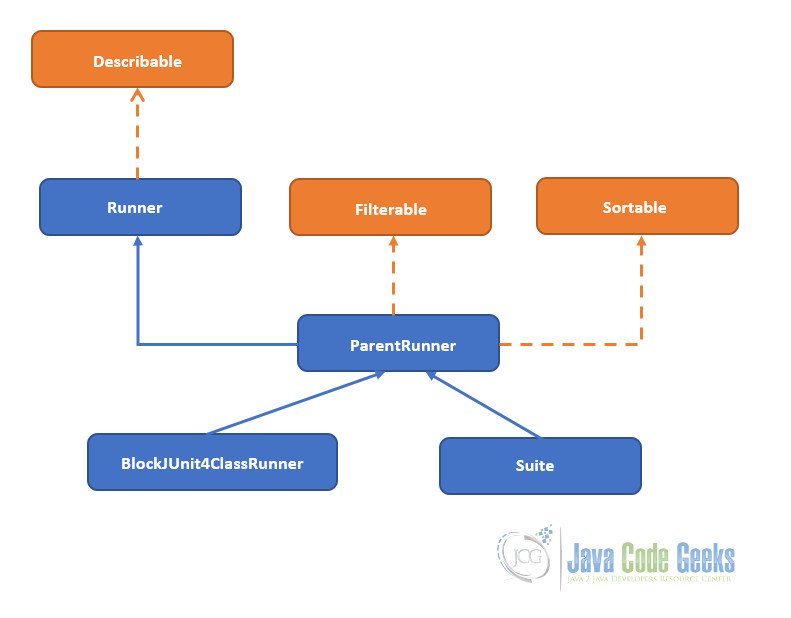
In this figure boxes, marked orange are interfaces and blue are classes. It is clear that BlockJUnit4ClassRunner class extends the ParentRunner class and obviously implement some of the methods of it. We will see some methods below.
There are lot of methods in this class. But we will see the common methods that are useful and understand about the class.
1. List getChildren(): This will scan the class for the methods annotated with @Test annotation.
2. Description describeChild(FrameworkMethod method): This will create a description on the basis of the method name
3. void runChild(final FrameworkMethod method, RunNotifier notifier): This will run all methods except the methods with @Ignore annotation. This will run @Before, then @Test and after that @After.
3. Technologies Used
We are using the following technologies for this example to work.
- Java 1.8
- JUnit 4.12
- Eclipse
- Maven
4. Project Setup
Let’s start creating our project.
You may skip project creation and jump directly to the beginning of the example below.
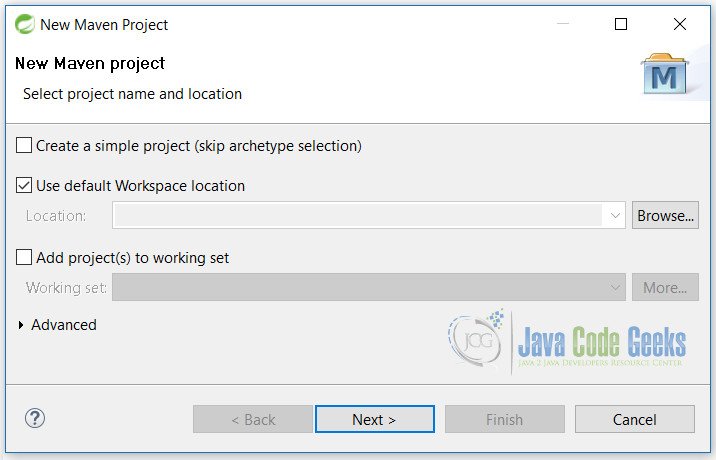
Open Eclipse. Click File -> New -> Maven Project Check the first check mark and click on Next button.
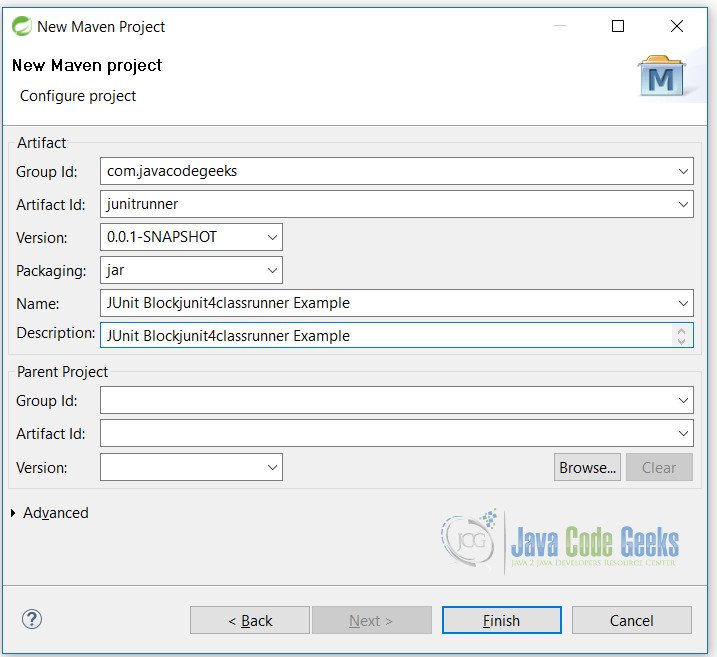
On this screen fill in the details as shown and click on the Finish button.
With this, we are finished with the creating of the blank Maven project.
5. JUnit BlockJUnit4ClassRunner Example
Before starting the coding part we need to add some lines to the pom.xml of the project. It contains all the jars we need to have for this project including some configurations.
pom.xml
    <dependencies>
        <dependency>
            <groupId>junit</groupId>
            <artifactId>junit</artifactId>
            <version>4.12</version>
            <scope>test</scope>
        </dependency>
    </dependencies>
    <build>
        <finalName>junitrunner</finalName>
        <plugins>
            <plugin>
                <groupId>org.apache.maven.plugins</groupId>
                <artifactId>maven-compiler-plugin</artifactId>
                <version>2.5.1</version>
                <inherited>true</inherited>
                <configuration>
                    <source>1.8</source>
                    <target>1.8</target>
                </configuration>
            </plugin>
        </plugins>
    </build>
In this file line numbers 1-8 show the dependencies that are required to run our project. We have added the JUnit 4.12 for in our project. Lines 9-23 show the build properties of the project.
Line number 10 indicates that the final name after building of our project will be “junitrunner“.
Line 18-19 tell that we are using Java 8 for building and compiling the project.

5.1 Test Classes
We will first see the example where we do not have to define the runner i.e. by default BlockJUnit4ClassRunner class is used.
5.1.1 Default Runner
DefaultRunnerTest.java
package com.javacodegeeks;

import static org.junit.Assert.*;

import org.junit.Test;

public class DefaultRunnerTest {

    @Test
    public void testDefault(){
        assertTrue(true);
    }
}
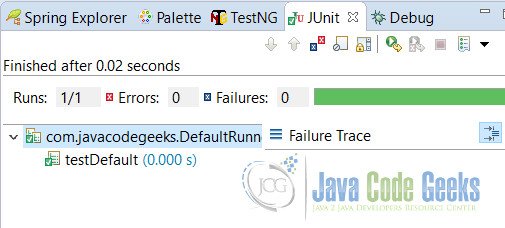
Here we are not using any runner but it will run. The output for the following will be:
5.1.2 Suite Runner
Lets take an example of Suite runner. We will create 2 classes and then add them to Suite to run both.
ClassATest.java
package com.javacodegeeks;

import org.junit.Ignore;
import org.junit.Test;

public class ClassATest {

    @Test
    public void classA_Test1() {
        System.out.println("classA_Test1");
    }

    @Test
    @Ignore
    public void classA_Test2() {
        System.out.println("classA_Test2");
    }
}
ClassBTest.java
package com.javacodegeeks;

import org.junit.Test;

public class ClassBTest {

    @Test
    public void classB_Test1() {
        System.out.println("classB_Test1");
    }

    @Test
    public void classB_Test2() {
        System.out.println("classB_Test2");
    }
}
SuiteRunnerTest.java
package com.javacodegeeks;

import org.junit.runner.RunWith;
import org.junit.runners.Suite;
import org.junit.runners.Suite.SuiteClasses;

@RunWith(Suite.class)
@SuiteClasses({ ClassATest.class, ClassBTest.class})
public class SuiteRunnerTest {

}
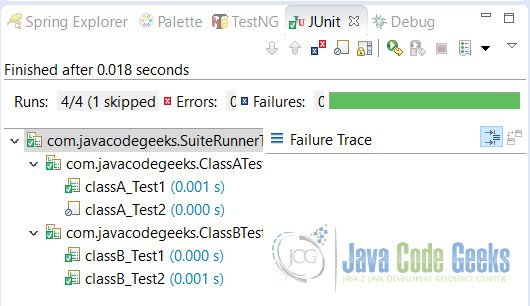
When we run this example we will see the following output in console
classA_Test1
classB_Test1
classB_Test2
If you notice one of the test case is not run in ClassATest with the @Ignore annotation. Because it is ignored by the runner.
Output in JUnit window is shown as this:
6. Custom Runners
We can also make custom runners for our use. There are many other runners available on the market. Some of the main Test runners that we widely used are:
- SpringJUnit4ClassRunner: Used by Spring for dependency managment
- MockitoJUnitRunner: Used by Mockito for mocking objects.
7. Conclusion
In this example we have seen what is BlockJUnit4ClassRunner class and why it is important in JUnit. There are by default 2 classes that we use in JUnit. One is BlockJUnit4ClassRunner class and the other is Suite class. We have seen that we can extend the class and create custom runners according to our own preference.
8. Download the Eclipse Project
This is a JUnit BlockJUnit4ClassRunner Example.
You can download the full source code of this example here: junitrunner.zip
