Is there anyone of you, Android developers, that doesn’t want to increase downloads of his app?!
Many times, a considerable way to make this happen, is by connecting your app to Facebook; but you don’t want to waste much time and effort, learning something completely new and this is what Facebook also cared about, so the Android Facebook SDK helps you integrate and connect your Android apps, with Facebook, quite easily.
So, the very first step of this integration is to enable our app to perform Facebook logins.
1. Generating Application Signature for Facebook Settings
The creation of a native android app, which integrates facebook, requires the application to be given a digital signature through facebook settings. That kind of signatures can easily be generated using the keytool executable, which comes along with the Java Runtime Environemt (jre). The command should look like this (when there is a password prompt, just type “android” and hit enter):

2. Creating Facebook Application
Visit facebook‘s developers page and click on “Add a New App”. Type the name of the applications and click “Create New Facebook App ID”.
Then, you have to select the exact category that your app targets to (i.e. video, weather, communication, etc.). Select from the dropdown and click again “Crate App ID”.
When you app is created, you will be redirected to its “quickstarts” page. The Key Hashes is where our interest should be focused, but we first have to provide the package name and the default activity’s name of our native app.
Be careful here, you must follow the same namings while creating the project in Eclipse, too.
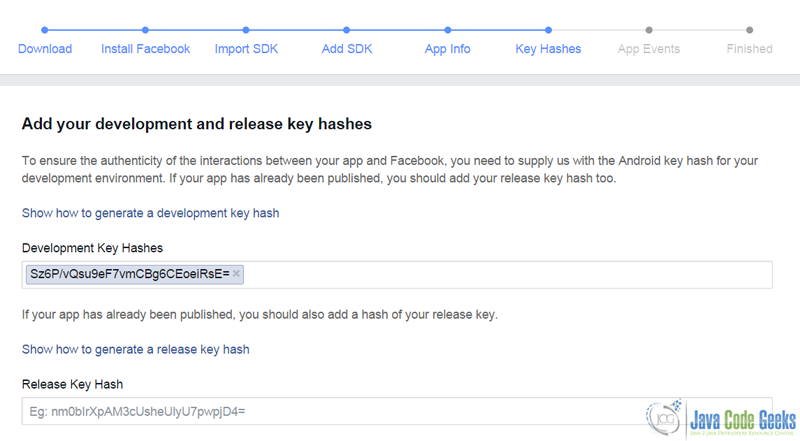
Click “Next” and you ‘ll be guided to the Key Hashes section, where you have to provide the previously created with keytool signature:
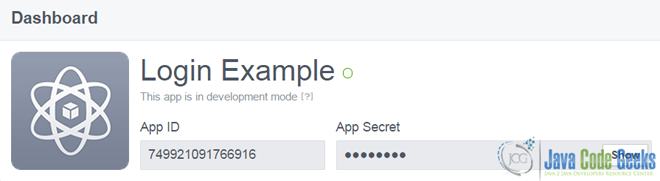
Click “Next” and navigate back to the newly created app’s dashboard. You ‘ll there find an App ID field. Please write down its value, as it will be used for connectivity verification.
An example of what the above lines describe follows:
3. The Example
For the need of this example, we will use the following tools in a Windows 64-bit platform:
- JDK 1.7
- Eclipse 4.4 Luna
- Android SDK 4.4
You may skip project creation and jump directly to the beginning of the example below.
3.1 Creating a New Android Application Project
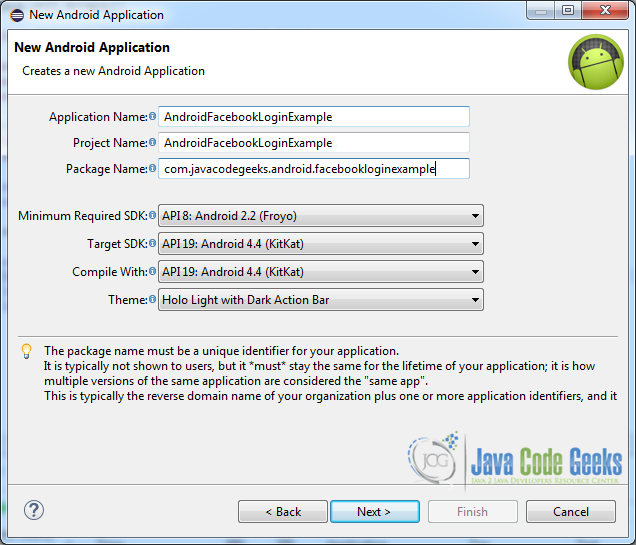
Open Eclipse IDE and go to File → New → Project → Android Application Project.
Fill in the name of the application, the project and the package in the appropriate fields and then click Next.
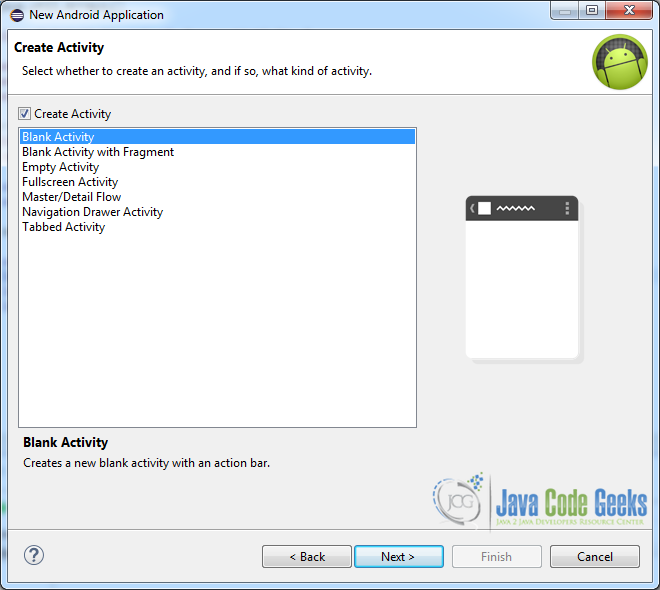
In the next window, the “Create Activity” option should be checked. The new created activity will be the main activity of your project. Then press Next button.
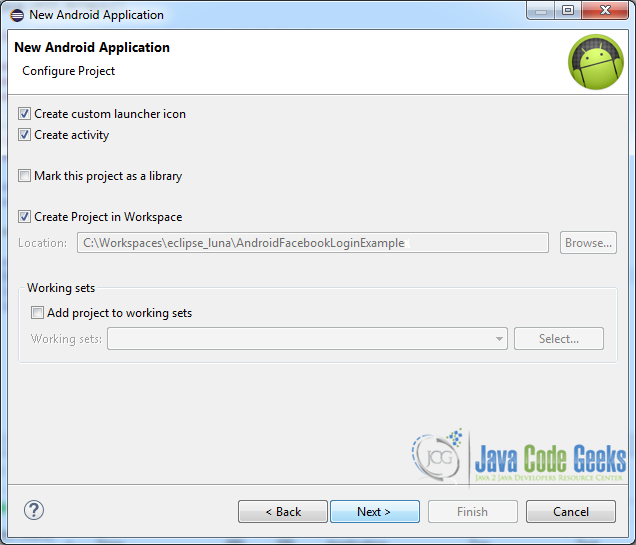
In “Configure Launcher Icon” window you should choose the icon you want to have in your app. We will use the default icon of android, so click Next.
Select the “Blank Activity” option and press Next.
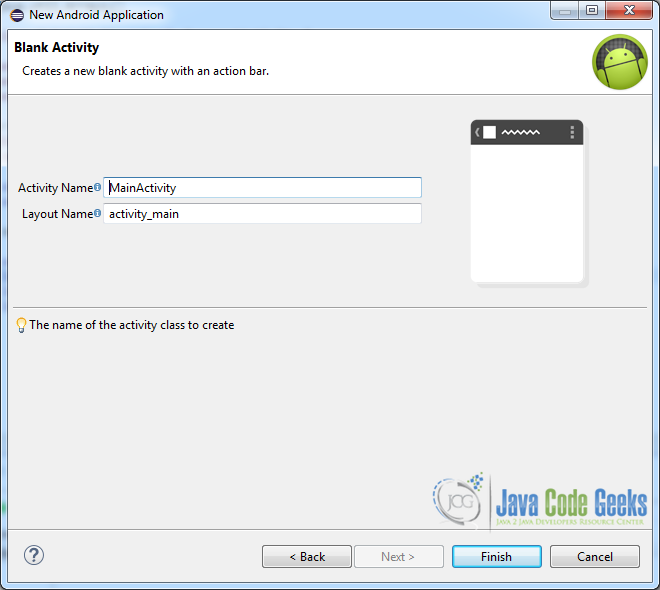
You then have to specify a name for the new Activity and a name for the layout description of your app. The .xml files for the layout will automatically be created in the res/layout folder. Finally, press Finish.
Here is the very final structure of the project, just in case you ‘ll miss something, while developing:

3.2 Downloading and using FacebookSDK
You can either download the Android Facebook SDK directly from facebook’s developers page as we mentioned in the beginning, or clone it for facebook’s git repository.
Extract the zipped file and import it in Eclipse by selecting “File” → “Import” → “Android” → “Existing Android Code into Workspace”.
3.3 Connecting the Android Project with Facebook
Once you have imported the FacebookSDK project, you have to use it in the project that we created in section 3.1. This can be done by adding the FacebookSDK project as a library to our project:
Right click on the project → Properties → Android → “Add” → Locate the directory of the extracted FacebookSDK project → “Apply” → “OK”.

3.4 Configuring AndroidManifest
What needs to be configured here is:
- Internet permission.
- Usage of default FacebookSDK’s LoginActivity.
- Usage of the
App IDthat we obtained from the Facebook developer console, after the creation and verification of our app.
It should finally look like this:
AndroidManifest.xml
<?xml version="1.0" encoding="utf-8"?>
<manifest xmlns:android="http://schemas.android.com/apk/res/android"
    package="com.example.facebookapp"
    android:versionCode="1"
    android:versionName="1.0" >

    <uses-sdk
        android:minSdkVersion="8"
        android:targetSdkVersion="19" />
    <uses-permission android:name="android.permission.INTERNET"/>

    <application
        android:allowBackup="true"
        android:icon="@drawable/ic_launcher"
        android:label="@string/app_name"
        android:theme="@style/AppTheme" >
        <activity
            android:name="com.javacodegeeks.android.facebookloginexample.MainActivity"
            android:label="@string/app_name" >
            <intent-filter>
                <action android:name="android.intent.action.MAIN" />

                <category android:name="android.intent.category.LAUNCHER" />
            </intent-filter>
        </activity>

        <activity android:name="com.facebook.LoginActivity"
            android:theme="@android:style/Theme.Translucent.NoTitleBar" />
        <meta-data android:name="com.facebook.sdk.ApplicationId"
            android:value="@string/APP_ID" />
    </application>

</manifest>
3.5 Creating the layout of the Main Activity
activity_main.xml
<LinearLayout xmlns:android="http://schemas.android.com/apk/res/android"
    xmlns:tools="http://schemas.android.com/tools"
    xmlns:facebook="http://schemas.android.com/apk/res-auto"
    android:layout_width="match_parent"
    android:layout_height="match_parent"
    android:orientation="vertical">


    <com.facebook.widget.LoginButton
        android:id="@+id/fb_login_button"
        android:layout_width="fill_parent"
        android:layout_height="wrap_content"
        android:layout_marginTop="5dp"
        facebook:confirm_logout="false"
        facebook:fetch_user_info="true" />

    <TextView
        android:id="@+id/username"
        android:layout_width="wrap_content"
        android:layout_height="wrap_content"
        android:layout_gravity="center"
        android:layout_margin="10dp"
        android:textSize="16sp" />

</LinearLayout>
com.facebook.widget.LoginButton is a custom button that maintains session state, so it eases a lot our development. You can read more about it in the official documentation. Moreover, the TextView defined under our login button, will help us verify that our app accomplishes its goal. Especially, we will use to display a message that informs the user whether or not he is logged in Facebook.

3.6 Coding the Main Activity
Let’s first navigate to src/com.javacodegeeks.android.facebookloginexample/MainActivity.java. Next, complete the class like below:
MainActivity.java
package com.javacodegeeks.android.facebookloginexample;

import java.util.Arrays;

import android.content.Intent;
import android.os.Bundle;
import android.support.v4.app.FragmentActivity;
import android.util.Log;
import android.widget.TextView;

import com.facebook.Session;
import com.facebook.SessionState;
import com.facebook.UiLifecycleHelper;
import com.facebook.model.GraphUser;
import com.facebook.widget.LoginButton;
import com.facebook.widget.LoginButton.UserInfoChangedCallback;

public class MainActivity extends FragmentActivity {

	private LoginButton loginBtn;
	private TextView username;
	private UiLifecycleHelper uiHelper;

	@Override
	public void onCreate(Bundle savedInstanceState) {
		super.onCreate(savedInstanceState);

		uiHelper = new UiLifecycleHelper(this, statusCallback);
		uiHelper.onCreate(savedInstanceState);

		setContentView(R.layout.activity_main);

		username = (TextView) findViewById(R.id.username);
		loginBtn = (LoginButton) findViewById(R.id.fb_login_button);
		loginBtn.setReadPermissions(Arrays.asList("email"));
		loginBtn.setUserInfoChangedCallback(new UserInfoChangedCallback() {
			@Override
			public void onUserInfoFetched(GraphUser user) {
				if (user != null) {
					username.setText("You are currently logged in as " + user.getName());
				} else {
					username.setText("You are not logged in.");
				}
			}
		});
	}

	private Session.StatusCallback statusCallback = new Session.StatusCallback() {
		@Override
		public void call(Session session, SessionState state,
				Exception exception) {
			if (state.isOpened()) {
				Log.d("MainActivity", "Facebook session opened.");
			} else if (state.isClosed()) {
				Log.d("MainActivity", "Facebook session closed.");
			}
		}
	};

	@Override
	public void onResume() {
		super.onResume();
		uiHelper.onResume();
	}

	@Override
	public void onPause() {
		super.onPause();
		uiHelper.onPause();
	}

	@Override
	public void onDestroy() {
		super.onDestroy();
		uiHelper.onDestroy();
	}

	@Override
	public void onActivityResult(int requestCode, int resultCode, Intent data) {
		super.onActivityResult(requestCode, resultCode, data);
		uiHelper.onActivityResult(requestCode, resultCode, data);
	}

	@Override
	public void onSaveInstanceState(Bundle savedState) {
		super.onSaveInstanceState(savedState);
		uiHelper.onSaveInstanceState(savedState);
	}
}
As you obviously noticed from the imports, UiLifecycleHelper comes also from FacebookSDK. This one, is similar to Android UI lifecycles, but from facebook’s perspective, it can also be used to create, automatically open, save and restore an active session. The usage of this class requires calls to all the respective public methods (either in an Activity or Fragment); otherwise Sessions may not be properly initialized/uninitialized. We here implement these calls in lines 60-88.
Another difficult part is the way that we could actually change the displayed text, according the user’s state (logged in / not logged in), by handling the session state. This is feasible by calling the setUserInfoChangedCallback method of a LoginButton, when the user changes. Lines 36-45 implement this process.
Finally, lines 48-58 provide asynchronous notification of Session state changes and can also help us while debugging.
3.7 Running the application
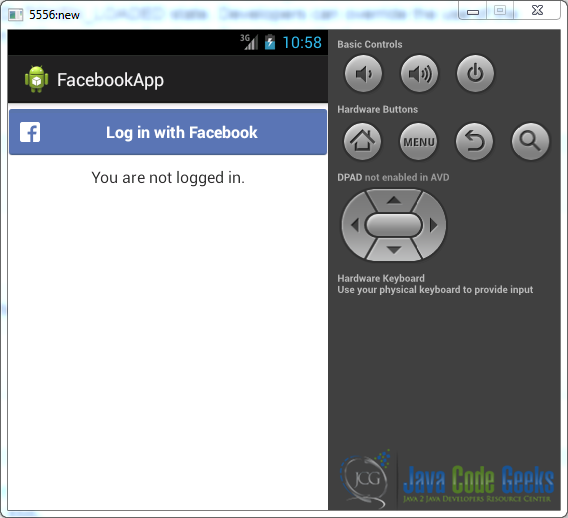
This is the initial screen of our app:
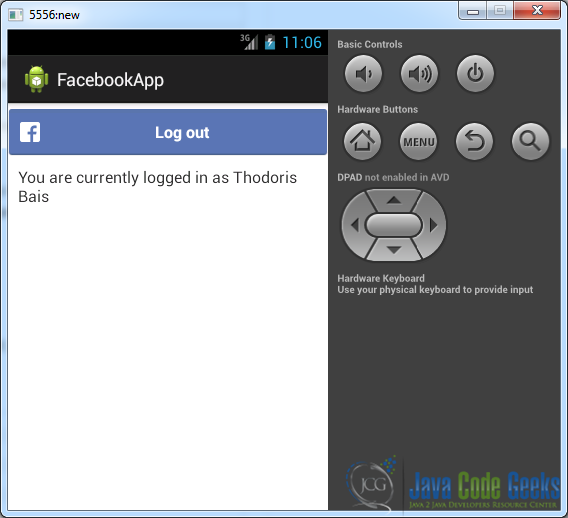
After hitting the login button, a credentials screen is poped up, so let’s fill it:

Given that we provided our credential and clicked the “Log in” button, an email access will be prompted (we developed our app to do so, in line 35), so approve it. When authentication with facebook servers is completed, you can see that you are successfully logged in (the button now says “Log out” and the TextView is also updated):
4. Download the Eclipse Project
You can download the full source code of this example here : AndroidFacebookLoginExample.zip
