Welcome, in this tutorial, we will see how to create a simple spring boot reactive programming application with webflux.
1. Introduction
Before going further in this tutorial, let us understanding webflux and reactive programming.
1.1 Webflux
- Webflux is the reactive-web framework in spring and was added as a part of the 5.0 release
- It offers asynchronous, non-blocking, and event-driven approach for the data processing
- It also offers reactive streams back-pressure and runs on servers like Netty, Undertow, or the Servlet 3.1 containers
1.2 Reactive programming
- Reactive programming is a functional, event-based, asynchronous, non-blocking data processing technique
- The programming technique refers to reacting to the changes such as mouse clicks or the I/O events
- The reactive programming application works better and more efficiently when working with the stream of data. The client application consumes it and streams it back to the users
- The streaming api provides 4 different interfaces –
Publisher– Emits a sequence of events to subscribers according to the subscriber demandsSubscriber– Receives and processes the events emitted by the publisher interface. Multiple subscribers can be linked to a single publisher and can respond differently to the same eventSubscription– Defines a 1-1 relationship between the publisher and subscriber interfaces. Each subscriber can only be linked to a single publisherProcessor– Shows a processing stage consisting of both subscriber and publisher interface. It also obeys the contract of both the interfaces
1.3 Spring webflux
- Spring webflux is similar to spring MVC and supports non-blocking reactive streams. It also supports the back-pressure concept and uses Netty as the preferred server to run reactive applications
- Uses the project reactor as the reactive library
- It uses 2 publishers –
Monoreturns 0 or 1 elementFluxreturns 0 to N elements. It is endless and can emit events forever. It also sends a complete notification when the last event is sent
- Allows scalability and immunity to latency problems in a microservice architecture. It also offers excellent stream processing capabilities
1.4 Lombok
- Lombok is nothing but a small library that reduces the amount of boilerplate Java code from the project
- Automatically generates the getters and setters for the object by using the Lombok annotations
- Hooks in via the Annotation processor API
- Raw source code is passed to Lombok for code generation before the Java Compiler continues. Thus, produces properly compiled Java code in conjunction with the Java Compiler
- Under the
target/classesfolder you can view the compiled class files - Can be used with Maven, Gradle IDE, etc.
1.4.1 Lombok features
| Feature | Details |
|---|---|
val | Local variables are declared as final |
var | Mutable local variables |
@Slf4J | Creates an SLF4J logger |
@Cleanup | Will call close() on the resource in the finally block |
@Getter | Creates getter methods for all properties |
@Setter | Creates setter for all non-final properties |
@EqualsAndHashCode |
|
@ToString |
|
@NoArgsConstructor |
|
@RequiredArgsContructor |
|
@AllArgsConstructor |
|
@Data |
|
@Builder |
|
@Value |
|
1.5 Spring boot starters
- Spring boot provides several starter libraries which are used that ease the development of the spring application
- In spring the stater name starts with a prefix –
spring-boot-starter-*where*denotes a particular type of application
Let us see some of the commonly used spring boot stater libraries.
| Name | Description |
|---|---|
spring-boot-starter-thymeleaf | Used to build MVC web applications using Thymeleaf views |
spring-boot-starter-data-redis | Used for Redis key-value data store with Spring Data Redis and the Jedis client |
spring-boot-starter-web | Used for building the web and RESTful applications. It uses Tomcat as the default embedded container |
spring-boot-starter-test | Used to test Spring Boot applications with libraries, including JUnit, Hamcrest, and Mockito |
spring-boot-starter-hateoas | Used to build a hypermedia-based RESTful application with Spring HATEOAS |
spring-boot-starter-aop | Used for aspect-oriented programming with Spring AOP and AspectJ |
spring-boot-starter-amqp | Used for Spring AMQP and Rabbit MQ |
spring-boot-starter-security | Used for Spring Security |
spring-boot-starter-data-jpa | Used for Spring Data JPA with Hibernate |
spring-boot-starter | Used for core starter, including auto-configuration support, logging, and YAML |
spring-boot-starter-webflux | Used for reactive programming in the spring framework. It uses Netty as the default embedded container |
2. Introduction to Spring Webflux
Let us go ahead with the tutorial implementation but before going any further I’m assuming that you’re aware of the Spring boot basics.
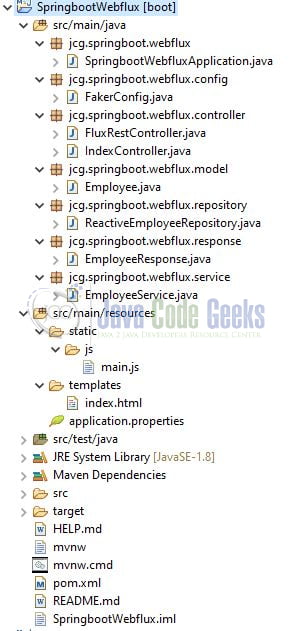
2.1 Tools Used for Spring boot application and Project Structure
We are using Eclipse Kepler SR2, JDK 8, and Maven. In case you’re confused about where you should create the corresponding files or folder, let us review the project structure of the spring boot application.
Let us start building the application!
3. Creating a Spring Boot application
Below are the steps involved in developing the application.
3.1 Maven dependency
Here, we specify the dependency for the Spring boot (Webflux and Thymeleaf), Java Faker (to generate the dummy data), and Lombok. The updated file will have the following code.
pom.xml
<?xml version="1.0" encoding="UTF-8"?>
<project xmlns:xsi="http://www.w3.org/2001/XMLSchema-instance" xmlns="http://maven.apache.org/POM/4.0.0"
         xsi:schemaLocation="http://maven.apache.org/POM/4.0.0 https://maven.apache.org/xsd/maven-4.0.0.xsd">
    <modelVersion>4.0.0</modelVersion>

    <parent>
        <groupId>org.springframework.boot</groupId>
        <artifactId>spring-boot-starter-parent</artifactId>
        <version>2.4.4</version>
        <relativePath/> <!-- lookup parent from repository -->
    </parent>

    <groupId>jcg.springboot.webflux</groupId>
    <artifactId>SpringbootWebflux</artifactId>
    <version>0.0.1-SNAPSHOT</version>

    <name>SpringbootWebflux</name>
    <description>Demo project for webflux in spring boot</description>

    <properties>
        <java.version>1.8</java.version>
    </properties>

    <dependencies>
        <!-- webflux reactive -->
        <dependency>
            <groupId>org.springframework.boot</groupId>
            <artifactId>spring-boot-starter-webflux</artifactId>
        </dependency>
        <!-- thymeleaf -->
        <dependency>
            <groupId>org.springframework.boot</groupId>
            <artifactId>spring-boot-starter-thymeleaf</artifactId>
        </dependency>

        <dependency>
            <groupId>com.github.javafaker</groupId>
            <artifactId>javafaker</artifactId>
            <version>1.0.2</version>
        </dependency>
        <dependency>
            <groupId>org.projectlombok</groupId>
            <artifactId>lombok</artifactId>
            <optional>true</optional>
        </dependency>

        <dependency>
            <groupId>org.springframework.boot</groupId>
            <artifactId>spring-boot-starter-test</artifactId>
            <scope>test</scope>
        </dependency>
        <dependency>
            <groupId>io.projectreactor</groupId>
            <artifactId>reactor-test</artifactId>
            <scope>test</scope>
        </dependency>
    </dependencies>

    <build>
        <plugins>
            <plugin>
                <groupId>org.springframework.boot</groupId>
                <artifactId>spring-boot-maven-plugin</artifactId>
                <configuration>
                    <excludes>
                        <exclude>
                            <groupId>org.projectlombok</groupId>
                            <artifactId>lombok</artifactId>
                        </exclude>
                    </excludes>
                </configuration>
            </plugin>
        </plugins>
    </build>

</project>
3.2 Application properties file
Create a new YML file at the location: SpringbootWebflux/src/main/resources/ and add the following code. You’re free to change the application details as per your wish.
application.properties
server.port=9090
spring.application.name=springboot-webflux
3.3 Java classes
Let us write the important java class(es) involved in this application. For brevity, we will skip the following classes –
Employee.java– Model classEmployeeResponse.java– Mapper for the model classFakerConfig.java– Configuration class to define the Faker bean
3.3.1 Implementation/Main class
Add the following code to the main class to bootstrap the application from the main method. Always remember, the entry point of the spring boot application is the class containing @SpringBootApplication annotation and the static main method.
SpringbootWebfluxApplication.java
package jcg.springboot.webflux;

import lombok.extern.slf4j.Slf4j;
import org.springframework.boot.SpringApplication;
import org.springframework.boot.autoconfigure.SpringBootApplication;

//lombok annotation
@Slf4j
//spring annotation
@SpringBootApplication
public class SpringbootWebfluxApplication {

    public static void main(String[] args) {
        SpringApplication.run(SpringbootWebfluxApplication.class, args);
        log.info("Spring boot and webflux application started successfully.");
    }
}
3.3.2 Reactive Repository class
Add the following code to the reactive repository class. The class consists of the method to fetch the details from a backend resource and send it back to the service method. For an easy setup, it will return the mock data while in the ideal case the data would be fetched from the queue where some subscribers would continuously put the data in the given topic.
ReactiveEmployeeRepository.java
package jcg.springboot.webflux.repository;

import com.github.javafaker.Faker;
import jcg.springboot.webflux.model.Employee;
import org.springframework.beans.factory.annotation.Autowired;
import org.springframework.stereotype.Repository;

import java.time.LocalDateTime;
import java.time.format.DateTimeFormatter;
import java.util.Random;
import java.util.UUID;

@Repository
public class ReactiveEmployeeRepository {

    private static final String[] GENDER = {"Male", "Female", "Not to specify"};
    private static final Random RANDOM = new Random();

    @Autowired
    private Faker faker;

    public Employee find() {
        //creating a dummy employee object and returning it.
        //ideally the data would be fetched from the rabbitmq where a subscriber would continuously
        //put in the queue.
        return createDummy();
    }

    private Employee createDummy() {
        final String firstName = faker.name().firstName();
        final String lastName = faker.name().lastName();
        final String emailAddress = firstName.toLowerCase() + "." + lastName.toLowerCase() + "@automation.com";
        final String gender = GENDER[RANDOM.nextInt(GENDER.length)];
        final LocalDateTime dateTime = LocalDateTime.parse(LocalDateTime.now().toString(),
                DateTimeFormatter.ISO_DATE_TIME);

        return Employee.builder()
                .id(RANDOM.nextInt())
                .firstName(firstName)
                .lastName(lastName)
                .gender(gender)
                .emailAddress(emailAddress)
                .phoneNumber(faker.phoneNumber().cellPhone())
                .createdAt(dateTime)
                .referenceId(UUID.randomUUID())
                .build();
    }
}
3.3.3 Employee Service class
Add the following code to the service class. The method would have a return type of Flux. The flux would emit out an event every 2 seconds. Once the last event is returned a complete notification would be sent.
EmployeeService.java
package jcg.springboot.webflux.service;

import jcg.springboot.webflux.repository.ReactiveEmployeeRepository;
import jcg.springboot.webflux.response.EmployeeResponse;
import lombok.extern.slf4j.Slf4j;
import org.springframework.beans.factory.annotation.Autowired;
import org.springframework.stereotype.Service;
import reactor.core.publisher.Flux;

import java.time.Duration;

//lombok annotation
@Slf4j
//spring annotation
@Service
public class EmployeeService {

    @Autowired
    ReactiveEmployeeRepository repository;

    public Flux<EmployeeResponse> getEvents() {
        log.info("Fetching the data from the queue or database.");
        return Flux.<EmployeeResponse>generate(synchronousSink -> {
            //for testing purpose we are keeping it simple
            //in ideal case the data needs to be pulled back from a queue for continuous emit
            final EmployeeResponse response = EmployeeResponse.from(repository.find());
            log.info("Returning employee with id = {}", response.getId());
            synchronousSink.next(response);
        }).delayElements(Duration.ofSeconds(2));
    }
}
3.3.4 Flux REST Controller class
Add the following code to the REST controller. The method will fetch the data from the service and return an event stream. You can hit the controller endpoint (http://localhost:9090/api/stream/employees) in the browser to verify the non-blocking response feature of the webflux. The results will appear one by one after a delay of 2 seconds in an event form.
FluxRestController.java
package jcg.springboot.webflux.controller;

import jcg.springboot.webflux.response.EmployeeResponse;
import jcg.springboot.webflux.service.EmployeeService;
import lombok.extern.slf4j.Slf4j;
import org.springframework.beans.factory.annotation.Autowired;
import org.springframework.http.MediaType;
import org.springframework.web.bind.annotation.GetMapping;
import org.springframework.web.bind.annotation.RequestMapping;
import org.springframework.web.bind.annotation.RestController;
import reactor.core.publisher.Flux;

//lombok annotation
@Slf4j
//spring annotations
@RestController
@RequestMapping(value = "/api/stream")
public class FluxRestController {

    @Autowired
    private EmployeeService service;

    //url - http://localhost:9090/api/stream/employees
    @GetMapping(value = "/employees", produces = MediaType.TEXT_EVENT_STREAM_VALUE)
    public Flux<EmployeeResponse> streamStaticEmployeeEvents() {
        log.info("Streaming static employee events for flux.");
        return service.getEvents();
    }
}
Similarly, you can create an index controller that can interact with the thymeleaf page to get the events beautifully. The thymeleaf controller will be available at the following url – http://localhost:9090/ in the browser. Refer to section 3.4 to create a simple HTML page that will be used to fetch the event stream from the backend.
IndexController.java
package jcg.springboot.webflux.controller;

import org.springframework.stereotype.Controller;
import org.springframework.web.bind.annotation.GetMapping;

@Controller
public class IndexController {

    //url - http://localhost:9090/
    @GetMapping(value = "/")
    public String index() {
        return "index";
    }
}
3.4 Thymeleaf page for Index Controller
Add the following code to the index page which will fetch the stream of employee events from the REST controller endpoint, parse it and display the results on the HTML page. The pre-requisite of the HTML page is the javascript file which can be downloaded from the Downloads section.
index.html
<!DOCTYPE html>
<html lang="en">
<head>
    <meta charset="utf-8">
    <link href="https://stackpath.bootstrapcdn.com/bootstrap/4.5.2/css/bootstrap.min.css" rel="stylesheet">
    <title>Index</title>
</head>
<style type="text/css">
    .container-width {
        max-width: 1850px !important;
    }

    .padding12 {
        padding: 12px;
    }

    table, th, td {
        text-align: center;
    }
</style>
<body>

<div class="container container-width">
    <div class="row">
        <div class="padding12">
            <h3>Spring Webflux Example</h3>
            <small>Stream of data which will simulate every 2 seconds.</small>
        </div>
        <table class="table table-bordered" id="employees">
            <thead>
            <tr>
                <th>Id</th>
                <th>First Name</th>
                <th>Last Name</th>
                <th>Gender</th>
                <th>Email address</th>
                <th>Phone number</th>
                <th>Joining date and time</th>
            </tr>
            </thead>
            <tbody>
            <tr data-th-each="employee : ${employees}">
                <td data-th-text="${employee.id}"></td>
                <td data-th-text="${employee.firstName}"></td>
                <td data-th-text="${employee.lastName}"></td>
                <td data-th-text="${employee.gender}"></td>
                <td data-th-text="${employee.emailAddress}"></td>
                <td data-th-text="${employee.phoneNumber}"></td>
                <td data-th-text="${employee.doj}"></td>
            </tr>
            </tbody>
        </table>
    </div>
</div>

<script data-th-src="@{/js/main.js}"></script>

</body>

</html>
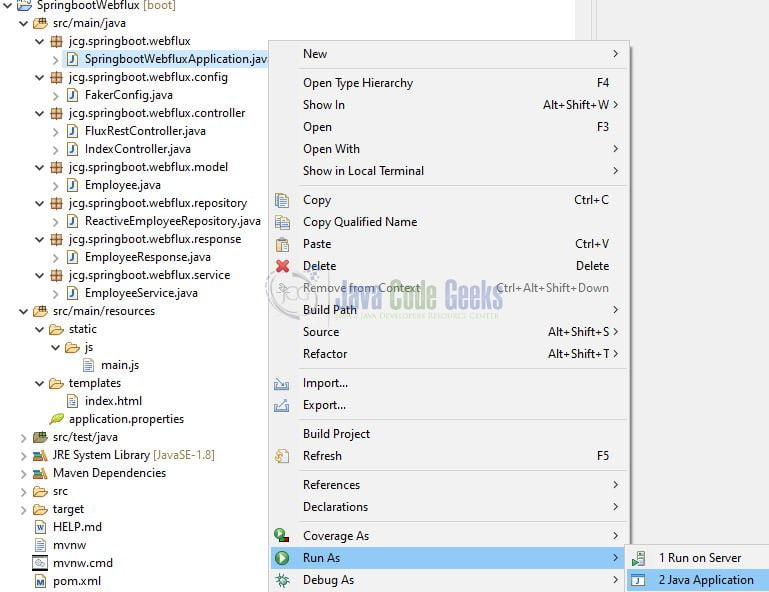
4. Run the Application
To execute the application, right-click on the SpringbootWebfluxApplication.java class, Run As -> Java Application.
5. Project Demo
When the application is started, open the browser of your choice and hit the following url – http://localhost:9090/api/stream/employees to verify the non-blocking response feature of the webflux. The results will appear one by one after a delay of 2 seconds in an event form. If you would like to view the results beautifully hit the following url – http://localhost:9090/. The latter one will open the HTML page and display the stream of employee events. That is all for this tutorial and I hope the article served you whatever you were looking for. Happy Learning and do not forget to share!
6. Summary
In this section, you learned:
- Introduction to Webflux, Reactive programming, Spring Webflux, and Lombok
- Steps to implement spring webflux in a spring boot application
You can download the sample application as an Eclipse project in the Downloads section.
7. Download the Project
This was an example to introduce spring webflux in a spring boot application.
You can download the full source code of this example here: Introduction to Spring Webflux

In order to receive the event update from the server every two seconds, must the client hold the HTTP-connection to the server forever?