How to use Java SpringLayout
In this article we’re going to see how to use SpringLayout, a class to build GUI in Java.
1. Introduction
SpringLayout is a class that arranges children elements associated in the container, using a sort of constraints. To clarify, this class is a very flexible layout manager that can emulate many of the features of other layout managers.
However, SpringLayout is very low-level and as such you really should only use it with a GUI builder, rather than attempting to code a spring layout manager by hand.
In the next sections, we’ll see how to work with SpringLayout and do some examples to have better knowledge using this class.
1.1 Pre-requisites
The minimum Java version for executing the article’s example is JDK 8 (find here), but we can use the most recently released Java version JDK 16 on Oracle’s official site or the OpenJDK version.
Also, I’m using the most recent IntelliJ version, but you can use any IDE with support for the versions recommended above.
2. SpringLayout API
We consider the SpringLayout API all the components in the class, from attributes to methods. Below we can see these components listed:
2.1 Fields
SpringLayout.NORTH– the top edge of a component’s bounding rectangle.SpringLayout.SOUTH– the bottom edge of a component’s bounding rectangle.SpringLayout.EAST– the right edge of a component’s bounding rectangle.SpringLayout.WEST– the left edge of a component’s bounding rectangle.SpringLayout.BASELINE– the baseline of a component.SpringLayout.HORIZONTAL_CENTER– the horizontal center of a component’s bounding rectangle.SpringLayout.VERTICAL_CENTER– the vertical center of a component’s bounding rectangle.
2.2 Methods
| Method | Description |
| void addLayoutComponent(Component component, Object constraints) | If the constraints is an instance of SpringLayout.Constraints, associates the constraints with the specified component. |
| void addLayoutComponent(String name, Component c) | Does not affect, since this layout manager does not use a per-component string. |
| Spring getConstraint(String edgeName, Component c) | Returns the spring controlling the distance between the specified edge of the component and the top or left edge of its parent. |
| SpringLayout.Constraints getConstraints(Component c) | Returns the constraints for the specified component. |
| float getLayoutAlignmentX(Container p) | Returns 0.5f (centered). |
| float getLayoutAlignmentY(Container p) | Returns 0.5f (centered). |
| void invalidateLayout(Container p) | Invalidates the layout, indicating that if the layout manager has cached information it should be discarded. |
| void layoutContainer(Container parent) | Lays out the specified container. |
| Dimension maximumLayoutSize(Container parent) | Calculates the maximum size dimensions for the specified container, given the components it contains. |
| Dimension minimumLayoutSize(Container parent) | Calculates the minimum size dimensions for the specified container, given the components it contains. |
| Dimension preferredLayoutSize(Container parent) | Calculates the preferred size dimensions for the specified container, given the components it contains. |
| void putConstraint(String e1, Component c1, int pad, String e2, Component c2) | Links edge e1 of component c1 to edge e2 of component c2, with a fixed distance between the edges. |
| void putConstraint(String e1, Component c1, Spring s, String e2, Component c2) | Links edge e1 of component c1 to edge e2 of component c2. |
| void removeLayoutComponent(Component c) | Removes the constraints associated with the specified component. |
3. How Spring Layouts Works
SpringLayout works by defining directional relationships, or constraints, between the edges of components. Furthermore, these constraints are nothing but horizontal and vertical distances between two components edges.
Every constraint is represented in the nested class SpringLayout.Constraint. This inner class controls the size and position change in a container that SpringLayout manages.
Components define edge properties, which are connected by Spring instances. Each spring has four properties: the minimum, the preferred, and the maximum values, and its actual (current) value. The springs associated with each component are collected into a SpringLayout.Constraints object.
3.1 Springs and Components Size
A SpringLayout object automatically installs Springs for the height and width of each component that the SpringLayout controls. That is to say, the Spring object that represents the width of a component is a special kind of spring that simply delegates its implementation to the relevant size methods of the component.
Further, that way the spring stays in sync with the size methods as the characteristics of the component change.
When a component’s getMaximumSize and getPreferredSize methods return the same value, SpringLayout interprets this as meaning that the component should not be stretched.
4. Examples
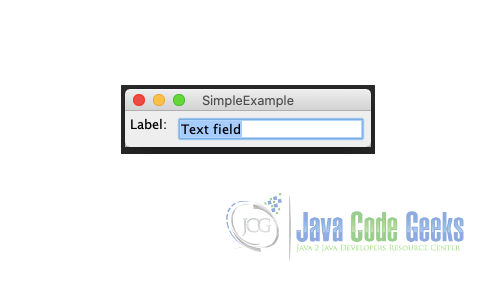
Here we see an example to build a simple example using SpringLayout.
SpringLayout example
private static void createAndShowGUI() {
        JFrame frame = new JFrame("SimpleExample");
        frame.setDefaultCloseOperation(JFrame.EXIT_ON_CLOSE);

        Container contentPane = frame.getContentPane();
        SpringLayout layout = new SpringLayout();
        contentPane.setLayout(layout);

        JLabel label = new JLabel("Label: ");
        JTextField textField = new JTextField("Text field", 15);
        contentPane.add(label);
        contentPane.add(textField);

        layout.putConstraint(SpringLayout.WEST, label,
                5,
                SpringLayout.WEST, contentPane);
        layout.putConstraint(SpringLayout.NORTH, label,
                5,
                SpringLayout.NORTH, contentPane);

        layout.putConstraint(SpringLayout.WEST, textField,
                5,
                SpringLayout.EAST, label);
        layout.putConstraint(SpringLayout.NORTH, textField,
                5,
                SpringLayout.NORTH, contentPane);
        setContainerSize(contentPane, 5);
        frame.pack();
        frame.setVisible(true);
    }
Let’s highlight our above code. First, we create the window using the Swing class JFrame. Further, we start our component the Container where we’ll put everything in the window.
Continuing, we create other components to use in the container. Finally, we start to use our SpringLayout object initialized before, firstly attaching it to the main component, in this case, the container.
The most important here is the method putConstraint(). We insert the necessary padding and interaction between the components. In the code below, we define that the component label will interact with the contentPane, keeping the padding set on the method.
putConstraint() method
        layout.putConstraint(SpringLayout.WEST, label,
                5,
                SpringLayout.WEST, contentPane);
The WEST constant in SpringLayout represents the left edge of the window. Keeping in mind what the API describes: NORTH for the top, SOUTH for the bottom, EAST for the right, and WEST for the left.
And we do the same to the other components in the window. If we miss some edge, the window could fail the layout, presenting a clunky UI to the user.
4.1 SpringUtilities
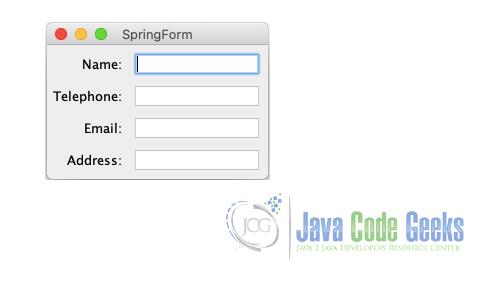
Oracle provides a utility class called SpringUtilities to work with SpringLayout more accurately. There, we find some ready-to-use methods to build layouts easily.
I put the code to build the form example below.
5. Summary
In conclusion, we take a look in the SpringLayout API, a nice to use tool for building GUI with Java. Also, we saw how it works and create a simple example to make an idea on how this API build the interface with Swing framework.
This article was based on Oracle Tutorial for Spring Layout where you can find more details here.
6. Download the source code
You can download the full source code of this example here: How to use Java SpringLayout


