In this article, we going to see how to download and install OpenJDK 11 and present its features with some examples for java JDK 11.
1. Introduction
OpenJDK 11 is the open-source reference implementation of version java JDK 11 of the Java SE Platform as specified by JSR 384 in the Java Community Process.
This version of JDK is the alternative for Oracle JDK that is paid now from version 11 of Java SE. So, if you want to use Java in your production application, a fee to Oracle is needed.
But, the OpenJDK came as an alternative to this and you can use it as well with the same features and APIs from Oracle patches.
In the next sessions, we’ll see how to download and install the OpenJDK 11 and dive into its features.
2. Download and Installation
2.1 Download java JDK 11
To download the OpenJDK 11 access the official community archive site here. For the purpose of this article, we going to download the 11.0.2 (build 11.0.2+9) version.
The OpenJDK 11 is available for Linux, macOS, and Windows. Choose the correct version for your current operating system and download it to your computer.
After download, extract the file to a place of your preference. Also, we need a user with administrator privileges because in the next steps we’ll change some system stuff to make our JDK ready for use.
2.2 Install JDK 11
To install JDK 11 we can use an admin user and a file extracted to a proper place, now we going to put in our system path the source of OpenJDK.
2.2.1 Linux Installation
On Linux, we open a Terminal and type the commands below to determine the JAVA_HOME variable and add the JDK in the PATH.
In my Linux example, I’ve downloaded the OpenJDK to the /usr/local/lib directory. So, will look like that:
Linux setup example
# export JAVA_HOME="/usr/local/lib/jdk-11.0.2/"
# export PATH=$PATH:$JAVA_HOME/bin
To be sure if our setting up worked, run an echo command in the terminal.
Print command on Linux
# echo $JAVA_HOME
/usr/local/lib/jdk-11.0.2/
# echo $PATH
/usr/local/sbin:/usr/local/bin:/usr/sbin:/usr/bin:/sbin:/bin:/usr/local/lib/jdk-11.0.2/bin
2.2.2 MacOS Installation
A little bit different from Linux installation, in macOS, we make the setup also in the terminal. However, macOS has some specific things.
Firstly, as a good habit, I recommend to extract the java JDK 11 in the directory /Library/Java/JavaVirtualMachines/ (that’s why we need an admin user).
Further, run the command below in the terminal:
MacOS Java versions
# /usr/libexec/java_home -V
Matching Java Virtual Machines (4):
    15, x86_64:	"OpenJDK 15"	/Library/Java/JavaVirtualMachines/jdk-15.jdk/Contents/Home
    14.0.1, x86_64:	"Java SE 14.0.1"	/Library/Java/JavaVirtualMachines/jdk-14.0.1.jdk/Contents/Home
    11.0.2, x86_64:	"OpenJDK 11.0.2"	/Library/Java/JavaVirtualMachines/jdk-11.0.2.jdk/Contents/Home
    1.8.0_181, x86_64:	"Java SE 8"	/Library/Java/JavaVirtualMachines/jdk1.8.0_181.jdk/Contents/Home
This command is a macOS-ready script to deal with Java versions and that’s the reason why I recommended putting our JDK in that specific directory.
So, now let’s put our desired OpenJDK to use with the following command:
Setting MacOS Java version
# export JAVA_HOME=`/usr/libexec/java_home -v 11`
# export PATH=$JAVA_HOME/bin:$PATH
# java -version
openjdk version "11.0.2" 2019-01-15
OpenJDK Runtime Environment 18.9 (build 11.0.2+9)
OpenJDK 64-Bit Server VM 18.9 (build 11.0.2+9, mixed mode)
First, we set our JAVA_HOME variable with the /usr/libexec/java_home script. Important here is know what version you want to set (11 in this case).
After, we update our PATH variable to include the JAVA_HOME/bin scripts. In conclusion, run the java -version command to be sure that the system accepts our changes.
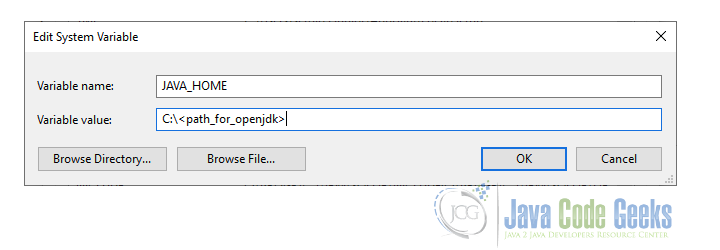
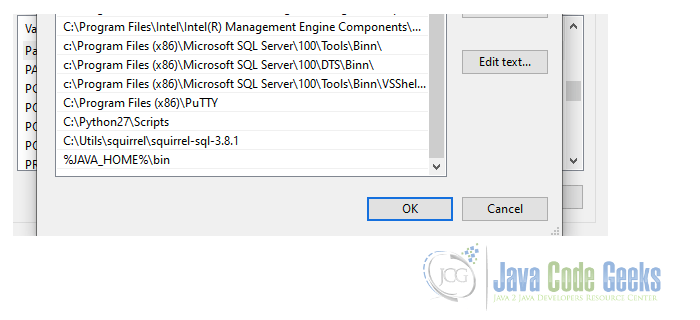
2.2.3 Windows Installation
On Windows, we don’t need to use terminal to change our environment variables.
Just access the Control Panel -> System Configuration -> Advanced Settings -> Environment variables. In the System variables (recommended), set JAVA_HOME and PATH as the following:
Now to test our settings, let’s use a terminal. Open the command line typing windows key + R as a shortcut and type “cmd”
Execute the command java -version and you get the OpenJDK version printed.
3. Features
OpenJDK 11 came with a bunch of features. These features are listed below that we’ll see in detail.
3.1 Security
3.1.1 ChaCha20 and Poly1305 Cryptographic Algorithms
Implement the ChaCha20 and ChaCha20-Poly1305 ciphers as specified in RFC 7539. ChaCha20 is a relatively new stream cipher that can replace the older, insecure RC4 stream cipher.
Find more information at JEP 329.
3.1.2 Key Agreement with Curve25519 and Curve448
The JEP 324 Implement key agreement using Curve25519 and Curve448 as described in RFC 7748.
Cryptography using Curve25519 and Curve448 is in demand due to their security and performance properties.
3.1.3 Transport Layer Security (TLS) 1.3
Implement version 1.3 of the Transport Layer Security (TLS) Protocol RFC 8446.
TLS 1.3 is a major overhaul of the TLS protocol and provides significant security and performance improvements over previous versions. Further, we need to support TLS 1.3 to remain competitive and keep pace with the latest standard.
Take a look in JEP 332 for details.
3.2 Libraries
3.2.1 Deprecate the Pack200 API
Deprecate the Pack200 API in java.util.jar. Pack200 is a compression scheme for JAR files. It was introduced in Java SE 5.0 by JSR 200.
See JEP 336 to get more information.
3.2.2 HTTP Client (Standard)
Java 11 standardizes the Http Client API.
The JEP 321 proposes to standardize the HTTP Client API that was introduced as an incubating API in JDK 9 and updated in JDK 10.
3.2.3 Remove the Java EE and CORBA Modules
JEP 320 Remove the Java EE and CORBA modules from the Java SE Platform and the JDK. These modules were deprecated in Java SE 9 with the declared intent to remove them in a future release.
3.2.4 Unicode 10
Upgrade existing platform APIs to support version 10.0 of the Unicode Standard.
JEP 327 Support the latest version of Unicode, mainly in the following classes:
CharacterandStringin thejava.langpackage,NumericShaperin thejava.awt.fontpackage, andBidi,BreakIterator, andNormalizerin thejava.textpackage.
3.4 Virtual Machine
3.4.1 Dynamic Class-File Constants
Extend the Java class-file format to support a new constant-pool form, CONSTANT_Dynamic. Loading a CONSTANT_Dynamic will delegate creation to a bootstrap method, just as linking an invokedynamic call site delegates linkage to a bootstrap method.
JEP 309 seeks the cost-reducing and disruption of creating new forms of materializable class-file constants, which in turn offers language designers and compiler implementors broader options for expressivity and performance.
3.4.2 Nest-Based Access Control
Introduce nests (JEP 181), an access-control context that aligns with the existing notion of nested types in the Java programming language.
The Java Language Specification allows classes and interfaces to be nested within each other. Within the scope of a top-level declaration (JLS 7.6), any number of types can appear nested.
These nested types have unrestricted access to each other (JLS 6.6.1), including to private fields, methods, and constructors. We can describe a top-level type, plus all types nested within it, as forming a nest, and two members of a nest are described as nestmates.
3.5 Language
3.5.1 Local-Variable Syntax for Lambda Parameters
JEP 323 allows var to be used when declaring the formal parameters of implicitly typed lambda expressions.
A lambda expression may be implicitly typed, where the types of all its formal parameters are inferred:
Implicitly typed lambda expression
(x, y) -> x.process(y)
Java SE 10 makes implicit typing available for local variables:
Java 10 implicity typed
var x = new Foo();
for (var x : xs) { ... }
try (var x = ...) { ... } catch ...
For uniformity with local variables, we wish to allow var for the formal parameters of an implicitly typed lambda expression:
Formal parameter for implicity lambda expression
(var x, var y) -> x.process(y)
4. Summary
In this article, we saw how to download and install OpenJDK 11 for each operating system. Also, we could look at the new features introduced in this version and its specifications.
The official documentation of install jdk 11 was the basis of this article. You can find all the information here.
