1. Introduction
In this article we will discuss one of Java’s most common design patterns – Factory Pattern Java design pattern. Factory Method pattern is a type of creational design pattern but it is one of the finest ways to generate an object. So, in Factory Method design pattern, we develop objects but without revealing the logic or functionality of creation to the users and use a common interface to refer to newly created object.
You can also check a tutorial in the following video:
The main objective of Factory Method design pattern is “It set an interface to produce an object, but allow sub classes to determine which class to instantiate. Factory method allows a class to delegate to sub classes.”
Factory design pattern is predicated upon an object – oriented encapsulation idea. The Factory method is used to make different objects from the factory that are sometimes linked to as items and encapsulate the code for creating. We therefore encapsulate the factory method in Java instead of having object creation code on the client side. Hence, The Factory Method design pattern is often used to construct objects or classes in Java and offers loose coupling and high cohesion. Factory Method pattern encapsulates the logic of object creation that makes it possible to modify later when changing how the object is generated but you could always create new objects with only one class change.
2. Java Design Patterns
Java design patterns are classified into three important and extensively used sub – categories such as Creational patterns, Structural patterns, Behavioural patterns which are discussed below and elaborated.
2.1 Creational Pattern
The Creational design pattern is further classified into five sub parts. Creational design patterns are design patterns which often concentrate upon the methods for creating objects and desire to create objects which are appropriate for the situation. The standard way to create objects tends to lead to design and build problems or creates complexities to the design. Creational design patterns solve this problem by controlling the creation of this object.
2.2 Structural Pattern
Structural pattern design characterises seven different pattern types. Structural design patterns are design patterns that automate design by understanding a good way of perceiving relationships between objects. Such design patterns focus primarily on how classes and objects can be connected to form bigger structures. The structural design patterns try to simplify or help facilitate the structure by making the link between the structural elements.
2.3 Behavioural Pattern
The behavioural design pattern offers eleven different design pattern types to define the mechanism of communication between objects. The behavioural design pattern identifies how well the objects interact. This pattern defines how various objects and classes send or push messages to one another in order to form an communication. The behavioural design pattern emphasis upon how difficulties are resolved and the allocation of responsibilities between objects. These types of design patterns involve communication rather than specification.
Below, we will discuss the easiest and most commonly used creational design patterns–the Factory Method design pattern. This article highlights the idea of the Factory Method design pattern with a real-life example to make you understand how much the Factory Method design pattern enables programmers achieve a better software tool. The sections below establish this pattern narratively in order to examine each and every part of the Factory Method design pattern. We will also put in place the Factory Method pattern in Java programming language.
3. Understanding the Factory Method design pattern
The Factory Method is a design pattern relating to the creation of objects. With Factory Method pattern, we create objects without revealing the code of creation to the users and the users utilises the same common functionality to develop new and fresh object. The main and important principle was to use a static factory method that generates and reverts instances that hide the user’s class modules details.
In other words, the Factory Method is designed to construct objects for the enactment of an algorithm as the template method. So, a superclass stipulates all typical and generic actions and then provides the creation details to subclasses provided by the user. This design pattern makes a architecture much more customizable as well as difficult only a little bit. Many other design pattern includes additional classes, while the factory method pattern involves just a new operation.
Let’s look at the UML class diagram before you go into more detail to understand the Factory Method design pattern.
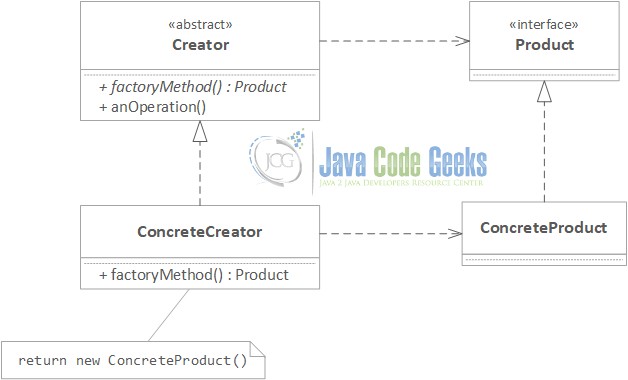
The Class diagram above comprises of the following classes, interfaces and objects:
The Creator class covers up the user’s manufacture and installation of the product. It is an advantage for the client, as they are sometimes isolated from possible future adjustments-the Creator class may take better care of all their creative requirements and permit them to decouple. In addition, when the Creator class and the product interface correspond to an interface which the client have an idea, the client does not need to understand the specific implementation of both. The Factory Method design pattern really promotes the programming of an interface to cope with future alterations.
The Creator class here delivers an interface for object creation, widely known as the Factory Method design pattern. All those other functions in abstract Creator class were written just to actually work on the ConcreteCreator class products. The Creator class does not generate the products-its sub classes, like ConcreateCreator class, does the work.
3.1 Real Life Example
In this section we will elaborate Factory Method design pattern using a real world example – Amul Company. In our day to day life we all are using Amul products as per our daily needs. Amul prompted the White Revolution in India, making the country the biggest exporter of milk and milk products in the world. As we know Amul produces various types of milk products but in this section we will talk about ice cream production. In the below figure how Ice cream factory will use Factory Method pattern to produce Ice cream is explained.
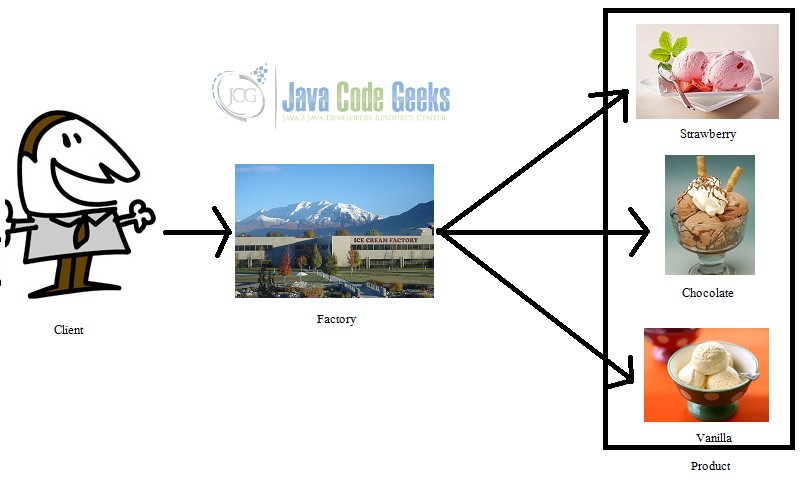
In the above diagram a client orders huge quantity of Ice Cream of various flavours from Ice Cream factory. Ice Cream factory first produces Ice Cream in regular flavour then it adds various flavours such as strawberry, pineapple, orange, mango, chocolate, etc. to the Ice cream as per client order.According to the Factory Method design pattern the functionality of making Ice cream is same for different types of Ice creams but the ingredients and flavours are different.
4. Implementing Factory Method design pattern
In this section, thus, we develop the Factory Method pattern in the java program using the real word example- A Veg Restaurant.
4.1 Restaurant Use case
In this use case we will explore how we use the factory pattern to encapsulate the functioning of a veg restaurant. The Restaurant makes various types of traditional Thali for the customer.
Thali.java
public abstract class Thali {
    public abstract void addSabji();
    public abstract void addDal();
    public abstract void addRice();
    public abstract void addRoti();

    public void makeThali() {
        System.out.println("Veg Thali will be ready in 30 minutes.");
    }
}
In the above code we have created an abstract class Thali. In this abstract class we have defined four abstract methods such as addSabji(), addDal(), addRice(), addRoti(). Also we have implemented makeThali() method in which we printed “Veg Thali will be ready in 30 minutes”.
GujaratiThali.java
public class GujaratiThali extends Thali {

    @Override
    public void addSabji() {
        System.out.println("Adding Sabji for Veg Gujarati Thali.");
    }

    @Override
    public void addDal() {
        System.out.println("Adding Dal for Veg Gujarati Thali.");

    }

    @Override
    public void addRice() {
        System.out.println("Adding Rice for Veg Gujarati Thali.");

    }

    @Override
    public void addRoti() {
        System.out.println("Adding Roti for Veg Gujarati Thali.");

    }
}
In the above code we have created a class GujaratiThali which extends an abstract class Thali. In this class we have implemented the abstract methods addSabji(), addDal(), addRice(), addRoti() which are defined in the abstract class known as Thali.
PunjabiThali.java
public class PunjabiThali extends Thali {

    @Override
    public void addSabji() {
        System.out.println("Adding Sabji for Veg Punjabi Thali.");
    }

    @Override
    public void addDal() {
        System.out.println("Adding Dal for Veg Punjabi Thali.");

    }

    @Override
    public void addRice() {
        System.out.println("Adding Rice for Veg Punjabi Thali.");

    }

    @Override
    public void addRoti() {
        System.out.println("Adding Roti for Veg Punjabi Thali.");

    }
}
In the above code we have created a class PunjabiThali which extends an abstract class Thali. In this class we have implemented the abstract methods addSabji(), addDal(), addRice(), addRoti() which are defined in the abstract class known as Thali.
BaseThaliRestaurant.java
public abstract class BaseThaliRestaurant {

    public abstract Thali createThali(String type);
}
In the above code we have created an abstract class BaseThaliRestaurant in which we have implemented an abstract method createThali() having an argument of string type.
ThaliRestaurant.java
public class ThaliRestaurant extends BaseThaliRestaurant{
    @Override
    public  Thali createThali(String type){
        Thali thali;
        switch (type.toLowerCase())
        {
            case "gujarati":
                thali = new GujaratiThali();
                break;
            case "punjabi":
                thali = new PunjabiThali();
                break;

            default: throw new IllegalArgumentException("No such Thali.");
        }

        thali.addSabji();
        thali.addRice();
        thali.addDal();
        thali.addRoti();
        thali.makeThali();
        return thali;
    }
}
In the above code we have created a class ThaliRestaurant which extends BaseThaliRestaurant class. In this class we have implemented an abstract method createThali() which is defined in BaseThaliRestaurant class. In createThali() method we implemented a switch case for thali such as gujarati thali and punjabi thali. Also, we have called methods addSabji(), addDal(), addRice(), addRoti() and makeThali() using Thali class object called thali.
FactoryDesignPattern.java
public class FactoryDesignPattern {

    public static void main(String args[]){
    BaseThaliRestaurant thalirestaurant = new ThaliRestaurant();
        Thali gujaratiThali = thalirestaurant.createThali("gujarati");
        Thali punjabiThali = thalirestaurant.createThali("punjabi");
    }
}
In the above code we have created FactoryDesignPattern class which consists of main() method. In this main() method we have created BaseThaliRestaurant class object known as thalirestaurant. Using this object we have called createThali() method for both gujarati thali and punjabi thali.
4.2 Logistics Industry Use case
In this example, we will consider the use case of the Logistics Industry. We will build a Shipping company, which ships goods via all modes of transport. So first we define the kind of operations each Transport mode will perform.
Transport.java
package Logistics.Transport;

public interface Transport {
    public void load();
    public void drive();
}
The Transport interface in Transport.java explains the actions which will be performed by each of the Transport mode employed by the shipping company. As we can see each transport mode will perform load() and drive().
After defining the actions we will define the Actual objects which will perform these actions. For the land based shipping, we create a TruckTransport object as shown below,
TruckTransport.java
package Logistics.Transport;

public class TruckTransport implements Transport {
    @Override
    public void load() {
        System.out.println("Loaded Truck with freight");
    }

    @Override
    public void drive() {
        System.out.println("Truck has hit the road");
    }

}
This concludes the definition of the TruckTransport object which will be used for land based transport.
Now it’s required to ship the load across sea, so Shipping company decided to create SeaTransport object.
SeaTransport.java
package Logistics.Transport;

public class SeaTransport implements Transport {

    @Override
    public void load() {
        System.out.println("Loaded ship with freight");
    }

    @Override
    public void drive() {
        System.out.println("Ship has set Sail");
    }

}
This concludes the definition of the SeaTransport object which will be used for sea based transport.
Now we have our transport object defined, we need to create the interface which will act as a factory to create the Transport object on demand.
we define that interface as LogisticsFactory.
LogisticsFactory.java
package Logistics;

import Logistics.Transport.Transport;

public interface LogisticsFactory {
    public Transport createTransport(String type);
}
After defining the interface we need to create the Class that implements the LogisticsFactory interface and contains the implementation of the createTransport() method. we name the class as CreateLogistics.
CreateLogistics.java
package Logistics;

import Logistics.Transport.SeaTransport;
import Logistics.Transport.Transport;
import Logistics.Transport.TruckTransport;

public class CreateLogistics implements LogisticsFactory {

    public Transport createTransport(String type) {
        switch (type) {
            case "SEA":
                return new SeaTransport();
            default:
                return new TruckTransport();
        }
    }

}
This concludes the definition of the CreateLogistics class which holds the code to generate the java object for the Transport function of the Shipping company based on the type of the object as per the need.
In the next code snippet, we show the driver class which shows the Transport mechanism for each of the existing transport modes in action.
LogisticsDriver.java
import Logistics.CreateLogistics;
import Logistics.Transport.Transport;

public class LogisticsDriver {
    public static void main(String[] args) {
        CreateLogistics cl = new CreateLogistics();
        System.out.println("Handling Land Logistics");
        Transport truck = cl.createTransport("LAND");
        truck.load();
        truck.drive();
        System.out.println("Handling Sea Logistics");
        Transport ship = cl.createTransport("SEA");
        ship.load();
        ship.drive();
    }
}
Output of the LogisticsDriver.java is shown in the snapshot below.
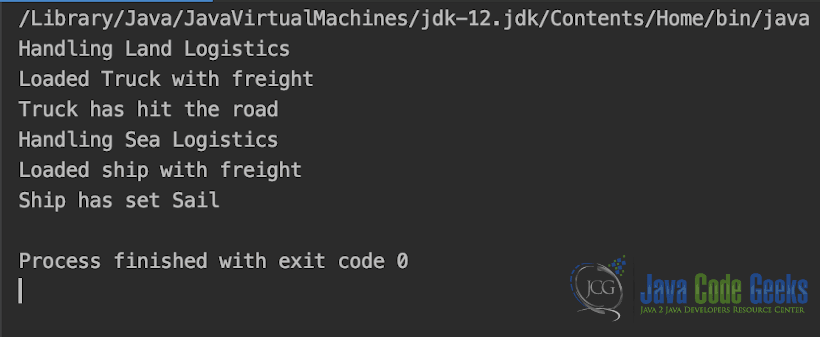
Using Factory method we have introduced loose coupling in our code. In future, if shipping company came back with a requirement of adding Air based shipping of load across location, we only need to do the following,
- Add a Java class called
AirTransportinAirTransport.javaimplementing theTransportinterface. - Then add another case in switch statement in
createTransport()method inCreateLogistics.javaclass.
After this the new transport mechanism for AirTransport is now added to the Shipping Company application.
4.3 Cryptography Library Use Case
In this example, we will consider the use case of the Cryptography Application. We will build a java application which will expose various cryptography methods based off of standard cryptographic methods available in java.
First we will define the contract for each of the cryptography algorithm. The contract is as shown in Algo class.
Algo.java
package Crypto.Algo;

public abstract class Algo {
    public abstract String encrypt(String str);

    public abstract String decrypt(String str);
}
Above defined abstract class Algo contains the abstract method definition for both encrypt() and decrypt() method will will be supported by each of the cryptography algorithm.
Next we will define an Algo call GHash, which is a fictitious cryptography algorithm we devised for this example.Implementation for GHash algo is shown in GHash.java as shown below,
GHash.java
package Crypto.Algo;

import javax.crypto.Cipher;
import javax.crypto.SecretKey;
import javax.crypto.SecretKeyFactory;
import javax.crypto.spec.IvParameterSpec;
import javax.crypto.spec.PBEKeySpec;
import javax.crypto.spec.SecretKeySpec;
import java.security.spec.KeySpec;
import java.util.Base64;

public class GHash extends Algo {
    private static String secretKey = "GHash!!!!";
    private static String salt = "GHash!!!!";
    private byte[] gHashInitVector = {0, 0, 0, 0, 0, 0, 0, 0, 0, 0, 0, 0, 0, 0, 0, 0};
    private IvParameterSpec gHashInitVectorHash = new IvParameterSpec(gHashInitVector);

    @Override
    public String encrypt(String str) {
        System.out.println("Encrypting String with GHash");
        try {
            SecretKeyFactory factory = SecretKeyFactory.getInstance("PBKDF2WithHmacSHA256");
            KeySpec spec = new PBEKeySpec(secretKey.toCharArray(), salt.getBytes(), 65536, 256);
            SecretKey tmp = factory.generateSecret(spec);
            SecretKeySpec secretKey = new SecretKeySpec(tmp.getEncoded(), "AES");

            Cipher cipher = Cipher.getInstance("AES/CBC/PKCS5Padding");
            cipher.init(Cipher.ENCRYPT_MODE, secretKey, gHashInitVectorHash);
            return Base64.getEncoder().encodeToString(cipher.doFinal(str.getBytes("UTF-8")));
        } catch (Exception e) {
            System.out.println("Error while encrypting with GHash: " + e.toString());
        }
        return null;
    }

    @Override
    public String decrypt(String str) {
        System.out.println("Decrypting String with GHash");
        try {
            SecretKeyFactory factory = SecretKeyFactory.getInstance("PBKDF2WithHmacSHA256");
            KeySpec spec = new PBEKeySpec(secretKey.toCharArray(), salt.getBytes(), 65536, 256);
            SecretKey tmp = factory.generateSecret(spec);
            SecretKeySpec secretKey = new SecretKeySpec(tmp.getEncoded(), "AES");

            Cipher cipher = Cipher.getInstance("AES/CBC/PKCS5PADDING");
            cipher.init(Cipher.DECRYPT_MODE, secretKey, gHashInitVectorHash);
            return new String(cipher.doFinal(Base64.getDecoder().decode(str)));
        } catch (Exception e) {
            System.out.println("Error while decrypting: " + e.toString());
        }
        return null;
    }
}
This concludes the implementation of the GHash algorithm.
Next we create yet another fictitious cryptographic algorithm call KHash. Implementation for KHash algo is shown in KHash.java as shown below,
KHash.java
package Crypto.Algo;

import javax.crypto.Cipher;
import javax.crypto.SecretKey;
import javax.crypto.SecretKeyFactory;
import javax.crypto.spec.IvParameterSpec;
import javax.crypto.spec.PBEKeySpec;
import javax.crypto.spec.SecretKeySpec;
import java.security.spec.KeySpec;
import java.util.Base64;

public class KHash extends Algo {
    private static String secretKey = "KHash!!!!";
    private static String salt = "KHash!!!!";
    private byte[] kHashInitVector = {0, 0, 0, 0, 0, 0, 0, 0, 0, 0, 0, 0, 0, 0, 0, 0};
    private IvParameterSpec kHashInitVectorHash = new IvParameterSpec(kHashInitVector);

    @Override
    public String encrypt(String str) {
        System.out.println("Encrypting String with KHash");
        try {
            SecretKeyFactory factory = SecretKeyFactory.getInstance("PBKDF2WithHmacSHA256");
            KeySpec spec = new PBEKeySpec(secretKey.toCharArray(), salt.getBytes(), 65536, 256);
            SecretKey tmp = factory.generateSecret(spec);
            SecretKeySpec secretKey = new SecretKeySpec(tmp.getEncoded(), "AES");

            Cipher cipher = Cipher.getInstance("AES/CBC/PKCS5Padding");
            cipher.init(Cipher.ENCRYPT_MODE, secretKey, kHashInitVectorHash);
            return Base64.getEncoder().encodeToString(cipher.doFinal(str.getBytes("UTF-8")));
        } catch (Exception e) {
            System.out.println("Error while encrypting with KHash: " + e.toString());
        }
        return null;
    }

    @Override
    public String decrypt(String str) {
        System.out.println("Decrypting String with KHash");
        try {
            SecretKeyFactory factory = SecretKeyFactory.getInstance("PBKDF2WithHmacSHA256");
            KeySpec spec = new PBEKeySpec(secretKey.toCharArray(), salt.getBytes(), 65536, 256);
            SecretKey tmp = factory.generateSecret(spec);
            SecretKeySpec secretKey = new SecretKeySpec(tmp.getEncoded(), "AES");

            Cipher cipher = Cipher.getInstance("AES/CBC/PKCS5PADDING");
            cipher.init(Cipher.DECRYPT_MODE, secretKey, kHashInitVectorHash);
            return new String(cipher.doFinal(Base64.getDecoder().decode(str)));
        } catch (Exception e) {
            System.out.println("Error while decrypting: " + e.toString());
        }
        return null;
    }
}
This concludes the implementation of the KHash algorithm.
Next we will create the factory abstract class called CryptoFactory, which exposes the contract required to create object of the individual algorithm.
CryptoFactory.java
package Crypto;

import Crypto.Algo.Algo;

abstract class CryptoFactory {
    abstract Algo createAlgorithm(String type);
}
After this we extend the contract (abstract class) defined in CryptoFactory class in CreateAlgorithmExecutorGenerator class to implement the createAlgorithm() function to generate object for the crypto algorithm as per the type passed as params.
CreateAlgorithmExecutorGenerator.java
package Crypto;

import Crypto.Algo.Algo;
import Crypto.Algo.GHash;
import Crypto.Algo.KHash;

public class CreateAlgorithmExecutorGenerator extends CryptoFactory {
    @Override
    public Algo createAlgorithm(String type) {
        switch (type) {
            case "KHASH":
                return new KHash();
            case "GHASH":
                return new GHash();
            default:
                return new GHash();
        }
    }
}
This concludes the implementation of the CreateAlgorithmExecutorGenerator class.
In the next code snippet, we show the driver class which shows the encrypt/decrypt algorithms for each of the existing cryptography algorithm in action.
CryptoDriver.java
import Crypto.Algo.Algo;
import Crypto.CreateAlgorithmExecutorGenerator;

public class CryptoDriver {
    public static void main(String[] args) {
        CreateAlgorithmExecutorGenerator cl = new CreateAlgorithmExecutorGenerator();
        System.out.println("Encrypting using GHash");
        Algo gHashAlgo = cl.createAlgorithm("GHASH");
        String SampleStringForGHash = "G-HASH";
        System.out.println("Sample String before Encryption :: " + SampleStringForGHash);
        String encryptedGHash = gHashAlgo.encrypt(SampleStringForGHash);
        System.out.println("Encrypted String after encryption with GHash :: " + encryptedGHash);
        String decryptedGHash = gHashAlgo.decrypt(encryptedGHash);
        System.out.println("Decrypted String after encryption with GHash :: " + decryptedGHash);

        System.out.println("Encrypting using KHash");
        Algo kHashAlgo = cl.createAlgorithm("KHASH");
        String SampleStringForKHash = "K-HASH";
        System.out.println("Sample String before Encryption :: " + SampleStringForKHash);
        String encryptedKHash = kHashAlgo.encrypt(SampleStringForKHash);
        System.out.println("Encrypted String after encryption with KHash :: " + encryptedKHash);
        String decryptedKHash = kHashAlgo.decrypt(encryptedKHash);
        System.out.println("Decrypted String after encryption with KHash :: " + decryptedKHash);
    }
}
Output of the CryptoDriver.java is shown in the snapshot below.

Using Factory method we have introduced loose coupling in our code. Like the example of the shipping company, a new cryptography algorithm can be introduced in our application by just create a new java class extending the Algo class and adding one switch case in createAlgorithm function in CreateAlgorithmExecutorGenerator.
5. Benefits of using Factory Method Design Pattern
In Java programming Factory Method design pattern is widely used all over, such as JDK, open source library and other frameworks. The main benefits of using Java programming Factory Method design pattern are as follows:
- One benefit of Factory Method design pattern is that it decouples the calling class from the target class, resulting in less coupling and highly unified code. JDBC is really a perfect example of this design pattern; software program does not have to understand which database to choose, so now it really does n’t know which database-specific driver classes to choose. It utilises factory methods instead to connect with the database.
- Factory method pattern eliminates the installation from the user code of the actual implementation classes. Factory method pattern renders our code stronger, less coupling, cheaper and easier to expand. For example, in the above example of restaurant we can easily change the implementation of the GujaratiThali or PunjabiThali class because the user program does not know this.
- Another advantage of using the Factory Method design pattern in Java is that it enables code continuity as every object is produced by using the Factory instead of using different constructor on different user sides.
6. Use of Factory Method Design Pattern
In this section we will discuss Factory Method design pattern usage in detail. The Factory Method pattern is beneficial if we want to abstract the creation of an object from its own actual creation in the application. In the following situations, the Factory Method pattern is widely used:
- Factory Method pattern is used when a class will not predict the kind of of object that must be created in advance.
- This design pattern is used when a class will determine the objects it produces in its sub-classes.
- This design pattern is also used when we would like to track down the logic to install a complex object.
For example, Suppose that the factory will produce a product type called ” MobilePhones. ” A mobile Phone can consist of a number of components, some of which can and will change in future, depending on the technological advancement.
7. Demerits of Factory Method Design Pattern
In this section we will explain some of the disadvantages of the Factory Method design pattern:
- One long – term downside of Factory methods is that user may have to sub classify the creator class in order to create a specific product.
- In this pattern sub-classification is okay if the user has to sub-classify the creator class either, but even then the user still has to contend with yet another design level.
- In the Factory Method design pattern, the factory often used to create the objects is linked to the user program, namely it is hard to create objects using a different factory.
8. Conclusion
So, Design Patterns can become an outstanding investment in addressing reoccurring difficulties, but they could also cause a lot of confusion if not recognised carefully. But one of the most importantly misinterpreted design patterns is the Factory Method design pattern, which can be incorrect for modifying the initial pattern. Hence, the Factory Method pattern gives us a way to install objects, but perhaps the particulars of the instance ‘s creation are stuck to be recognised by the instance class itself. The Factory Method design pattern is an incredibly valuable tool to the simple problem of mandating various replaceable alternatives for a common approach. And if we need a variety of different functionalities, it is always beneficial to use a Factory Method pattern.
9. Download the Source Code
You can download the full source code of this example here: Factory Pattern Java Example
Last updated on Sept. 25, 2019
