Spring MVC (Model-View-Controller) is the web component of Spring framework, which provides a great functionality for building web Applications. Following the basic tenet of Spring framework “convention over configuration“, the Spring MVC Framework is designed in such a way that every piece of logic and functionality is highly configurable. Spring is not tightly coupled with Servlet or JSP technology paradigms to render the view to the clients. It is also very simple and easy to integrate Spring with other Web Frameworks. Thus Spring is a perfect and logical choice for building multi-faceted web application with multiple interfaces. Additionally, Spring MVC can also work seamlessly with third party view technologies like Velocity, Freemarker and document manipulation APIs like Apace POI, Aspose etc.
Table Of Contents
1. Spring MVC Tutorial – Introduction
MVC stands for Model-View-Controller. Like most other MVC frameworks, Spring MVC is also request-driven. The Spring Web model-view-controller (MVC) framework is designed around a DispatcherServlet that dispatches requests to handlers, with configurable handler mappings, view resolution, locale, time zone and theme resolution as well as support for uploading files. The DispatcherServlet is completely integrated with Spring IoC container. The default handler is based on the @Controller and @RequestMapping annotations, offering a wide range of flexible handling methods.
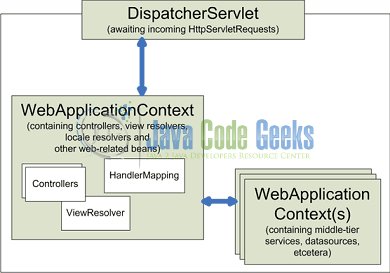
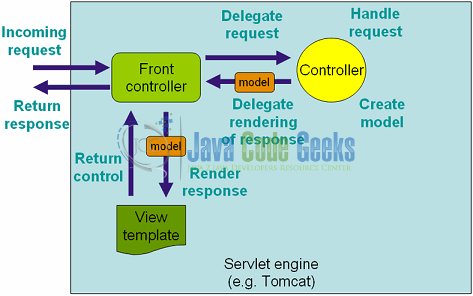
The request processing flow in Spring MVC is as follows:
- A request is sent from the client to the web container as a http request.
- This request is first intercepted by the
DispatcherServlet,which then looks for appropriate handler mappings designated to handle that request. - The handler mappings contain a list of controllers.
DispatcherServletwill forward the request to the correct controller. - The controller will process the request and send back the backing model and view object to the
DispatcherServlet.
TheDispatcherServletwill then resolve the view with the help ofViewResolvermappings. This is consulted to resolve views which can be JSP, Velocity etc. - The final view is sent to the client and rendered on browser.
2. Technologies used
- Spring 4.2.6.RELEASE
- Maven 3
- JDK 1.8
- Spring Tool Suite (STS) 3.9.0
- Java Server Pages
3. Setup Maven project
In this tutorial, we show you a Spring MVC hello world example, using Maven build tool.
Maven dependencies: We will be using Apache Maven for our project management. The required dependencies for a Spring MVC project are added and Maven will resolve and manage all the dependencies automatically. Below is the pom.xml file for our project.
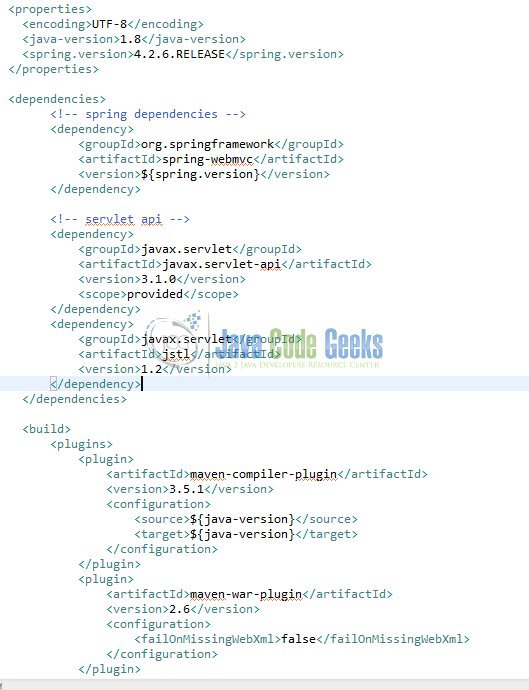
We have included the maven-war-plugin since we are configuring our application using Java Configuration, we don’t need the web.xml anymore. In order for our project to build successfully, we need to instruct Maven to ignore the web.xml file. We do this by setting the failOnMissingWebXml element to false.
3.1 Create a Maven Project in Spring Tool Suite
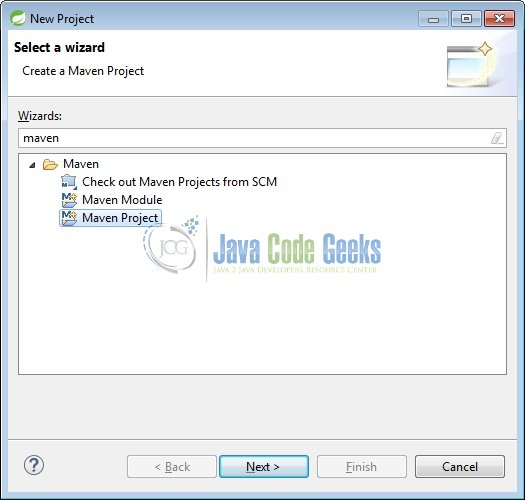
- Navigate to File menu in Eclipse or Spring Tool Suite IDE.
- Click ‘File’ -> ‘New’ -> ‘Maven Project’.
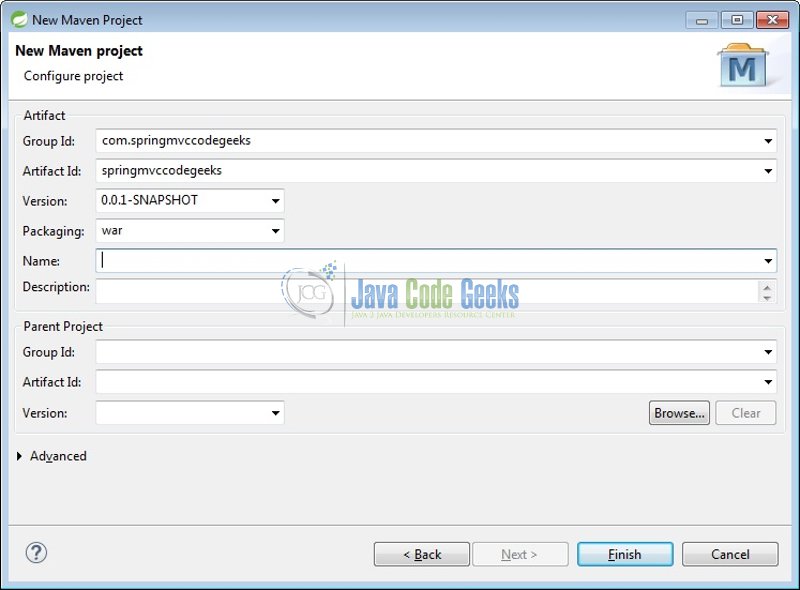
Under the “New Maven Project” window:
- Select ‘Create a simple project….’ check box.
- The remaining options can be kept as it is and simply click on ‘Next’.

In the next window enter the following options:
- For
Group IDenter com.springmvccodegeeks - For
Artifact IDenter springmvccodegeeks - The remaining options can be kept as it is (We will be working with a jar file here)
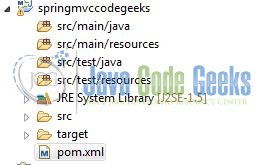
- Click on ‘Finish’.
A new maven project is created and is visible under Package Explorer in Eclipse
4. Project Demo
4.1 Setting up application configuration
In this example we are using java based configurations. These style of configurations allow for more flexibility and easier debugging capabilities. Hence we will not be using the traditional web.xml. Instead we will be implementing the org.springframework.web.WebApplicationInitializer API to spin up our application context.
SpringMvcInitializer.java
01 02 03 04 05 06 07 08 09 10 11 12 13 14 15 16 17 18 19 20 21 22 23 24 25 26 27 | public class SpringMvcInitializer extends AbstractAnnotationConfigDispatcherServletInitializer { /* (non-Javadoc) * @see org.springframework.web.servlet.support.AbstractAnnotationConfigDispatcherServletInitializer#getRootConfigClasses() */ @Override protected Class<?>[] getRootConfigClasses() { return new Class[] { SpringMvcConfig.class }; } /* (non-Javadoc) * @see org.springframework.web.servlet.support.AbstractAnnotationConfigDispatcherServletInitializer#getServletConfigClasses() */ @Override protected Class<?>[] getServletConfigClasses() { return null; } /* (non-Javadoc) * @see org.springframework.web.servlet.support.AbstractDispatcherServletInitializer#getServletMappings() */ @Override protected String[] getServletMappings() { return new String[] { "/" }; }} |
Here the method getRootConfigClasses() should return a class setting up the application root context. The method getServletConfigClasses() should return a class setting up the web context on top of the previously defined application context. In our example, however, to keep things simple, the root context class itself is setting up the necessary contexts. Finally, getServletMappings defines the http API endpoints to be responded by the DispatcherServlet. This can be modified to hold different string patterns.
4.2 Setting up the Spring configuration
Since we have moved away from xml-based configurations, we are creating the spring application context in java class. To setup the spring MVC configs, this java config class should extend the org.springframework.web.servlet.config.annotation.WebMvcConfigurerAdapter class.
SpringMvcConfig.java

01 02 03 04 05 06 07 08 09 10 11 12 13 14 | @Configuration@EnableWebMvc@ComponentScan(basePackages = {"com.springmvccodegeeks"})public class SpringMvcConfig extends WebMvcConfigurerAdapter { @Bean public ViewResolver viewResolver() { InternalResourceViewResolver viewResolver = new InternalResourceViewResolver(); viewResolver.setViewClass(JstlView.class); viewResolver.setPrefix("/WEB-INF/views/"); viewResolver.setSuffix(".jsp"); return viewResolver; }} |
The uses for the different annotations:
@Configuration – This annotation will tell spring application context to treat this as a configuration class during auto scanning.
@EnableWebMvc – Enable Spring MVC-specific annotations like @Controller
@ComponentScan – Scan starts from base package and registers all controllers, repositories, service, beans, etc. Include the packages here which contains beans or classes for the application to inject when required.
@Bean – Defines spring beans. Here we have defined the ViewResolver
4.3 Setting up the Controller
We are annotating the class with @Controller annotation. This annotation is a stereo type annotation used to indicate that this is a controller. This enables the DispatcherServlet to automatically map the methods defined in the class using the @RequestMapping annotation.
The @RequestMapping annotation maps the URL’s onto particular classes or methods. The class-level annotation is mostly used to map a specific request path onto a form controller, whereas a method-level annotations narrows the mapping for a specific HTTP request method like (GET, PUT, POST and DELETE). In this example, we are using the annotation at the method level. Also, we are populating the Model map. This is a map for the request attributes. It contains a key called message and a simple string value.
The return value is the name of the view. The InternalResourceViewResolver will prefix and suffix the return value to form the real path of the view file name.
DefaultController.java
1 2 3 4 5 6 7 8 9 | @Controllerpublic class DefaultController { @RequestMapping(value = "/", method = RequestMethod.GET) public String index(ModelMap model) { model.addAttribute("message", "Spring MVC Java Configuration Example!!"); return "index"; }} |
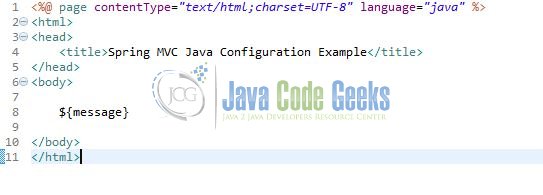
4.4 Setting up the JSP page
We are creating a simple JSP page here. This page will be rendered as the home page when the main application endpoint is requested from a client (browser). This view will display the value of the message attribute we added earlier in the controller.
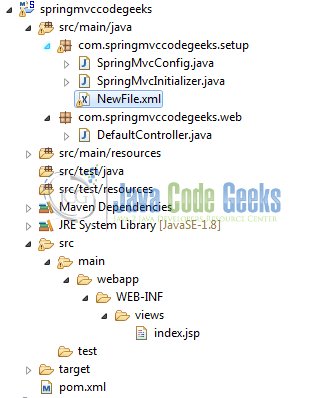
The final project structure is as below:
4.5 View in browser
Start the embedded application server that comes with the IDE. Open a browser and enter the URL: http://localhost:8080/springmvccodegeeks/ . The message “Spring MVC Java Configuration Example!!” is displayed as was defined in the controller method. This is a simple view rendering.
5. Conclusion
In this example we have covered the following:
- Understand the basic concepts and main elements of a Spring MVC project
- Setup a simple MVC project using maven
- Render a page and display customized message using spring MVC
6. References
- https://docs.spring.io/spring/docs/current/spring-framework-reference/html/mvc.html
- Spring in Practice by Willie Wheeler et al
- Spring in Action by Craig Walls
7. Download the Source Code
You can download the full source code of this example here: SpringMVC

Login application in spring ———————————————————————————————— pom,xml file are 1.8 4.3.0.RELEASE 5.1.36 2.9.0 junit junit 3.8.1 test org.springframework spring-context ${spring.version} org.springframework spring-webmvc ${spring.version} org.springframework spring-web ${spring.version} org.springframework spring-orm ${spring.version} javax.servlet javax.servlet-api 3.1.0 provided javax.servlet.jsp javax.servlet.jsp-api 2.3.1 provided javax.servlet jstl 1.2 mysql mysql-connector-java ${mysqlconnector.version} Configuration file —————————————————————————- WebMvcConfig.java package com.krunal.config; import org.springframework.beans.factory.annotation.Autowired; import org.springframework.context.annotation.Bean; import org.springframework.context.annotation.ComponentScan; import org.springframework.context.annotation.Configuration; import org.springframework.context.annotation.PropertySource; import org.springframework.core.env.Environment; import org.springframework.jdbc.core.JdbcTemplate; import org.springframework.jdbc.datasource.DriverManagerDataSource; import org.springframework.web.servlet.ViewResolver; import org.springframework.web.servlet.config.annotation.EnableWebMvc; import org.springframework.web.servlet.config.annotation.WebMvcConfigurerAdapter; import org.springframework.web.servlet.view.InternalResourceViewResolver; @Configuration @EnableWebMvc @ComponentScan(basePackages=”com.krunal”) @PropertySource(value= {“classpath:application.properties”}) public class WebMvcConfig extends WebMvcConfigurerAdapter { @Autowired Environment env; @Bean public ViewResolver getViewResolver() { InternalResourceViewResolver view= new InternalResourceViewResolver(); view.setPrefix(“/views/”); view.setSuffix(“.jsp”); return view; }… Read more »